2012 BMW X5 XDRIVE35D lock
[x] Cancel search: lockPage 13 of 317

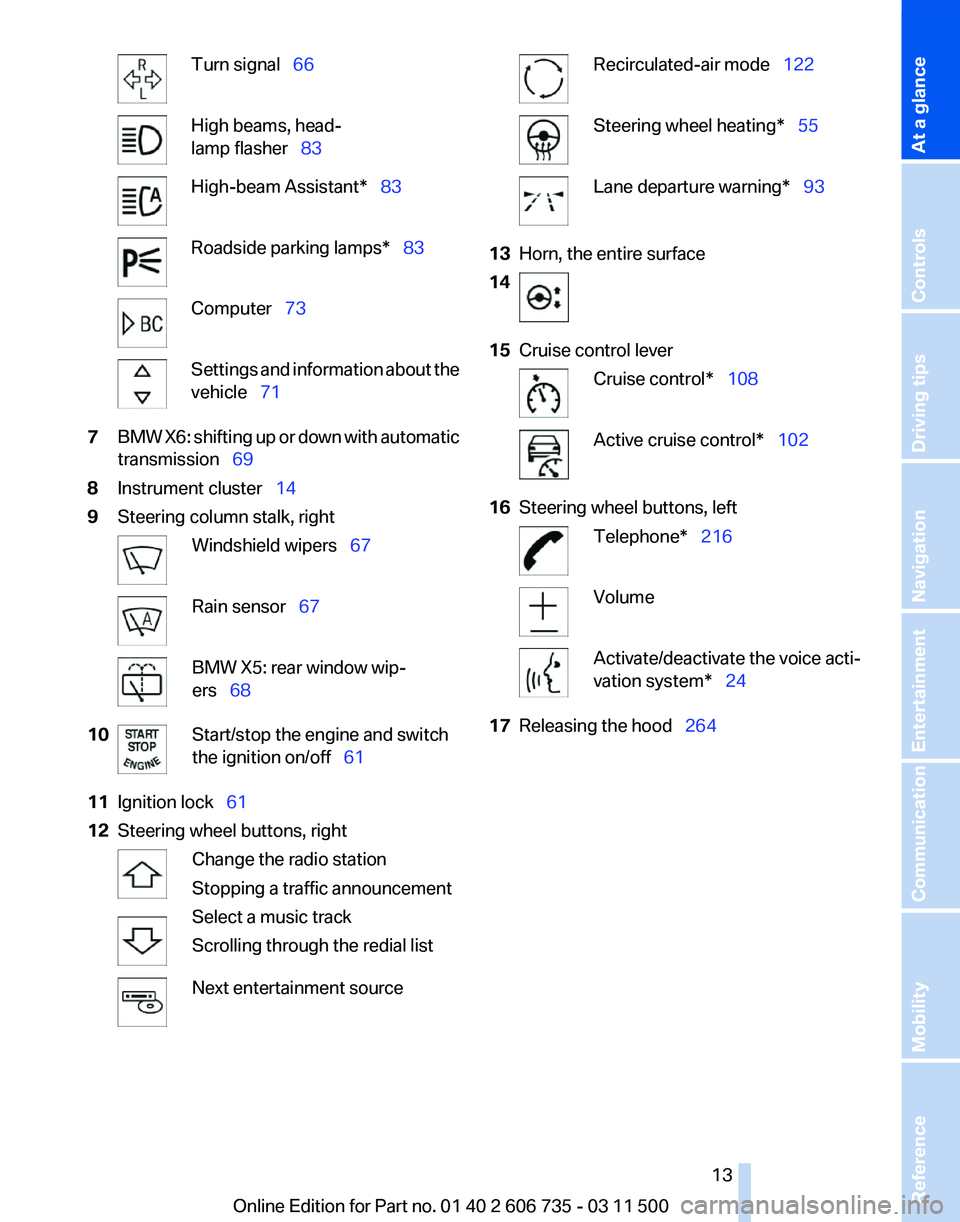
Turn signal 66
High beams, head‐
lamp flasher 83
High-beam Assistant* 83
Roadside parking lamps* 83
Computer 73
Settings and information about the
vehicle 71
7 BMW X6: shifting up or down with automatic
transmission 69
8 Instrument cluster 14
9 Steering column stalk, right Windshield wipers 67
Rain sensor
67 BMW X5: rear window wip‐
ers 68
10 Start/stop the engine and switch
the ignition on/off 61
11 Ignition lock 61
12 Steering wheel buttons, right Change the radio station
Stopping a traffic announcement
Select a music track
Scrolling through the redial list
Next entertainment source Recirculated-air mode 122
Steering wheel heating* 55
Lane departure warning* 93
13 Horn, the entire surface
14 15
Cruise control lever Cruise control*
108 Active cruise control*
102
16 Steering wheel buttons, left Telephone* 216
Volume
Activate/deactivate the voice acti‐
vation system* 24
17 Releasing the hood 264
Seite 13
13Online Edition for Part no. 01 40 2 606 735 - 03 11 500
Reference Mobility Communication Entertainment Navigation Driving tips Controls
At a glance
Page 14 of 317

Instrument cluster
1
Turn signal indicator lamp
2 Speedometer
3 Indicator/warning lamps 15
4 Active cruise control* 102
5 Tachometer 72
6 BMW X5: current fuel consumption 72
BMW X6: engine oil temperature
72 or
current fuel consumption 72
7 Display for
▷Clock 71
▷ External temperature 71
▷ Indicator/warning lamps 15
▷ Cruise control* 108
▷ Active Cruise Control* 102 ▷
BMW X5: reserve display for diesel ex‐
haust fluid 249
8 Display for
▷Automatic transmission position 69
▷ HDC Hill Descent Control 98
▷ Computer 73
▷ Date of next scheduled service, and re‐
maining distance to be driven
75
▷ Odometer and trip odometer 71
▷ High-beam Assistant* 83
▷ Check Control message
present 76
▷ Adaptive Drive*:
Sport chassis and sus‐
pension tuning 99
9 Fuel gauge 73
10 Resetting the trip odometer 71
Viewing service requirement display 71
Seite 14
14 Online Edition for Part no. 01 40 2 606 735 - 03 11 500
Cockpit
Page 16 of 317

All around the center console
1
Headliner 17
2 Control Display 19
3 Hazard warning system 280
Central locking system 33
4 Opening glove compartment 134
5 Automatic climate control with 2-zone con‐
trol 120
Automatic climate control with 4-zone con‐
trol* 124
6 Radio and CD/DVD drive* 174 7 Open the tailgate
33 36 Active seat* 49
Park Distance Control
PDC* 110
Top View* 114
Backup camera* 112
HDC Hill Descent Control
97
Seite 16
16 Online Edition for Part no. 01 40 2 606 735 - 03 11 500Cockpit
Page 21 of 317

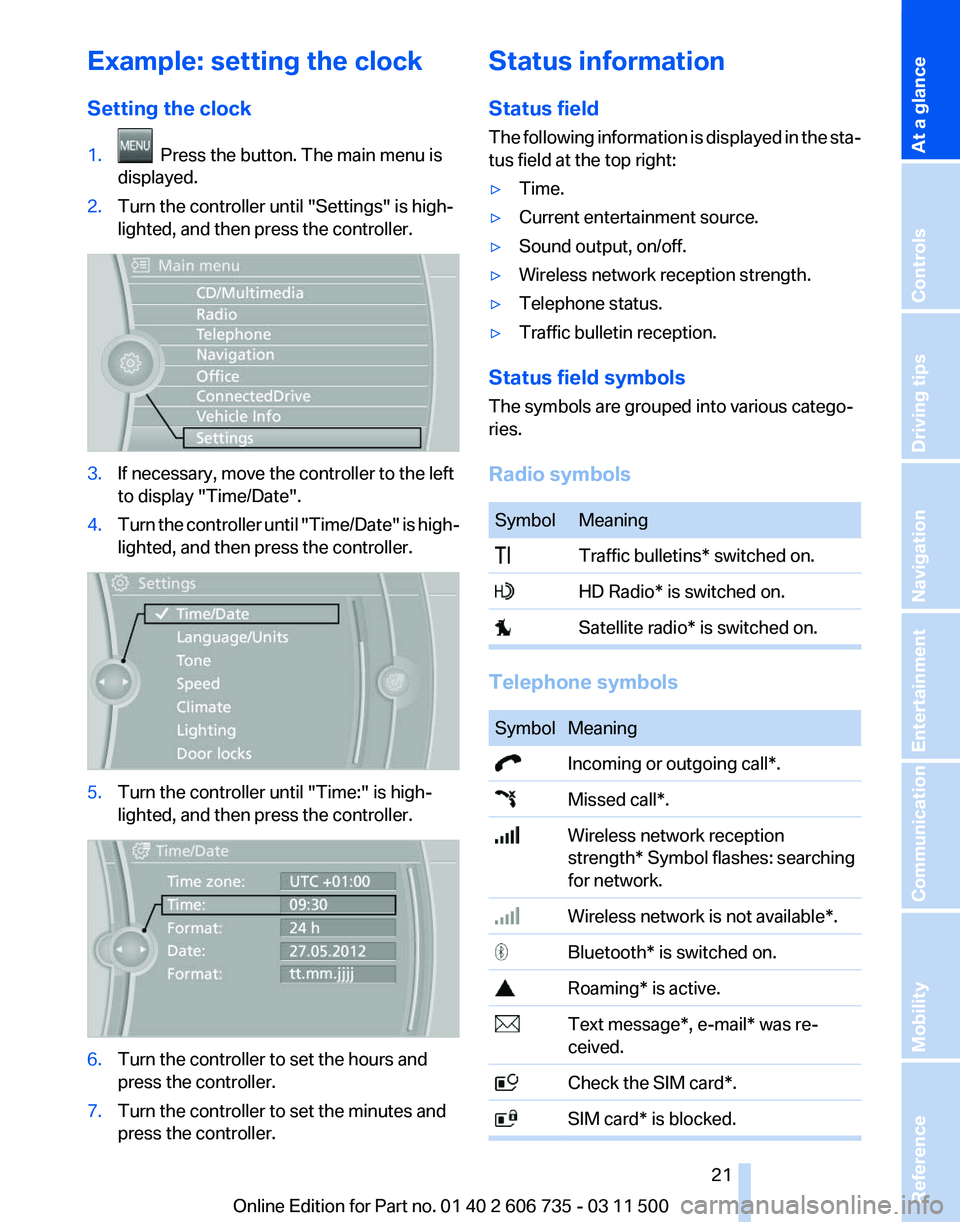
Example: setting the clock
Setting the clock
1.
Press the button. The main menu is
displayed.
2. Turn the controller until "Settings" is high‐
lighted, and then press the controller. 3.
If necessary, move the controller to the left
to display "Time/Date"
.
4. Turn the controller until "Time/Date"
is high‐
lighted, and then press the controller. 5.
Turn the controller until "Time:" is high‐
lighted, and then press the controller. 6.
Turn the controller to set the hours and
press the controller.
7. Turn the controller to set the minutes and
press the controller. Status information
Status field
The
following information is displayed in the sta‐
tus field at the top right:
▷ Time.
▷ Current entertainment source.
▷ Sound output, on/off.
▷ Wireless network reception strength.
▷ Telephone status.
▷ Traffic bulletin reception.
Status field symbols
The symbols are grouped into various catego‐
ries.
Radio symbols Symbol Meaning
Traffic bulletins* switched on.
HD Radio* is switched on.
Satellite radio* is switched on.
Telephone symbols
Symbol Meaning
Incoming or outgoing call*.
Missed call*.
Wireless network reception
strength*
Symbol flashes: searching
for network. Wireless network is not available*.
Bluetooth* is switched on.
Roaming* is active.
Text message*, e-mail* was re‐
ceived. Check the SIM card*.
SIM card* is blocked. Seite 21
21Online Edition for Part no. 01 40 2 606 735 - 03 11 500
Reference Mobility Communication Entertainment Navigation Driving tips Controls
At a glance
Page 28 of 317

Opening and closing
Remote control/key
Buttons on the remote control
1
Unlocking
2 Locking
3 Opening tailgate
General information
The vehicle is supplied with two remote controls
with keys.
Each remote control contains a rechargeable
battery that is automatically recharged when it
is in the ignition lock while the car is being driven.
Use each remote control at least twice a year for
longer road trips in order to maintain the batter‐
ies' charge status.
In vehicles equipped with Comfort Access*, the
remote control contains a replaceable battery,
refer to page 39.
The settings called up and implemented when
the vehicle is unlocked depend on which remote
control is used to unlock the vehicle, refer to
Personal Profile.
In addition, information about service require‐
ments is stored in the remote control, Service
data in the remote control, refer to page 268.Integrated key Press button 1 and pull out the key.
The integrated key fits the following locks:
▷
Driver's door, refer to page 32.
▷ Cargo floor cover in cargo area, refer to
page 137.
New remote controls
You can obtain new remote controls from your
service center.
Loss of the remote controls
Lost remote controls can be blocked by your
service center.
Personal Profile
The concept
You can set several of your vehicle's functions
to suit your personal needs and preferences.
▷ The settings are automatically saved in the
profile
currently activated in the remote con‐
trol.
▷ The remote control used is detected when
the
vehicle is unlocked and the stored profile
is called up.
▷ Your personal settings will be recognized
and called up again even if the vehicle has
been
used in the meantime by someone else
with another remote control.
Seite 28
28 Online Edition for Part no. 01 40 2 606 735 - 03 11 500
Opening and closing
Page 29 of 317

The individual settings are stored for a maximum
of
four remote controls. They are stored for two
remote controls if Comfort Access* is in use.
Personal Profile settings
The following functions and settings can be
stored in a profile.
More information on the settings can be found
under:
▷ Assigning the programmable memory but‐
tons, refer to page 22.
▷ Response of the central locking system
when the car is being unlocked, refer to
page 30.
▷ Automatic locking of the vehicle, refer to
page 33.
▷ Driver's seat, exterior mirror and steering
wheel positions*, refer to page 53.
▷ Settings for the display on the Control Dis‐
play and in the instrument cluster:
▷12h/24h clock format, refer to
page 79.
▷ Date format, refer to page 79.
▷ Brightness of the Control Display, refer
to page 80.
▷ Language on the Control Display, refer
to page 80.
▷ Units of measure for fuel consumption,
distance covered/remaining distances,
and temperature, refer to page 80.
▷ Show visual warning for the Park Distance
Control PDC*, refer to page 111.
▷ Show visual warning for Top View*, refer to
page 114.
▷ Show Side View*, refer to page 116.
▷ Backup camera*:
▷Function selection, refer to page 113.
▷ Type of display, refer to page 114.
▷ Lane departure warning*: last setting, on/
off, refer to page 93.
▷ Head-up Display*: selection, brightness and
position of the display, refer to page 117.▷
Adaptive Drive*: selected chassis and sus‐
pension tuning, refer to page 99.
▷ Light settings:
▷Triple turn signal activation, refer to
page 66.
▷ Welcome lamps, refer to page 81.
▷ Headlamp courtesy delay feature, refer
to page 81.
▷ Daytime running lights, refer to
page 82.
▷ High-beam Assistant*, refer to
page 83.
▷ Automatic climate control with 2-zone con‐
trol: settings, refer to page 120.
▷ Navigation:
▷Voice activation, refer to page 163.
▷ Route criteria, refer to page 161.
▷ Map view settings, refer to page 164.
▷ Entertainment:
▷Tone control, refer to page 172.
▷ Radio, stored stations, refer to
page 180.
▷ CD/multimedia, audio source listened to
last, refer to page 181.
▷ Telephone: volume, refer to page 220.
Central locking system
The concept
The central locking system becomes active
when the driver's door is closed.
The system simultaneously engages and re‐
leases the locks on the following:
▷ Doors.
▷ Tailgate.
▷ Fuel filler flap.
Operating from the outside
▷ Via the remote control.
▷ Via the door lock*.
Seite 29
29Online Edition for Part no. 01 40 2 606 735 - 03 11 500
Reference Mobility Communication Entertainment Navigation Driving tips
Controls At a glance
Page 30 of 317

▷
In cars with Comfort Access*, via the door
handles.
The following takes place simultaneously when
locking/unlocking the vehicle via the remote
control:
▷ The welcome lamps, interior lamps and
courtesy lamps* are switched on and off.
▷ The alarm system* is armed or disarmed,
refer to page 39.
Operating from the inside
Via the button for the central locking system, re‐
fer to page 33.
If the vehicle is locked from the inside, the fuel
filler flap remains unlocked.
If an accident of a certain severity occurs, the
central locking system unlocks automatically.
The hazard warning system and interior lamps
come on.
Opening and closing: from the
outside
Using the remote control
General information
Take the remote control with you
People or animals left unattended in a
parked vehicle can lock the doors from the in‐
side. Always take the remote control with you
when leaving the vehicle so that the vehicle can
then be opened from the outside.◀
Unlocking Press the button. The vehicle is unlocked.
You can set how the vehicle is to be unlocked.
The
setting is stored for the remote control cur‐
rently in use.
1. "Settings"
2. "Door locks" 3.
"Unlock button:" 4.
Select the desired function:
▷"All doors" The entire vehicle is unlocked.
▷ "Driver's door only" Only the driver's door and the fuel
filler flap are unlocked. Pressing again
unlocks the entire vehicle.
Convenient opening Press and hold the button on the remote
control.
The
windows and the glass sunroof*/panoramic
glass sunroof* open.
Locking Press the button on the remote control.
Locking from the outside
Do
not lock the vehicle from the outside if
there are people in it, as the vehicle cannot be
unlocked from inside without special knowl‐
edge.◀
Switching on the interior lamps,
courtesy lamps*, and welcome lamps Press
the button on the remote control
with the vehicle locked.
You can also use this function to locate your ve‐
hicle in parking garages, etc.
Panic mode*
You can trigger the alarm system if you find
yourself in a dangerous situation. Seite 30
30 Online Edition for Part no. 01 40 2 606 735 - 03 11 500
Opening and closing
Page 31 of 317

Press the button on the remote control for at
least 3 seconds.
To switch off the alarm: press any button.
Unlocking tailgate Press the button on the remote control for
approx. 1 second and release.
The tailgate will open slightly, regardless of
whether it was previously locked or unlocked.
With automatic tailgate operation
*: the tailgate
opens automatically.
The tailgate pivots back and up when it opens.
Ensure that adequate clearance is available be‐
fore opening.
To avoid locking yourself out of the vehicle, do
not place the remote control into the cargo area.
The tailgate is locked again as soon as it is
pushed closed.
Before and after each trip, check that the tailgate
has not been inadvertently unlocked.
Provide edge protection
Sharp or angular objects can hit the rear
window while driving and damage the heating
wires of the rear window. Provide edge protec‐
tion.◀
Confirmation signals from the vehicle
1. "Settings"
2. "Door locks"
3. "Flash when lock/unlock" Retrieving the seat, mirror, and
steering wheel settings
*
The driver's seat, exterior mirror, and steering
wheel positions* selected last are stored for the
currently used remote control.
When the vehicle is being unlocked, these po‐
sitions are automatically retrieved if the setting
is activated.
Pinch hazard when moving back the seat
If this function is used, first make sure that
the footwell behind the driver's seat is empty.
Failure to do so could cause injury to persons or
damage to objects behind the seat as a result of
a rearward movement of the seat.◀
The adjustment procedure is interrupted:
▷ When a seat position switch is pressed.
▷ When a button of the seat and mirror mem‐
ory is pressed.
Selecting automatic activation
1. "Settings"
2. "Door locks"
3. "Last seat position auto." Malfunctions
Local
radio waves may interfere with the remote
control.
In this case, unlock and lock the car at the door
lock with the integrated key.
If the car can no longer be locked with a remote
control, the battery in the remote control is dis‐
charged. Use the remote control during an ex‐
tended drive in order to recharge the battery,
refer to page 28. The remote control for Comfort Seite 31
31Online Edition for Part no. 01 40 2 606 735 - 03 11 500
Reference Mobility Communication Entertainment Navigation Driving tips
Controls At a glance