2012 BMW X5 XDRIVE35D lights
[x] Cancel search: lightsPage 53 of 317

Seat, mirror, and steering
wheel memory*
General information
Two different driver's seat and front passenger
seat* positions, exterior mirror positions and
steering
wheel positions* can be stored and re‐
trieved.
The adjustment of the backrest width and the
lumbar support is not stored in the memory.
Storing 1.
Switch on the radio ready state or the igni‐
tion, refer to page 61.
2. Set the desired seat, exterior mirror and
steering wheel positions.
3. Press the button. The LED in the
button lights up.
4. Press the desired memory button 1 or 2. The
LED goes out.
If the M button is pressed accidentally: Press the button again. The LED goes
out.
Calling up settings
Do not retrieve the memory setting while
driving
Do
not retrieve the memory setting while driving,
as an unexpected seat movement could result
in an accident.◀ Comfort function
1.
Open the driver's door after unlocking or
switch on the radio ready state, refer to
page 61.
2. Briefly press the desired memory but‐
ton 1 or 2.
The seat is automatically moved to the stored
position.
The procedure stops when a switch for setting
the seat or one of the memory buttons is
pressed.
Safety mode
1. Close the driver's door and switch the igni‐
tion on or off, refer to page 61.
2. Press and hold the desired memory button
1 or 2 until the setting procedure is com‐
pleted.
Mirrors
Exterior mirrors
General information
The
mirror on the passenger side is more curved
than the driver's mirror.
Estimating distances correctly
Objects reflected in the mirror are closer
than they appear. Do not estimate the distance
to the traffic behind you based on what you see
in the mirror, as this will increase your risk of an
accident.◀ Seite 53
53Online Edition for Part no. 01 40 2 606 735 - 03 11 500
Reference Mobility Communication Entertainment Navigation Driving tips
Controls At a glance
Page 55 of 317

Interior and exterior mirrors, automatic
dimming feature
*Two photocells are used for control:
▷
In the mirror glass, see arrow.
▷ On the back of the mirror.
For proper operation:
▷ Keep the photocells clean.
▷ Do not cover the area between the inside
rearview mirror and the windshield.
Steering wheel
General information Do not adjust while driving
Do not adjust the steering wheel while
driving; otherwise, an unexpected movement
could result in an accident.◀
Adjusting
Mechanical* 1.
Fold the lever down.
2. Move the steering wheel to the preferred
height and angle to suit your seating posi‐
tion. 3.
Fold the lever back.
Do not use force to swing the lever back.
Do not use force to swing the lever back
up; otherwise, the mechanism will be dam‐
aged.◀
Electric* The steering wheel can be adjusted in four di‐
rections.
Storing steering wheel positions, refer to Seat,
mirror, and steering wheel memory, refer to
page
53.
Easy entry/exit*
To facilitate entry and exit, the steering wheel
temporarily
moves into the uppermost position.
Steering wheel heating*
Switching on/off Press the button.
▷
On: the LED lights up.
▷ Off: the LED goes out. Seite 55
55Online Edition for Part no. 01 40 2 606 735 - 03 11 500
Reference Mobility Communication Entertainment Navigation Driving tips
Controls At a glance
Page 63 of 317

Switching off the engine
Procedure
1.
Engage transmission position P with the ve‐
hicle stopped.
2. Press the Start/Stop button.
3. Set the parking brake.
4. Remove the remote control from the ignition
lock, refer to page 61.
Before driving into a car wash
The vehicle is able to roll when the following
steps are adhered to:
1. With Comfort Access*: insert the remote
control in the ignition lock.
2. Depress the brake pedal.
3. Engage transmission position N.
4. Release the parking brake or deactivate Au‐
tomatic Hold.
5. Switch the engine off.
Transmission position P will be engaged:
▷ Automatically after approx. 30 minutes.
▷ If you remove the remote control from the
ignition lock.
Parking brake
The concept
The parking brake is primarily intended to pre‐
vent the vehicle from rolling while parked; it
brakes the rear wheels.
The parking brake can be set manually or auto‐
matically:
▷ Manual: by pulling and pushing the switch.
▷ Automatic: by activating Automatic Hold. Setting manually Pull the button. The parking brake is set.
The indicator lamp lights up in red. The
parking brake is set.
Indicator lamp in Canadian models.
To set the parking brake, the remote control
does not need to be in the ignition lock. Set the parking brake and further secure
the vehicle as required
Set the parking brake firmly when parking; oth‐
erwise, the vehicle could roll. On steep upward
and
downward inclines, further secure the vehi‐
cle, for example, by turning the steering wheel in
the direction of the curb.◀
While driving
Use while driving:
Pull the switch and hold it. The vehicle brakes
hard while the button is being pulled.
The indicator lamp lights up in red, a sig‐
nal sounds and the brake lamps light up.
Indicator lamp in Canadian models.
If the vehicle is braked to a speed of approx.
2 mph/3 km/h, the parking brake remains set. Seite 63
63Online Edition for Part no. 01 40 2 606 735 - 03 11 500
Reference Mobility Communication Entertainment Navigation Driving tips
Controls At a glance
Page 64 of 317

Releasing manually
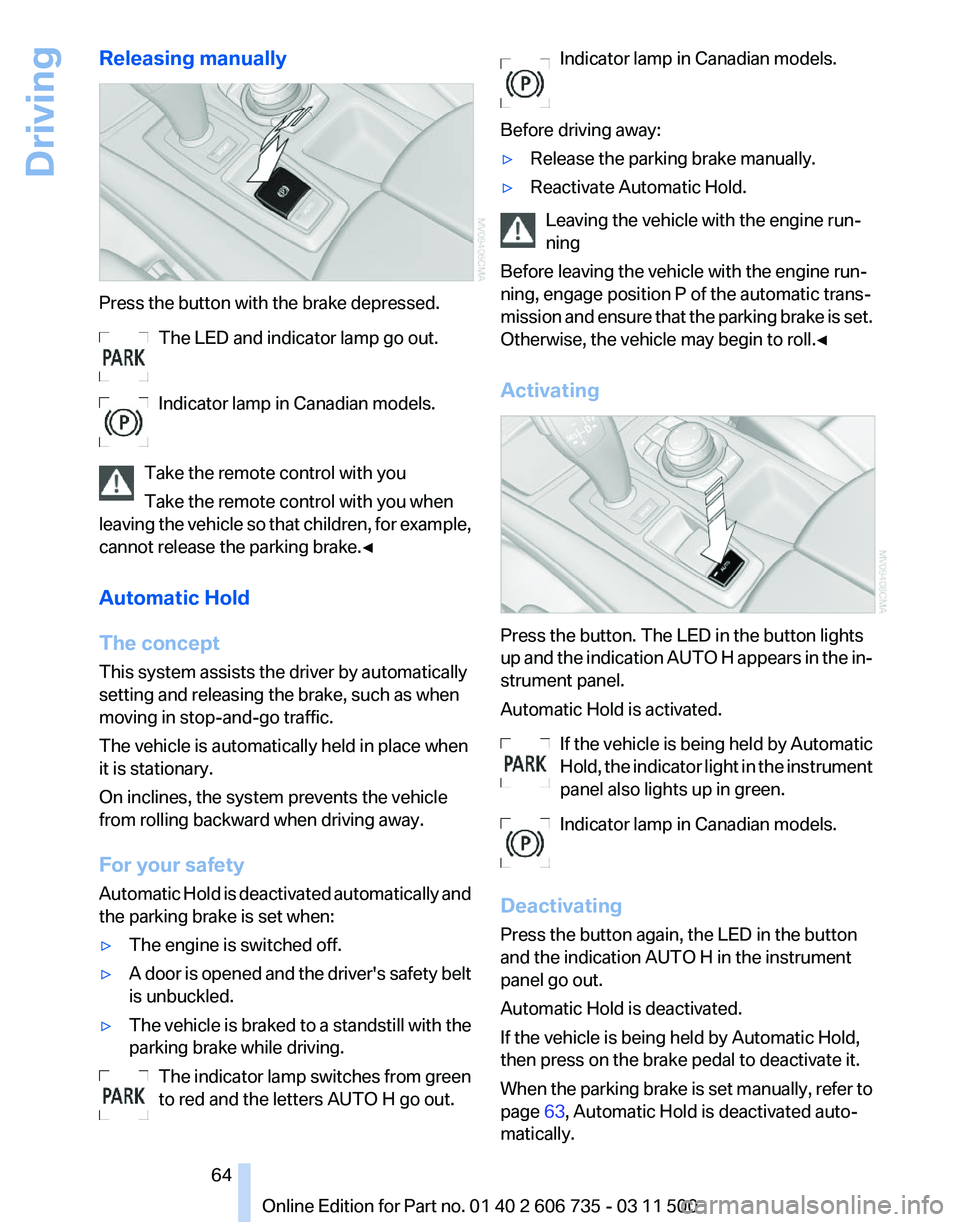
Press the button with the brake depressed.
The LED and indicator lamp go out.
Indicator lamp in Canadian models.
Take the remote control with you
Take the remote control with you when
leaving
the vehicle so that children, for example,
cannot release the parking brake.◀
Automatic Hold
The concept
This system assists the driver by automatically
setting and releasing the brake, such as when
moving in stop-and-go traffic.
The vehicle is automatically held in place when
it is stationary.
On inclines, the system prevents the vehicle
from rolling backward when driving away.
For your safety
Automatic Hold is deactivated automatically and
the parking brake is set when:
▷ The engine is switched off.
▷ A door is opened and the driver's safety belt
is unbuckled.
▷ The vehicle is braked to a standstill with the
parking brake while driving.
The indicator lamp switches from green
to red and the letters AUTO H go out. Indicator lamp in Canadian models.
Before driving away:
▷ Release the parking brake manually.
▷ Reactivate Automatic Hold.
Leaving the vehicle with the engine run‐
ning
Before leaving the vehicle with the engine run‐
ning, engage position P of the automatic trans‐
mission
and ensure that the parking brake is set.
Otherwise, the vehicle may begin to roll.◀
Activating Press the button. The LED in the button lights
up
and the indication AUTO H appears in the in‐
strument panel.
Automatic Hold is activated.
If the vehicle is being held by Automatic
Hold, the indicator light in the instrument
panel also lights up in green.
Indicator lamp in Canadian models.
Deactivating
Press the button again, the LED in the button
and the indication AUTO H in the instrument
panel go out.
Automatic Hold is deactivated.
If the vehicle is being held by Automatic Hold,
then press on the brake pedal to deactivate it.
When the parking brake is set manually, refer to
page 63, Automatic Hold is deactivated auto‐
matically. Seite 64
64 Online Edition for Part no. 01 40 2 606 735 - 03 11 500
Driving
Page 65 of 317

Driving
Automatic
Hold is activated: the vehicle is auto‐
matically secured against rolling when it stops.
The indicator lamp lights up in green.
Indicator lamp in Canadian models.
Step on the accelerator pedal to drive off.
The brake is released automatically.
The indicator lamp goes out. Before driving into a car wash
Deactivate Automatic Hold; otherwise, the
parking brake will be set when the vehicle is sta‐
tionary and the vehicle will no longer be able to
roll.◀
Parking
The parking brake is automatically set if the en‐
gine is switched off while the vehicle is being
held by Automatic Hold.
The indicator lamp changes from green
to red.
Indicator lamp in Canadian models.
The parking brake is not set if the engine is
switched off while the vehicle is coasting to a
halt. Automatic Hold is deactivated. Take the remote control with you
Take the remote control with you when
leaving the vehicle so that children, for example,
cannot release the parking brake.◀
Malfunction
In the event of a failure or malfunction of the
parking brake, secure the vehicle against rolling
using a wheel chock, for example, when leaving
it. Releasing the parking brake manually
In the event of an electrical power loss or elec‐
trical malfunction, you can release the parking
brake manually.
Secure the vehicle against rolling
Before releasing the parking brake man‐
ually,
and whenever you park the vehicle with the
parking brake released, ensure that position P of
the automatic transmission is engaged. Note
the display in the instrument cluster.
In addition, secure the vehicle against rolling,
e.g. with a wheel chock. Otherwise there is a
danger that the vehicle could roll if parked on a
steep slope.◀
Jump-starting and towing, refer to page 282.
Unlocking
1. Open the left-hand side panel in the cargo
area.
2. Remove the first aid kit* and the warning tri‐
angle*.
Close the bracket of the warning tri‐
angle.
3. Insert the releasing tool or screwdriver, con‐
tained in the tool kit under the cargo floor
panel, refer to page 270, at the releasing
point. 4.
Firmly pull the releasing tool or screwdriver
upward against the mechanical resistance,
refer to arrow, until a considerable increase
in force is felt and the parking brake is then
clearly heard to release.
5. Stow the releasing tool or screwdriver,
warning
triangle*, and first aid kit* and close
the left side panel in the cargo area. Seite 65
65Online Edition for Part no. 01 40 2 606 735 - 03 11 500
Reference Mobility Communication Entertainment Navigation Driving tips
Controls At a glance
Page 67 of 317

The setting is stored for the remote control cur‐
rently in use.
Washer/wiper system
Do not switch on the wipers if frozen
Do
not switch on the wipers if they are fro‐
zen onto the windshield; otherwise, the wiper
blades and the windshield wiper motor may be
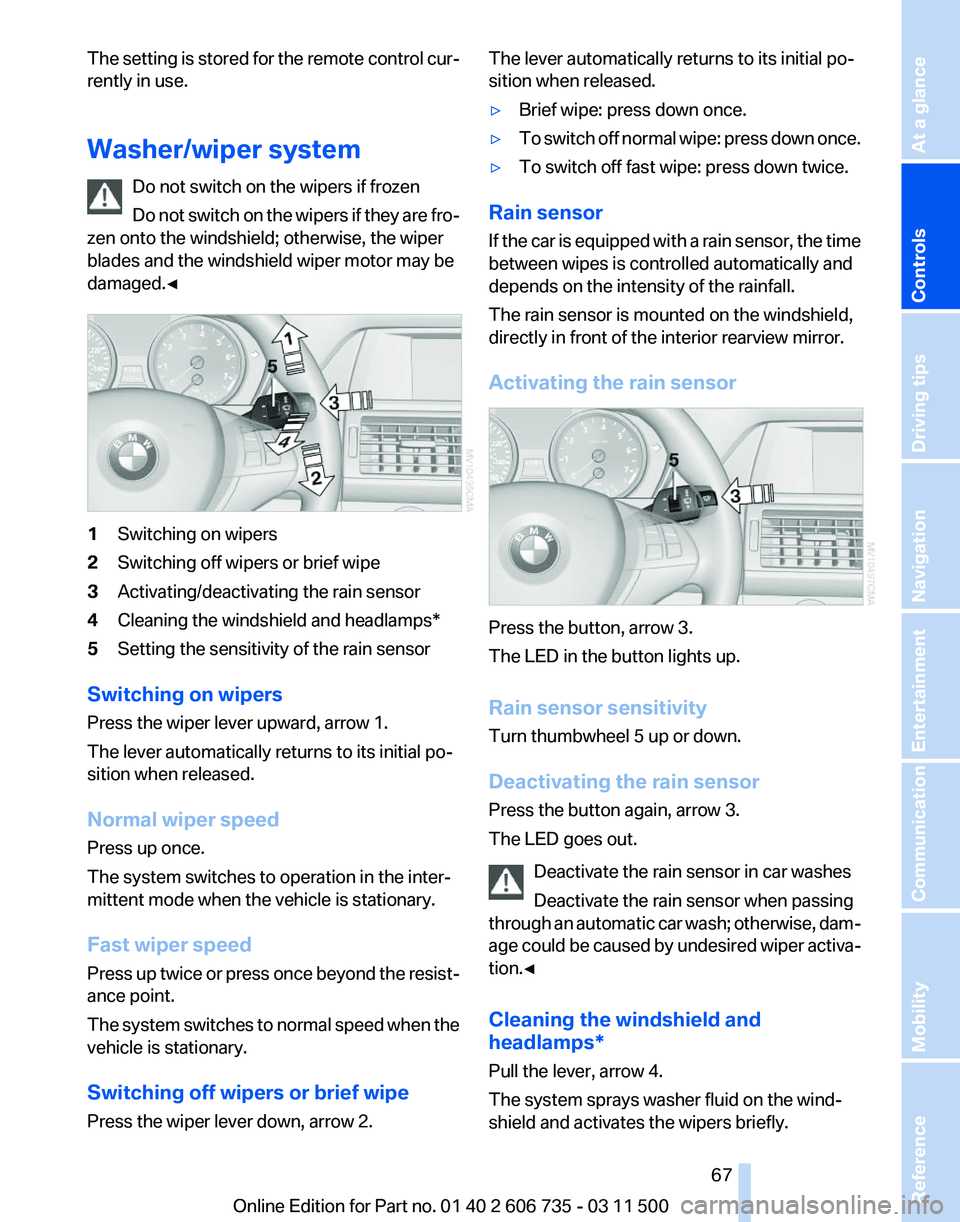
damaged.◀ 1
Switching on wipers
2 Switching off wipers or brief wipe
3 Activating/deactivating the rain sensor
4 Cleaning the windshield and headlamps*
5 Setting the sensitivity of the rain sensor
Switching on wipers
Press the wiper lever upward, arrow 1.
The lever automatically returns to its initial po‐
sition when released.
Normal wiper speed
Press up once.
The system switches to operation in the inter‐
mittent mode when the vehicle is stationary.
Fast wiper speed
Press
up twice or press once beyond the resist‐
ance point.
The system switches to normal speed when the
vehicle is stationary.
Switching off wipers or brief wipe
Press the wiper lever down, arrow 2. The lever automatically returns to its initial po‐
sition when released.
▷
Brief wipe: press down once.
▷ To switch off normal wipe: press down once.
▷ To switch off fast wipe: press down twice.
Rain sensor
If
the car is equipped with a rain sensor, the time
between wipes is controlled automatically and
depends on the intensity of the rainfall.
The rain sensor is mounted on the windshield,
directly in front of the interior rearview mirror.
Activating the rain sensor Press the button, arrow 3.
The LED in the button lights up.
Rain sensor sensitivity
Turn thumbwheel 5 up or down.
Deactivating the rain sensor
Press the button again, arrow 3.
The LED goes out.
Deactivate the rain sensor in car washes
Deactivate the rain sensor when passing
through
an automatic car wash; otherwise, dam‐
age could be caused by undesired wiper activa‐
tion.◀
Cleaning the windshield and
headlamps*
Pull the lever, arrow 4.
The system sprays washer fluid on the wind‐
shield and activates the wipers briefly. Seite 67
67Online Edition for Part no. 01 40 2 606 735 - 03 11 500
Reference Mobility Communication Entertainment Navigation Driving tips
Controls At a glance
Page 71 of 317

Displays
Odometer, external
temperature display, clock
1
Knob in the instrument cluster
2 Time, external temperature, and date
3 Odometer and trip odometer
Knob in the instrument cluster
Press the knob.
▷ When the ignition is switched on, the trip
odometer is reset.
Press the knob for approx. 5 seconds:
View service requirement display, refer to
page 75
▷ When the ignition is switched off, the time,
external
temperature and odometer are dis‐
played.
Units of measure
To
set the respective units of measure, miles or
km for the odometer and ℃ or ℉ for the external
temperature, refer to page 80.
The setting is stored for the remote control cur‐
rently in use.
Time, date, external temperature
From radio readiness the external temperature
and the time are displayed.
Set the time, refer to page 79.Retrieving date
Press the button on turn signal lever upward; the
date appears.
Set the date, refer to page
79.
Pressing the button upward or downward sev‐
eral times changes the display between clock,
external temperature, date, and Check Control
messages, refer to page 76.
External temperature warning
If the display drops to +37 ℉/+3 ℃, a signal
sounds and a warning lamp lights up. There is
the increased danger of ice. Ice on roads
Even
at temperatures above +37 ℉/+3 ℃,
there can be a risk of ice on roads.
Therefore, drive carefully on bridges and shady
roads, for example, to avoid the increased dan‐
ger of an accident.◀
Odometer and trip odometer
Resetting trip odometer:
With the ignition switched on, press button 1 in
the instrument cluster.
When the vehicle is parked
If you still want to view the time, external tem‐
perature and odometer reading briefly after the
remote control has been taken out of the ignition
lock:
Press button 1 in the instrument cluster. Seite 71
71Online Edition for Part no. 01 40 2 606 735 - 03 11 500
Reference Mobility Communication Entertainment Navigation Driving tips
Controls At a glance
Page 81 of 317

Lamps
At a glance
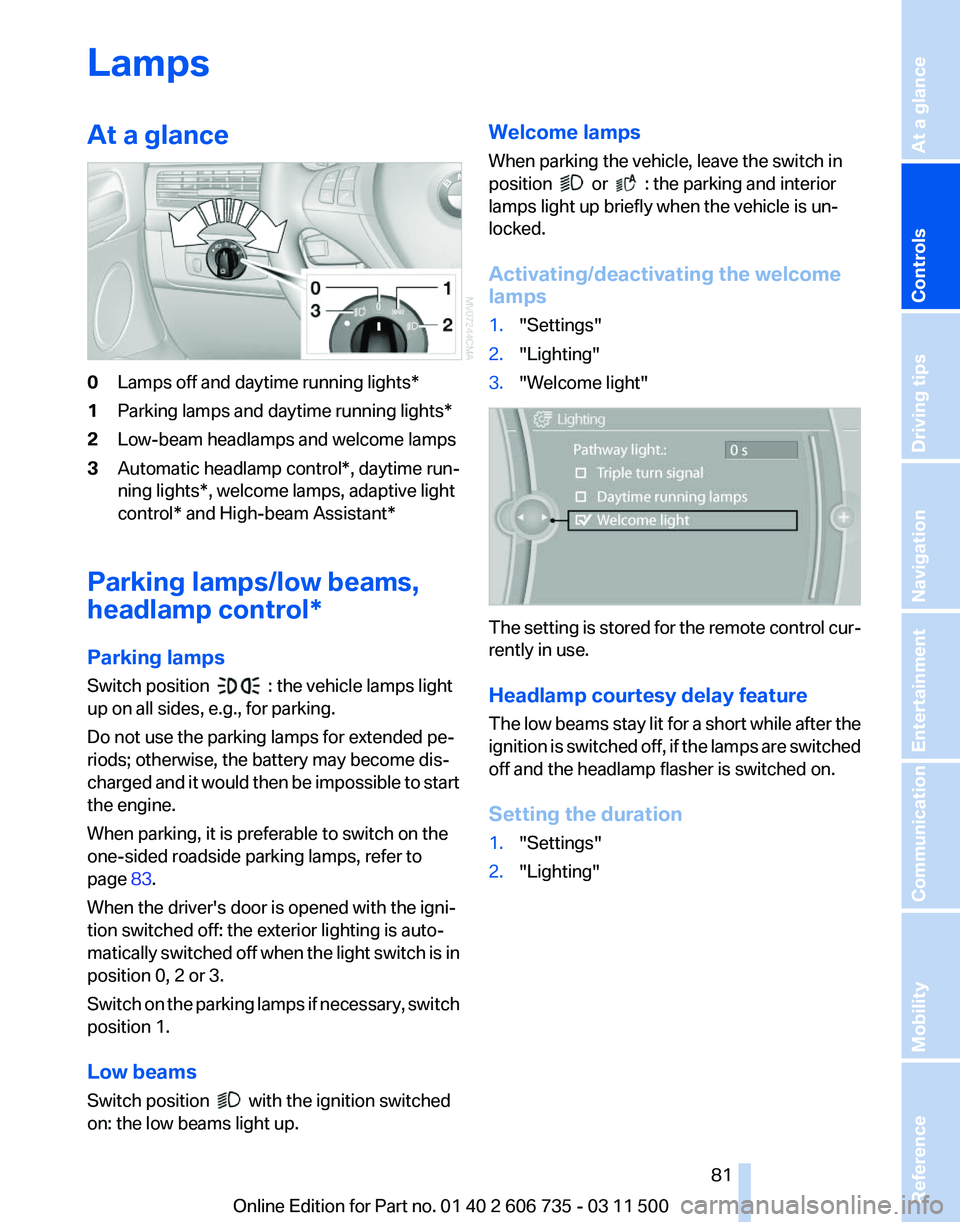
0
Lamps off and daytime running lights*
1 Parking lamps and daytime running lights*
2 Low-beam headlamps and welcome lamps
3 Automatic headlamp control*, daytime run‐
ning lights*, welcome lamps,
adaptive light
control* and High-beam Assistant*
Parking lamps/low beams,
headlamp control*
Parking lamps
Switch position : the vehicle lamps light
up on all sides, e.g., for parking.
Do not use the parking lamps for extended pe‐
riods; otherwise, the battery may become dis‐
charged
and it would then be impossible to start
the engine.
When parking, it is preferable to switch on the
one-sided roadside parking lamps, refer to
page 83.
When the driver's door is opened with the igni‐
tion switched off: the exterior lighting is auto‐
matically switched off when the light switch is in
position 0, 2 or 3.
Switch on the parking lamps if necessary, switch
position 1.
Low beams
Switch position with the ignition switched
on: the low beams light up. Welcome lamps
When parking the vehicle, leave the switch in
position or : the parking and interior
lamps light up briefly when the vehicle is un‐
locked.
Activating/deactivating the welcome
lamps
1. "Settings"
2. "Lighting"
3. "Welcome light" The setting is stored for the remote control cur‐
rently in use.
Headlamp courtesy delay feature
The
low beams stay lit for a short while after the
ignition is switched off, if the lamps are switched
off and the headlamp flasher is switched on.
Setting the duration
1. "Settings"
2. "Lighting"
Seite 81
81Online Edition for Part no. 01 40 2 606 735 - 03 11 500
Reference Mobility Communication Entertainment Navigation Driving tips
Controls At a glance