2012 BMW X5 XDRIVE 50I buttons
[x] Cancel search: buttonsPage 205 of 317
▷
"Tone":
▷"Treble / Bass" and "Balance": sepa‐
rately adjustable for the left and right
headphones and the infrared head‐
phones.
▷ "Reset": the settings are reset to the de‐
fault values.
▷ "DVD format":
▷"Standard"
▷ "Zoom": full-screen playback.
▷ "Language":
language of the DVD playback.
The language advances one setting each
time the menu item is selected.
▷ "Subtitles":
language of the subtitles or turn
off the subtitles.
▷ "Title": select individual tracks on the DVD.
▷ "Angle of view": camera angle.
Information or symbols that appear during
the
playback of a film generally point out dif‐
ferent camera angles. These are usually only
briefly available.
▷ "Menu": open the DVD-specific menu.
▷ "Return": exit the menu, or: Press the buttons on the remote con‐
trol.
Many DVDs offer dialogs and subtitles in various
languages
or scene descriptions for the hearing
impaired. These functions are stored on the
DVD.
With some DVDs, it is only possible to select
language, subtitles, camera angle, or title by us‐
ing the DVD-specific menu. Consult the infor‐
mation accompanying your DVD.
Opening the DVD-specific menu
Additional functions may be available on DVDs.
It is thus possible, for example, to select from
among several possible actions or to access in‐
formation about the film.
1. Press the button on the remote control
during playback.
2. Select "Menu".
3. Press the button. On some DVDs, you can use "Main menu"
and "Title" to access additional menus in
which you can select music scenes, for ex‐
ample.
To make a selection:
1. Select the symbol.
2. Press the button until the desired func‐
tion is selected.
3. Select the arrow.
4. Press the button.
To return to the start menu:
1. Select the arrow.
2. Press the button.
You can also select language, subtitles, camera
angle,
or title in the DVD-specific menu. Consult
the information accompanying your DVD.
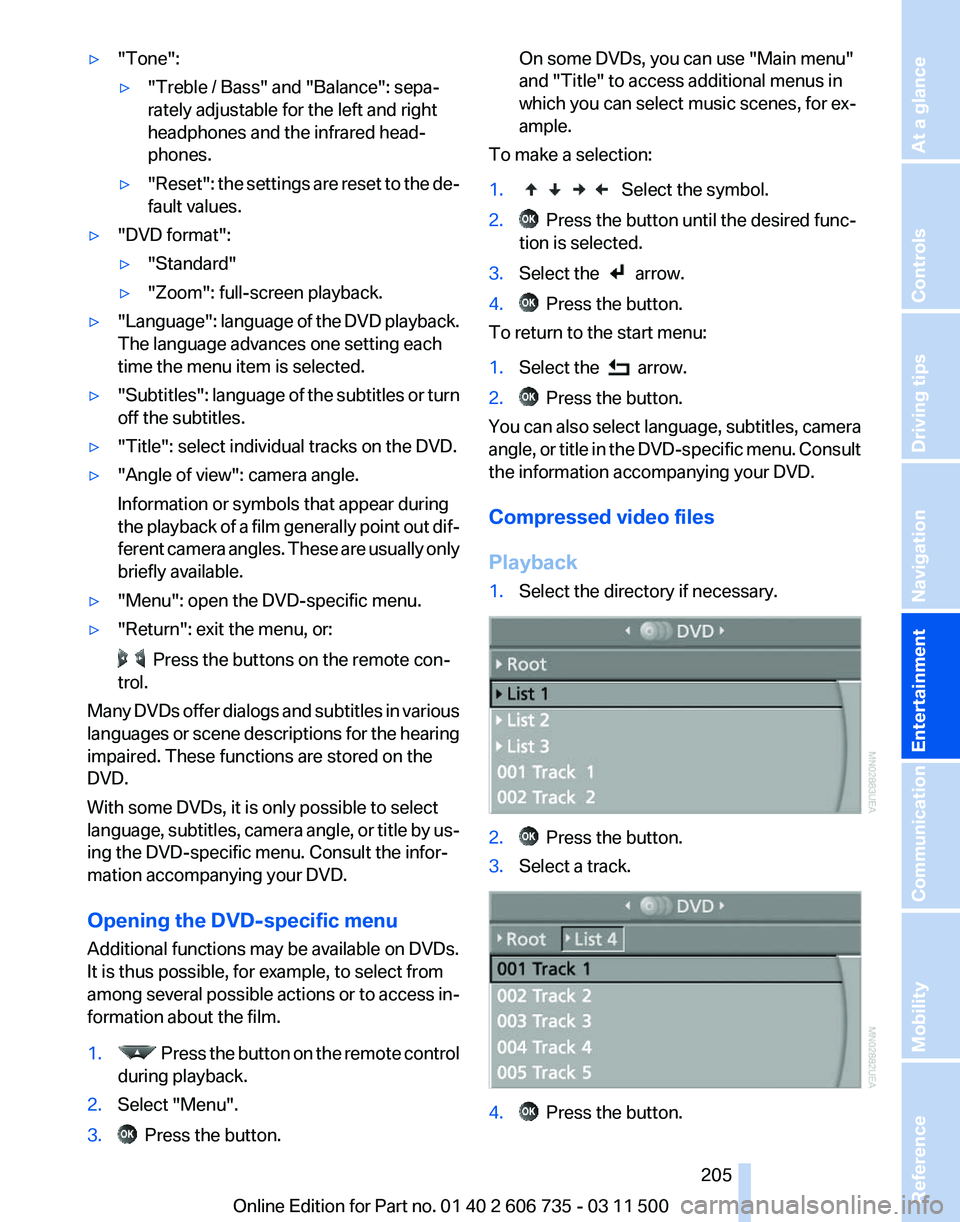
Compressed video files
Playback
1. Select the directory if necessary. 2. Press the button.
3. Select a track. 4. Press the button.
Seite 205
205Online Edition for Part no. 01 40 2 606 735 - 03 11 500
Reference Mobility Communication
Entertainment Navigation Driving tips Controls At a glance
Page 206 of 317
5.
Select "Play".
6. Press the button.
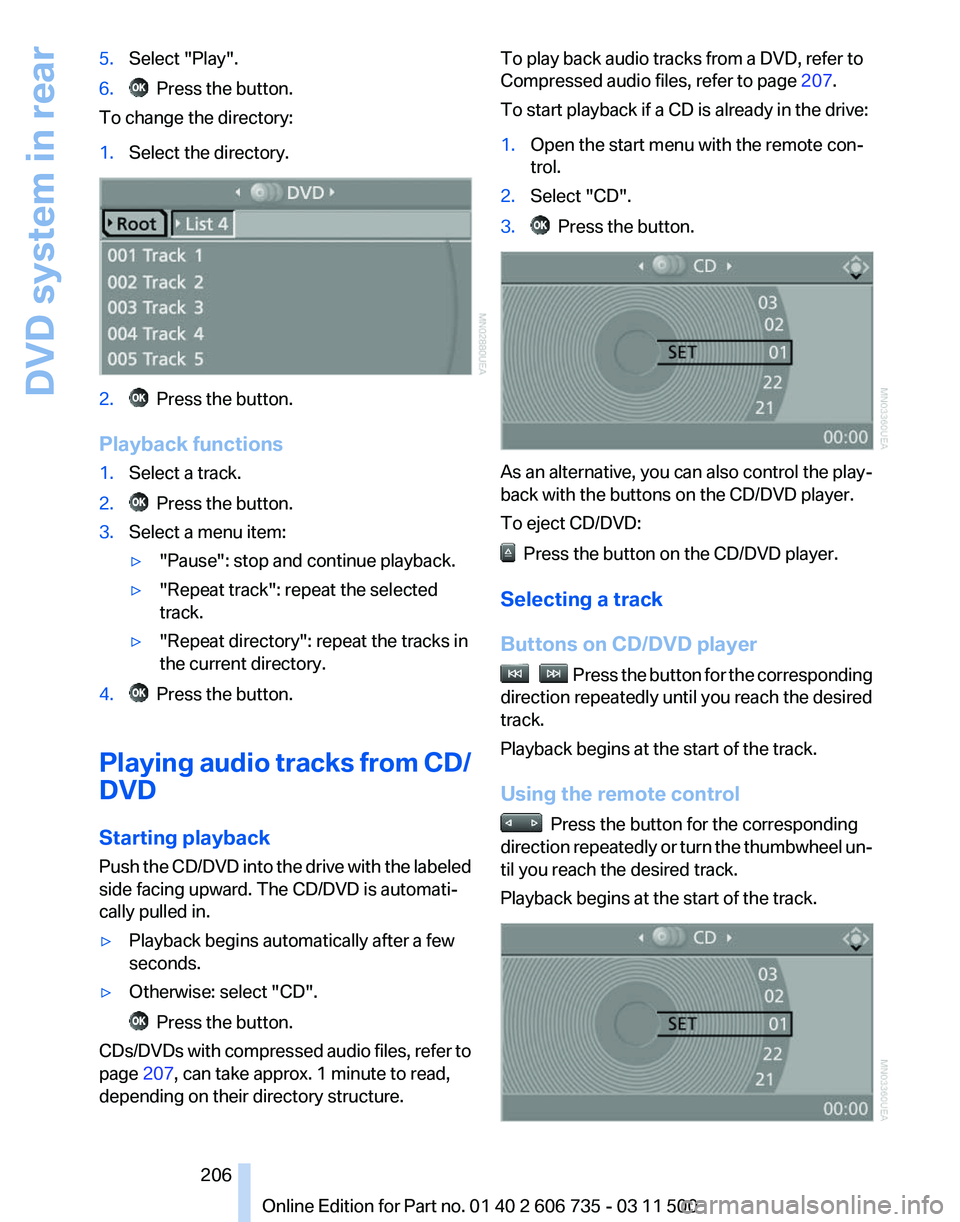
To change the directory:
1. Select the directory. 2. Press the button.
Playback functions
1. Select a track.
2. Press the button.
3. Select a menu item:
▷"Pause": stop and continue playback.
▷ "Repeat track": repeat the selected
track.
▷ "Repeat directory": repeat the tracks in
the current directory.
4. Press the button.
Playing audio tracks from CD/
DVD
Starting playback
Push
the CD/DVD into the drive with the labeled
side facing upward. The CD/DVD is automati‐
cally pulled in.
▷ Playback begins automatically after a few
seconds.
▷ Otherwise: select "CD". Press the button.
CDs/DVDs with compressed audio files, refer to
page 207, can take approx. 1 minute to read,
depending on their directory structure. To play back audio tracks from a DVD, refer to
Compressed audio files, refer to page
207.
To start playback if a CD is already in the drive:
1. Open the start menu with the remote con‐
trol.
2. Select "CD".
3. Press the button.
As an alternative, you can also control the play‐
back with the buttons on the CD/DVD player.
To eject CD/DVD:
Press the button on the CD/DVD player.
Selecting a track
Buttons on CD/DVD player Press the button for the corresponding
direction repeatedly until you reach the desired
track.
Playback begins at the start of the track.
Using the remote control Press the button for the corresponding
direction
repeatedly or turn the thumbwheel un‐
til you reach the desired track.
Playback begins at the start of the track. Seite 206
206 Online Edition for Part no. 01 40 2 606 735 - 03 11 500
DVD system in rear
Page 207 of 317
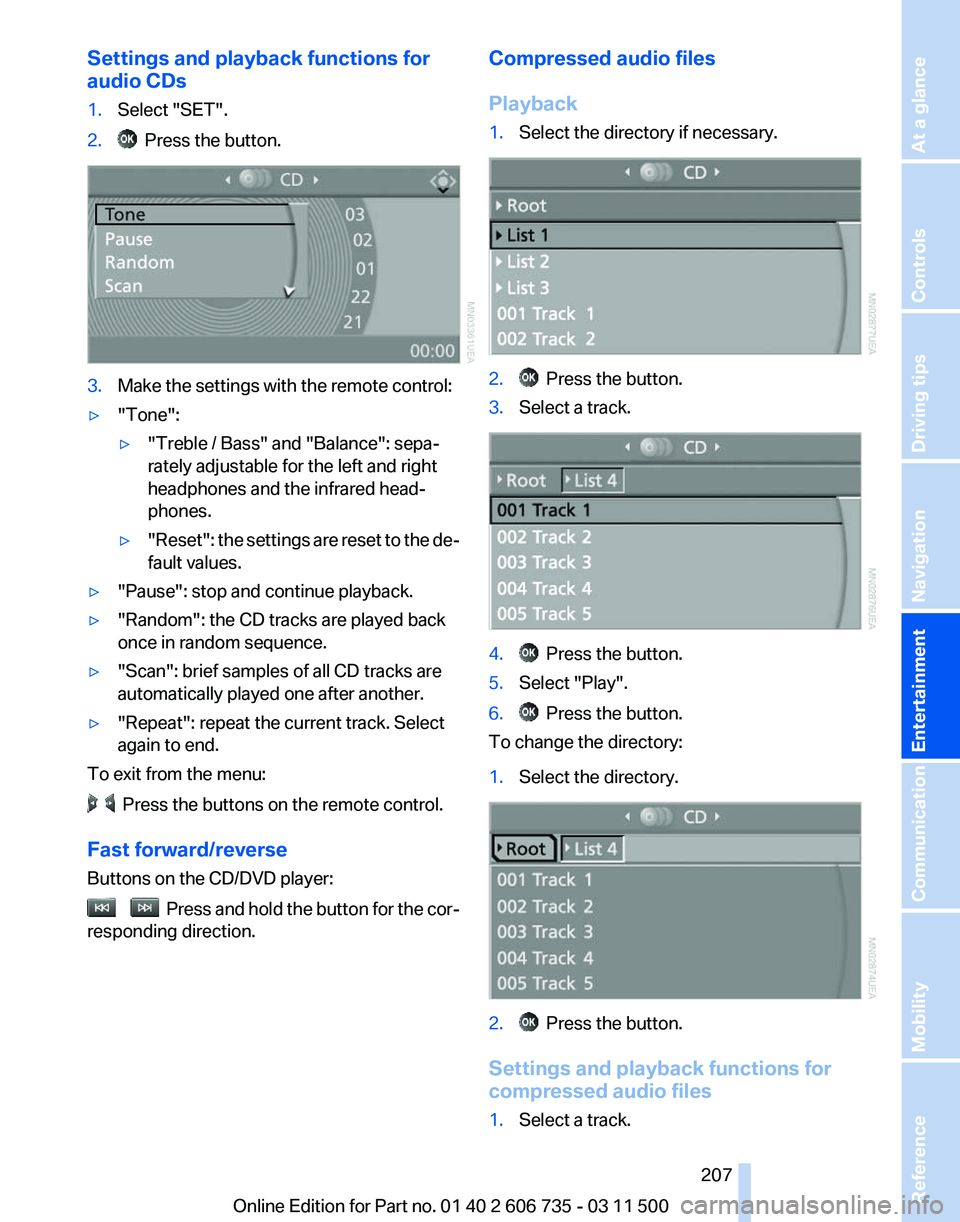
Settings and playback functions for
audio CDs
1.
Select "SET".
2. Press the button.
3.
Make the settings with the remote control:
▷ "Tone":
▷"Treble / Bass" and "Balance": sepa‐
rately adjustable for the left and right
headphones and the infrared head‐
phones.
▷ "Reset": the settings are reset to the de‐
fault values.
▷ "Pause": stop and continue playback.
▷ "Random": the CD tracks are played back
once in random sequence.
▷ "Scan": brief samples of all CD tracks are
automatically played one after another.
▷ "Repeat": repeat the current track. Select
again to end.
To exit from the menu: Press the buttons on the remote control.
Fast forward/reverse
Buttons on the CD/DVD player: Press and hold the button for the cor‐
responding direction. Compressed audio files
Playback
1.
Select the directory if necessary. 2. Press the button.
3. Select a track. 4. Press the button.
5. Select "Play".
6. Press the button.
To change the directory:
1. Select the directory. 2. Press the button.
Settings and playback functions for
compressed audio files
1. Select a track.
Seite 207
207Online Edition for Part no. 01 40 2 606 735 - 03 11 500
Reference Mobility Communication
Entertainment Navigation Driving tips Controls At a glance
Page 208 of 317
2. Press the button.
3. Make the settings with the remote control:
▷ "Tone":
▷"Treble / Bass" and "Balance": sepa‐
rately adjustable for the left and right
headphones and the infrared head‐
phones.
▷ "Reset": the settings are reset to the de‐
fault values.
▷ "Pause": stop and continue playback.
▷ "Scan directory": briefly sample the tracks
in the current directory.
▷ "Scan all": briefly sample all tracks.
▷ "Random directory": play the tracks in the
current directory in a random sequence.
▷ "Random
all": play all tracks in a random se‐
quence.
▷ "Repeat track": repeat the selected track.
▷ "Repeat directory": repeat the tracks in the
current directory.
▷ "Details": display any stored information on
the current track.
To exit from the menu: Press the buttons on the remote control.
Displaying images from CD/
DVD
1. Push the CD/DVD into the drive with the la‐
beled side facing upward. The CD/DVD is
automatically pulled in.
2. Open the start menu with the remote con‐
trol.
3. Select "Photo".
4. Press the button.
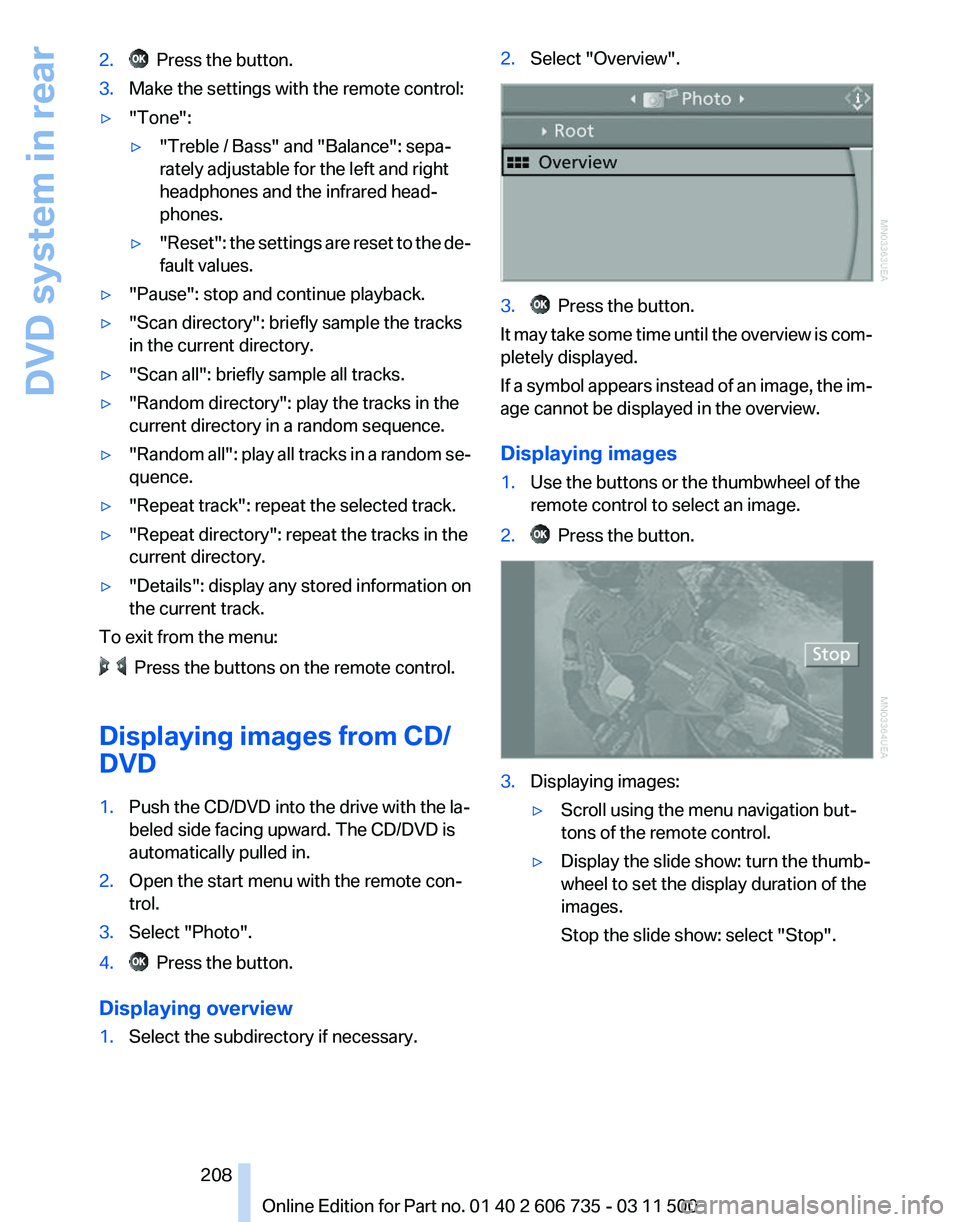
Displaying overview
1. Select the subdirectory if necessary. 2.
Select "Overview". 3. Press the button.
It may take some time until the overview is com‐
pletely displayed.
If
a symbol appears instead of an image, the im‐
age cannot be displayed in the overview.
Displaying images
1. Use the buttons or the thumbwheel of the
remote control to select an image.
2. Press the button.
3.
Displaying images:
▷Scroll using the menu navigation but‐
tons of the remote control.
▷ Display the slide show: turn the thumb‐
wheel to set the display duration of the
images.
Stop the slide show: select "Stop".
Seite 208
208 Online Edition for Part no. 01 40 2 606 735 - 03 11 500
DVD system in rear
Page 212 of 317
Press the buttons on the remote control.
Seite 212
212 Online Edition for Part no. 01 40 2 606 735 - 03 11 500DVD system in rear
Page 216 of 317
Telephone*
At a glance
The concept
Mobile
phones or other external devices such as
audio players can be connected to the vehicle
via Bluetooth.
Bluetooth® is a registered trademark of Blue‐
tooth® SIG, Inc.
After these devices are paired once, they are
recognized automatically when the ignition is
switched on as soon as they are in the vehicle
and can then be operated via iDrive, the buttons
on the steering wheel, and via voice activation*.
Depending on their functionality, external devi‐
ces can be used via the vehicle as a telephone
or as an audio source. The telephone functions
are described in the following. Operating the au‐
dio functions, refer to page 196.
Up to four external devices can be paired.
Certain functions may need to be enabled by the
mobile phone provider or service provider.
Using the mobile phone while driving
Make entries only when traffic and road
conditions allow. Do not hold the mobile phone
in your hand while you are driving; use the
hands-free system instead. If you do not ob‐
serve this precaution, you can endanger the ve‐
hicle occupants and other road users.◀
Snap-in adapter*
The snap-in adapter is used to:
▷ Hold the mobile phone.
▷ Recharge the battery.
▷ Connect the mobile phone to an outside an‐
tenna of the vehicle.
This provides for better network reception
and consistent sound quality.
Approved mobile phones
Details on which mobile phones and external
devices with a Bluetooth interface are sup‐ ported by the mobile phone preparation pack‐
age
can be obtained at www.bmwusa.com/blue‐
tooth.
Displaying the vehicle identification
number and software part number
The vehicle identification number and software
part number are needed to determine which mo‐
bile phones are supported by the mobile phone
preparation package. The software version of
the mobile phone may also be required.
1. "Telephone"
2. Open "Options".
3. "Bluetooth® info"
4. "Display system information"
These approved mobile phones with a certain
software version, support the vehicle functions
described below.
Malfunctions may occur with other mobile
phones or software versions.
Do
not operate a mobile phone that is connected
to the vehicle on the mobile phone keypad, as
this may lead to a malfunction.
A software update, refer to page 199, can be
performed if necessary.
Pairing/unpairing the mobile
phone
General information
The following functions are available:
▷ Use of a mobile phone as a telephone.
▷ Use of a mobile phone as an additional tele‐
phone.
▷ Use of a mobile phone as an audio source.
▷ Use of an audio device as an audio source,
refer to page 196.
Seite 216
216 Online Edition for Part no. 01 40 2 606 735 - 03 11 500
Telephone
Page 226 of 317
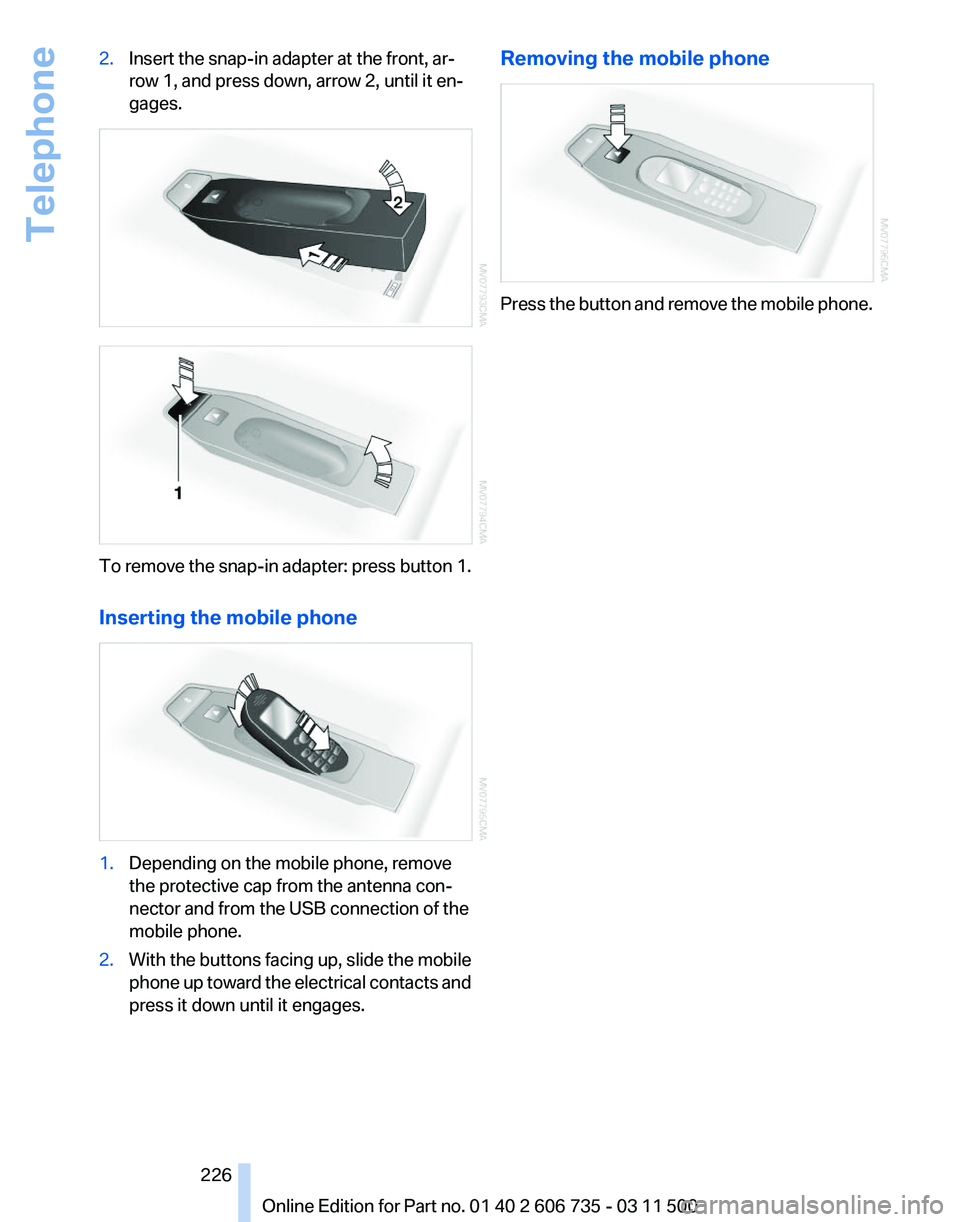
2.
Insert the snap-in adapter at the front, ar‐
row 1, and press down, arrow 2, until it en‐
gages. To remove the snap-in adapter: press button 1.
Inserting the mobile phone
1.
Depending on the mobile phone, remove
the protective cap from the antenna con‐
nector and from the USB connection of the
mobile phone.
2. With the buttons facing up, slide the mobile
phone
up toward the electrical contacts and
press it down until it engages. Removing the mobile phone
Press the button and remove the mobile phone.
Seite 226
226 Online Edition for Part no. 01 40 2 606 735 - 03 11 500
Telephone
Page 309 of 317
Lane margin, warning
93
Language, changing on Con‐ trol Display 80
Lap-and-shoulder
belt, refer to
Safety belts 50
Lashing eyes, securing cargo 146
LATCH child restraint fixing system 57
Leather, care 286
LEDs, light-emitting di‐ odes 271
Length, refer to Dimen‐ sions 291
Letters and numbers, enter‐ ing 23
License plate lamps, replacing bulbs 273, 275
Light-alloy wheels, care 286
Light-emitting diodes, LEDs 271
Lighter 130
Lighting
– Instruments 84
Lighting, vehicle, refer to
Lamps 81
Light switch 81
Limit, refer to Speed limit 78
Load 145
Loading 144
Lock buttons, doors, refer to Locking 33
Locking
– From the inside 33
– From the outside 30
– Setting the confirmation sig‐ nals 31
– Without remote control, refer to Comfort Access 37
Locking the vehicle
– From the inside 33
– From the outside 30
Locks, doors, and win‐
dows 60
Longlife oils, alternative oil types 266
Longlife
oils, refer to Approved
engine oils 266
Low beams 81 Low beams
– Automatic
82
Low beams, automatic 81
Low
beams, automatic, refer to
High-beam Assistant 83
Lower back support, refer to Lumbar support 46
Lower tailgate 36
Low-sulfur diesel 248
Luggage compartment roller cover 132
Luggage rack, refer to Roof- mounted luggage rack 147
Lumbar support 46
M
Main inspection, refer to Serv‐ ice requirements 75
Maintenance 268
Maintenance, refer to Service booklet
Maintenance, refer to Service requirements 75
Maintenance require‐ ments 268
Maintenance system BMW 268
Malfunction
– Door lock 32
– Fuel filler flap 246
Malfunction of upper tail‐
gate 34
Malfunction,
parking brake 65
Malfunction warnings, refer to Check Control 76
Manual air distribution 121
Manual mode, automatic transmission with Step‐
tronic 70
Manual operation
– Door lock 32
– Driver's door 32
Manual operation, fuel filler
flap 246
Manual
operation of upper tail‐
gate 34
Manual operation, Side View 116 Manual operation, Top
View 115
Map, destination entry 157
Map display in black and white 166
Map in split screen 164
Map view 163
Marking on approved tires 260
Master key, refer to Remote control with integrated
key 28
Maximum cooling 122
Maximum speed, winter tires 261
Medical kit, refer to First aid kit 281
Memory,
refer to Seat and mir‐
ror memory 53
Menus, operating, iDrive 18
Menus, refer to iDrive operat‐ ing concept 19
Message list, traffic bulle‐ tins 165
Messages 230
Microfilter 124
Minimum tread, tires 259
Mirror
– Mirror memory, refer to Seat and mirror memory 53
Mirrors 53
Mirrors
– Automatic Curb Monitor 54
Mirrors, folding in and out 54
Mirrors, heating 54
Mirrors, interior mirror 54
Mobile communication devi‐ ces in the vehicle 143
Mobile phone, installation lo‐ cation, refer to Center arm‐
rest 134
Mobile phone, refer to Tele‐ phone 216
Modifications, technical, refer to Safety 6
Monitor, refer to Control Dis‐ play 19
Mounting of child restraint fix‐ ing systems 56
Seite 309
309Online Edition for Part no. 01 40 2 606 735 - 03 11 500
Reference Mobility Communication Entertainment Navigation Driving tips Controls At a glance