2012 BMW X5 XDRIVE 50I buttons
[x] Cancel search: buttonsPage 37 of 317

Closing
Danger of pinching
Make
sure that the closing path of the tail‐
gate is clear; otherwise, injuries may result.◀ The tailgate closes automatically when the but‐
ton on the inside of the tailgate is pressed.
To stop the closing process:
▷
Press the button on the inside of the tailgate.
▷ Press the button on the exterior of the tail‐
gate.
Closing is not canceled when you put the vehicle
into motion.
Automatic closing
The tailgate closes automatically without
button
operation if it is weighed down by an ad‐
ditional weight of approx. 11 lbs/5 kg, such as
snow or ice.◀
Manually opening or closing
In case of an electrical malfunction:
1. Push out cover 1 on the tailgate with a
screwdriver. 2.
Push the catch 2 in the direction of the ar‐
row. 3.
Open or close the tailgate slowly and with‐
out making sudden movements.
Do not use force to open or close
If the tailgate offers increased resistance,
do
not forcefully open or close the tailgate; oth‐
erwise, injury or damage may result.◀
Comfort Access*
The concept
The vehicle can be accessed without activating
the remote control.
All you need to do is to have the remote control
with you, e.g., in your jacket pocket.
The vehicle automatically detects the remote
control when it is nearby or in the passenger
compartment.
Comfort Access supports the following func‐
tions:
▷ Unlocking/locking of the vehicle.
▷ Unlocking of the tailgate separately.
▷ Starting the engine.
▷ Convenient closing.
Functional requirement
▷ To lock the vehicle, the remote control must
be located outside of the vehicle.
▷ The next unlocking and locking cycle is not
possible until after approx. 2 seconds.
▷ The engine can only be started if the remote
control is inside the vehicle.
Comparison with ordinary remote
control
The
functions can be controlled by pressing the
buttons or via Comfort Access.
Should a short delay occur when opening or
closing the windows or the glass sunroof*/pan‐
oramic glass sunroof*, the system checks
whether a remote control is located in the vehi‐
cle. Please repeat opening or closing if neces‐
sary. Seite 37
37Online Edition for Part no. 01 40 2 606 735 - 03 11 500
Reference Mobility Communication Entertainment Navigation Driving tips
Controls At a glance
Page 38 of 317

Unlocking
Fully grasp a door handle, arrow 1.
This corresponds to pressing the
button.
Locking Touch the area on the door handle, arrow 2, with
your finger for approx. 1 second.
This corresponds to pressing the
but‐
ton.
To save battery power, ensure that the ignition
and all electronic systems and/or power con‐
sumers are switched off before locking the ve‐
hicle.
If
a remote control is detected within the vehicle,
the vehicle does not lock or is unlocked again.
Convenient closing
Press the area, arrow 2, with your finger and
hold.
In addition, the windows and the glass sunroof*/
panoramic glass sunroof* close.
Monitor the closing process
Watch during the closing process to be
sure that no one is injured. Removing the hand
from the door handle immediately stops the
closing process.◀ Unlocking the tailgate separately
Press the button on the exterior of the tailgate.
This corresponds to pressing the
button.
If a remote control accidentally left in the cargo
area is detected in the locked vehicle, the tail‐
gate opens again.
The hazard warning flashers flash and a signal*
sounds.
Ignition on
Pressing the Start/Stop button switches the ig‐
nition on.
When
doing so, do not depress the brake pedal,
otherwise the engine will start.
Starting the engine
The engine can be started or the ignition can be
switched on when a remote control is inside the
vehicle. It is not necessary to insert a remote
control into the ignition lock, refer to page 61.
As long as no remote control is detected in the
vehicle, it is only possible to restart the engine
within approx. 10 seconds after it is switched off
if no door has been opened.
Switching off the engine
▷ Remote control not in ignition lock:
After
switching off the engine, the transmis‐
sion is automatically switched into transmis‐
sion position P.
▷ Remote control in ignition lock:
If transmission position N is engaged, the
transmission remains in this position after
the engine is switched off.
Malfunction
Comfort Access may not function properly if it
experiences
interference from local radio waves,
e.g., mobile phones.
If this occurs, open or close the vehicle using the
buttons on the remote control or use the
integrated key in the door lock.
To start the engine afterward, insert the remote
control into the ignition switch.
Seite 38
38 Online Edition for Part no. 01 40 2 606 735 - 03 11 500
Opening and closing
Page 53 of 317
Seat, mirror, and steering
wheel memory*
General information
Two different driver's seat and front passenger
seat* positions, exterior mirror positions and
steering
wheel positions* can be stored and re‐
trieved.
The adjustment of the backrest width and the
lumbar support is not stored in the memory.
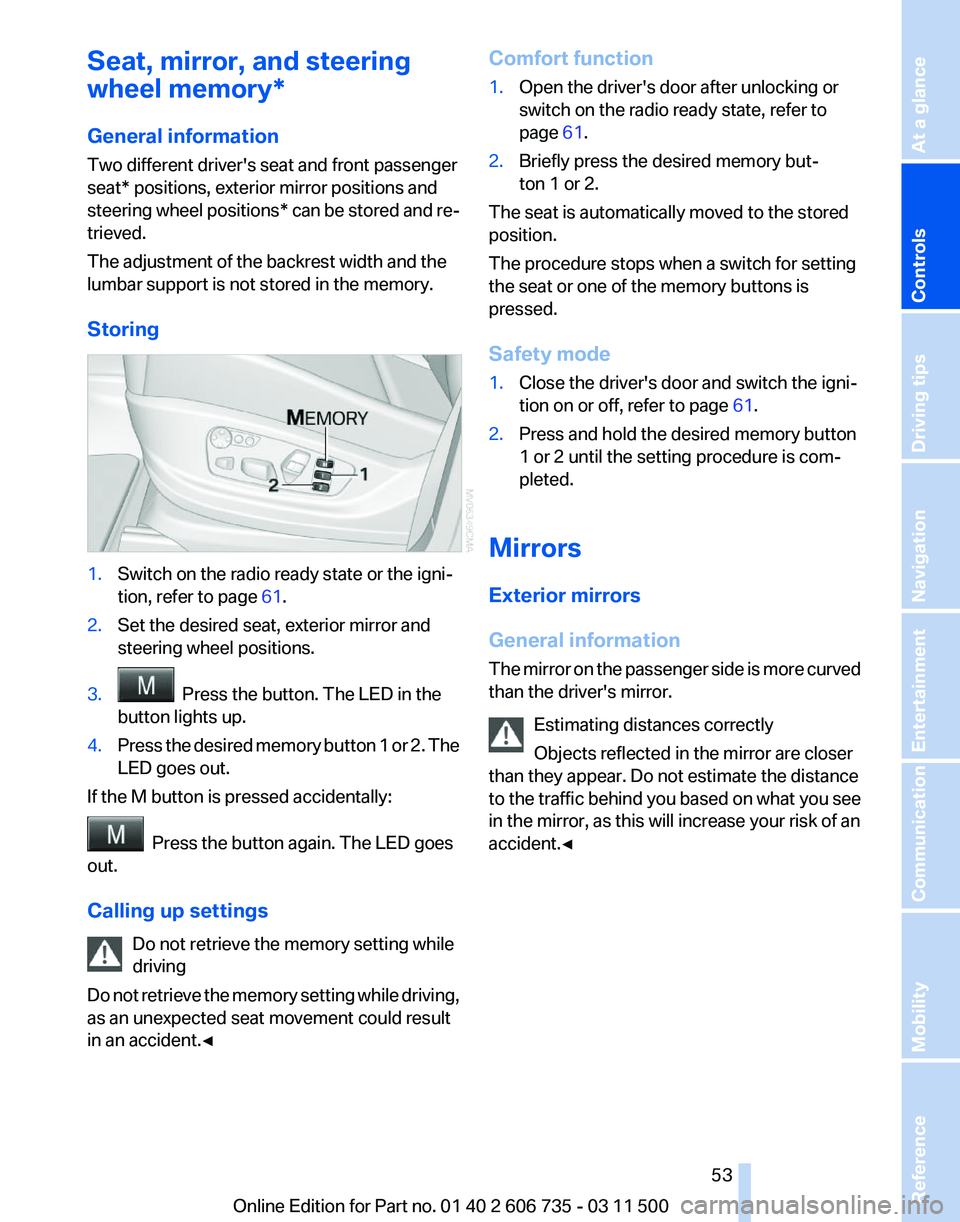
Storing 1.
Switch on the radio ready state or the igni‐
tion, refer to page 61.
2. Set the desired seat, exterior mirror and
steering wheel positions.
3. Press the button. The LED in the
button lights up.
4. Press the desired memory button 1 or 2. The
LED goes out.
If the M button is pressed accidentally: Press the button again. The LED goes
out.
Calling up settings
Do not retrieve the memory setting while
driving
Do
not retrieve the memory setting while driving,
as an unexpected seat movement could result
in an accident.◀ Comfort function
1.
Open the driver's door after unlocking or
switch on the radio ready state, refer to
page 61.
2. Briefly press the desired memory but‐
ton 1 or 2.
The seat is automatically moved to the stored
position.
The procedure stops when a switch for setting
the seat or one of the memory buttons is
pressed.
Safety mode
1. Close the driver's door and switch the igni‐
tion on or off, refer to page 61.
2. Press and hold the desired memory button
1 or 2 until the setting procedure is com‐
pleted.
Mirrors
Exterior mirrors
General information
The
mirror on the passenger side is more curved
than the driver's mirror.
Estimating distances correctly
Objects reflected in the mirror are closer
than they appear. Do not estimate the distance
to the traffic behind you based on what you see
in the mirror, as this will increase your risk of an
accident.◀ Seite 53
53Online Edition for Part no. 01 40 2 606 735 - 03 11 500
Reference Mobility Communication Entertainment Navigation Driving tips
Controls At a glance
Page 127 of 317
Interior equipment
Integrated universal remote
control*
The concept
This system can replace up to three different
hand-held transmitters for various types of re‐
mote-controlled equipment, such as garage
doors or lighting systems.
The hand-held transmitter signal can be pro‐
grammed on one of the three memory buttons.
The
corresponding device can then be operated
using the programmed memory button.
The LED indicates that a signal is being trans‐
mitted.
When selling the vehicle, delete the stored pro‐
grams for security reasons.
During programming
During programming and before activat‐
ing a device using the integrated universal re‐
mote control, ensure that there are no people,
animals or objects in the range of movement of
the remote-controlled device; otherwise, there
is a risk of injury or damage.
Also follow the safety instructions of the hand-
held transmitter.◀
Compatibility
If this symbol is printed on the packaging
or in the instructions of the hand-held
transmitter, the remote-controlled de‐
vice is generally compatible with the universal
remote control.
If you have any questions, please contact:
▷ Your service center.
▷ www.homelink.com on the Internet. Programming
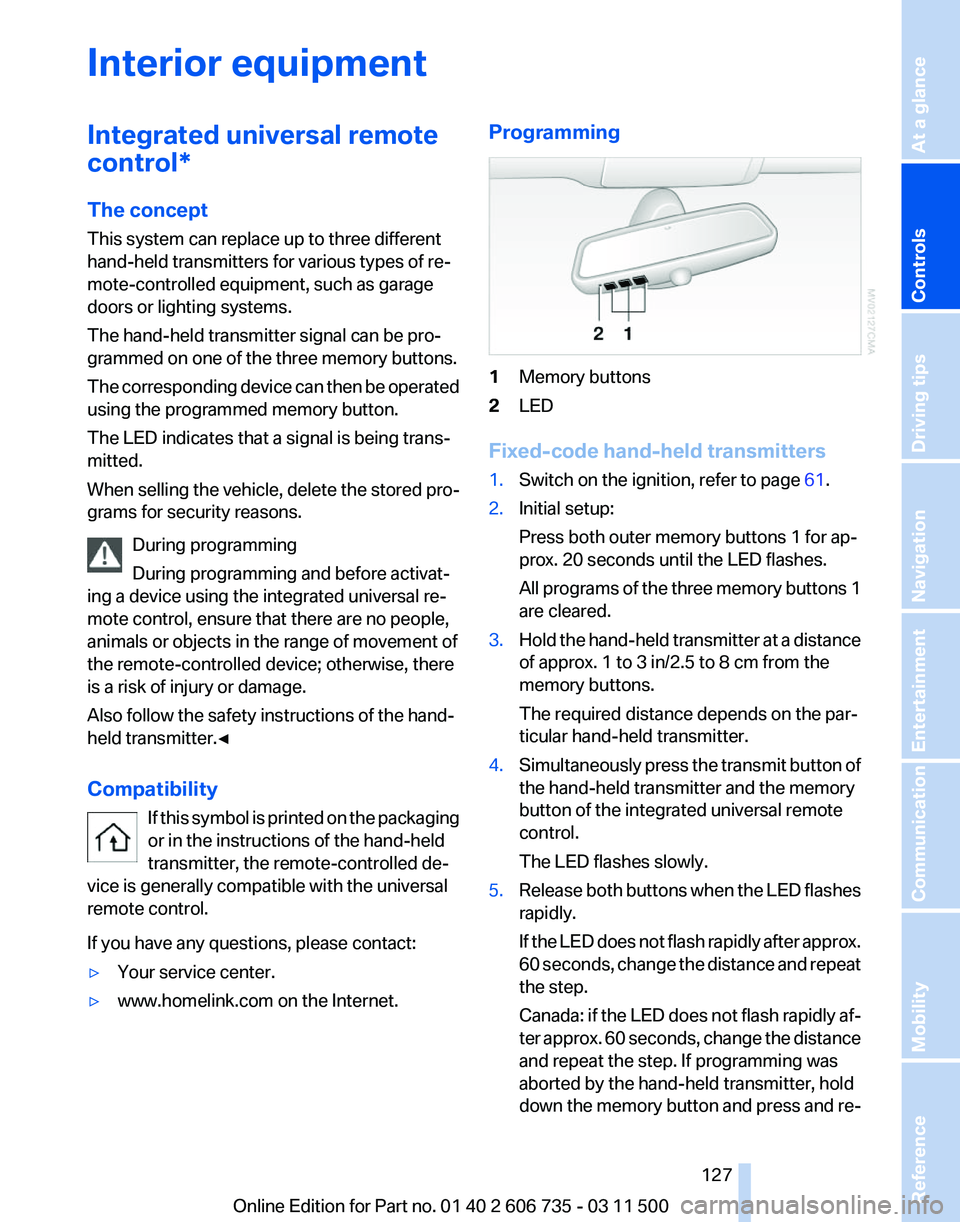
1
Memory buttons
2 LED
Fixed-code hand-held transmitters
1. Switch on the ignition, refer to page 61.
2. Initial setup:
Press both outer memory buttons 1 for ap‐
prox. 20 seconds until the LED flashes.
All
programs of the three memory buttons 1
are cleared.
3. Hold the hand-held transmitter at a distance
of approx. 1 to 3 in/2.5 to 8 cm from the
memory buttons.
The required distance depends on the par‐
ticular hand-held transmitter.
4. Simultaneously press the transmit button of
the hand-held transmitter and the memory
button of the integrated universal remote
control.
The LED flashes slowly.
5. Release both buttons when the LED flashes
rapidly.
If
the LED does not flash rapidly after approx.
60 seconds, change the distance and repeat
the step.
Canada: if the LED does not flash rapidly af‐
ter approx. 60 seconds, change the distance
and repeat the step. If programming was
aborted by the hand-held transmitter, hold
down the memory button and press and re‐
Seite 127
127Online Edition for Part no. 01 40 2 606 735 - 03 11 500
Reference Mobility Communication Entertainment Navigation Driving tips
Controls At a glance
Page 128 of 317
lease the button on the hand-held transmit‐
ter several times for 2 seconds.
6. To program additional hand-held transmit‐
ters, repeat steps 3 to 5.
The device can be operated using the memory
button with the engine running or the ignition
switched on.
Malfunction
If the device cannot be used after repeated at‐
tempts at programming, please check whether
the hand-held transmitter is equipped with an
alternating code system.
To do so:
▷ Read the instructions of the hand-held
transmitter.
▷ Press the memory button of the universal
remote control for an extended period.
If the LED of the integrated universal remote
control flashes quickly for a short period and
then lights up continuously, the hand-held
transmitter
is equipped with an alternating code
system.
In this case, program the memory buttons as
described under Alternating-code hand-held
transmitters.
Alternating-code hand-held
transmitters
Please obtain information on synchronizing the
device in the operating manual of the device be‐
ing set up.
Programming will be easier with the aid of a sec‐
ond person.
1. Park the vehicle within range of the remote-
controlled device.
2. Program the integrated universal remote
control as described above under Fixed-
code hand-held transmitters.
3. Locate the button on the receiver of the de‐
vice to be set, e.g., on the drive. 4.
Press the button on the receiver of the de‐
vice
to be set. You have approx. 30 seconds
for the next step.
5. Press the programmed memory button of
the integrated universal remote control for
approx. 3 seconds. Repeat this step up to
three times if necessary.
The device can be operated using the memory
button with the engine running or the ignition
switched on.
Reassigning individual programs
1. Switch on the ignition.
2. Hold the hand-held transmitter at a distance
of approx. 1 to 3 in/2.5 to 8 cm from the
memory buttons.
The required distance depends on the par‐
ticular hand-held transmitter.
3. Press the memory button of the integrated
universal remote control.
4. If the LED flashes slowly after approx.
20 seconds, press the transmit button on
the hand-held transmitter.
5. Release both buttons when the LED flashes
rapidly.
If
the LED does not flash rapidly after approx.
60 seconds, change the distance and repeat
the step.
Canada: if the LED does not flash rapidly af‐
ter approx. 60 seconds, change the distance
and repeat the step. If programming was
aborted by the hand-held transmitter, hold
down the memory button and press and re‐
lease the button on the hand-held transmit‐
ter several times for 2 seconds.
Deleting all stored programs
Press both outer memory buttons 1 for ap‐
prox. 20 seconds until the LED flashes rapidly.
All stored programs are deleted.
The programs cannot be deleted individually.
Seite 128
128 Online Edition for Part no. 01 40 2 606 735 - 03 11 500
Interior equipment
Page 163 of 317
4.
Highlight a gas station.
The position of the gas station is shown on
the split screen.
5. Select the gas station.
6. Select the symbol.
7. "Start guidance": destination guidance to
the selected gas station is started.
"Add as another destination"
: the gas sta‐
tion is added to the route.
Destination guidance
through voice instructions
Switching spoken instructions on/off
The
setting is stored for the remote control cur‐
rently in use.
1. "Navigation"
2. "Map"
3. "Voice instructions"
Repeating a spoken instruction
1. "Navigation"
2. "Map"
3. Highlight the symbol.
4. Press the controller twice.
Volume of spoken instructions
Turn
the volume button while giving an instruc‐
tion until the desired volume is set.
The setting is stored for the remote control cur‐
rently in use.
Saving the spoken instructions on the
programmable memory buttons
The function for switching the spoken instruc‐
tions on/off can be stored on a programmable
memory button, refer to page 22, for quick ac‐
cess. Map view
Selecting the map view
1.
"Navigation"
2. "Map"
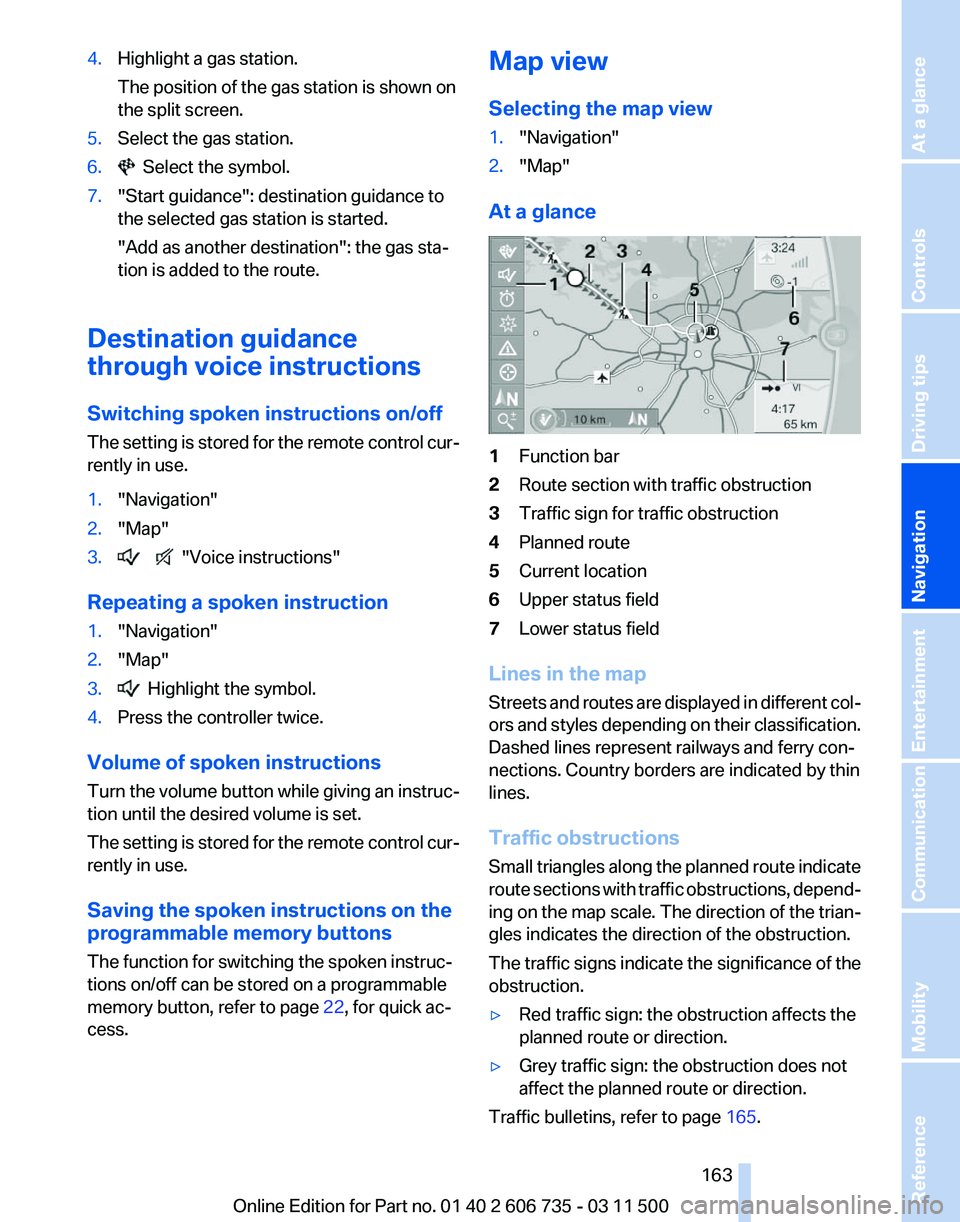
At a glance 1
Function bar
2 Route section with traffic obstruction
3 Traffic sign for traffic obstruction
4 Planned route
5 Current location
6 Upper status field
7 Lower status field
Lines in the map
Streets
and routes are displayed in different col‐
ors and styles depending on their classification.
Dashed lines represent railways and ferry con‐
nections. Country borders are indicated by thin
lines.
Traffic obstructions
Small triangles along the planned route indicate
route sections with traffic obstructions, depend‐
ing on the map scale. The direction of the trian‐
gles indicates the direction of the obstruction.
The traffic signs indicate the significance of the
obstruction.
▷ Red traffic sign: the obstruction affects the
planned route or direction.
▷ Grey traffic sign: the obstruction does not
affect the planned route or direction.
Traffic bulletins, refer to page 165.
Seite 163
163Online Edition for Part no. 01 40 2 606 735 - 03 11 500
Reference Mobility Communication Entertainment
Navigation Driving tips Controls At a glance
Page 174 of 317
Radio
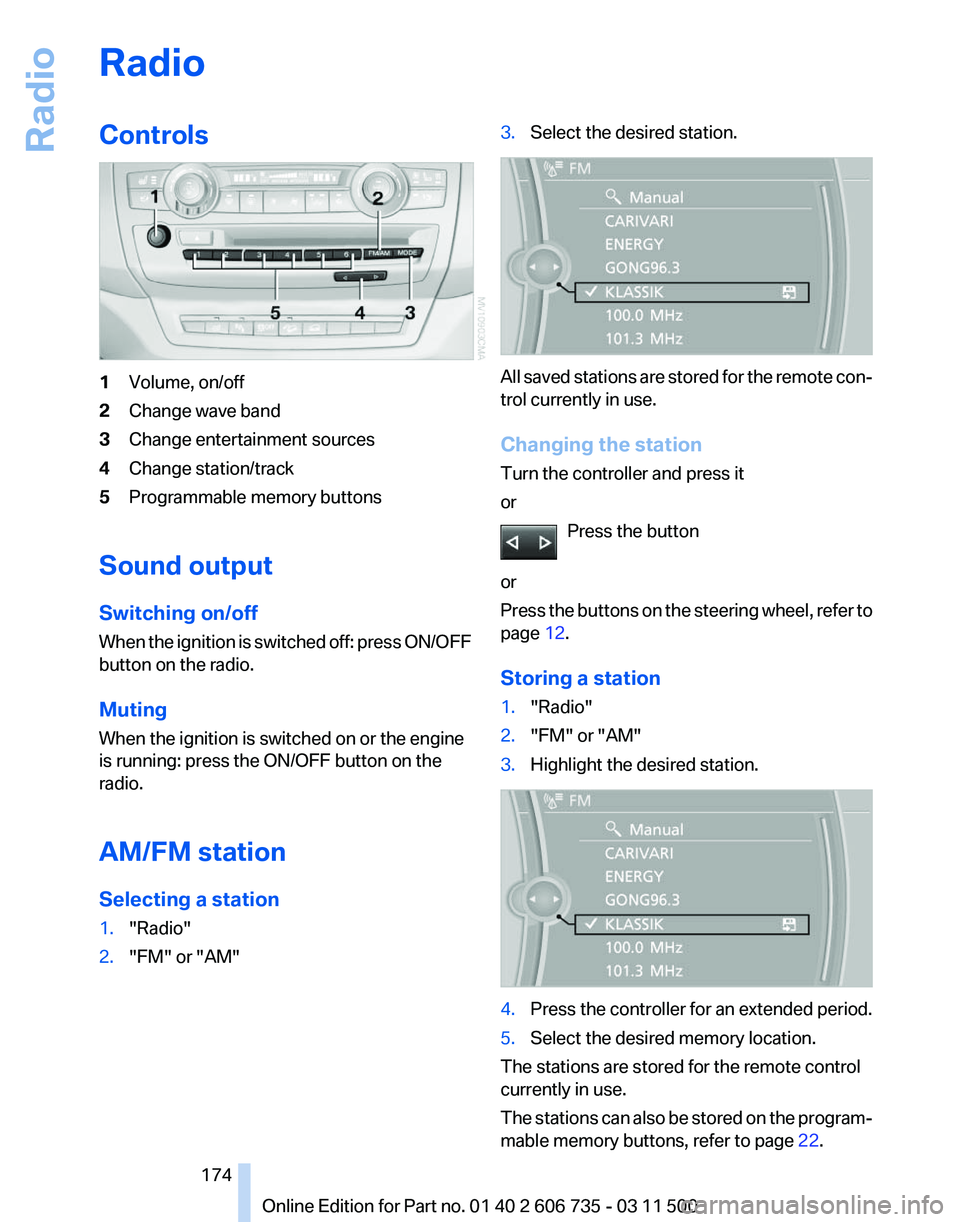
Controls
1
Volume, on/off
2 Change wave band
3 Change entertainment sources
4 Change station/track
5 Programmable memory buttons
Sound output
Switching on/off
When
the ignition is switched off: press ON/OFF
button on the radio.
Muting
When the ignition is switched on or the engine
is running: press the ON/OFF button on the
radio.
AM/FM station
Selecting a station
1. "Radio"
2. "FM" or "AM" 3.
Select the desired station. All saved stations are stored for the remote con‐
trol currently in use.
Changing the station
Turn the controller and press it
or
Press the button
or
Press
the buttons on the steering wheel, refer to
page 12.
Storing a station
1. "Radio"
2. "FM" or "AM"
3. Highlight the desired station. 4.
Press the controller for an extended period.
5. Select the desired memory location.
The stations are stored for the remote control
currently in use.
The
stations can also be stored on the program‐
mable memory buttons, refer to page 22. Seite 174
174 Online Edition for Part no. 01 40 2 606 735 - 03 11 500
Radio
Page 176 of 317
When reception is poor, the substation is muted
for several seconds. If reception is interrupted
for an extended period, it switches back to the
main station.
Satellite radio
*
General information
The channels are offered in predefined pack‐
ages. The packages must be enabled by tele‐
phone.
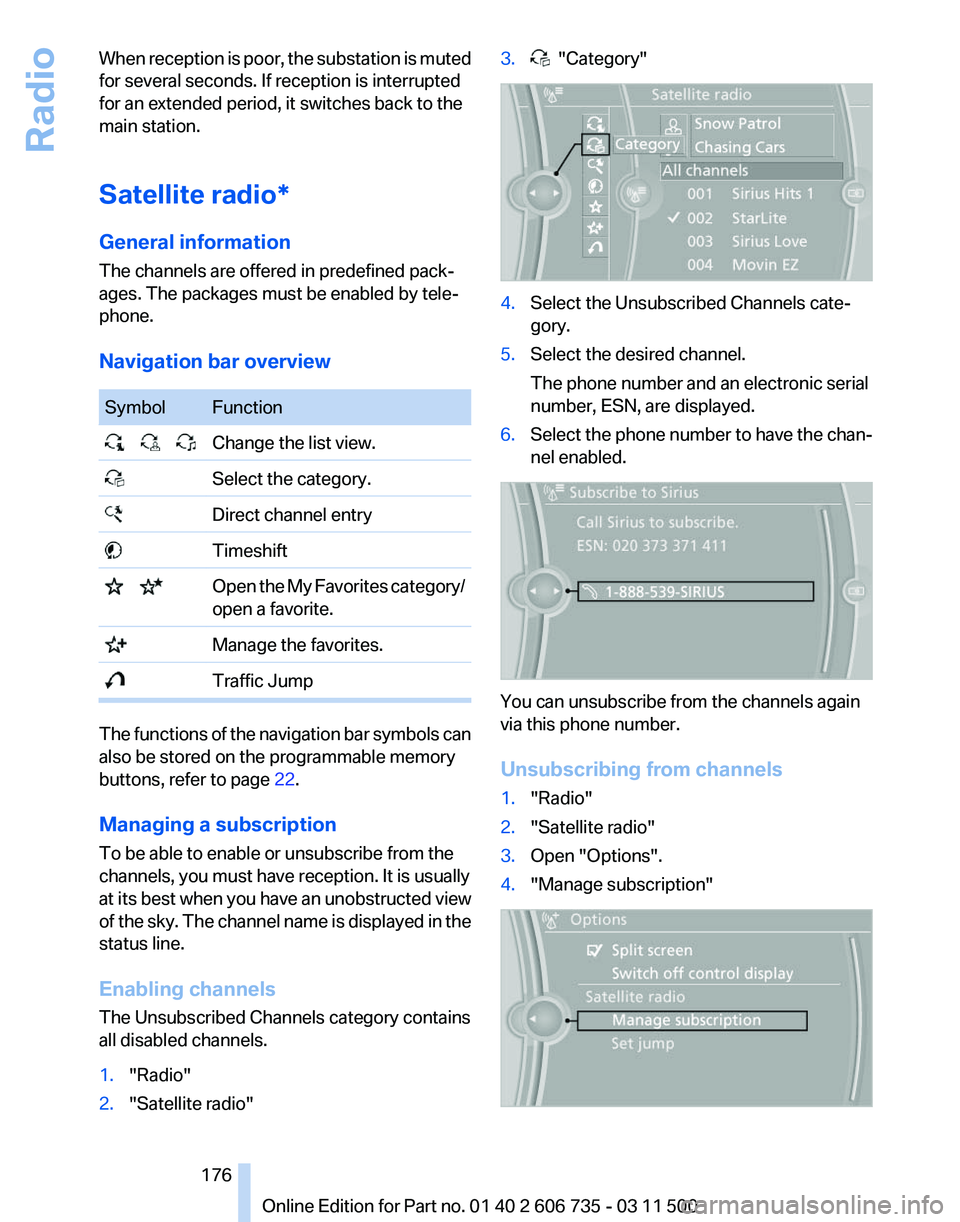
Navigation bar overview Symbol Function
Change the list view.
Select the category.
Direct channel entry
Timeshift
Open the My Favorites category/
open a favorite. Manage the favorites.
Traffic Jump
The functions of the navigation bar symbols can
also be stored on the programmable memory
buttons, refer to page
22.
Managing a subscription
To be able to enable or unsubscribe from the
channels, you must have reception. It is usually
at
its best when you have an unobstructed view
of the sky. The channel name is displayed in the
status line.
Enabling channels
The Unsubscribed Channels category contains
all disabled channels.
1. "Radio"
2. "Satellite radio" 3. "Category"
4.
Select the Unsubscribed Channels cate‐
gory.
5. Select the desired channel.
The phone number and an electronic serial
number, ESN, are displayed.
6. Select the phone number to have the chan‐
nel enabled. You can unsubscribe from the channels again
via this phone number.
Unsubscribing from channels
1.
"Radio"
2. "Satellite radio"
3. Open "Options".
4. "Manage subscription" Seite 176
176 Online Edition for Part no. 01 40 2 606 735 - 03 11 500
Radio