2012 BMW ACTIVEHYBRID 5 engine
[x] Cancel search: enginePage 196 of 319

CD/multimediaVehicle equipment
All standard, country-specific and optional
equipment that is offered in the model series is
described in this chapter. Therefore, equipment
is also described that is not available in a vehicle,
e. g., because of the selected optional equip‐
ment or country variant. This also applies for
safety-related functions and systems.
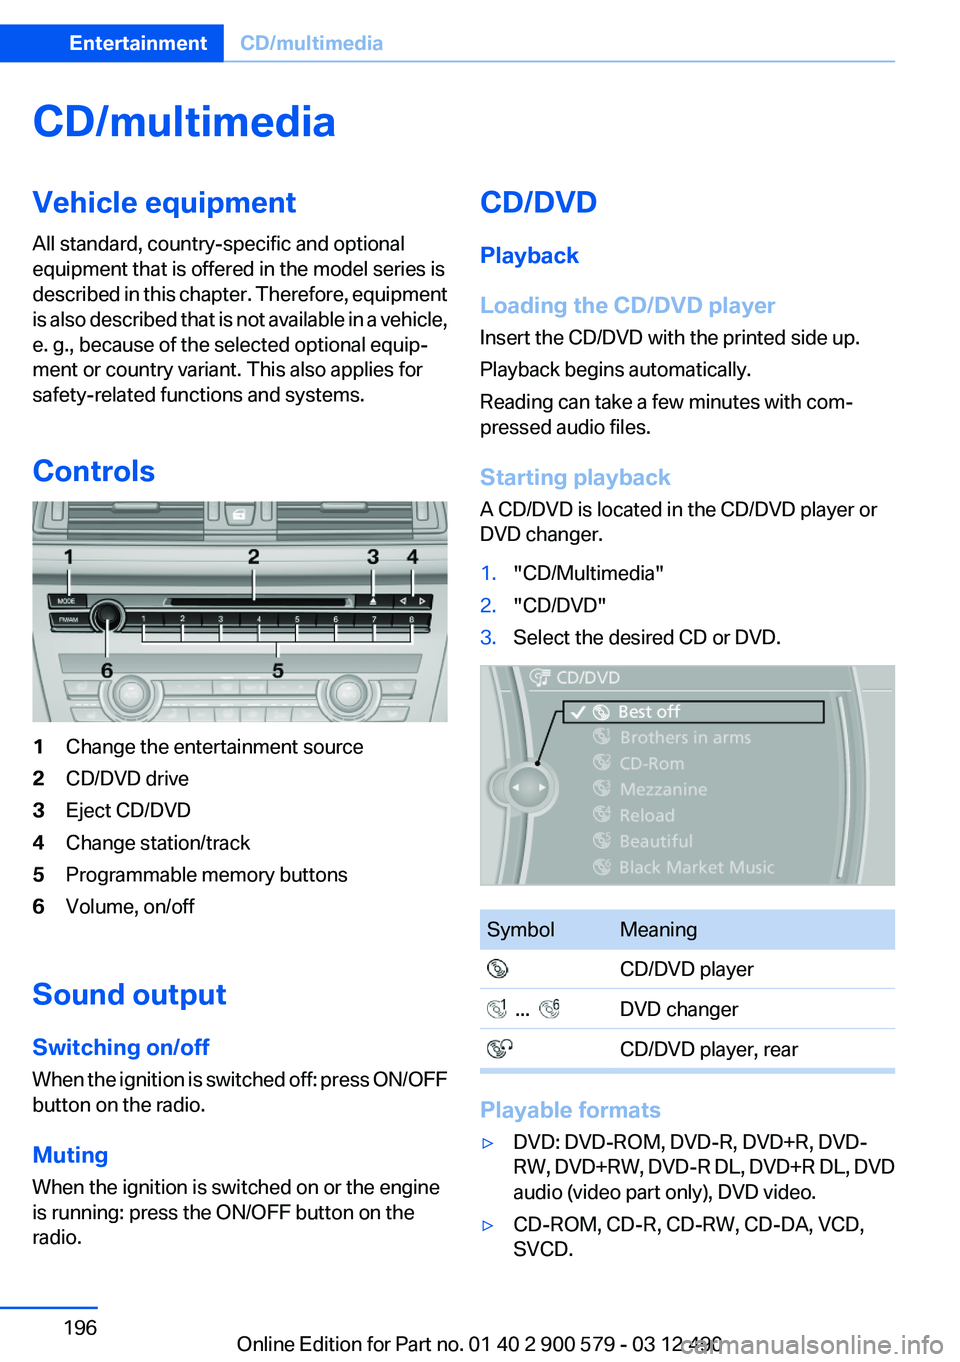
Controls1Change the entertainment source2CD/DVD drive3Eject CD/DVD4Change station/track5Programmable memory buttons6Volume, on/off
Sound output
Switching on/off
When the ignition is switched off: press ON/OFF
button on the radio.
Muting
When the ignition is switched on or the engine
is running: press the ON/OFF button on the
radio.
CD/DVD
Playback
Loading the CD/DVD player
Insert the CD/DVD with the printed side up.
Playback begins automatically.
Reading can take a few minutes with com‐
pressed audio files.
Starting playback
A CD/DVD is located in the CD/DVD player or
DVD changer.1."CD/Multimedia"2."CD/DVD"3.Select the desired CD or DVD.SymbolMeaning CD/DVD player ... DVD changer CD/DVD player, rear
Playable formats
▷DVD: DVD-ROM, DVD-R, DVD+R, DVD-
RW, DVD+RW, DVD-R DL, DVD+R DL, DVD
audio (video part only), DVD video.▷CD-ROM, CD-R, CD-RW, CD-DA, VCD,
SVCD.Seite 196EntertainmentCD/multimedia196
Online Edition for Part no. 01 40 2 900 579 - 03 12 490
Page 207 of 319

name is not available, it can be changed later if
desired.1."CD/Multimedia"2."Music collection"3.Highlight the desired album.4.Open "Options".5."Rename album"6.Select the letters individually.
Deleting an album
An album cannot be deleted while a track from
that album is being played.
1."CD/Multimedia"2."Music collection"3.Highlight the desired album.4.Open "Options".5."Delete album"
Deleting a track and directory
A track cannot be deleted while it is being
played.
A directory cannot be deleted while a track from
that directory is being played.
1."CD/Multimedia"2."Music collection"3.Highlight the directory or track.4.Open "Options".5."Delete folder" or "Delete track"Free memory capacity
Display the free memory capacity in the music
collection.1."CD/Multimedia"2."Music collection"3.Open "Options".4."Free memory"
Music collection
Backing up the music collection
The entire music collection can be stored on a
USB device. Make sure there is enough free
memory capacity on the USB device.
Depending on the number of tracks, backing up
the music collection may take several hours.
Therefore, it is best to perform the backup dur‐
ing a long trip.
1.Starting the engine.2.Connect the USB device to the USB inter‐
face in the glove compartment.3."CD/Multimedia"4."Music collection"5.Open "Options".Seite 207CD/multimediaEntertainment207
Online Edition for Part no. 01 40 2 900 579 - 03 12 490
Page 228 of 319

Pairing and connectingPairing the mobile phone
To avoid becoming distracted and posing
an unnecessary hazard both to your own vehi‐
cle's occupants and to other road users, only
pair the mobile phone while the vehicle is sta‐
tionary.◀
Pair the vehicle entirely on the front or rear Con‐
trol Display.1."Telephone"2."Bluetooth® (phone)"3."Add new phone"
The Bluetooth name of the vehicle is dis‐
played.4.To perform additional steps on the mobile
phone, refer to the mobile phone operating
instructions: e.g. search for or connect the
Bluetooth device or a new device.
The Bluetooth name of the vehicle appears
on the mobile phone display.5.Select the Bluetooth name of the vehicle on
the mobile phone display.6.You are prompted by the iDrive or mobile
phone to enter the same Bluetooth passkey.
Enter the passkey and confirm.
Or
Compare the control number in the display
of the vehicle to the control number in the
display of the mobile phone. Confirm the
control number in the mobile phone and in
the vehicle.
"OK"7.Select the functions for which the mobile
phone is to be used.8."OK"
If the pairing was successful, the mobile phone
appears at the top of the list of mobile phones.
The functions supported by the mobile phone
and audio device are displayed as symbols when
paired.
White symbol: the function is active.
Gray symbol: the function is inactive.SymbolFunction Telephone. Additional telephone. Audio source.
Four mobile phones can be paired with the ve‐
hicle at once. Up to three mobile phones can be
connected with the vehicle at once.
If pairing was unsuccessful: What to do if..., refer
to page 229.
Following the initial pairing
▷The mobile phone is detected/connected in
the vehicle within a short period of time
when the engine is running or the ignition is
switched on.▷The phone book entries of the telephone
stored on the SIM card or mobile phone are
transmitted to the vehicle after detection,
depending on the mobile phone.▷Four mobile phones can be paired.▷Specific settings may be necessary in some
mobile phones, e.g., authorization or a se‐
cure connection; refer to the mobile phone
operating instructions.
Connecting a particular mobile phone
If more than one mobile phone is detected by the
vehicle, the mobile phone at the top of the list is
connected. If a different detected cell phone is
connected with the vehicle. A different mobile
phone can be connected by selecting it.
1."Telephone"2."Bluetooth® (phone)"3.Select the mobile phone that is to be con‐
nected.
The functions assigned to the mobile phone be‐
fore unpairing are assigned to the mobile phone
Seite 228CommunicationTelephone228
Online Edition for Part no. 01 40 2 900 579 - 03 12 490
Page 258 of 319

RefuelingVehicle equipment
All standard, country-specific and optional
equipment that is offered in the model series is
described in this chapter. Therefore, equipment
is also described that is not available in a vehicle,
e. g., because of the selected optional equip‐
ment or country variant. This also applies for
safety-related functions and systems.
General information Refuel promptly
Refuel no later than at a range of
30 miles/50 km, or operation of the engine is not
ensured and damage may occur.◀
Fuel cap
Opening1.Briefly press the rear edge of the fuel filler
flap.2.Turn the fuel cap counterclockwise.3.Place the fuel cap in the bracket attached to
the fuel filler flap.
Closing
1.Fit the cap and turn it clockwise until you
clearly hear a click.2.Close the fuel filler flap.
Do not pinch the retaining strap
Do not pinch the retaining strap attached
to the cap; otherwise, the cap cannot be closed
properly and fuel vapors can escape.
A message is displayed if the cap is loose or
missing.◀
Manually unlocking fuel filler flap
In the event of an electrical malfunction, for ex‐
ample.
Seite 258MobilityRefueling258
Online Edition for Part no. 01 40 2 900 579 - 03 12 490
Page 260 of 319

FuelVehicle equipment
All standard, country-specific and optional
equipment that is offered in the model series is
described in this chapter. Therefore, equipment
is also described that is not available in a vehicle,
e. g., because of the selected optional equip‐
ment or country variant. This also applies for
safety-related functions and systems.
Fuel quality
Fuels that are marked on the gas pump as con‐
taining metal must not be used.
Refuel only with unleaded gasoline with‐
out metallic additives.
Do not refuel with any leaded gasoline or gaso‐
line with metallic additives, e. g. manganese or
iron, or permanent damage to the catalytic con‐
verter and other components.◀
Do not refuel with ethanol
Do not refuel with E85, i.e., fuel with an
ethanol content of 85 %, or with Flex Fuel, as this
would damage the engine and fuel supply sys‐
tem.◀
Required fuel
Super Premium Gasoline/AKI 91 or AKI
89
BMW recommends AKI 91 or 89.
Gasoline with lower AKI
The minimum AKI Rating is 89.
If you use gasoline with this minimum AKI Rat‐
ing, the engine may produce knocking sounds
when starting at high outside temperatures.
This has no effect on the engine life.Minimum fuel grade
Do not use any gasoline below the mini‐
mum fuel grade as this may impair engine per‐
formance.◀
Use high-quality brands
Field experience has indicated significant differ‐
ences in fuel quality: volatility, composition, ad‐
ditives, etc., among gasolines offered for sale in
the United States and Canada.
Fuels containing up to and including 10 % etha‐
nol or other oxygenates with up to 2.8 % oxygen
by weight, that is, 15 % MTBE or 3 % methanol
plus an equivalent amount of co-solvent, will not
void the applicable warranties with respect to
defects in materials or workmanship.
Minimum fuel grade
The use of poor-quality fuels may result in
driveability, starting and stalling problems es‐
pecially under certain environmental conditions
such as high ambient temperature and high al‐
titude.
Should you encounter driveability problems
which you suspect could be related to the fuel
you are using, we recommend that you respond
by switching to a recognized high-quality brand
such as gasoline that is advertised as Top Tier
Detergent Gasoline.
Failure to comply with these recommendations
may result in unscheduled maintenance.◀Seite 260MobilityFuel260
Online Edition for Part no. 01 40 2 900 579 - 03 12 490
Page 268 of 319

Engine compartmentVehicle equipment
All standard, country-specific and optional
equipment that is offered in the model series is
described in this chapter. Therefore, equipmentis also described that is not available in a vehicle,
e. g., because of the selected optional equip‐
ment or country variant. This also applies for
safety-related functions and systems.
Important features in the engine compartment
1Vehicle identification number2Jump-starting, negative terminal3Washer fluid reservoir4Jump-starting, positive terminal5Oil filler neck.6Coolant reservoirHood
Opening the hood Working in the engine compartment
Never attempt to perform any service or
repair operations on your vehicle without the
necessary professional technical training.If you are unfamiliar with the statutory guide‐
lines, have any work on the vehicle performed
only by a service center.
If this work is not carried out properly, there is
the danger of subsequent damage and related
safety hazards.◀Seite 268MobilityEngine compartment268
Online Edition for Part no. 01 40 2 900 579 - 03 12 490
Page 269 of 319

Never reach into the engine compartment
Never reach into the intermediate spaces
or gaps in the engine compartment. Otherwise,
there is risk of injury, e.g. from rotating or hot
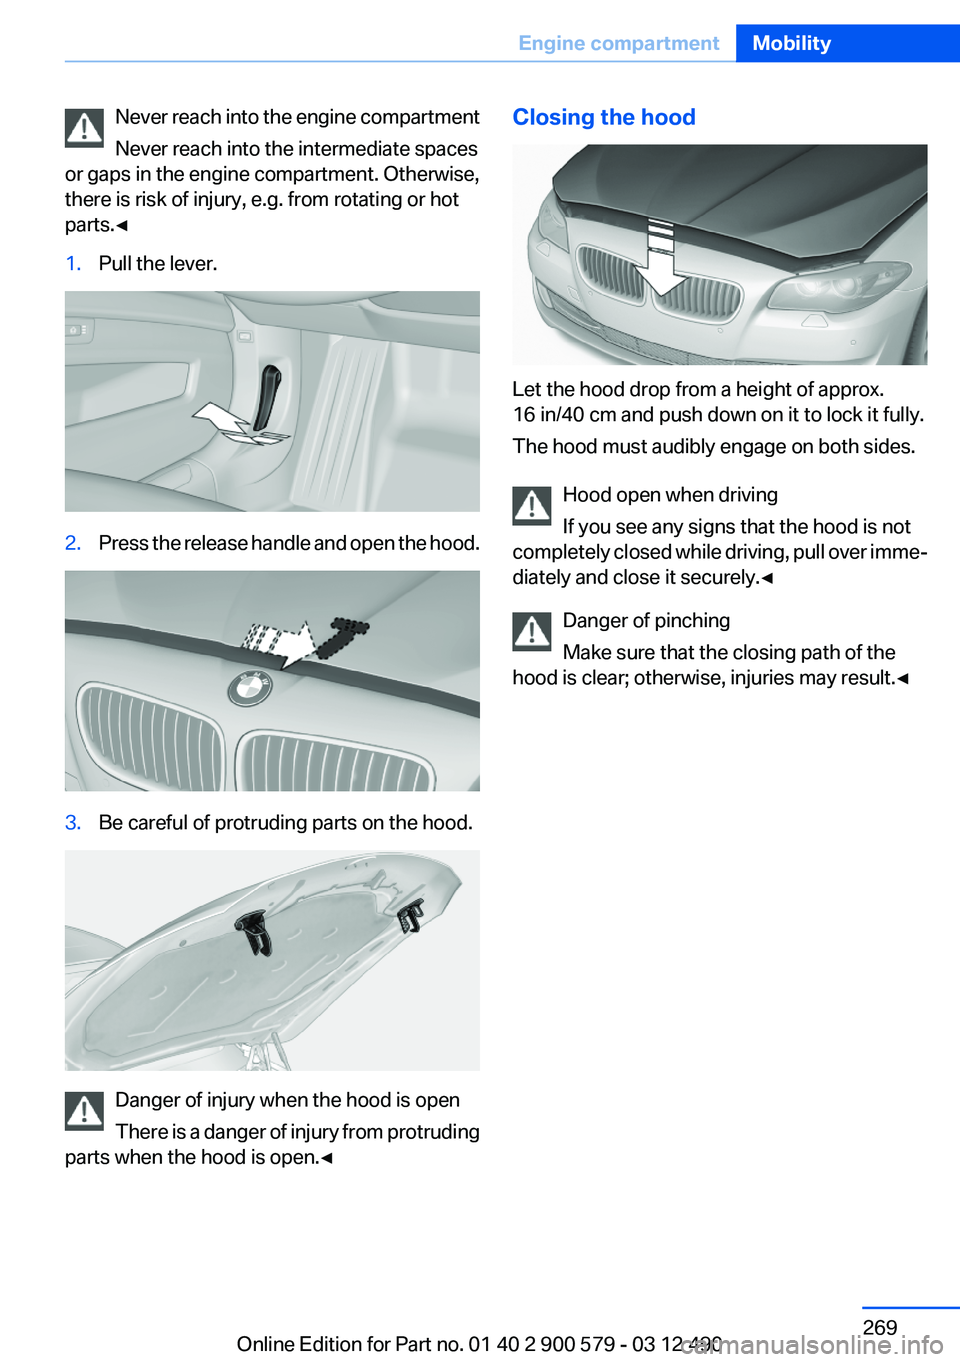
parts.◀1.Pull the lever.2.Press the release handle and open the hood.3.Be careful of protruding parts on the hood.
Danger of injury when the hood is open
There is a danger of injury from protruding
parts when the hood is open.◀
Closing the hood
Let the hood drop from a height of approx.
16 in/40 cm and push down on it to lock it fully.
The hood must audibly engage on both sides.
Hood open when driving
If you see any signs that the hood is not
completely closed while driving, pull over imme‐
diately and close it securely.◀
Danger of pinching
Make sure that the closing path of the
hood is clear; otherwise, injuries may result.◀
Seite 269Engine compartmentMobility269
Online Edition for Part no. 01 40 2 900 579 - 03 12 490
Page 270 of 319

Engine oilVehicle equipment
All standard, country-specific and optional
equipment that is offered in the model series is
described in this chapter. Therefore, equipment
is also described that is not available in a vehicle,
e. g., because of the selected optional equip‐
ment or country variant. This also applies for
safety-related functions and systems.
General information
The engine oil consumption is dependent on the
driving style and driving conditions.
Therefore, regularly check the engine oil level
after refueling.
Checking the oil level
The concept
The oil level is monitored electronically during
driving and shown on the Control Display.
If the oil level reaches the minimum level, a
check control message is displayed.
Displaying the oil level1."Vehicle Info"2."Vehicle status"3. "Engine oil level"
Possible messages
▷"Engine oil level OK"▷"Engine oil at minimum. Add 1 quart of
engine oil!"
When the display appears in the instrument
cluster, add 1 US quart/liter of oil within the
next 125 miles/200 km.▷"Engine oil level below minimum. Add 1
quart!"Immediately add 1 US quart/liter of oil.
Detailed measurement
Requirements:
▷Vehicle is on a level road and the engine is
running at operating temperature.▷Automatic transmission: Selector lever in
transmission position N or P and gas pedal
not depressed.
In order to perform a detailed measurement of
the engine oil level:
1."Vehicle Info"2."Vehicle status"3. "Measure engine oil level"4."Start measurement"
The oil level is checked and displayed via a scale.
During the detailed measurement, the idle
speed is increased somewhat.
Duration: approx. 1 minute.
Adding engine oil
Filler neck
Only replenish the maximum oil amount of
1 US quart/liter if the message is displayed in the
instrument cluster or the oil level has dropped to
just at the lower mark of the dipstick.
Seite 270MobilityEngine oil270
Online Edition for Part no. 01 40 2 900 579 - 03 12 490