2012 BMW ACTIVEHYBRID 5 ECU
[x] Cancel search: ECUPage 159 of 319

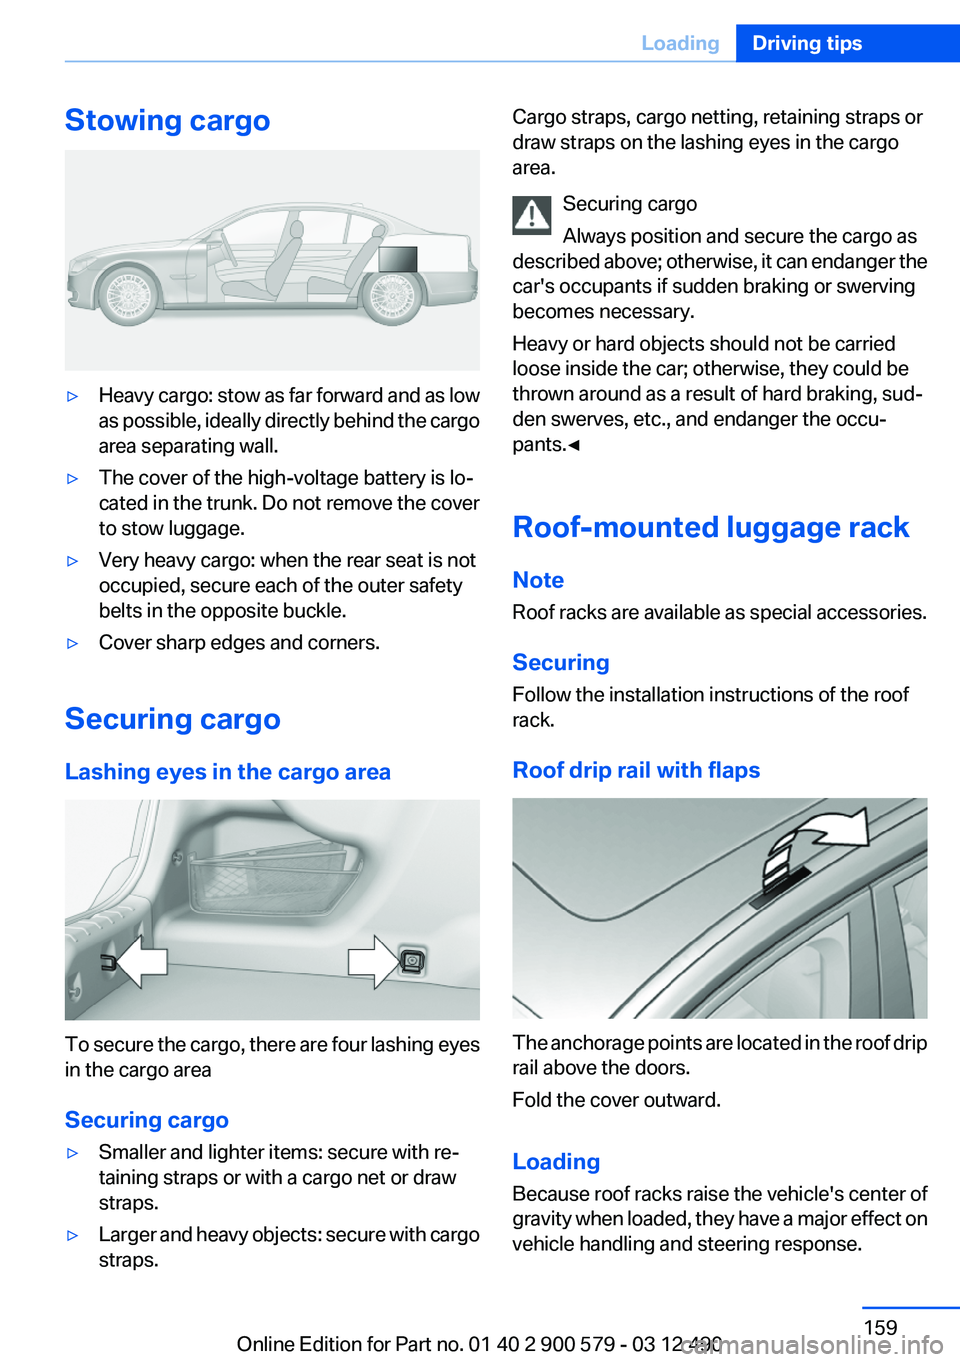
Stowing cargo▷Heavy cargo: stow as far forward and as low
as possible, ideally directly behind the cargo
area separating wall.▷The cover of the high-voltage battery is lo‐
cated in the trunk. Do not remove the cover
to stow luggage.▷Very heavy cargo: when the rear seat is not
occupied, secure each of the outer safety
belts in the opposite buckle.▷Cover sharp edges and corners.
Securing cargo
Lashing eyes in the cargo area
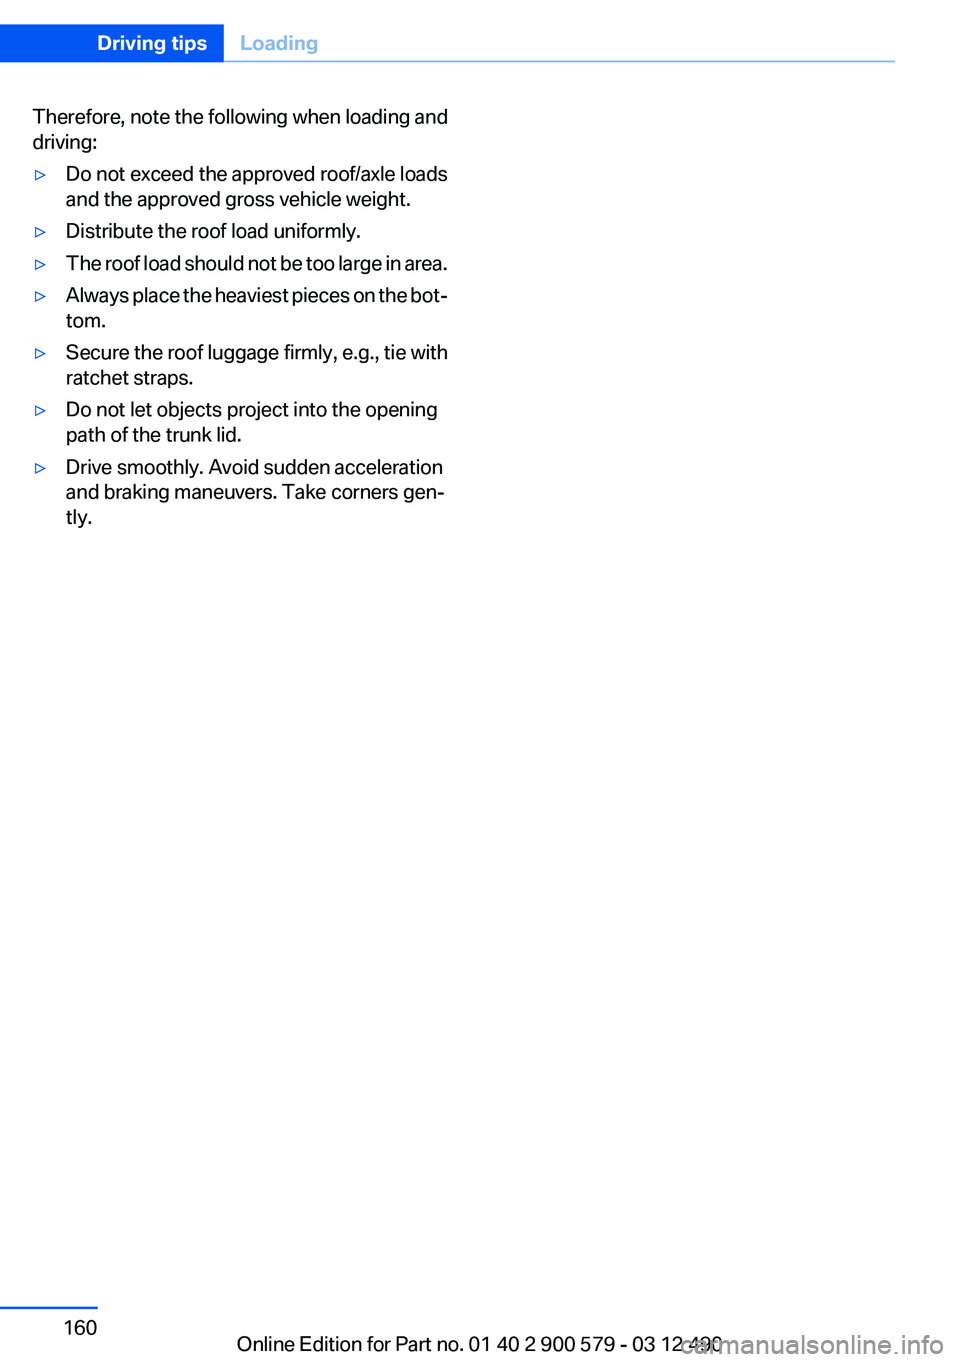
To secure the cargo, there are four lashing eyes
in the cargo area
Securing cargo
▷Smaller and lighter items: secure with re‐
taining straps or with a cargo net or draw
straps.▷Larger and heavy objects: secure with cargo
straps.Cargo straps, cargo netting, retaining straps or
draw straps on the lashing eyes in the cargo
area.
Securing cargo
Always position and secure the cargo as
described above; otherwise, it can endanger the
car's occupants if sudden braking or swerving
becomes necessary.
Heavy or hard objects should not be carried
loose inside the car; otherwise, they could be
thrown around as a result of hard braking, sud‐
den swerves, etc., and endanger the occu‐
pants.◀
Roof-mounted luggage rack
Note
Roof racks are available as special accessories.
Securing
Follow the installation instructions of the roof
rack.
Roof drip rail with flaps
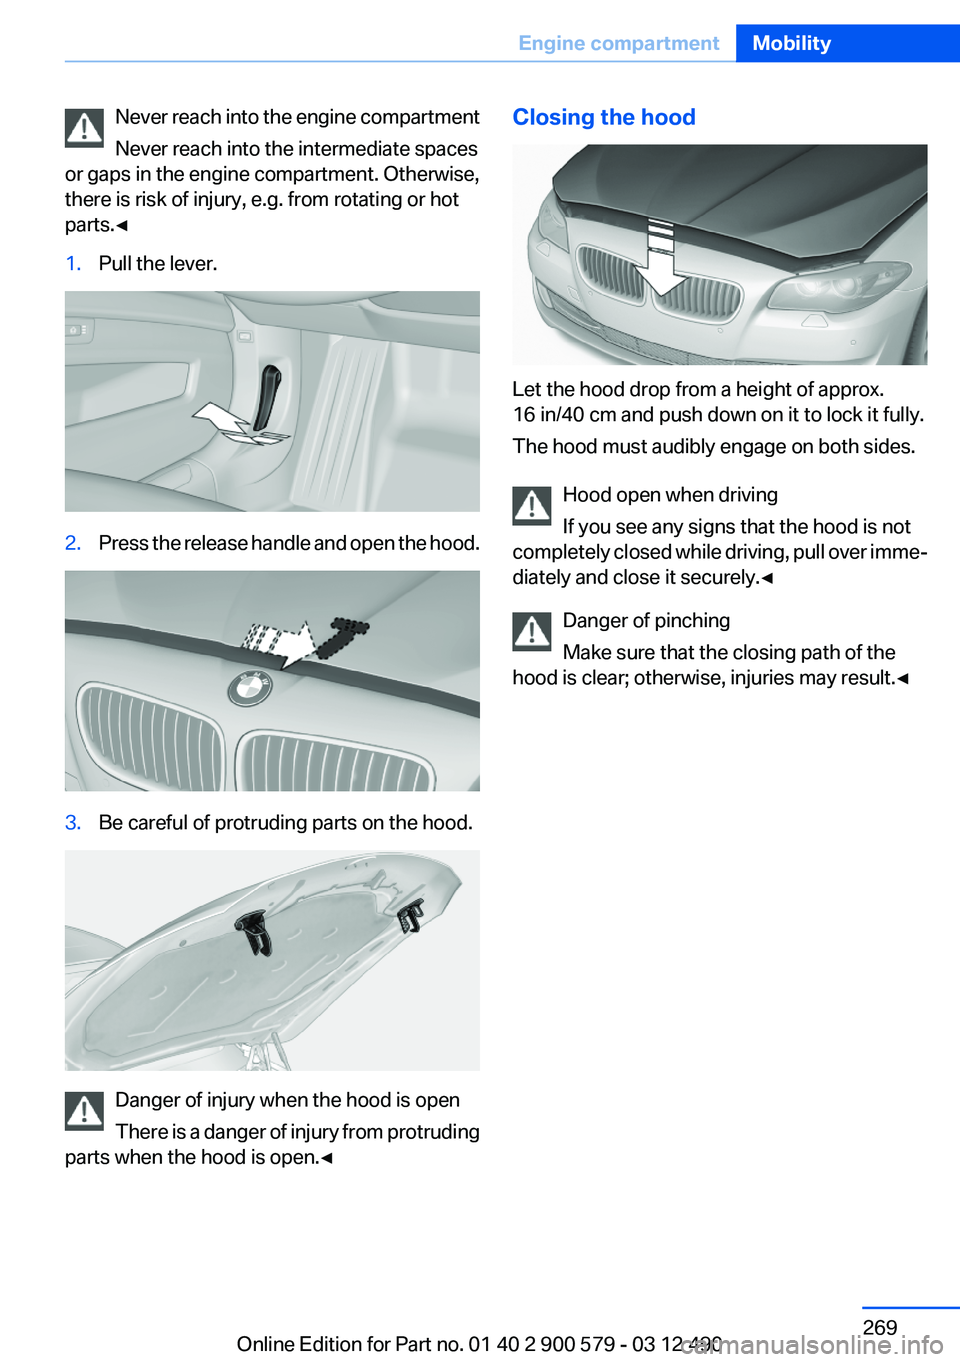
The anchorage points are located in the roof drip
rail above the doors.
Fold the cover outward.
Loading
Because roof racks raise the vehicle's center of
gravity when loaded, they have a major effect on
vehicle handling and steering response.
Seite 159LoadingDriving tips159
Online Edition for Part no. 01 40 2 900 579 - 03 12 490
Page 160 of 319

Therefore, note the following when loading and
driving:▷Do not exceed the approved roof/axle loads
and the approved gross vehicle weight.▷Distribute the roof load uniformly.▷The roof load should not be too large in area.▷Always place the heaviest pieces on the bot‐
tom.▷Secure the roof luggage firmly, e.g., tie with
ratchet straps.▷Do not let objects project into the opening
path of the trunk lid.▷Drive smoothly. Avoid sudden acceleration
and braking maneuvers. Take corners gen‐
tly.Seite 160Driving tipsLoading160
Online Edition for Part no. 01 40 2 900 579 - 03 12 490
Page 218 of 319

Notes▷Do not cover lower screen edge, since this
is where the sensors and the infrared inter‐
face are installed.▷When loading the rear seats and adjusting
the backrest of the front seat, fold in the
screens.▷When cleaning the screen, follow the care
instructions, refer to page 292.
Remote control
In the center armrest in the rear
Storage is possible in a horizontal position in the
center armrest.
Menu navigation
Press the but‐
tonFunctionOperating concept as for the
front controller.
Turn the wheel: highlight a
menu item.
Press the center knob: con‐
firm the selection.
Pressing arrow keys corre‐
sponds to moving controller:
switching between panels.Open the main menu.Press the but‐
tonFunctionDisplays the previous menu.Opens the "Options" menu.Changes the station, track or
chapter.
Press and hold the button:
fast forward/reverse.Adjusts the volume.Switches the volume adjust‐
ment to the left/right.
With Professional rear enter‐
tainment: Toggles between
the screens.
The transmission time of the remote control is
limited by law. To execute a function again,
press or turn the required button again.
Replacing the batteries No rechargeable batteries
Do not use rechargeable batteries, as
damage may result from the substances in the
batteries.◀
1.Remove the cover. Press on the cover, ar‐
row 1, and push forward, arrow 2.2.Insert batteries of the same type.3.Close the cover.Seite 218EntertainmentRear entertainment218
Online Edition for Part no. 01 40 2 900 579 - 03 12 490
Page 226 of 319

TelephoneVehicle equipment
All standard, country-specific and optional
equipment that is offered in the model series is
described in this chapter. Therefore, equipment
is also described that is not available in a vehicle,
e. g., because of the selected optional equip‐
ment or country variant. This also applies for
safety-related functions and systems.
At a glance
The concept
Mobile phones or other external devices such as
audio players can be connected to the vehicle
via Bluetooth.
After these devices are paired once, they are
recognized automatically when the ignition is
switched on as soon as they are inside the ve‐
hicle and can be operated via iDrive, the buttons
on the steering wheel, and via voice activation.
Depending on their functionality, external devi‐
ces can be used via the vehicle as a telephone
or as an audio source. The telephone functions
are described in the following.
Up to four external devices can be paired.
Certain functions may need to be enabled by the
mobile phone provider or service provider.
Using the mobile phone while driving
Make entries only when traffic and road
conditions allow. Do not hold the mobile phone
in your hand while you are driving; use the
hands-free system instead. If you do not ob‐
serve this precaution, you can endanger the ve‐
hicle occupants and other road users.◀
Snap-in adapter
The snap-in adapter is used to:▷Hold the mobile phone.▷Recharge the battery.▷Connect the mobile phone to an outside an‐
tenna of the vehicle.
This provides for better network reception
and consistent sound quality.
Approved mobile phones
Details on which mobile phones and external
devices with a Bluetooth interface are sup‐
ported by the mobile phone preparation pack‐
age can be obtained at www.bmwusa.com/blue‐
tooth.
Displaying the vehicle identification
number and software part number
The vehicle identification number and software
part number are needed to determine which mo‐
bile phones are supported by the mobile phone
preparation package. The software version of
the mobile phone may also be required.
1."Telephone"2.Open "Options".3."Bluetooth® info"4."Display system information"
These approved mobile phones with a certain
software version, support the vehicle functions
described below.
Malfunctions may occur with other mobile
phones or software versions.
Do not operate a mobile phone that is connected
to the vehicle on the mobile phone keypad, as
this may lead to a malfunction.
A software update can be performed if neces‐
sary.
Notes
At high temperatures, the charge function of the
mobile phone can be limited where appropriate
and the functions are no longer executed.
Seite 226CommunicationTelephone226
Online Edition for Part no. 01 40 2 900 579 - 03 12 490
Page 236 of 319

Deleting all entries1.›Delete phonebook‹
The dialog for deleting the phone book is
opened.2.Confirm the query with ›Yes‹.3.Confirm the query again with ›Yes‹.
Reading and selecting entries
1.›Read phonebook‹
The dialog for reading the phone book is
opened.2.Say ›Dial number‹ when the desired entry is
read.
Selecting an entry
1.›Dial name‹2.Say the name after being prompted to do so.3.Confirm the query with ›Yes‹.
Adjusting the volume
Turn the knob during an announcement.
▷The volume remains constant even if the
volume of other audio sources is changed.▷The volume is stored for the remote control
currently in use.
Notes
Do not use the voice operation to initiate an
Emergency Request. In stressful situations, the
voice and vocal pitch can change. This can un‐
necessarily delay the establishment of a tele‐
phone connection.
Instead, use the SOS button, refer to
page 283, in the vicinity of the interior mirror.
Environmental conditions
▷Say the commands, numbers, and letters
smoothly and with normal volume, empha‐
sis, and speed.▷Always say commands in the language of
the system. The language for the mobilephone voice operation is preset and cannot
be changed in the Control Display.▷Keep the doors, windows, and glass sun‐
roof closed to prevent noise interference.▷Avoid making other noise in the vehicle
while speaking.
Snap-in adapter
General information
Detailed information about snap-in adapters,
which support the functions of the mobile
phone, is available from the service center.
Notes
At high temperatures, the charge functions of
the mobile phone can be limited under certain
circumstances, and the functions are no longer
executed.
When the mobile phone is used via the vehicle,
heed the operating manual of the mobile phone.
Installation position
In the center armrest.
Inserting the snap-in adapter
1.Press the button and remove the cover.Seite 236CommunicationTelephone236
Online Edition for Part no. 01 40 2 900 579 - 03 12 490
Page 269 of 319

Never reach into the engine compartment
Never reach into the intermediate spaces
or gaps in the engine compartment. Otherwise,
there is risk of injury, e.g. from rotating or hot
parts.◀1.Pull the lever.2.Press the release handle and open the hood.3.Be careful of protruding parts on the hood.
Danger of injury when the hood is open
There is a danger of injury from protruding
parts when the hood is open.◀
Closing the hood
Let the hood drop from a height of approx.
16 in/40 cm and push down on it to lock it fully.
The hood must audibly engage on both sides.
Hood open when driving
If you see any signs that the hood is not
completely closed while driving, pull over imme‐
diately and close it securely.◀
Danger of pinching
Make sure that the closing path of the
hood is clear; otherwise, injuries may result.◀
Seite 269Engine compartmentMobility269
Online Edition for Part no. 01 40 2 900 579 - 03 12 490
Page 282 of 319

Power failure
After a temporary power loss, some equipment
needs to be reinitialized.
Individual settings need to be reprogrammed:▷Seat, mirror, and steering wheel memory:
store the positions again.▷Time: update.▷Date: update.▷Radio station: save again.▷Navigation system: wait for the operability of
the navigation.
Disposing of old batteries
Have old batteries disposed of by your
service center or bring them to a recy‐
cling center.
Maintain the battery in an upright position for
transport and storage. Secure the battery so
that it does not tip over during transport.
Fuses
Notes Replacing fuses
Never attempt to repair a blown fuse and
do not replace a defective fuse with a substitute
of another color or amperage rating; this could
lead to a circuit overload, ultimately resulting in
a fire in the vehicle.◀
Plastic tweezers and information on the fuse
types and locations are stored in the fuse box in
the cargo area.
In the glove compartment
Push the handle up, arrow 1, and open the lid,
arrow 2.
In the cargo area
Open the cover on the right side trim.
Information on the fuse types and locations is
found on a separate sheet.
Seite 282MobilityReplacing components282
Online Edition for Part no. 01 40 2 900 579 - 03 12 490
Page 286 of 319

If the first starting attempt is not successful,
wait a few minutes before making another
attempt in order to allow the discharged bat‐
tery to recharge.3.Let both engines run for several minutes.4.Disconnect the jumper cables in the reverse
order.
Check the battery and recharge if necessary.
Tow-starting and towing
Automatic transmission: transporting
your vehicle
Note
Your vehicle is not permitted to be towed.
Therefore, contact a service center in the event
of a breakdown.
Do not have the vehicle towed
Have your vehicle transported on a loading
platform only; otherwise, damage may occur.◀
Tow truck
Do not lift the vehicle
Do not lift the vehicle by the tow fitting or
body and chassis parts; otherwise, damage may
result.◀
Use the tow fitting screwed in at the front for
maneuvering the vehicle only.
Towing other vehicles
General information Light towing vehicle
The towing vehicle must not be lighter
than the vehicle being towed; otherwise, it will
not be possible to control the vehicle re‐
sponse.◀
Attaching the tow bar/tow rope correctly
Attach the tow bar or tow rope to the tow
fitting; connecting it to other vehicle parts may
cause damage.◀▷Switch on the hazard warning system, de‐
pending on local regulations.▷If the electrical system has failed, clearly
identify the vehicle being towed by placing
a sign or a warning triangle in the rear win‐
dow.
Tow bar
The tow fittings used should be on the same
side on both vehicles.
Should it prove impossible to avoid mounting
the tow bar at an offset angle, please observe
the following:
▷Maneuvering capability is limited during cor‐
nering.▷The tow bar will generate lateral forces if it
is secured with an offset.
Tow rope
When starting to tow the vehicle, make sure that
the tow rope is taut.
To avoid jerking and the associated stresses on
the vehicle components when towing, always
use nylon ropes or nylon straps.
Attaching the tow rope correctly
Only secure the tow rope on the tow fit‐
ting; otherwise, damage can occur when it is se‐
cured on other parts of the vehicle.◀
Seite 286MobilityBreakdown assistance286
Online Edition for Part no. 01 40 2 900 579 - 03 12 490