2012 BMW 650I page 53
[x] Cancel search: page 53Page 76 of 282
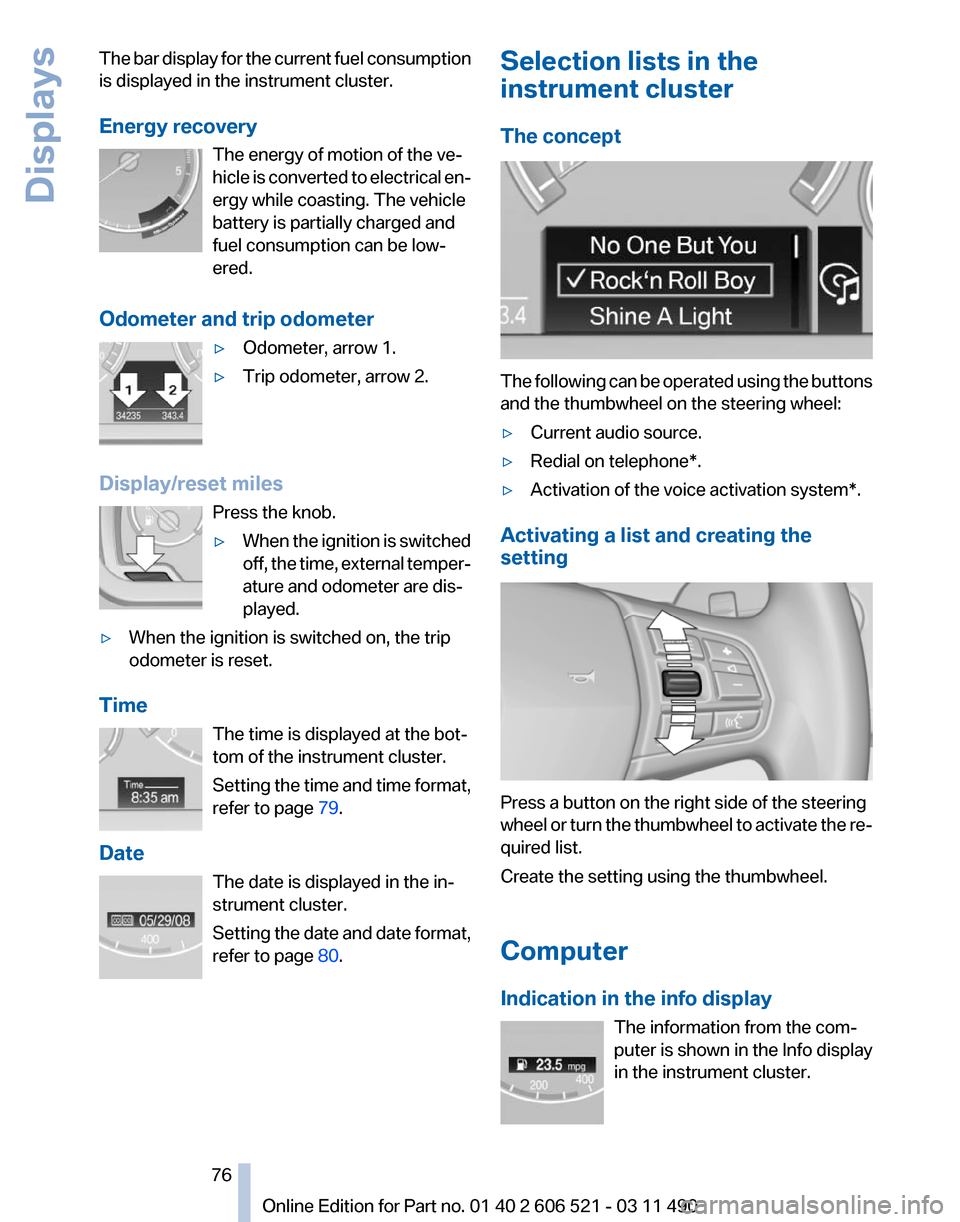
The bar display for the current fuel consumption
is displayed in the instrument cluster.
Energy recovery
The energy of motion of the ve‐
hicle
is converted to electrical en‐
ergy while coasting. The vehicle
battery is partially charged and
fuel consumption can be low‐
ered.
Odometer and trip odometer ▷Odometer, arrow 1.
▷ Trip odometer, arrow 2.
Display/reset miles Press the knob.
▷When the ignition is switched
off,
the time, external temper‐
ature and odometer are dis‐
played.
▷ When the ignition is switched on, the trip
odometer is reset.
Time The time is displayed at the bot‐
tom of the instrument cluster.
Setting
the time and time format,
refer to page 79.
Date The date is displayed in the in‐
strument cluster.
Setting the date and date format,
refer to page 80. Selection lists in the
instrument cluster
The concept
The following can be operated using the buttons
and the thumbwheel on the steering wheel:
▷
Current audio source.
▷ Redial on telephone*.
▷ Activation of the voice activation system*.
Activating a list and creating the
setting Press a button on the right side of the steering
wheel
or turn the thumbwheel to activate the re‐
quired list.
Create the setting using the thumbwheel.
Computer
Indication in the info display
The information from the com‐
puter is shown in the Info display
in the instrument cluster. Seite 76
76 Online Edition for Part no. 01 40 2 606 521 - 03 11 490
Displays
Page 80 of 282
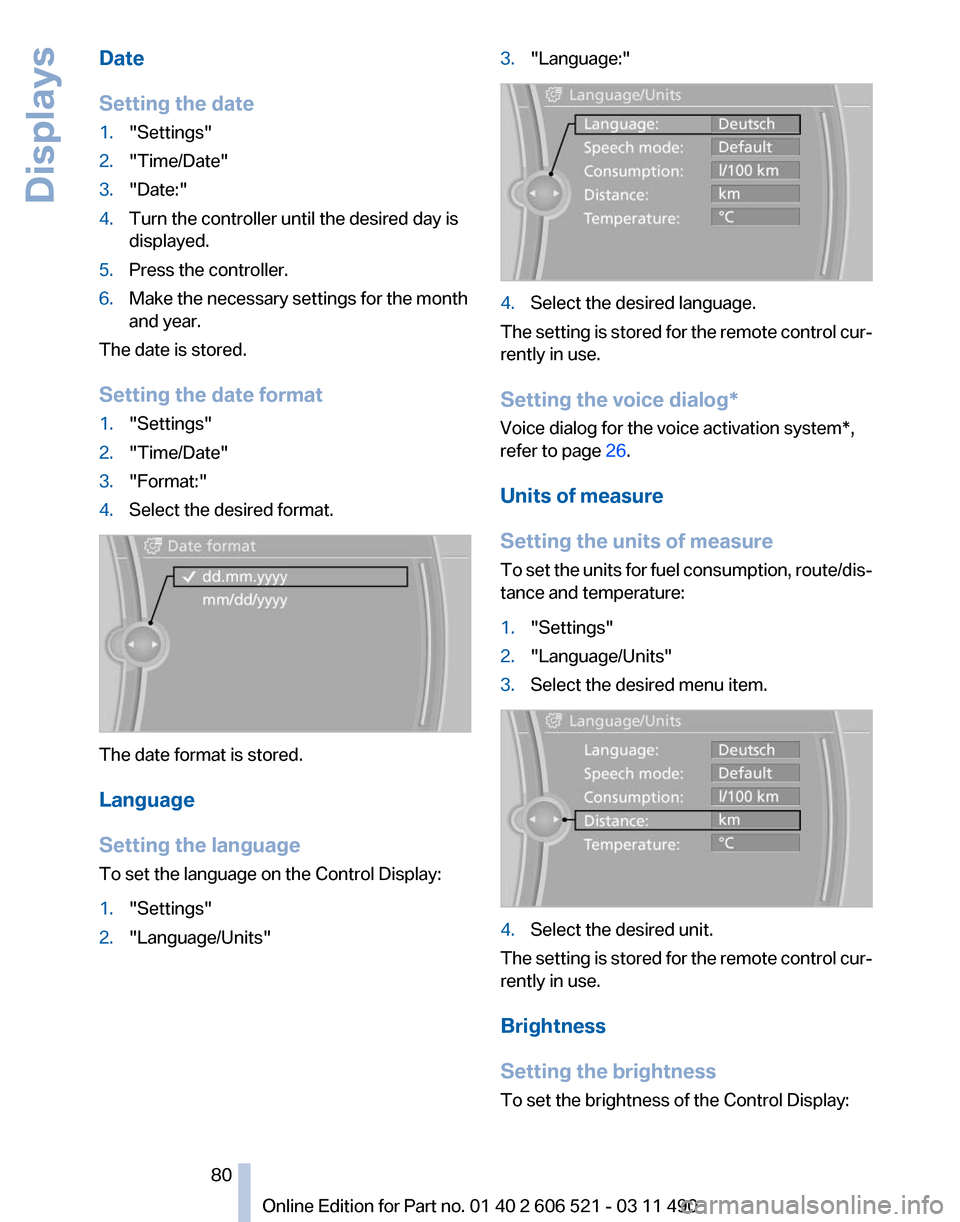
Date
Setting the date
1.
"Settings"
2. "Time/Date"
3. "Date:"
4. Turn the controller until the desired day is
displayed.
5. Press the controller.
6. Make the necessary settings for the month
and year.
The date is stored.
Setting the date format
1. "Settings"
2. "Time/Date"
3. "Format:"
4. Select the desired format. The date format is stored.
Language
Setting the language
To set the language on the Control Display:
1.
"Settings"
2. "Language/Units" 3.
"Language:" 4.
Select the desired language.
The setting is stored for the remote control cur‐
rently in use.
Setting the voice dialog
*
Voice dialog for the voice activation system*,
refer to page 26.
Units of measure
Setting the units of measure
To set the units for fuel consumption, route/dis‐
tance and temperature:
1. "Settings"
2. "Language/Units"
3. Select the desired menu item. 4.
Select the desired unit.
The setting is stored for the remote control cur‐
rently in use.
Brightness
Setting the brightness
To set the brightness of the Control Display:
Seite 80
80 Online Edition for Part no. 01 40 2 606 521 - 03 11 490
Displays
Page 81 of 282
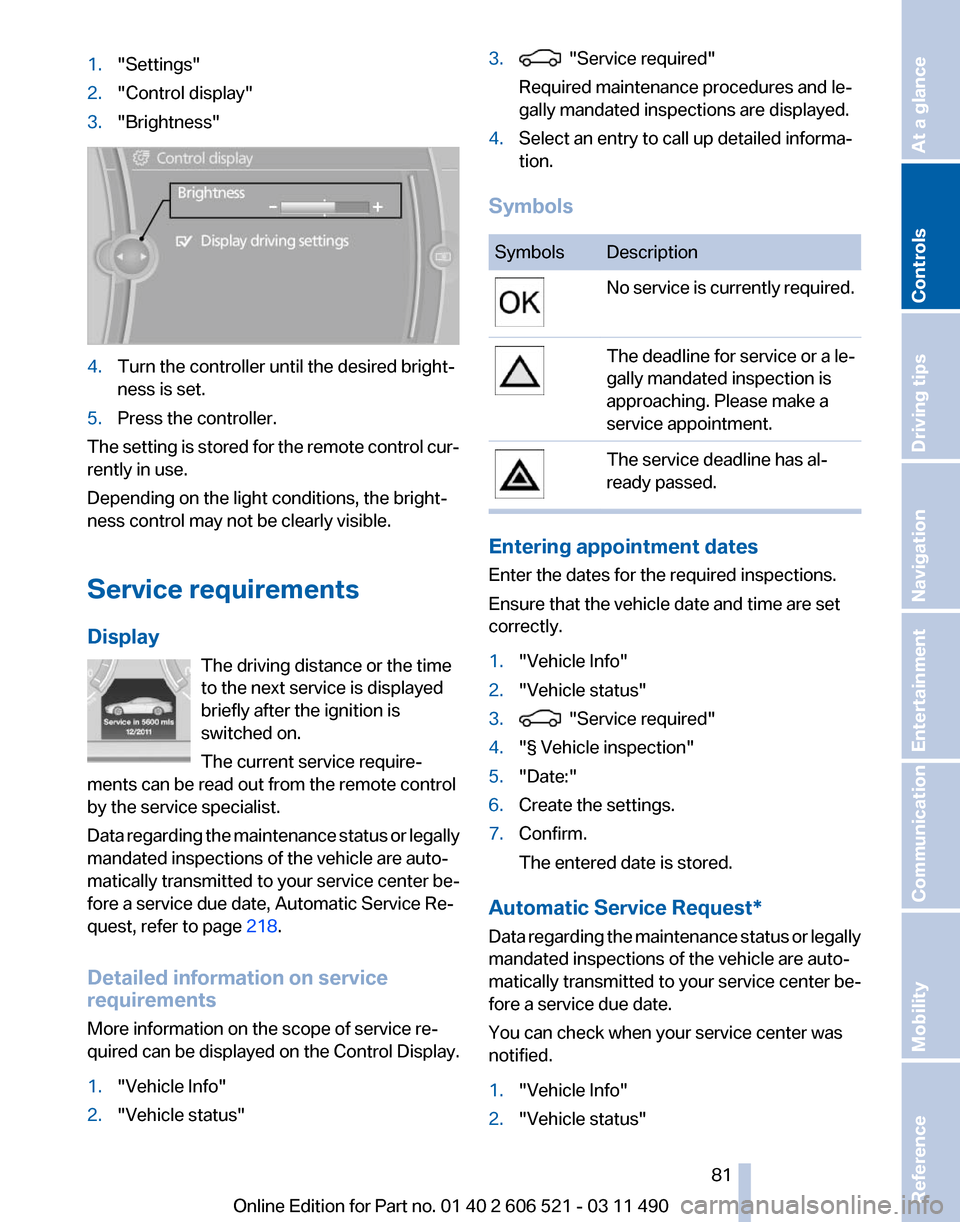
1.
"Settings"
2. "Control display"
3. "Brightness" 4.
Turn the controller until the desired bright‐
ness is set.
5. Press the controller.
The setting is stored for the remote control cur‐
rently in use.
Depending on the light conditions, the bright‐
ness control may not be clearly visible.
Service requirements
Display The driving distance or the time
to the next service is displayed
briefly after the ignition is
switched on.
The current service require‐
ments can be read out from the remote control
by the service specialist.
Data
regarding the maintenance status or legally
mandated inspections of the vehicle are auto‐
matically transmitted to your service center be‐
fore a service due date, Automatic Service Re‐
quest, refer to page 218.
Detailed information on service
requirements
More information on the scope of service re‐
quired can be displayed on the Control Display.
1. "Vehicle Info"
2. "Vehicle status" 3. "Service required"
Required maintenance procedures and le‐
gally mandated inspections are displayed.
4. Select an entry to call up detailed informa‐
tion.
Symbols Symbols Description
No service is currently required.
The deadline for service or a le‐
gally mandated inspection is
approaching. Please make a
service appointment.
The service deadline has al‐
ready passed.
Entering appointment dates
Enter the dates for the required inspections.
Ensure that the vehicle date and time are set
correctly.
1.
"Vehicle Info"
2. "Vehicle status"
3. "Service required"
4. "§ Vehicle inspection"
5. "Date:"
6. Create the settings.
7. Confirm.
The entered date is stored.
Automatic Service Request*
Data
regarding the maintenance status or legally
mandated inspections of the vehicle are auto‐
matically transmitted to your service center be‐
fore a service due date.
You can check when your service center was
notified.
1. "Vehicle Info"
2. "Vehicle status"
Seite 81
81Online Edition for Part no. 01 40 2 606 521 - 03 11 490
Reference Mobility Communication Entertainment Navigation Driving tips
Controls At a glance
Page 84 of 282
Lamps
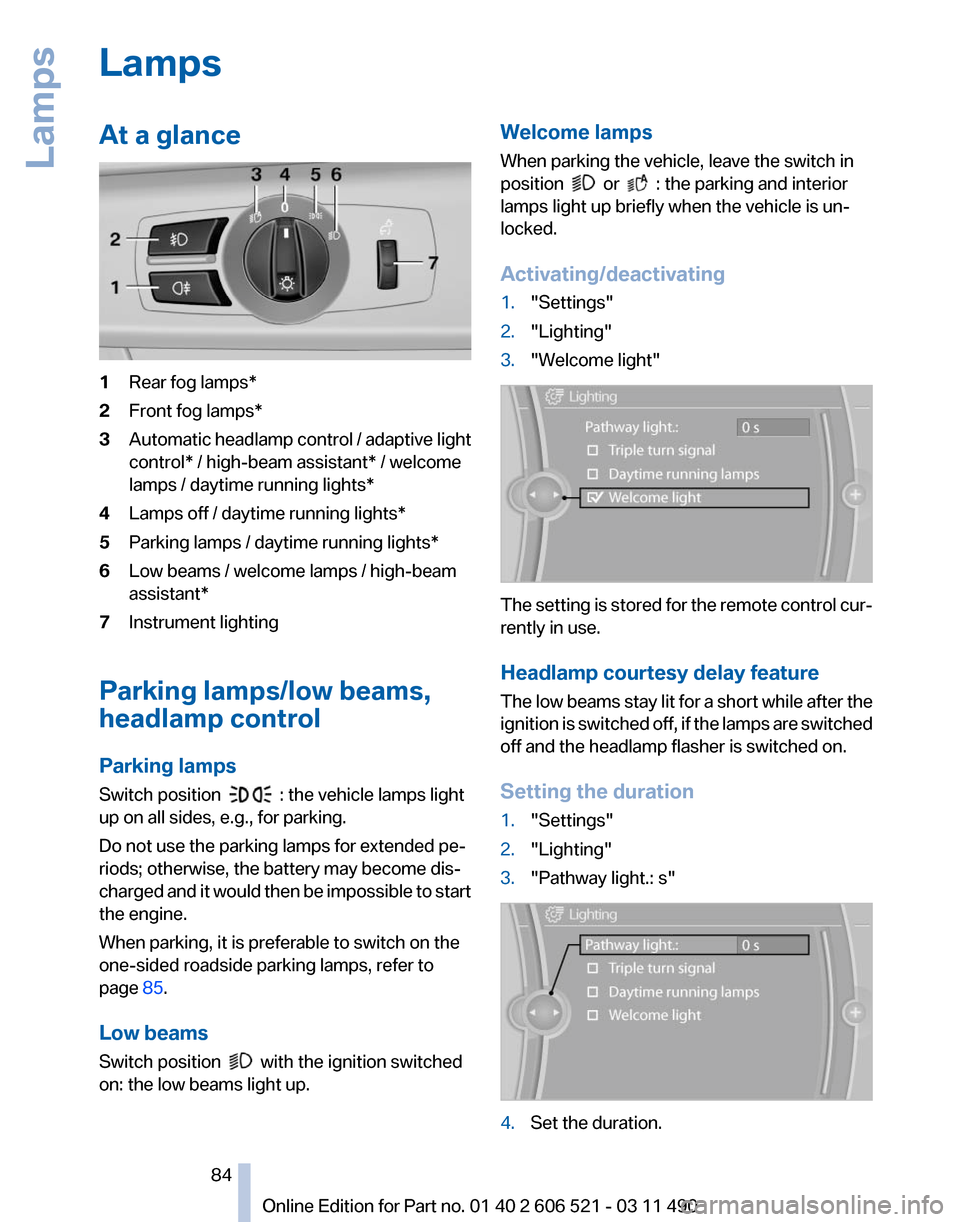
At a glance
1
Rear fog lamps*
2 Front fog lamps*
3 Automatic headlamp control / adaptive light
control* / high-beam assistant* / welcome
lamps / daytime running lights
*
4 Lamps off / daytime running lights*
5 Parking lamps / daytime running lights*
6 Low beams / welcome lamps / high-beam
assistant*
7 Instrument lighting
Parking lamps/low beams,
headlamp control
Parking lamps
Switch position : the vehicle lamps light
up on all sides, e.g., for parking.
Do not use the parking lamps for extended pe‐
riods; otherwise, the battery may become dis‐
charged
and it would then be impossible to start
the engine.
When parking, it is preferable to switch on the
one-sided roadside parking lamps, refer to
page 85.
Low beams
Switch position with the ignition switched
on: the low beams light up. Welcome lamps
When parking the vehicle, leave the switch in
position or : the parking and interior
lamps light up briefly when the vehicle is un‐
locked.
Activating/deactivating
1. "Settings"
2. "Lighting"
3. "Welcome light" The setting is stored for the remote control cur‐
rently in use.
Headlamp courtesy delay feature
The
low beams stay lit for a short while after the
ignition is switched off, if the lamps are switched
off and the headlamp flasher is switched on.
Setting the duration
1. "Settings"
2. "Lighting"
3. "Pathway light.: s" 4.
Set the duration.
Seite 84
84 Online Edition for Part no. 01 40 2 606 521 - 03 11 490
Lamps
Page 87 of 282

Camera
The camera is located on the front of the interior
rearview mirror.
Keep the area in front of the interior rearview
mirror clear.
Fog lamps
Front fog lamps*
The parking lamps or low beams must be
switched on.
Press the button. The green indicator
lamp lights up.
If the automatic headlamp control, refer to
page 85, is activated, the low beams will come
on automatically when you switch on the front
fog lamps.
Instrument lighting
Adjusting
The parking lamps or low beams
must
be switched on to adjust the
brightness.
Adjust the brightness using the
thumbwheel.
Interior lamps
General information
The interior lamps, footwell lamps, entry lamps
and courtesy lamps are controlled automati‐
cally. The brightness of some of these lamps is influ‐
enced by the thumbwheel for the instrument
lighting.
1
Interior lamps
2 Reading lamp
Switching the interior lamps on and off Press the button.
To switch off permanently: press the button for
approx. 3 seconds.
To clear this setting: press the button.
Reading lamps Press the button. Seite 87
87Online Edition for Part no. 01 40 2 606 521 - 03 11 490
Reference Mobility Communication Entertainment Navigation Driving tips
Controls At a glance
Page 93 of 282

4.
Start the engine - do not drive away.
5. Reset the tire pressure using "Reset".
6. Drive away.
The tires are shown in gray and "Resetting
TPM..." is displayed.
After
driving for a few minutes, the set tire infla‐
tion pressures are applied as set values. The re‐
setting process is completed automatically dur‐
ing driving. The tires are shown in green and
"TPM active" is shown on the Control Display.
The trip can be interrupted at any time. If you
drive away again, the process resumes auto‐
matically.
If a flat tire is detected during a reset, all tires are
displayed in yellow.
Low tire pressure message
The yellow warning lamp lights up. A
Check Control message is displayed.
▷There is a flat tire or a major loss in
tire inflation pressure.
▷ The system was not reset after a wheel
change and thus warns based on the infla‐
tion pressures initialized last.
1. Reduce your speed and stop cautiously.
Avoid sudden braking and steering maneu‐
vers.
2. Check whether the vehicle is fitted with reg‐
ular tires* or run-flat tires*.
Run-flat
tires, refer to page 234, are labeled
with a circular symbol containing the letters
RSC marked on the tire sidewall.
When a low inflation pressure is indicated, DSC
Dynamic
Stability Control is switched on if nec‐
essary.
Actions in the event of a flat tire
Normal tires*
1. Identify the damaged tire.
Do this by checking the air pressure in all
four tires.
If the tire inflation pressure in all four tires is
correct, the Tire Pressure Monitor may not have been initialized. In this case, initialize
the system.
If an identification is not possible, please
contact the service center.
2. Rectify the flat tire.
Use
of tire sealant, e.g., the Mobility System,
may damage the TPM wheel electronics. In
this case, have the electronics checked at
the next opportunity and have them re‐
placed if necessary.
Run-flat tires*
You
can continue driving with a damaged tire at
speeds up to 50 mph/80 km/h.
Do not continue driving without run-flat
tires
Do not continue driving if the vehicle is not
equipped with run-flat tires; continued driving
may result in serious accidents.◀
Continued driving with a flat tire
If continuing to drive with a damaged tire:
1. Avoid sudden braking and steering maneu‐
vers.
2. Do not exceed a speed of 50 mph/80 km/h.
3. Check the air pressure in all four tires at the
next opportunity.
If the tire inflation pressure in all four tires is
correct, the Flat Tire Monitor may not have
been initialized. In this case, initialize the
system.
If the tire inflation pressure in all four tires is
correct, the Tire Pressure Monitor may not
have been initialized. In this case, initialize
the system.
Possible driving distance with complete loss of
tire inflation pressure:
The possible driving distance after a loss of tire
inflation pressure depends on the cargo load
and the driving style and conditions.
For a vehicle containing an average load, the
possible driving distance is approx. 50 miles/
80 km. Seite 93
93Online Edition for Part no. 01 40 2 606 521 - 03 11 490
Reference Mobility Communication Entertainment Navigation Driving tips
Controls At a glance
Page 96 of 282
1.
Reduce your speed and stop cautiously.
Avoid sudden braking and steering maneu‐
vers.
2. Check whether the vehicle is fitted with reg‐
ular tires* or run-flat tires*.
Run-flat
tires, refer to page 234, are labeled
with a circular symbol containing the letters
RSC marked on the tire sidewall.
When a flat tire is indicated, DSC Dynamic Sta‐
bility Control is switched on if necessary.
Actions in the event of a flat tire
Normal tires*
1. Identify the damaged tire.
Do this by checking the air pressure in all
four tires.
If the tire inflation pressure in all four tires is
correct, the Flat Tire Monitor may not have
been initialized. In this case, initialize the
system.
If an identification is not possible, please
contact the service center.
2. Rectify the flat tire.
Run-flat tires*
You
can continue driving with a damaged tire at
speeds up to 50 mph/80 km/h.
Do not continue driving without run-flat
tires
Do not continue driving if the vehicle is not
equipped with run-flat tires; continued driving
may result in serious accidents.◀
Continued driving with a flat tire
If continuing to drive with a damaged tire:
1. Avoid sudden braking and steering maneu‐
vers.
2. Do not exceed a speed of 50 mph/80 km/h.
3. Check the air pressure in all four tires at the
next opportunity.
If the tire inflation pressure in all four tires is
correct, the Flat Tire Monitor may not have been initialized. In this case, initialize the
system.
If the tire inflation pressure in all four tires is
correct, the Tire Pressure Monitor may not
have been initialized. In this case, initialize
the system.
Possible driving distance with complete loss of
tire inflation pressure:
The possible driving distance after a loss of tire
inflation pressure depends on the cargo load
and the driving style and conditions.
For a vehicle containing an average load, the
possible driving distance is approx. 50 miles/
80 km.
When the vehicle is driven with a damaged tire,
its handling characteristics change, e.g., re‐
duced lane stability during braking, a longer
braking distance, and altered self-steering
properties. Adjust your driving style accord‐
ingly. Avoid abrupt steering maneuvers or driv‐
ing over obstacles, e.g., curbs, potholes, etc.
Because
the possible driving distance depends
on how the vehicle is used during the trip, the
actual distance may be smaller or greater de‐
pending on the driving speed, road conditions,
external temperature, cargo load, etc.
Continued driving with a flat tire
Drive moderately and do not exceed a
speed of 50 mph/80 km/h.
A loss of tire inflation pressure results in a
change in the handling characteristics, e.g., re‐
duced lane stability during braking, a longer
braking distance and altered self-steering prop‐
erties.◀
Final tire failure
Vibrations or loud noises while driving can
indicate the final failure of the tire. Reduce speed
and stop; otherwise, pieces of the tire could
come loose and cause an accident. Do not con‐
tinue driving, and contact your service center.◀ Seite 96
96 Online Edition for Part no. 01 40 2 606 521 - 03 11 490
Safety
Page 102 of 282
▷
When driving in slush or on uncleared,
snow-covered roads.
▷ When rocking the vehicle or driving off in
deep snow or on loose surfaces.
▷ When driving with snow chains.
Adaptive Drive*
The concept
Adaptive
Drive* includes the following systems:
▷ Dynamic Drive, refer to page 102
▷ Dynamic Damping Control, refer to
page 102
The system increases driving stability and driv‐
ing comfort.
Dynamic Drive*
The concept
Dynamic Drive reduces the lateral inclination of
the vehicle that occurs during rapid driving in
curves or during quick evasive maneuvers.
Driving stability and driving comfort are in‐
creased
under all driving conditions. The system
utilizes active stabilizer bars on the front and rear
axles that react immediately to all driving situa‐
tions.
Programs
The system offers two different programs.
The programs can be selected via Dynamic Driv‐
ing Control, refer to page 103.
SPORT
Sporty tuning for greater driving agility.
NORMAL
Comfort-oriented tuning for optimal comfort. Dynamic Damping Control*
The concept
This system reduces undesirable vehicle mo‐
tion when using a dynamic driving style or trav‐
eling on uneven road surfaces.
The system enhances driving dynamics and
comfort as required for the road surface and
driving style.
Programs
The system offers three different programs.
The
programs can be selected via Dynamic Driv‐
ing Control, refer to page 103.
SPORT
Consistently sporty control of the shock absorb‐
ers for greater driving agility.
NORMAL
Balanced tuning between the COMFORT and
SPORT programs.
COMFORT
Comfort-oriented tuning of the shock absorbers
for optimal traveling comfort.
Integral Active Steering*
The concept
Integral Active Steering is a combination of Ac‐
tive Steering and rear axle steering.
Active Steering varies the steering angle of the
wheels in relation to the steering wheel move‐
ment as a function of the speed.
At speeds up to approx. 37 mph/60 km/h, e.g.,
in curves, the steering angle is increased, i.e.,
steering becomes more direct.
The rear axle steering acts to increase maneu‐
verability by turning the rear wheels slightly in a
direction opposite to the front wheels.
At higher speeds, the steering angle is increas‐
ingly reduced.
Seite 102
102 Online Edition for Part no. 01 40 2 606 521 - 03 11 490
Driving stability control systems