2012 BMW 650I window
[x] Cancel search: windowPage 46 of 282

▷
When the convertible top is opened during
driving, be alert to traffic; otherwise, it may
result
in an accident. If possible, do not move
the convertible top while driving in reverse
because rearward vision is severely im‐
paired while the convertible top is in motion.
During windy conditions, do not operate the
convertible top while driving. Do not drive
faster than 30 mph/50 km/h; otherwise, ve‐
hicle damage may occur.
▷ Do not attach any roof carrier systems; oth‐
erwise, an accident may occur.◀
Functional requirements
The ignition or radio ready state must be
switched on.
It
is not possible to start the engine and operate
the convertible top simultaneously. When the
engine is started, the convertible top movement
is briefly interrupted.
Under the following conditions, the convertible
top movement cannot be moved and a Check
Control message is displayed.
▷ Cargo area partition is flipped up.
▷ Trunk lid is open.
▷ External temperature is too low.
▷ Vehicle system too low.
▷ Convertible top drive is overheating.
▷ Movement of the convertible top not al‐
lowed because of national regulations.
▷ Vehicle speed is too high.
Before opening and closing
▷ Follow the safety instructions for the con‐
vertible top.
▷ Make sure that the cargo area partition in the
cargo area is folded down.
▷ Make sure that the cargo does not push
against the cargo area partition from below.
▷ Make sure that the trunk lid is closed. Convertible top switch
1
Switch
2 LEDs
Opening and closing from the inside
In order to protect the battery, move the con‐
vertible top only when the engine is running if
possible.
Before closing the convertible top, remove any
foreign objects from the windshield frame; oth‐
erwise, closing may be prevented.
▷ Press and hold the switch. The con‐
vertible top opens while the switch
is being pressed. ▷
Pull the switch and hold it. The con‐
vertible top closes while the switch
is being pulled. Push or pull switch until the convertible top is
completely open or closed and the end of the
procedure is indicated by a corresponding
Check
Control message. Always make sure that
the convertible top well storage cover is com‐
pletely closed. If the convertible top is com‐
pletely open or closed, convertible top and con‐
vertible top well storage cover are latched.
The side windows and the rear window go down
when the convertible top control switch is pulled
or pushed.
LEDs
▷ Left LED lights up green: convertible top is
opened or closed. If the operation is com‐
pleted,
the LED goes out and a correspond‐
ing Check Control message is displayed.
Seite 46
46 Online Edition for Part no. 01 40 2 606 521 - 03 11 490
Opening and closing
Page 48 of 282

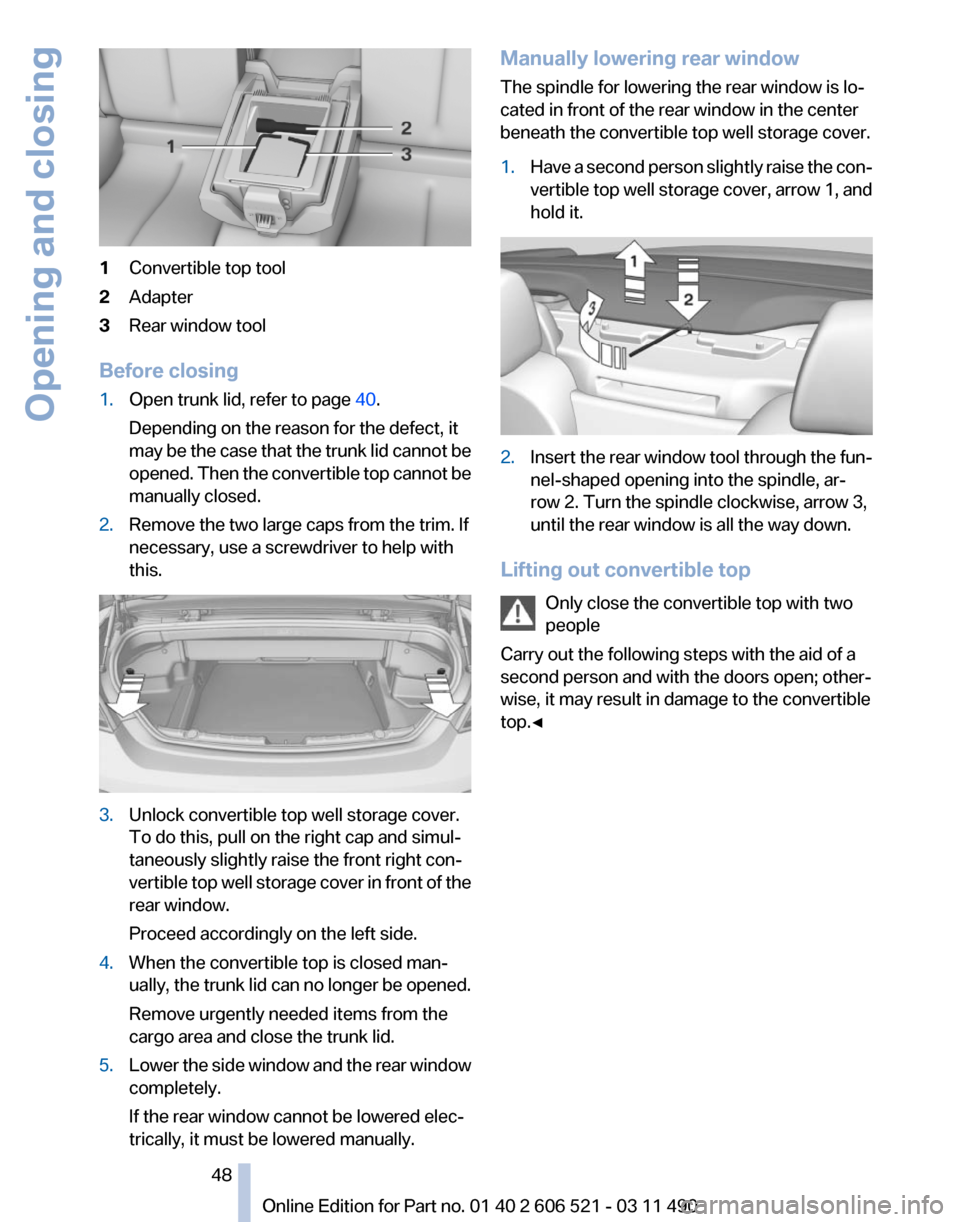
1
Convertible top tool
2 Adapter
3 Rear window tool
Before closing
1. Open trunk lid, refer to page 40.
Depending on the reason for the defect, it
may
be the case that the trunk lid cannot be
opened. Then the convertible top cannot be
manually closed.
2. Remove the two large caps from the trim. If
necessary, use a screwdriver to help with
this. 3.
Unlock convertible top well storage cover.
To do this, pull on the right cap and simul‐
taneously slightly raise the front right con‐
vertible
top well storage cover in front of the
rear window.
Proceed accordingly on the left side.
4. When the convertible top is closed man‐
ually,
the trunk lid can no longer be opened.
Remove urgently needed items from the
cargo area and close the trunk lid.
5. Lower the side window and the rear window
completely.
If the rear window cannot be lowered elec‐
trically, it must be lowered manually. Manually lowering rear window
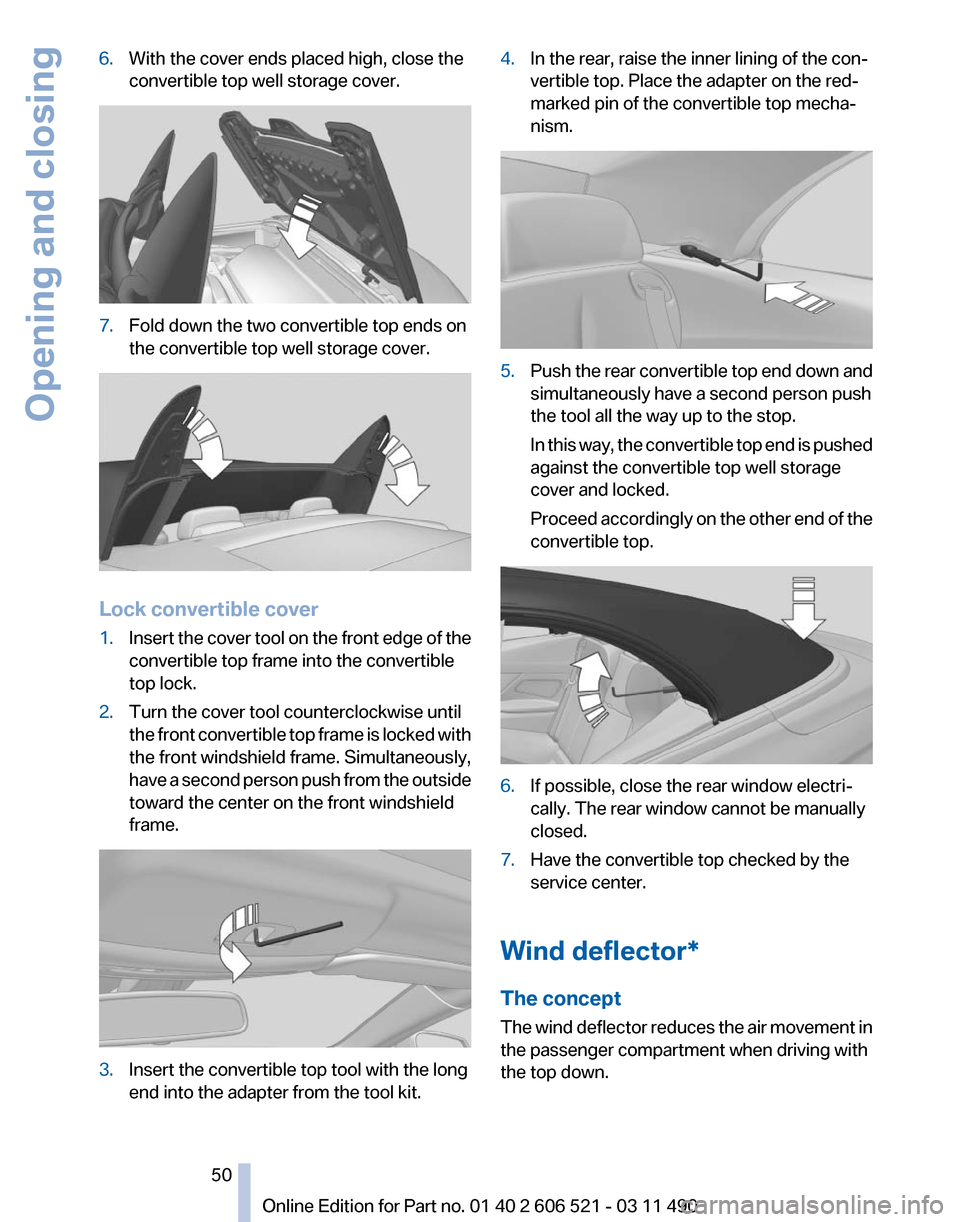
The spindle for lowering the rear window is lo‐
cated in front of the rear window in the center
beneath the convertible top well storage cover.
1.
Have a second person slightly raise the con‐
vertible
top well storage cover, arrow 1, and
hold it. 2.
Insert the rear window tool through the fun‐
nel-shaped opening into the spindle, ar‐
row 2. Turn the spindle clockwise, arrow 3,
until the rear window is all the way down.
Lifting out convertible top Only close the convertible top with two
people
Carry out the following steps with the aid of a
second person and with the doors open; other‐
wise, it may result in damage to the convertible
top.◀ Seite 48
48 Online Edition for Part no. 01 40 2 606 521 - 03 11 490
Opening and closing
Page 50 of 282

6.
With the cover ends placed high, close the
convertible top well storage cover. 7.
Fold down the two convertible top ends on
the convertible top well storage cover. Lock convertible cover
1.
Insert the cover tool on the front edge of the
convertible top frame into the convertible
top lock.
2. Turn the cover tool counterclockwise until
the
front convertible top frame is locked with
the front windshield frame. Simultaneously,
have a second person push from the outside
toward the center on the front windshield
frame. 3.
Insert the convertible top tool with the long
end into the adapter from the tool kit. 4.
In the rear, raise the inner lining of the con‐
vertible top. Place the adapter on the red-
marked pin of the convertible top mecha‐
nism. 5.
Push the rear convertible top end down and
simultaneously have a second person push
the tool all the way up to the stop.
In
this way, the convertible top end is pushed
against the convertible top well storage
cover and locked.
Proceed accordingly on the other end of the
convertible top. 6.
If possible, close the rear window electri‐
cally. The rear window cannot be manually
closed.
7. Have the convertible top checked by the
service center.
Wind deflector*
The concept
The
wind deflector reduces the air movement in
the passenger compartment when driving with
the top down.
Seite 50
50 Online Edition for Part no. 01 40 2 606 521 - 03 11 490
Opening and closing
Page 66 of 282

Starting the engine
General information
Enclosed areas
Do not let the engine run in enclosed
areas; otherwise, breathing of exhaust fumes
may lead to loss of consciousness and death.
The
exhaust gases contain carbon monoxide, an
odorless and colorless but highly toxic gas.◀
Unattended vehicle
Do not leave the car unattended with the
engine running; otherwise, it presents a poten‐
tial source of danger.
Before leaving the car with the engine running,
set the parking brake and place the transmission
in position P or neutral to prevent the car from
moving.◀
Frequent starting in quick succession
Avoid repeated futile attempts at starting
the car and avoid starting the car frequently in
quick succession. Otherwise, the fuel is not
burned or is inadequately burned, and there is
the danger of overheating and damaging the
catalytic converter.◀
Do not wait for the engine to warm up while the
vehicle remains stationary. Start driving at mod‐
erate engine speeds.
Manual transmission
Starting the engine
1. Depress the brake pedal.
2. Press on the clutch and shift to neutral.
3. Press the Start/Stop button.
The ignition is activated automatically for a cer‐
tain time and is stopped as soon as the engine
starts.
Automatic transmission
*
Starting the engine
1. Depress the brake pedal.
2. Press the Start/Stop button. The ignition is activated automatically for a cer‐
tain time and is stopped as soon as the engine
starts.
Engine stop
General information
Take the remote control with you
Take the remote control with you when
leaving
the vehicle so that children, for example,
cannot operate the windows and injure them‐
selves.◀
Set the parking brake and further secure
the vehicle as required
Set the parking brake firmly when parking; oth‐
erwise, the vehicle could roll. On steep upward
and downward inclines, further secure the vehi‐
cle, for example, by turning the steering wheel in
the direction of the curb. ◀
Before driving into a car wash
In order for the vehicle to be able to roll into a car
wash, heed the information regarding Washing
in automatic car washes, refer to page 254.
Manual transmission
Switching off the engine
1. With the vehicle at a standstill, press the
Start/Stop button.
2. Shift into first gear or reverse.
3. Set the parking brake.
Automatic transmission*
Switching off the engine
1. Engage transmission position P with the ve‐
hicle stopped.
2. Press the Start/Stop button.
The engine is switched off.
The radio ready state is switched on.
3. Set the parking brake. Seite 66
66 Online Edition for Part no. 01 40 2 606 521 - 03 11 490
Driving
Page 88 of 282

Safety
Airbags
1
Front airbag, driver
2 Front airbag, front passenger 3
Side airbag
4 Knee airbags
Front airbags
Front airbags help protect the driver and front
passenger by responding to frontal impacts in
which safety belts alone cannot provide ade‐
quate restraint.
Side airbags
In a lateral impact, the side airbag supports the
side
of the body in the chest, lap, and head area.
Knee airbag
The knee airbag supports the legs in a frontal
impact.
Protective action
Airbags are not triggered in every impact situa‐
tion, e.g., in less severe accidents or rear-end
collisions. Information on how to ensure the optimal
protective effect of the airbags
▷ Keep at a distance from the airbags.
▷ Always grasp the steering wheel on the
steering wheel rim, holding your hands at
the
3 o'clock and 9 o'clock positions, to keep
the danger of injury to your hands or arms as
low as possible if the airbag is triggered.
▷ There should be no people, animals, or ob‐
jects between an airbag and a person.
▷ Do not use the cover of the front airbag on
the front passenger side as a storage area.
▷ Keep the dashboard and window on the
front
passenger side clear, i.e., do not cover
with adhesive labels or coverings, and do not
attach holders such as for navigation instru‐
ments and mobile phones. Seite 88
88 Online Edition for Part no. 01 40 2 606 521 - 03 11 490
Safety
Page 123 of 282

Climate control
Automatic climate control
1
Air distribution, left
2 Temperature, left
3 AUTO program, left
4 Air volume, AUTO intensity, residual heat,
left
5 Remove ice and condensation
6 Maximum cooling
7 Display
8 Air volume, AUTO intensity, right
9 AUTO program, right
10 Temperature, right 11
Air distribution, right
12 Seat heating*, right 55
13 Active seat ventilation*, right 55
14 Automatic recirculated-air control/recircu‐
lated-air mode
15 Cooling function
16 Rear window defroster
17 ALL program
18 Active seat ventilation*, left 55
19 Seat heating*, left 55
Climate control functions in detail
Manual air distribution Press the button repeatedly to select a
program:
▷ Upper body region.
▷ Upper body region and footwell. ▷
Footwell.
▷ Windows and footwell: driver's side only.
▷ Windows, upper body region and footwell:
driver's side only.
If the windows are fogged over, press the AUTO
button on the driver's side to utilize the conden‐
sation sensor.
Seite 123
123Online Edition for Part no. 01 40 2 606 521 - 03 11 490
Reference Mobility Communication Entertainment Navigation Driving tips
Controls At a glance
Page 124 of 282

Temperature
Turn the wheel to set the desired
temperature.
The automatic climate control achieves this
temperature as quickly as possible, if necessary
with the maximum cooling or heating capacity,
and then keeps it constant.
Avoid rapidly switching between different tem‐
perature settings. The automatic climate control
will not have sufficient time to adjust the set
temperature.
AUTO program Press the button.
Air volume, air distribution, and tem‐
perature are controlled automatically.
Depending on the selected temperature, AUTO
intensity, and outside influences, the air is di‐
rected to the windshield, side windows, upper
body, and into the footwell.
The cooling function, refer to page 125, is
switched on automatically with the AUTO pro‐
gram.
At the same time, a condensation sensor con‐
trols the program so as to prevent window con‐
densation as much as possible.
Intensity of the AUTO program
With the AUTO program switched on, automatic
control of the air volume and air distribution can
be adjusted.
Press the left or right side of the button:
decrease or increase the intensity.
The selected intensity is shown on the display
of the automatic climate control.
Convertible program
When the convertible top is open, the converti‐
ble program is activated as well. In the conver‐
tible program, the automatic climate control is
optimized for driving with the convertible top open. In addition, the air volume is increased as
the vehicle speed increases.
The
efficiency of the convertible program can be
greatly enhanced by installing the wind deflec‐
tor*.
Air volume, manual
To be able to manually adjust the air volume,
switch off the AUTO program first.
Press the left or right side of the button:
decrease or increase air volume.
The selected air volume is shown on the display
of the automatic climate control.
The air volume of the automatic climate control
may be reduced automatically to save battery
power.
Defrosting windows and removing
condensation Press the button.
Ice and condensation are quickly re‐
moved from the windshield and the front side
windows.
The air volume can be adjusted when the pro‐
gram is active.
If the windows are fogged over, additionally
switch on the cooling function or press the
AUTO button to utilize the condensation sensor.
Maximum cooling
Press the button.
The system is set to the lowest tem‐
perature, maximum air volume and recirculated-
air mode.
Air flows out of the vents for the upper body re‐
gion. Open them for this purpose.
Air is cooled as quickly as possible:
▷ At an external temperature of approx. 32 ℉/
0 ℃.
▷ When the engine is running.
The air volume can be adjusted when the pro‐
gram is active. Seite 124
124 Online Edition for Part no. 01 40 2 606 521 - 03 11 490
Climate control
Page 125 of 282

Automatic recirculated-air control/
recirculated-air mode
You can respond to unpleasant odors or pollu‐
tants in the immediate environment by tempo‐
rarily suspending the supply of outside air. The
system
then recirculates the air currently within
the vehicle.
Press the button repeatedly to select
an operating mode:
▷ LEDs off: outside air flows in continuously.
▷ Left LED on, automatic recirculated-air con‐
trol: a sensor detects pollutants in the out‐
side air and controls the shut-off automati‐
cally.
▷ Right LED on, recirculated-air mode: the
supply of outside air into the vehicle is per‐
manently blocked.
If the windows are fogged over, switch off the
recirculated-air
mode and press the AUTO but‐
ton on the driver's side to utilize the condensa‐
tion sensor. Make sure that air can flow onto the
windshield.
Continuous recirculated-air mode
The recirculated-air mode should not be
used for an extended period of time, as the air
quality inside the vehicle deteriorates steadily.◀
Cooling function
The passenger compartment can only be
cooled with the engine running.
Press the button.
The air is cooled and dehumidified and
– depending on the temperature setting –
warmed again.
Depending on the weather, the windshield may
fog up briefly when the engine is started.
The cooling function is switched on automati‐
cally with the AUTO program.
When using the automatic climate control, con‐
densation water, refer to page 140, develops
that exits underneath the vehicle. Rear window defroster
Press the button.
The
rear window defroster switches off
automatically after a certain period of time.
The rear window defroster is only active when
the rear window is closed.
ALL program
Press the button.
Current settings on the driver's side for
the temperature, air volume, air distribution, and
AUTO program are transferred to the front pas‐
senger side.
The program is switched off if the settings on
the front passenger side are changed.
Residual heat
The heat stored in the engine is used to heat the
interior.
Functional requirement
▷ Up to 20 minutes after the engine has been
switched off.
▷ Warm engine.
▷ The battery is sufficiently charged.
▷ External temperature below 77 ℉/25 ℃.
Switching on
1. Switch off the ignition.
2. Press the right side of the button on
the driver's side. is shown on the display of the automatic cli‐
mate control.
The
interior temperature, air volume and air dis‐
tribution can be adjusted with the ignition
switched on.
Switching off
At the lowest fan speed, press the left side of the
button on the driver's side. on the display of the automatic climate control
goes out. Seite 125
125Online Edition for Part no. 01 40 2 606 521 - 03 11 490
Reference Mobility Communication Entertainment Navigation Driving tips
Controls At a glance