2012 BMW 640I COUPE power steering
[x] Cancel search: power steeringPage 12 of 303
CockpitVehicle equipment
All standard, country-specific and optional
equipment that is offered in the model series is
described in this chapter. Therefore, equipmentis also described that is not available in a vehicle,
e. g., because of the selected optional equip‐
ment or country variant. This also applies for
safety-related functions and systems.
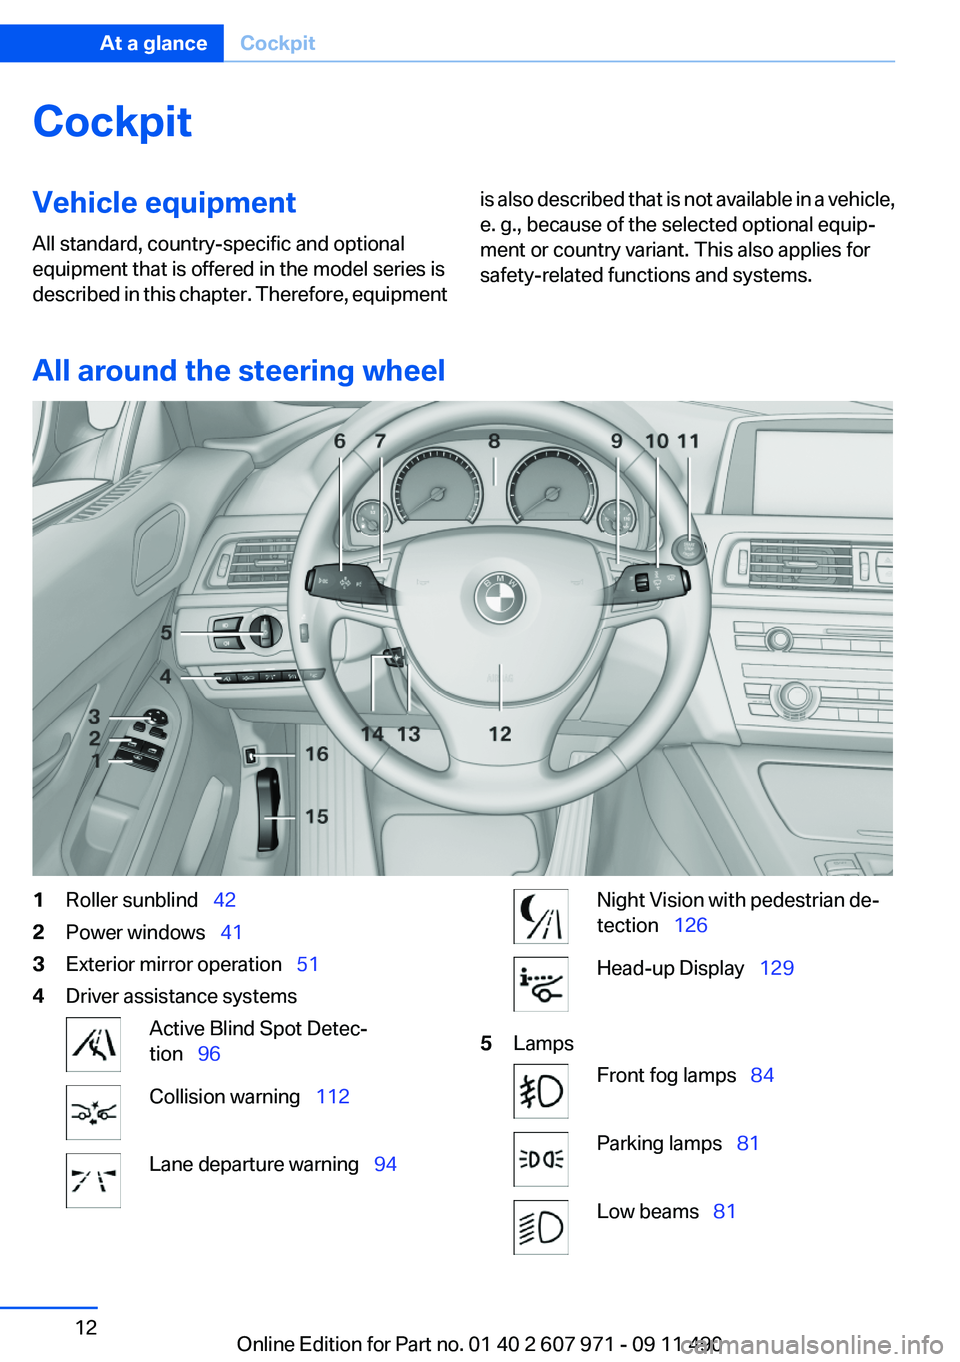
All around the steering wheel
1Roller sunblind 422Power windows 413Exterior mirror operation 514Driver assistance systemsActive Blind Spot Detec‐
tion 96Collision warning 112Lane departure warning 94Night Vision with pedestrian de‐
tection 126Head-up Display 1295LampsFront fog lamps 84Parking lamps 81Low beams 81Seite 12At a glanceCockpit12
Online Edition for Part no. 01 40 2 607 971 - 09 11 490
Page 40 of 303

Monitor the closing process
Monitor the closing process to ensure that
no one becomes trapped.◀
Unlocking the trunk lid separately
Press on the top half of the BMW emblem on the
trunk lid.
This corresponds to pressing the
button.
Do not place the remote control in the
cargo area
Take the remote control with you and do not
leave it in the cargo area; otherwise, the remote
control is locked inside the vehicle when the
trunk lid is closed.◀
Malfunction
Comfort Access may not function properly if it
experiences interference from external sources
such as mobile phones, metal objects, overhead
power lines, transmission towers, etc.
In this case, open or close the vehicle using the
buttons on the remote control or use the
integrated key in the door lock.
To subsequently start the engine, hold the re‐
mote control against the marked area on the
steering column, refer to page 31.
Alarm system
The concept
The vehicle alarm system responds to:
▷Opening of a door, the hood or the trunk lid.▷Movements in the vehicle.▷Changes in the vehicle tilt, e.g., during at‐
tempts to steal a wheel or when towing the
car.▷Interruptions in battery voltage.
The alarm system briefly indicates tampering:
▷By sounding an acoustic alarm.▷By switching on the hazard warning system.▷By flashing the high beams.
Arming and disarming the alarm
system
General information
When you lock or unlock the vehicle, either with
the remote control, Comfort Access or at the
door lock the alarm system is armed or disarmed
at the same time.
Door lock and armed alarm system
Unlocking via the door lock will trigger the alarm
on some country-specific versions.
In order to terminate this alarm, unlock vehicle
with the remote control or switch on the ignition,
if necessary, by emergency detection of the re‐
mote control.
Trunk lid and armed alarm system
The trunk lid can be opened using the remote
control, even if the alarm system is armed.
Press the button on the remote control
for approx. 1 second.
After the trunk lid is closed, it is locked and
monitored again by the alarm system. The haz‐
ard warning system flashes once.
In some vehicle equipment variants, the trunk lid
can only be opened using the remote control if
the vehicle was unlocked first.
Panic mode Press the button on the remote control
for at least 3 seconds.
Switching off the alarm
▷Unlock the vehicle using the remote control.▷With Comfort Access: if you are carrying the
remote control with you, pull on the door
handle.Seite 40ControlsOpening and closing40
Online Edition for Part no. 01 40 2 607 971 - 09 11 490
Page 51 of 303
Storing1.Switch on the ignition.2.Set the desired position.3. Press the button. The LED in the
button lights up.4.Press the desired button 1 or 2. The LED
goes out.
If the M button is pressed accidentally:
Press the button again.
The LED goes out.
Calling up settings Do not retrieve the memory while driving
Do not retrieve the memory setting while
driving, as an unexpected movement of the seat
or steering wheel could result in an accident.◀
Comfort function
1.Open the driver's door.2.Switch off the ignition.3.Briefly press the desired button 1 or 2.
The corresponding seat position is performed
automatically.
The procedure stops when a switch for adjust‐
ing the seat or one of the buttons is pressed.
Safety mode
1.Close the driver's door or switch on the ig‐
nition.2.Press and hold the desired button 1 or 2 until
the adjustment procedure is completed.
Calling up of a seat position
deactivated
After a brief period, the calling up of stored seat
positions is deactivated to save battery power.
To reactivate calling up of a seat position:
▷Open or close the door or trunk lid.▷Press a button on the remote control.▷Press the Start/Stop button.
Mirrors
Exterior mirrors
At a glance
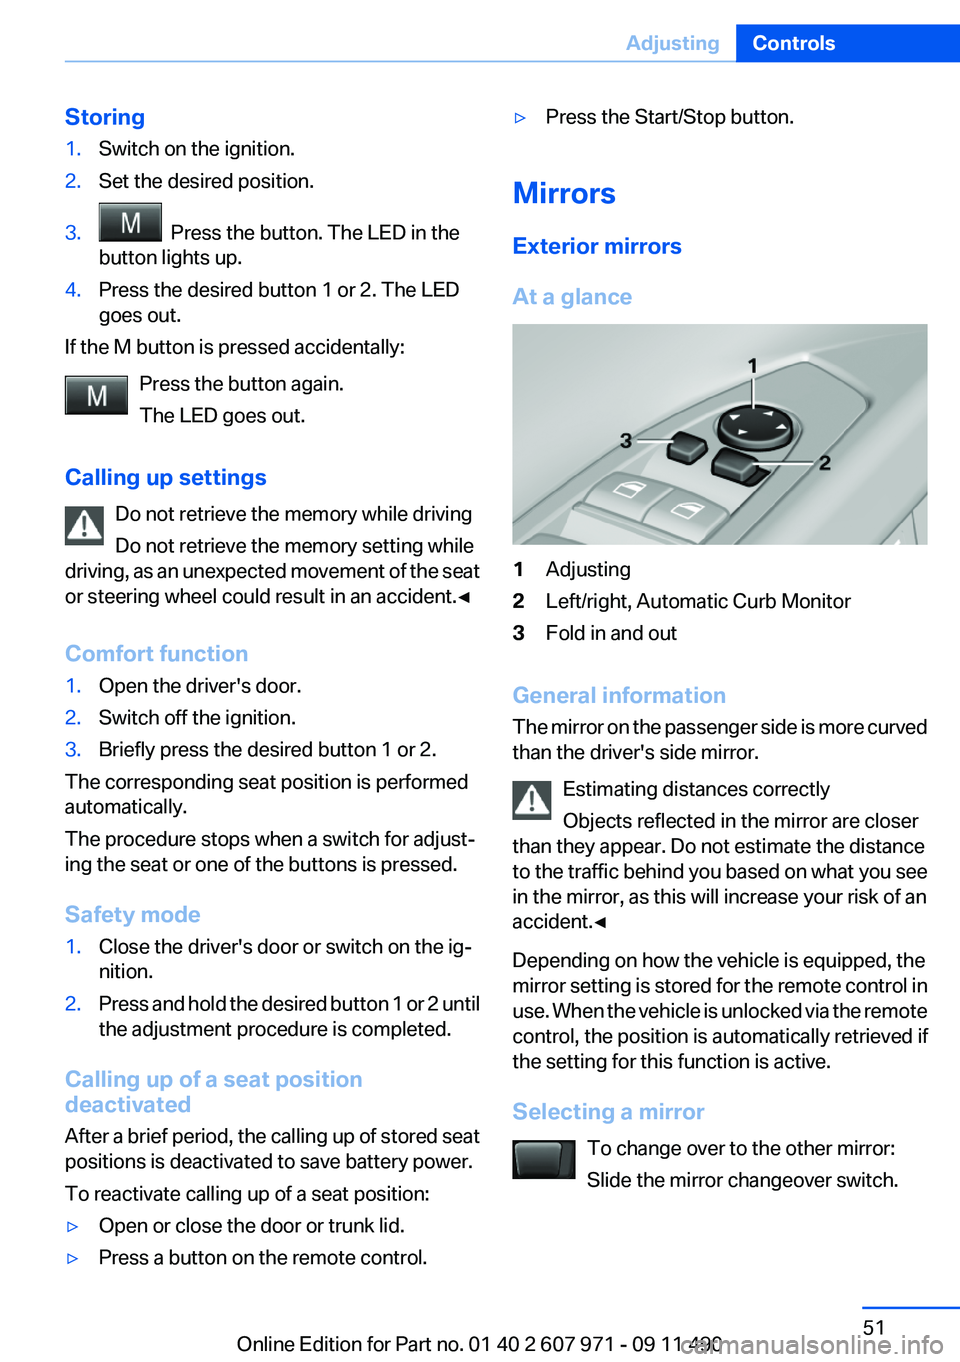
1Adjusting2Left/right, Automatic Curb Monitor3Fold in and out
General information
The mirror on the passenger side is more curved
than the driver's side mirror.
Estimating distances correctly
Objects reflected in the mirror are closer
than they appear. Do not estimate the distance
to the traffic behind you based on what you see
in the mirror, as this will increase your risk of an
accident.◀
Depending on how the vehicle is equipped, the
mirror setting is stored for the remote control in
use. When the vehicle is unlocked via the remote
control, the position is automatically retrieved if
the setting for this function is active.
Selecting a mirror To change over to the other mirror:
Slide the mirror changeover switch.
Seite 51AdjustingControls51
Online Edition for Part no. 01 40 2 607 971 - 09 11 490
Page 106 of 303
Driving comfortVehicle equipment
All standard, country-specific and optional
equipment that is offered in the model series is
described in this chapter. Therefore, equipment
is also described that is not available in a vehicle,
e. g., because of the selected optional equip‐
ment or country variant. This also applies for
safety-related functions and systems.
Active Cruise Control with
Stop & Go function, ACC
The concept
This system can be used to select a desired
speed that the vehicle will maintain automati‐
cally on clear roads.
To the extent possible, the system automatically
adjusts the speed to a slower vehicle ahead of
you.
The distance that the vehicle maintains to the
vehicle ahead of you can be varied.
For safety reasons, it depends on the speed.
To maintain a certain distance, the system au‐
tomatically decelerates, applies the brakes
lightly, or accelerates again if the vehicle ahead
begins moving faster.
If the vehicle ahead of you brakes to a halt, the
system is able to detect this within the given
system limits. If the vehicle ahead of your drives
away again from a halt, your vehicle is able to
accelerate if operated accordingly.
Even if some time passes before the vehicle
drives away again, the BMW can still be accel‐
erated automatically and simply.
As soon as the road is clear, it accelerates to the
desired speed.
The speed is also maintained on downhill gra‐
dients, but may not be maintained on uphill
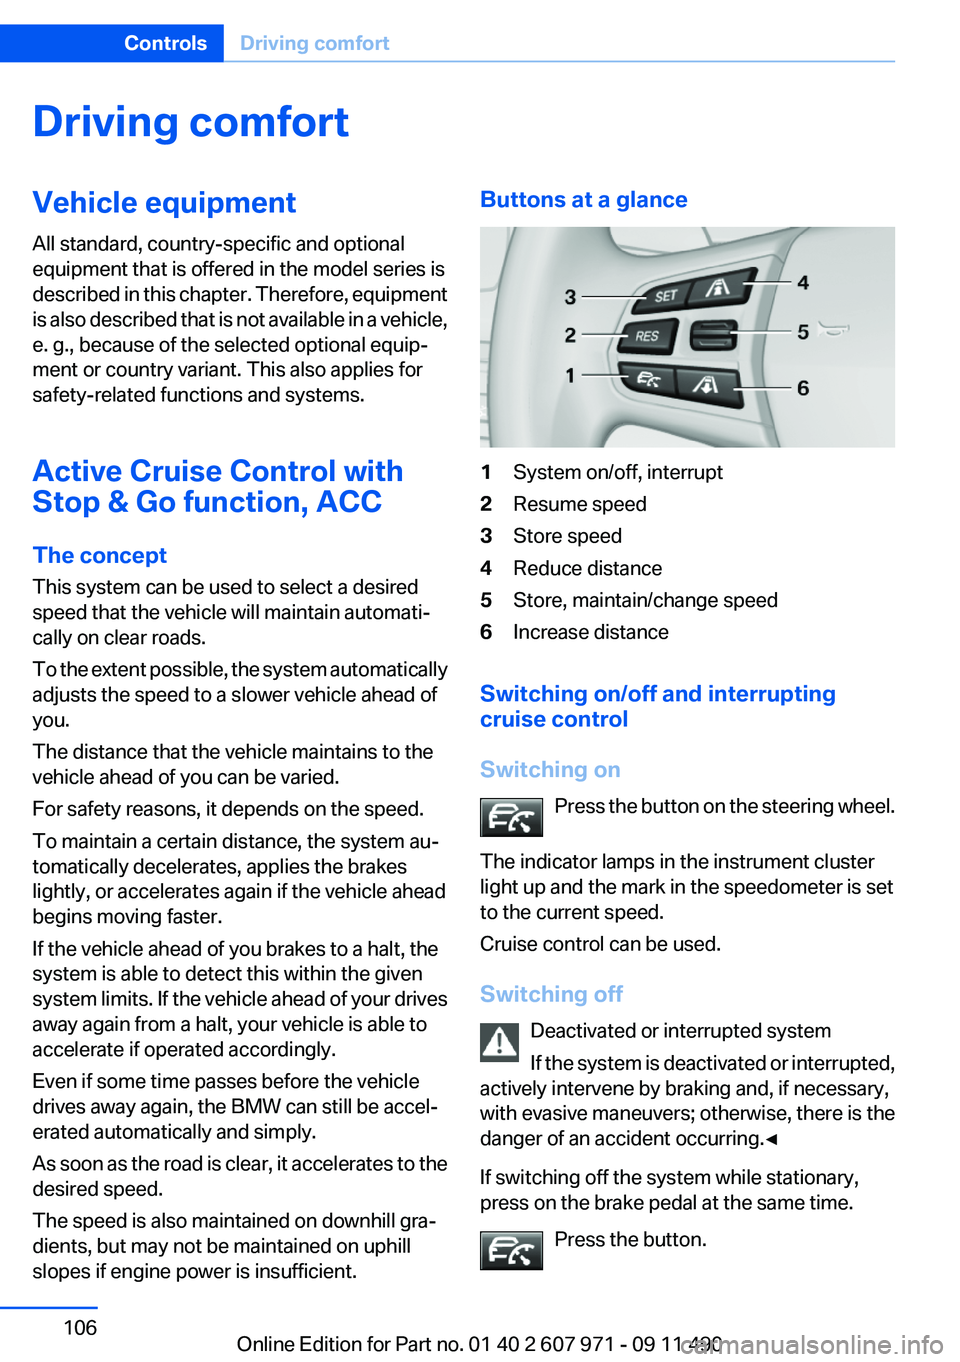
slopes if engine power is insufficient.Buttons at a glance1System on/off, interrupt2Resume speed3Store speed4Reduce distance5Store, maintain/change speed6Increase distance
Switching on/off and interrupting
cruise control
Switching on Press the button on the steering wheel.
The indicator lamps in the instrument cluster
light up and the mark in the speedometer is set
to the current speed.
Cruise control can be used.
Switching off Deactivated or interrupted system
If the system is deactivated or interrupted,
actively intervene by braking and, if necessary,
with evasive maneuvers; otherwise, there is the
danger of an accident occurring.◀
If switching off the system while stationary,
press on the brake pedal at the same time.
Press the button.
Seite 106ControlsDriving comfort106
Online Edition for Part no. 01 40 2 607 971 - 09 11 490
Page 112 of 303
the device should be switched off immedi‐
ately. In this case, please contact the man‐
ufacturer and only use the product after the
problem has been corrected.3.The "legal communication" specified above
refers to communication in accordance with
telecommunication regulations. Low-power
devices should withstand interference from
legal communication and ISM devices.
Collision warning with
braking function
The concept
The system issues a two-phase warning of a
danger of collision at speeds above approx.
10 mph/15 km/h. The time of these warnings
may vary depending on the current driving sit‐
uation.
The collision warning is available even if cruise
control has been deactivated.
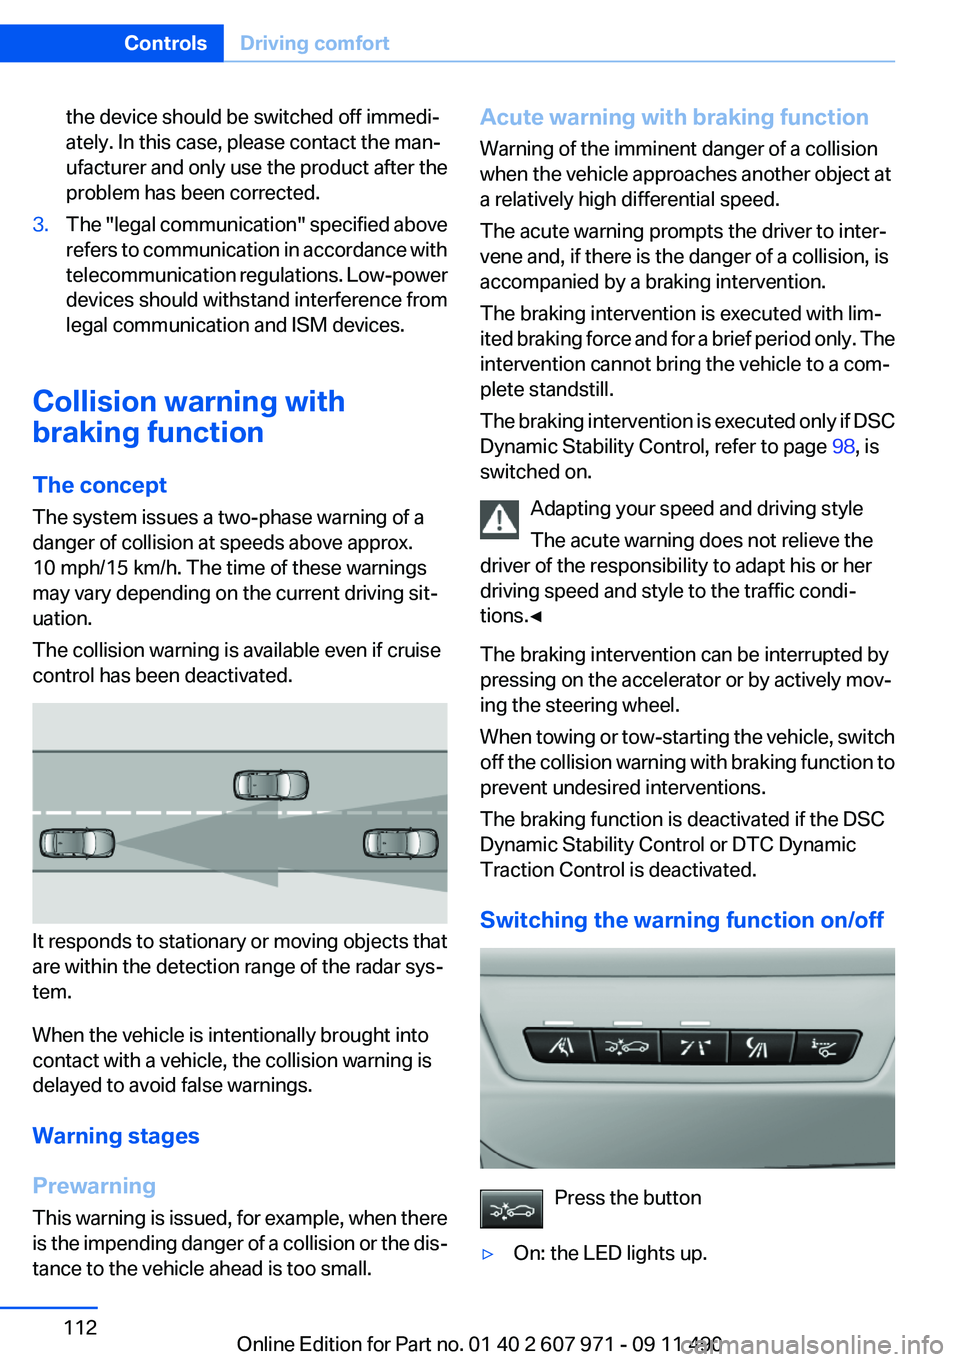
It responds to stationary or moving objects that
are within the detection range of the radar sys‐
tem.
When the vehicle is intentionally brought into
contact with a vehicle, the collision warning is
delayed to avoid false warnings.
Warning stages
Prewarning
This warning is issued, for example, when there
is the impending danger of a collision or the dis‐
tance to the vehicle ahead is too small.
Acute warning with braking function
Warning of the imminent danger of a collision
when the vehicle approaches another object at
a relatively high differential speed.
The acute warning prompts the driver to inter‐
vene and, if there is the danger of a collision, is
accompanied by a braking intervention.
The braking intervention is executed with lim‐
ited braking force and for a brief period only. The
intervention cannot bring the vehicle to a com‐
plete standstill.
The braking intervention is executed only if DSC
Dynamic Stability Control, refer to page 98, is
switched on.
Adapting your speed and driving style
The acute warning does not relieve the
driver of the responsibility to adapt his or her
driving speed and style to the traffic condi‐
tions.◀
The braking intervention can be interrupted by
pressing on the accelerator or by actively mov‐
ing the steering wheel.
When towing or tow-starting the vehicle, switch
off the collision warning with braking function to
prevent undesired interventions.
The braking function is deactivated if the DSC
Dynamic Stability Control or DTC Dynamic
Traction Control is deactivated.
Switching the warning function on/off
Press the button
▷On: the LED lights up.Seite 112ControlsDriving comfort112
Online Edition for Part no. 01 40 2 607 971 - 09 11 490
Page 266 of 303
to ensure that all comfort functions are fully
available and that any Check Control messages
are no longer displayed.
Charging the battery
In the vehicle, only charge the battery via the
terminals, refer to page 269, in the engine com‐
partment with the engine off.
Power failure
After a temporary power loss, some equipment
needs to be reinitialized.
Individual settings need to be reprogrammed:▷Seat, mirror, and steering wheel memory:
store the positions again.▷Time: update.▷Date: update.▷Radio station: save again.▷Navigation system: wait for the operability of
the navigation.
Disposing of old batteries
Have old batteries disposed of by your
service center or bring them to a recy‐
cling center.
Maintain the battery in an upright position for
transport and storage. Secure the battery so
that it does not tip over during transport.
Fuses
Notes Replacing fuses
Never attempt to repair a blown fuse and
do not replace a defective fuse with a substitute
of another color or amperage rating; this could
lead to a circuit overload, ultimately resulting in
a fire in the vehicle.◀
Plastic tweezers and information on the fuse
types and locations are stored in the fuse box in
the cargo area.
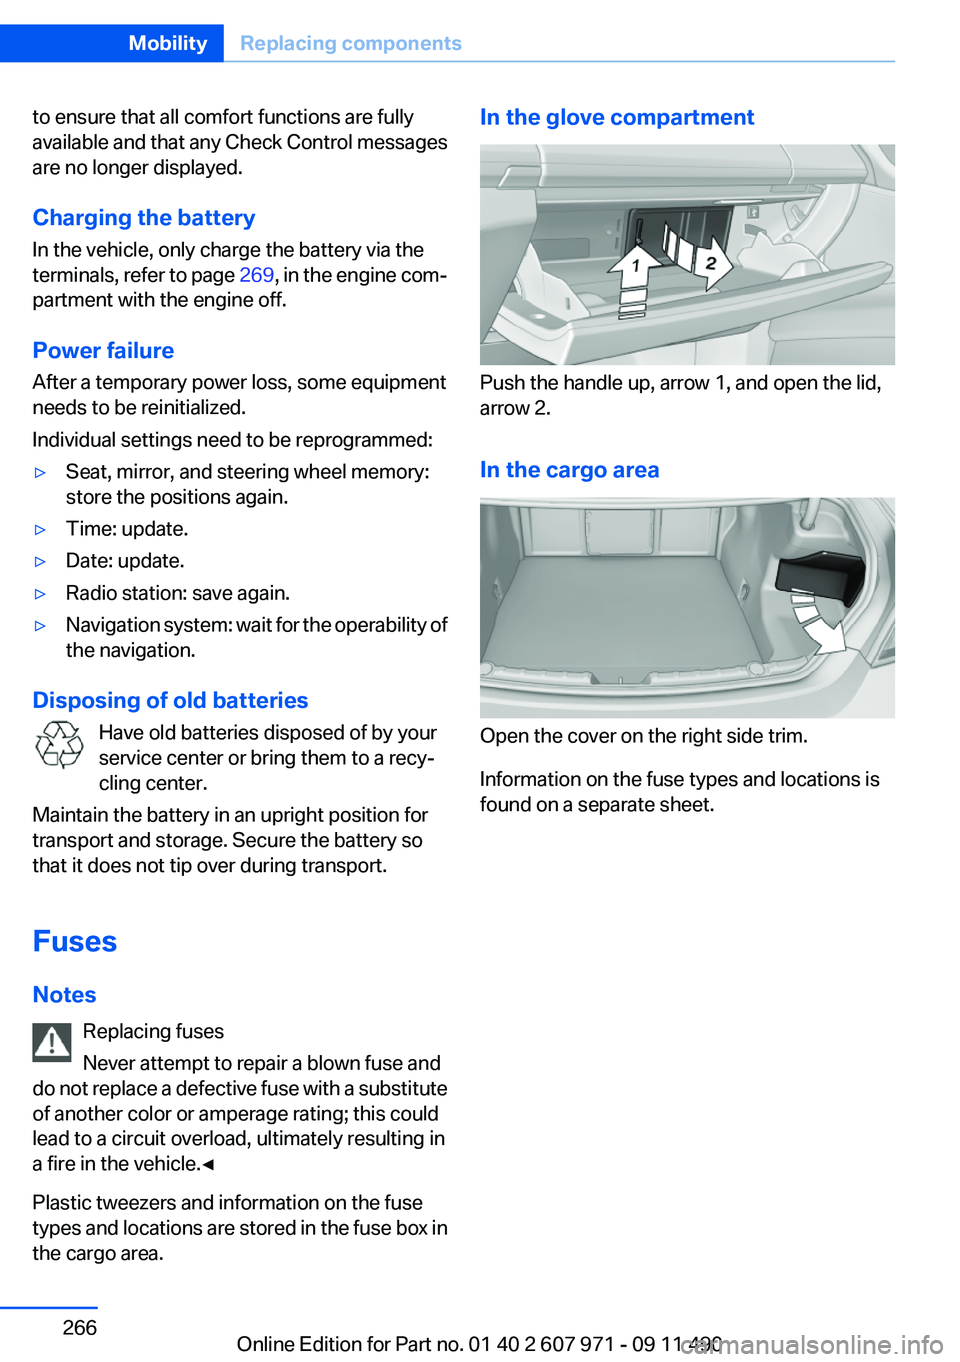
In the glove compartment
Push the handle up, arrow 1, and open the lid,
arrow 2.
In the cargo area
Open the cover on the right side trim.
Information on the fuse types and locations is
found on a separate sheet.
Seite 266MobilityReplacing components266
Online Edition for Part no. 01 40 2 607 971 - 09 11 490
Page 270 of 303
Starting the engine
Never use spray fluids to start the engine.1.Start the engine of the assisting vehicle and
let it run for several minutes at an increased
idle speed.2.Start the engine of the vehicle being started
in the usual way.
If the first starting attempt is not successful,
wait a few minutes before making another
attempt in order to allow the discharged bat‐
tery to recharge.3.Let both engines run for several minutes.4.Disconnect the jumper cables in the reverse
order.
Check the battery and recharge if necessary.
Tow-starting and towing
Manual transmission
Observe before towing your vehicle The parking brake is blocked
The parking brake cannot be released
manually.
When the parking brake is blocked, do not tow
with the front axle lifted or the vehicle can be
damaged.
Contact your service center.◀
Gearshift lever in neutral position.
Towing Follow the towing instructions
Follow all towing instructions; otherwise,
vehicle damage or accidents may occur.◀
▷Make sure that the ignition is switched on;
otherwise, the low beams, tail lamps, turn
signals, and windshield wipers may be un‐
available.▷Do not tow the vehicle with the rear axle
tilted, as the front wheels could turn.▷When the engine is stopped, there is no
power assist. Consequently, more force
needs to be applied when braking and steer‐
ing.▷Larger steering wheel movements are re‐
quired.
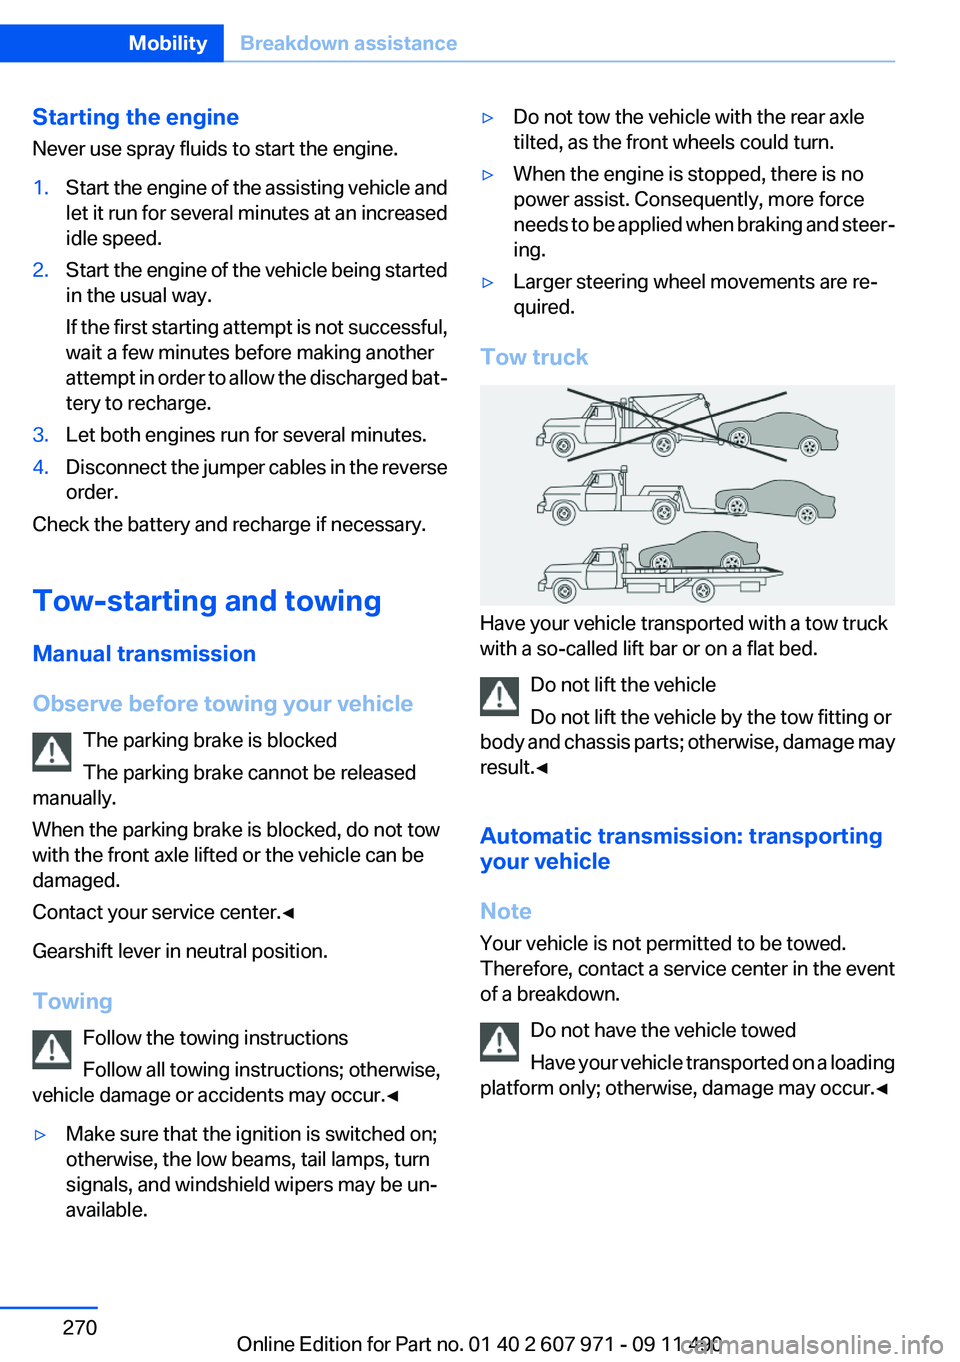
Tow truck
Have your vehicle transported with a tow truck
with a so-called lift bar or on a flat bed.
Do not lift the vehicle
Do not lift the vehicle by the tow fitting or
body and chassis parts; otherwise, damage may
result.◀
Automatic transmission: transporting
your vehicle
Note
Your vehicle is not permitted to be towed.
Therefore, contact a service center in the event
of a breakdown.
Do not have the vehicle towed
Have your vehicle transported on a loading
platform only; otherwise, damage may occur.◀
Seite 270MobilityBreakdown assistance270
Online Edition for Part no. 01 40 2 607 971 - 09 11 490
Page 295 of 303
Engine start, refer to Startingthe engine 58
Engine start, Starting aid 269
Engine stop 58
Engine temperature 72
Entering/exiting vehicle, assis‐ tance, steering wheel 53
Entering a car wash 273
Equalizer 176
Equipment, interior 136
ESP Electronic Stability Pro‐ gram, refer to DSC 98
Exchanging wheels/tires 251
Exhaust system 147
Exterior mirror, automatic dim‐ ming feature 52
Exterior mirrors 51
External devices 199
External start 269
External temperature dis‐ play 73
External temperature warn‐ ing 73
Eyes for securing cargo 150
F
Fader 176
Failure message, refer to Check Control 70
False alarm, refer to Uninten‐ tional alarm 41
Fan, refer to Air volume 132
Fault displays, refer to Check Control 70
Filler neck for engine oil 257
Fine wood, care 275
First aid kit 268
Fitting for towing, refer to Tow fitting 271
Flat tire, changing wheels 265
Flat Tire Monitor FTM 92
Flat tire, Tire Pressure Monitor TPM 89
Flat tire, warning lamp 90, 93
Flooding 147 Floor carpet, care 275
Floor mats, care 275
FM/AM station 179
Fold-out position, windshield wipers 65
Foot brake 147
Front airbags 86
Front fog lamps 84
Front lamps 263
Front passenger airbags, au‐ tomatic deactivation 88
Front passenger airbags, indi‐ cator lamp 88
Front seats 45
FTM Flat Tire Monitor 92
Fuel cap 242
Fuel consumption, current 74
Fuel consumption, refer to Average fuel consump‐
tion 76
Fuel filler flap 242
Fuel gauge 72
Fuel quality 244
Fuel, tank capacity 282
Fuse 266
G
Garage door opener, refer to Integrated universal remote
control 136
Gas station recommenda‐ tion 168
Gear change, automatic trans‐ mission 67
Gear shift indicator 75
General driving notes 146
Glass sunroof, powered with tilt function 43
Glove compartment 141
Gong, volume equaliza‐ tion 177
GPS navigation, refer to Navi‐ gation system 158
Gray display of the map 171 Gross vehicle weight, ap‐
proved 281
Gross weight, permissible for trailer towing 281
H
Hand brake, refer to Parking brake 61
Hand-held transmitter, alter‐ nating code 137
Hazard warning flashers 267
HDC Hill Descent Control 100
HD Radio 180
Head airbags 86
Headlamp control, auto‐ matic 82
Headlamp courtesy delay fea‐ ture 82
Headlamp courtesy delay fea‐ ture via remote control 35
Headlamp flasher 64
Headlamp glass 263
Headlamps 263
Headlamps, care 274
Headlamp washer system 64
Headliner 15
Head restraints 45
Head restraints, front 49
Head-up Display 129
Head-up Display, care 276
Heavy cargo, stowing 150
Height, seats 45
Height, vehicle 280
High-beam Assistant 83
High beams 64
High beams/low beams, refer to High-beam Assistant 83
Hill Descent Control HDC 100
Hills 148
Hill start assistant, refer to Drive-off assistant 98
Hints 6
Holder for beverages 142
Homepage 6
Hood 255 Seite 295Everything from A to ZReference295
Online Edition for Part no. 01 40 2 607 971 - 09 11 490