2012 BMW 550I XDRIVE GRAN TURISMO fold seats
[x] Cancel search: fold seatsPage 53 of 321
level. When the Maximum Cooling function is
switched off, the unit switches to the previously
set level.
After a short time, the system automatically
moves down one level in order to prevent ex‐
cessive cooling.
Switching off
Press the button longer.
The LEDs go out.
Rear seats
General information
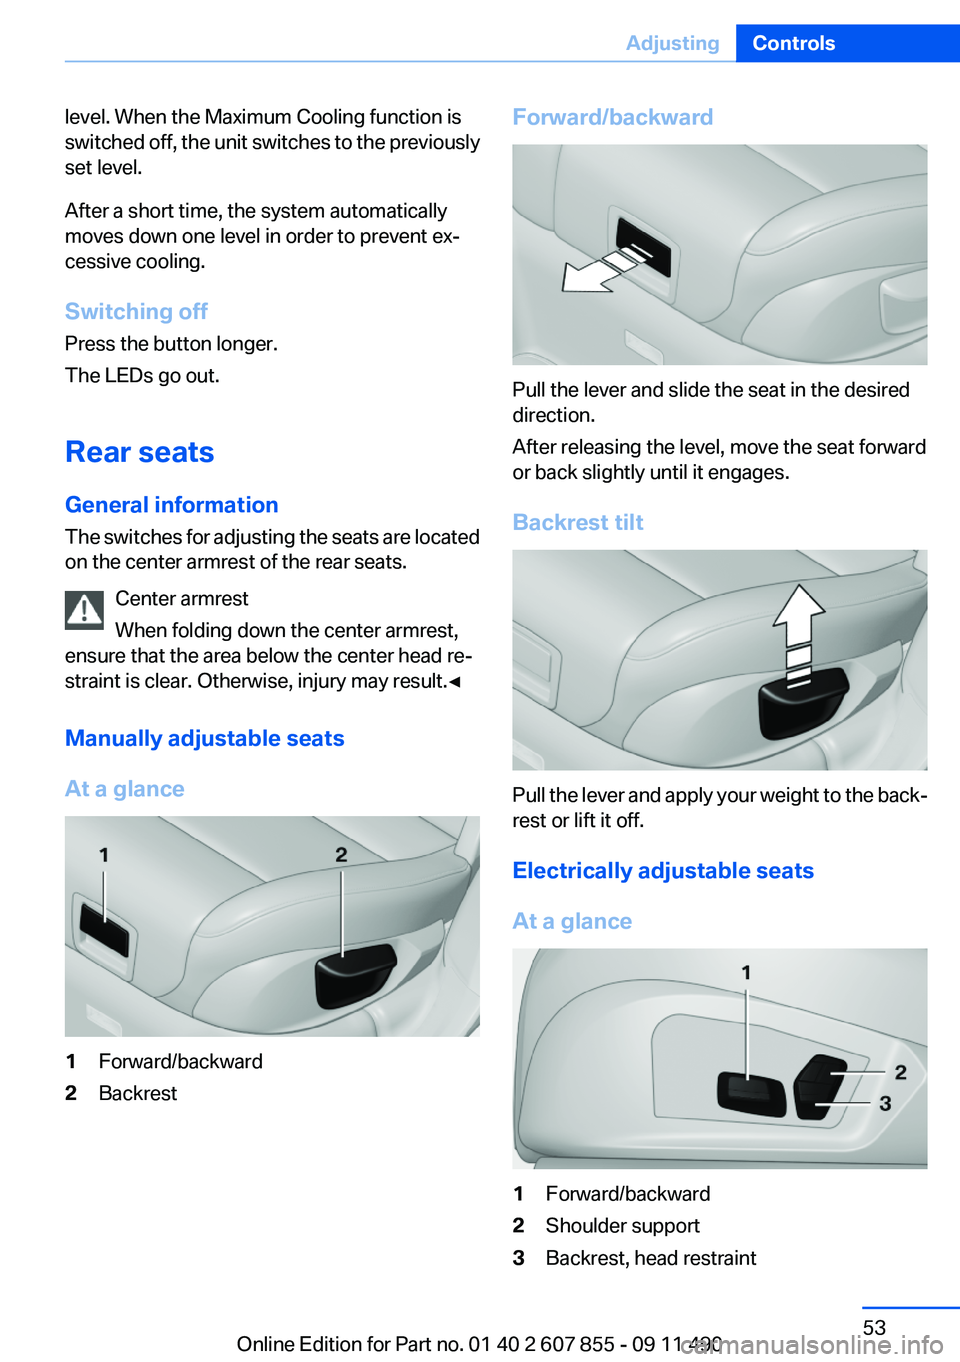
The switches for adjusting the seats are located
on the center armrest of the rear seats.
Center armrest
When folding down the center armrest,
ensure that the area below the center head re‐
straint is clear. Otherwise, injury may result.◀
Manually adjustable seats
At a glance1Forward/backward2BackrestForward/backward
Pull the lever and slide the seat in the desired
direction.
After releasing the level, move the seat forward
or back slightly until it engages.
Backrest tilt
Pull the lever and apply your weight to the back‐
rest or lift it off.
Electrically adjustable seats
At a glance
1Forward/backward2Shoulder support3Backrest, head restraintSeite 53AdjustingControls53
Online Edition for Part no. 01 40 2 607 855 - 09 11 490
Page 58 of 321
Distance to back of head: electrical
head restraints
The head restraint is automatically repositioned
when the shoulder support is adjusted.
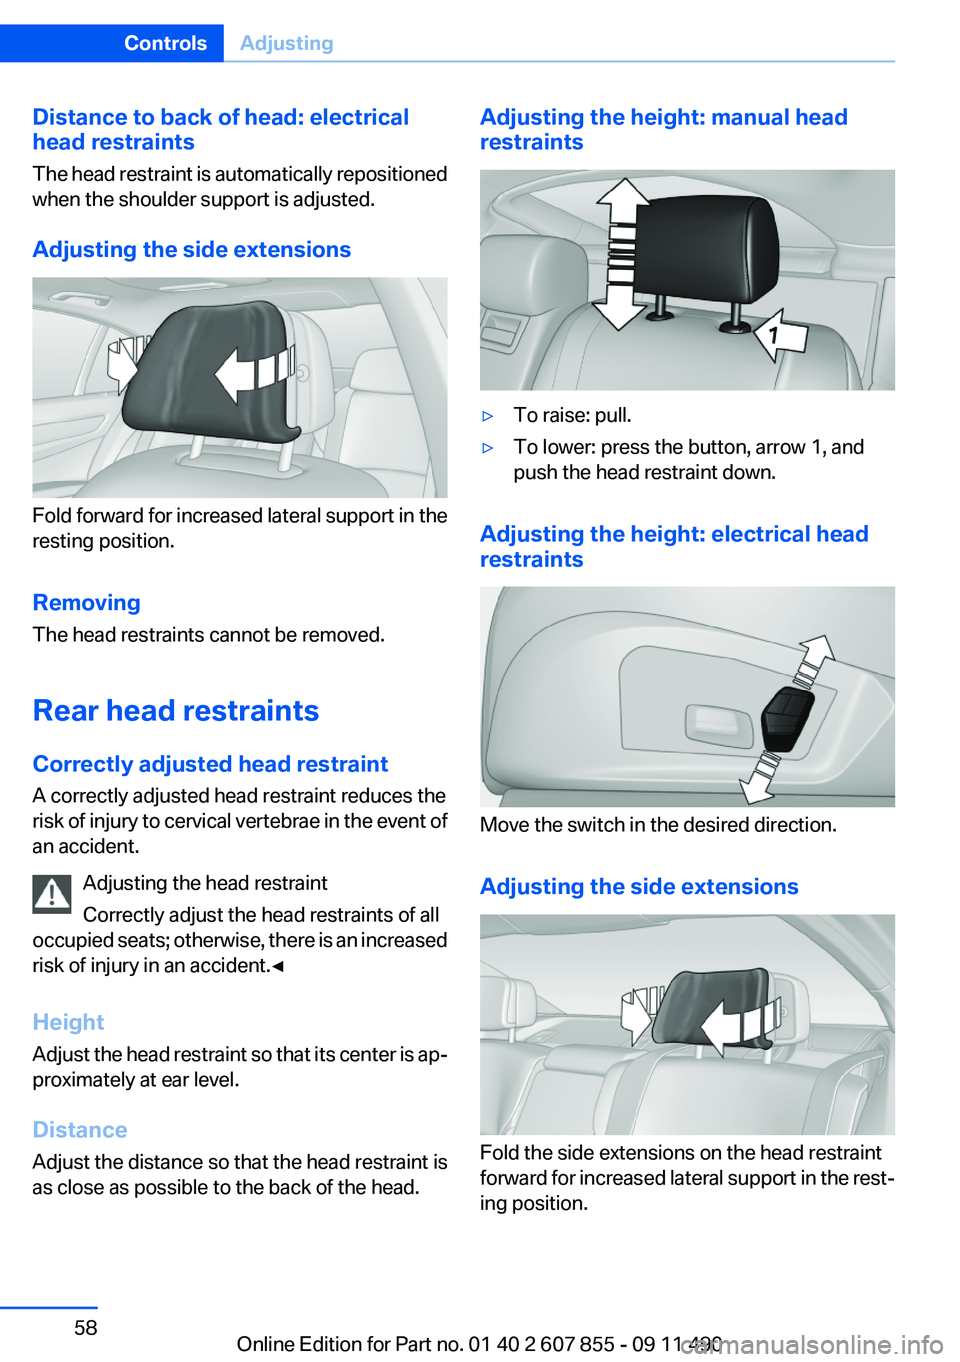
Adjusting the side extensions
Fold forward for increased lateral support in the
resting position.
Removing
The head restraints cannot be removed.
Rear head restraints
Correctly adjusted head restraint
A correctly adjusted head restraint reduces the
risk of injury to cervical vertebrae in the event of
an accident.
Adjusting the head restraint
Correctly adjust the head restraints of all
occupied seats; otherwise, there is an increased
risk of injury in an accident.◀
Height
Adjust the head restraint so that its center is ap‐
proximately at ear level.
Distance
Adjust the distance so that the head restraint is
as close as possible to the back of the head.
Adjusting the height: manual head
restraints▷To raise: pull.▷To lower: press the button, arrow 1, and
push the head restraint down.
Adjusting the height: electrical head
restraints
Move the switch in the desired direction.
Adjusting the side extensions
Fold the side extensions on the head restraint
forward for increased lateral support in the rest‐
ing position.
Seite 58ControlsAdjusting58
Online Edition for Part no. 01 40 2 607 855 - 09 11 490
Page 65 of 321
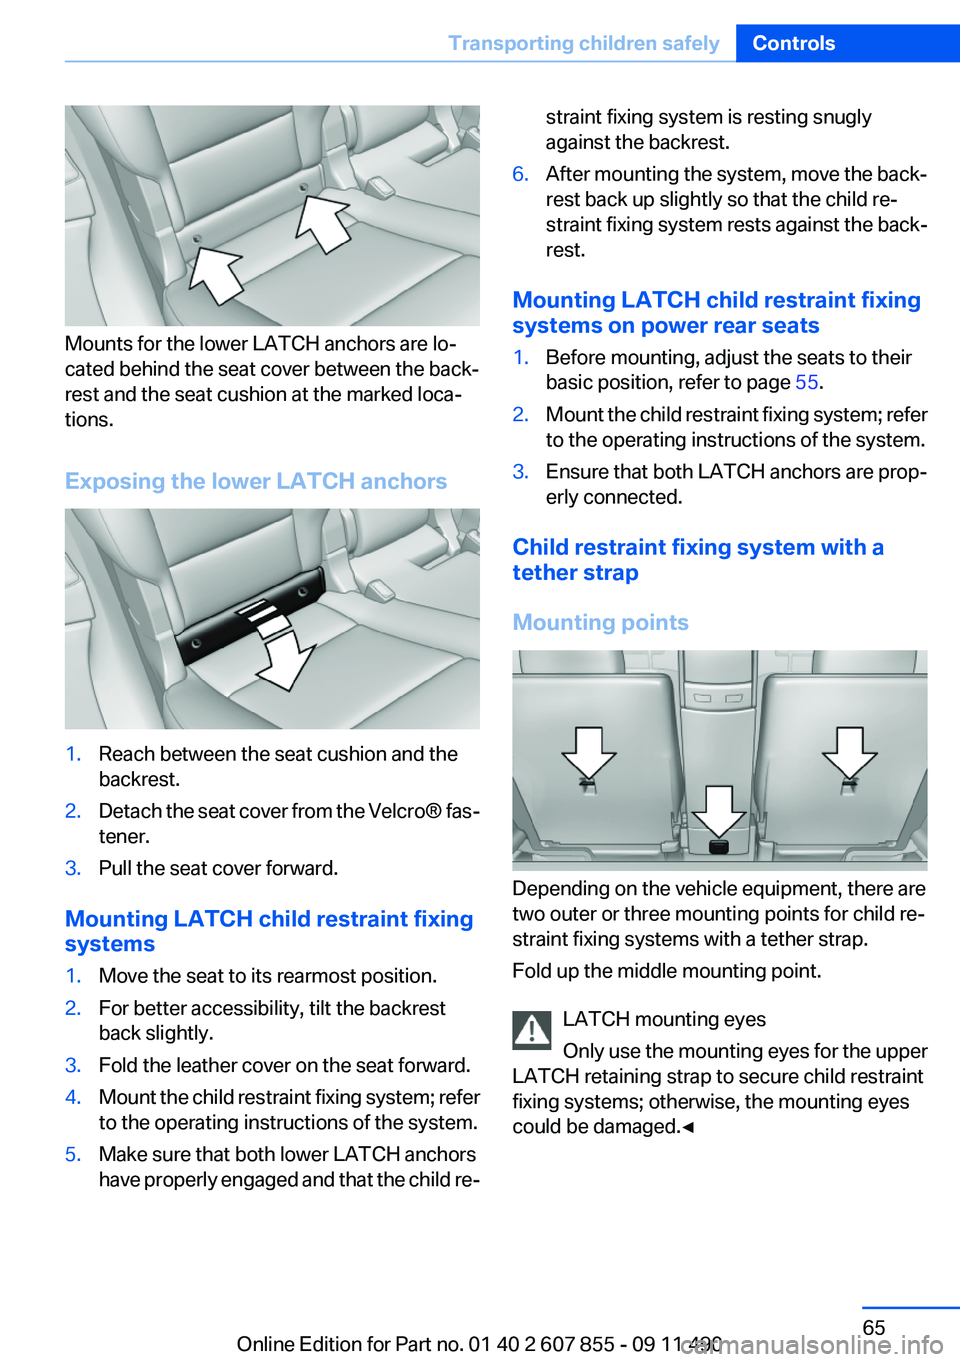
Mounts for the lower LATCH anchors are lo‐
cated behind the seat cover between the back‐
rest and the seat cushion at the marked loca‐
tions.
Exposing the lower LATCH anchors
1.Reach between the seat cushion and the
backrest.2.Detach the seat cover from the Velcro® fas‐
tener.3.Pull the seat cover forward.
Mounting LATCH child restraint fixing
systems
1.Move the seat to its rearmost position.2.For better accessibility, tilt the backrest
back slightly.3.Fold the leather cover on the seat forward.4.Mount the child restraint fixing system; refer
to the operating instructions of the system.5.Make sure that both lower LATCH anchors
have properly engaged and that the child re‐straint fixing system is resting snugly
against the backrest.6.After mounting the system, move the back‐
rest back up slightly so that the child re‐
straint fixing system rests against the back‐
rest.
Mounting LATCH child restraint fixing
systems on power rear seats
1.Before mounting, adjust the seats to their
basic position, refer to page 55.2.Mount the child restraint fixing system; refer
to the operating instructions of the system.3.Ensure that both LATCH anchors are prop‐
erly connected.
Child restraint fixing system with a
tether strap
Mounting points
Depending on the vehicle equipment, there are
two outer or three mounting points for child re‐
straint fixing systems with a tether strap.
Fold up the middle mounting point.
LATCH mounting eyes
Only use the mounting eyes for the upper
LATCH retaining strap to secure child restraint
fixing systems; otherwise, the mounting eyes
could be damaged.◀
Seite 65Transporting children safelyControls65
Online Edition for Part no. 01 40 2 607 855 - 09 11 490
Page 147 of 321
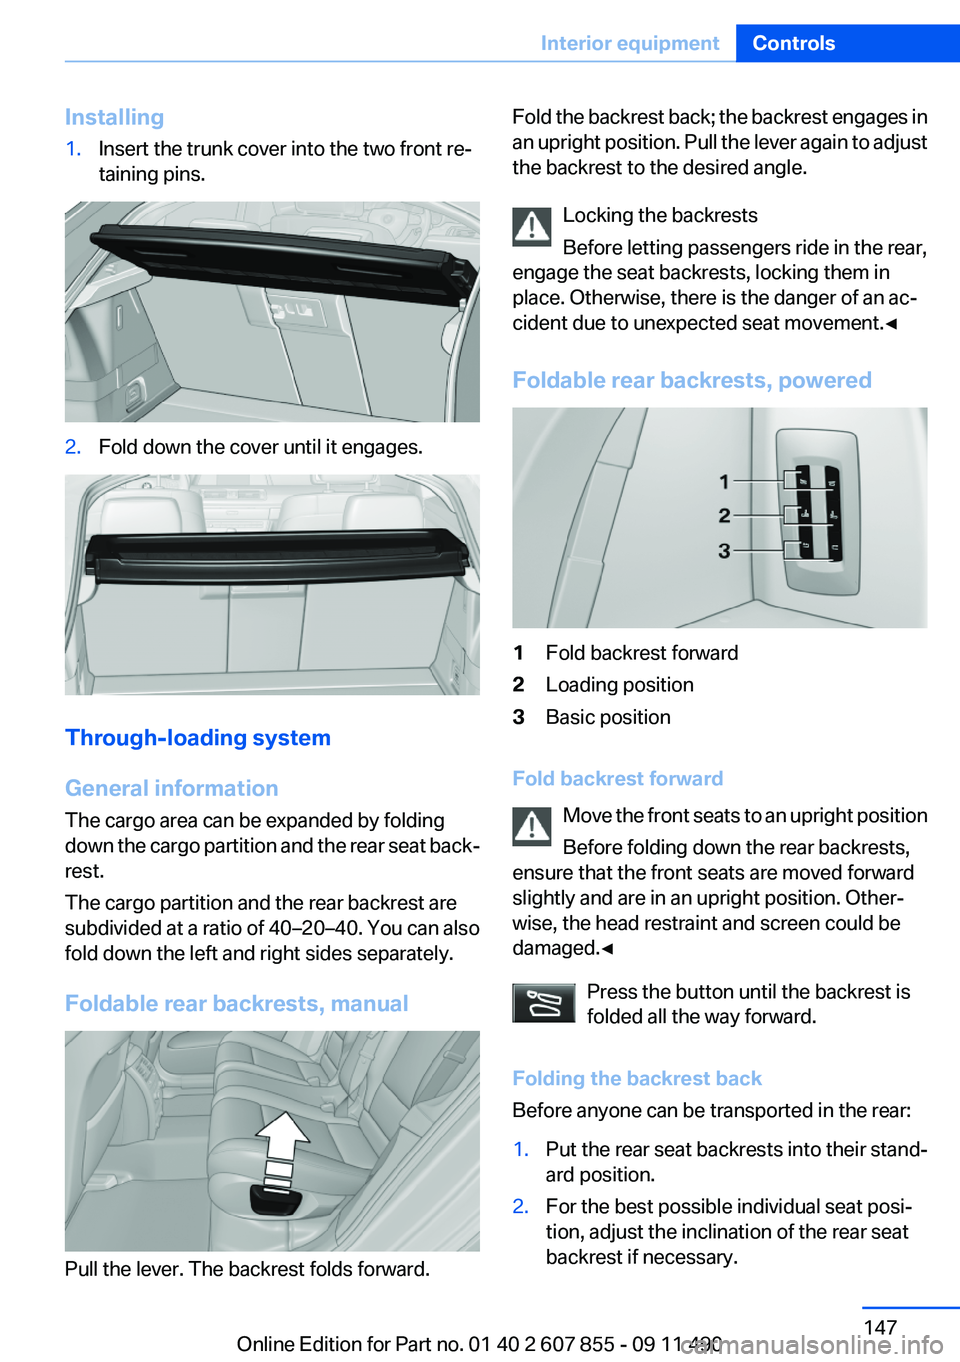
Installing1.Insert the trunk cover into the two front re‐
taining pins.2.Fold down the cover until it engages.
Through-loading system
General information
The cargo area can be expanded by folding
down the cargo partition and the rear seat back‐
rest.
The cargo partition and the rear backrest are
subdivided at a ratio of 40–20–40. You can also
fold down the left and right sides separately.
Foldable rear backrests, manual
Pull the lever. The backrest folds forward.
Fold the backrest back; the backrest engages in
an upright position. Pull the lever again to adjust
the backrest to the desired angle.
Locking the backrests
Before letting passengers ride in the rear,
engage the seat backrests, locking them in
place. Otherwise, there is the danger of an ac‐
cident due to unexpected seat movement.◀
Foldable rear backrests, powered1Fold backrest forward2Loading position3Basic position
Fold backrest forward Move the front seats to an upright position
Before folding down the rear backrests,
ensure that the front seats are moved forward
slightly and are in an upright position. Other‐
wise, the head restraint and screen could be
damaged.◀
Press the button until the backrest is
folded all the way forward.
Folding the backrest back
Before anyone can be transported in the rear:
1.Put the rear seat backrests into their stand‐
ard position.2.For the best possible individual seat posi‐
tion, adjust the inclination of the rear seat
backrest if necessary.Seite 147Interior equipmentControls147
Online Edition for Part no. 01 40 2 607 855 - 09 11 490
Page 148 of 321
Adjust the standard position of the rear
seat backrest
Before transporting passengers in the rear and
adjusting the rear seat backrest, set the rear seat
backrest to its basic position. Otherwise, the
rear seats may not effectively restrain passen‐
gers in an accident if the backrests are not ade‐
quately inclined.◀
Loading position Press the button. The seat moves for‐
ward and the backrest moves to the ba‐
sic position. Comfortable seating is still possible
although knee clearance is reduced.
Basic position Press and hold the button until the seat
stops automatically in its basic position.
Operation of the rear backrest was
deactivated
After a brief period, operation of the rear back‐
rest is deactivated to save battery power.
To reactivate operation:▷Open or close a door or the tailgate.▷Press a button on the remote control.▷Press the Start/Stop button.
Folding down the cargo partition
Danger of pinching
Before folding down the trunk partition,
ensure that the area of movement of the parti‐
tion is clear. In particular, ensure that no one is
located in the area of movement and that no one
reaches into the area of movement of the trunk
partition when the middle section is folded
down. Otherwise, injury or damage may result. ◀
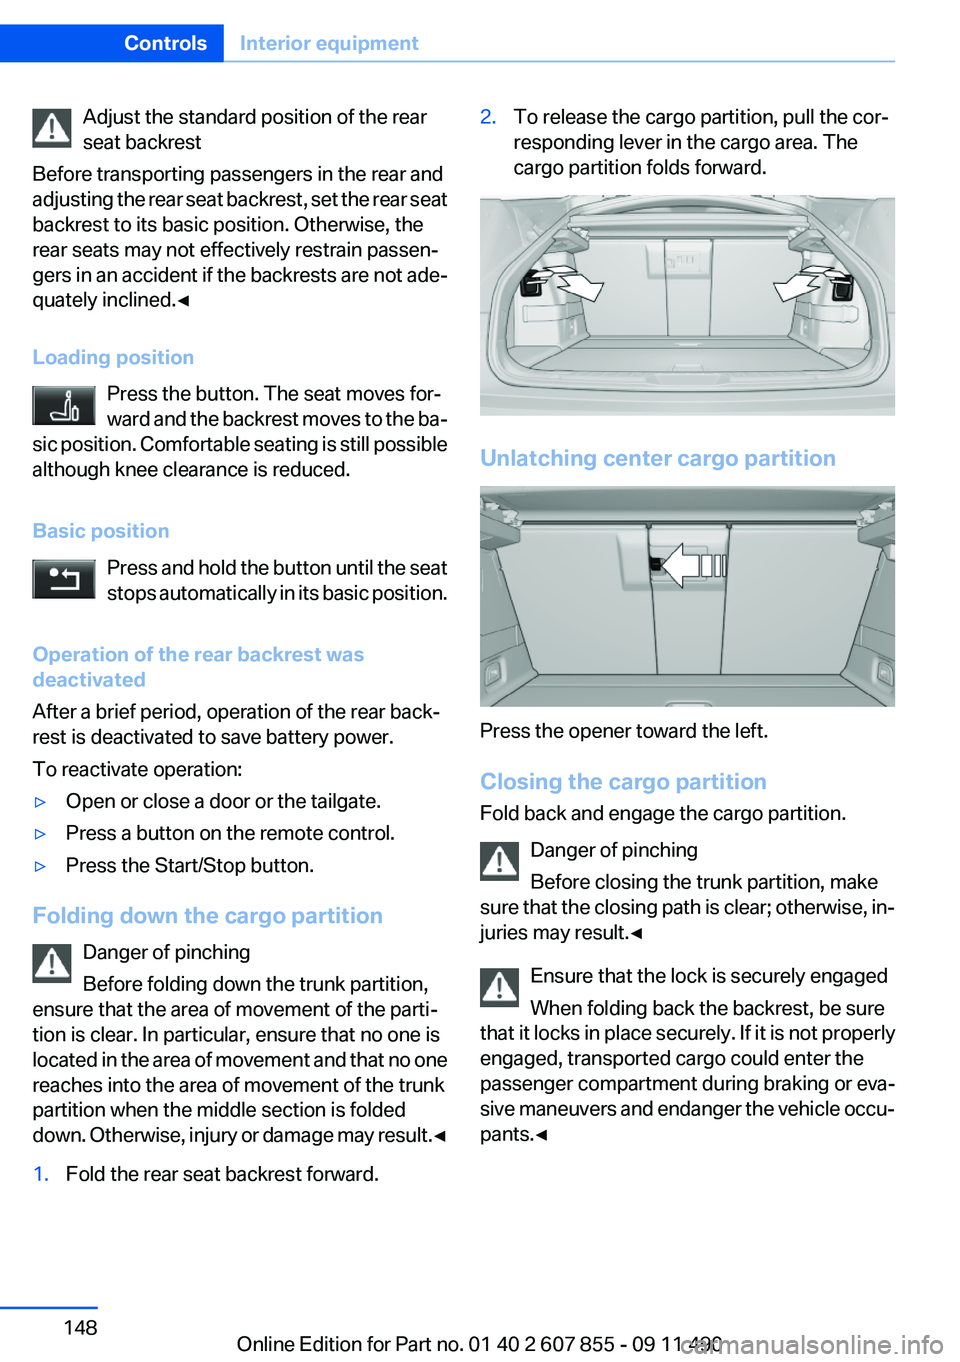
1.Fold the rear seat backrest forward.2.To release the cargo partition, pull the cor‐
responding lever in the cargo area. The
cargo partition folds forward.
Unlatching center cargo partition
Press the opener toward the left.
Closing the cargo partition
Fold back and engage the cargo partition.
Danger of pinching
Before closing the trunk partition, make
sure that the closing path is clear; otherwise, in‐
juries may result.◀
Ensure that the lock is securely engaged
When folding back the backrest, be sure
that it locks in place securely. If it is not properly
engaged, transported cargo could enter the
passenger compartment during braking or eva‐
sive maneuvers and endanger the vehicle occu‐
pants.◀
Seite 148ControlsInterior equipment148
Online Edition for Part no. 01 40 2 607 855 - 09 11 490
Page 150 of 321
Storage compartmentsVehicle equipment
All standard, country-specific and optional
equipment that is offered in the model series is
described in this chapter. Therefore, equipment
is also described that is not available in a vehicle,
e. g., because of the selected optional equip‐
ment or country variant. This also applies for
safety-related functions and systems.
Storage compartments
The following storage compartments are avail‐
able in the vehicle interior:▷Glove compartment on the driver's and front
passenger side, refer to page 150.▷Storage compartment in the center console,
refer to page 152.▷Storage compartment in the center armrest,
refer to page 151, in the front and rear.▷Compartments in the doors.▷Pockets on the backrests of the front seats.▷Net in the front passenger footwell.
No loose objects in the passenger com‐
partment
Do not stow any objects in the passenger com‐
partment without securing them; otherwise,
they may present a danger to occupants for in‐
stance during braking and avoidance maneu‐
vers.◀
Glove compartment
Front passenger side
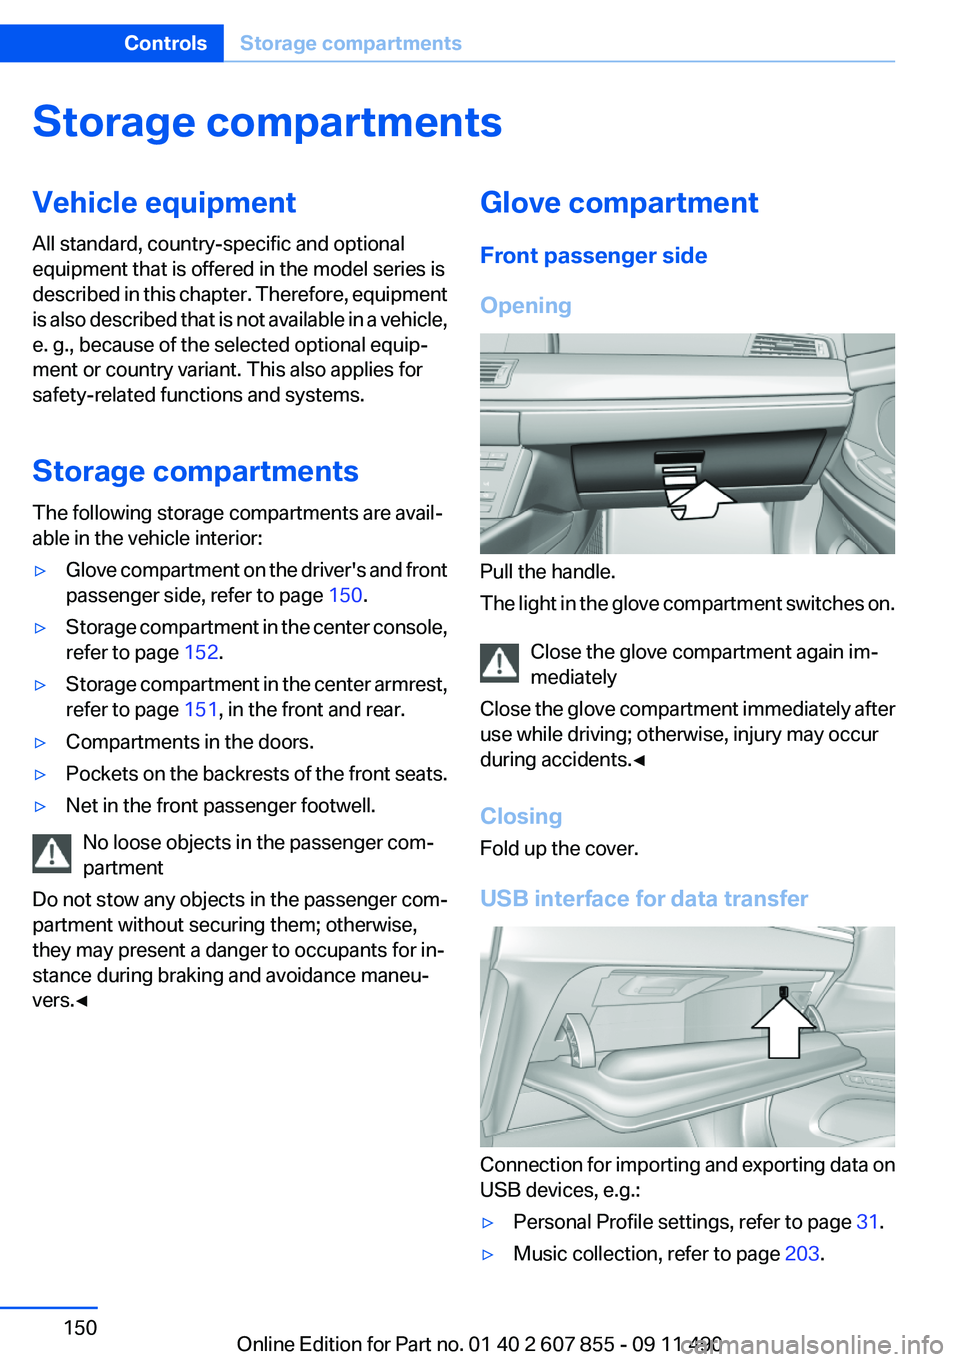
Opening
Pull the handle.
The light in the glove compartment switches on.
Close the glove compartment again im‐
mediately
Close the glove compartment immediately after
use while driving; otherwise, injury may occur
during accidents.◀
Closing
Fold up the cover.
USB interface for data transfer
Connection for importing and exporting data on
USB devices, e.g.:
▷Personal Profile settings, refer to page 31.▷Music collection, refer to page 203.Seite 150ControlsStorage compartments150
Online Edition for Part no. 01 40 2 607 855 - 09 11 490
Page 151 of 321
Observe the following when connecting:▷Do not use force when plugging the con‐
nector into the USB interface.▷Do not connect devices such as fans or
lamps to the USB interface.▷Do not connect USB hard drives.▷Do not use the USB interface to recharge
external devices.
Driver's side
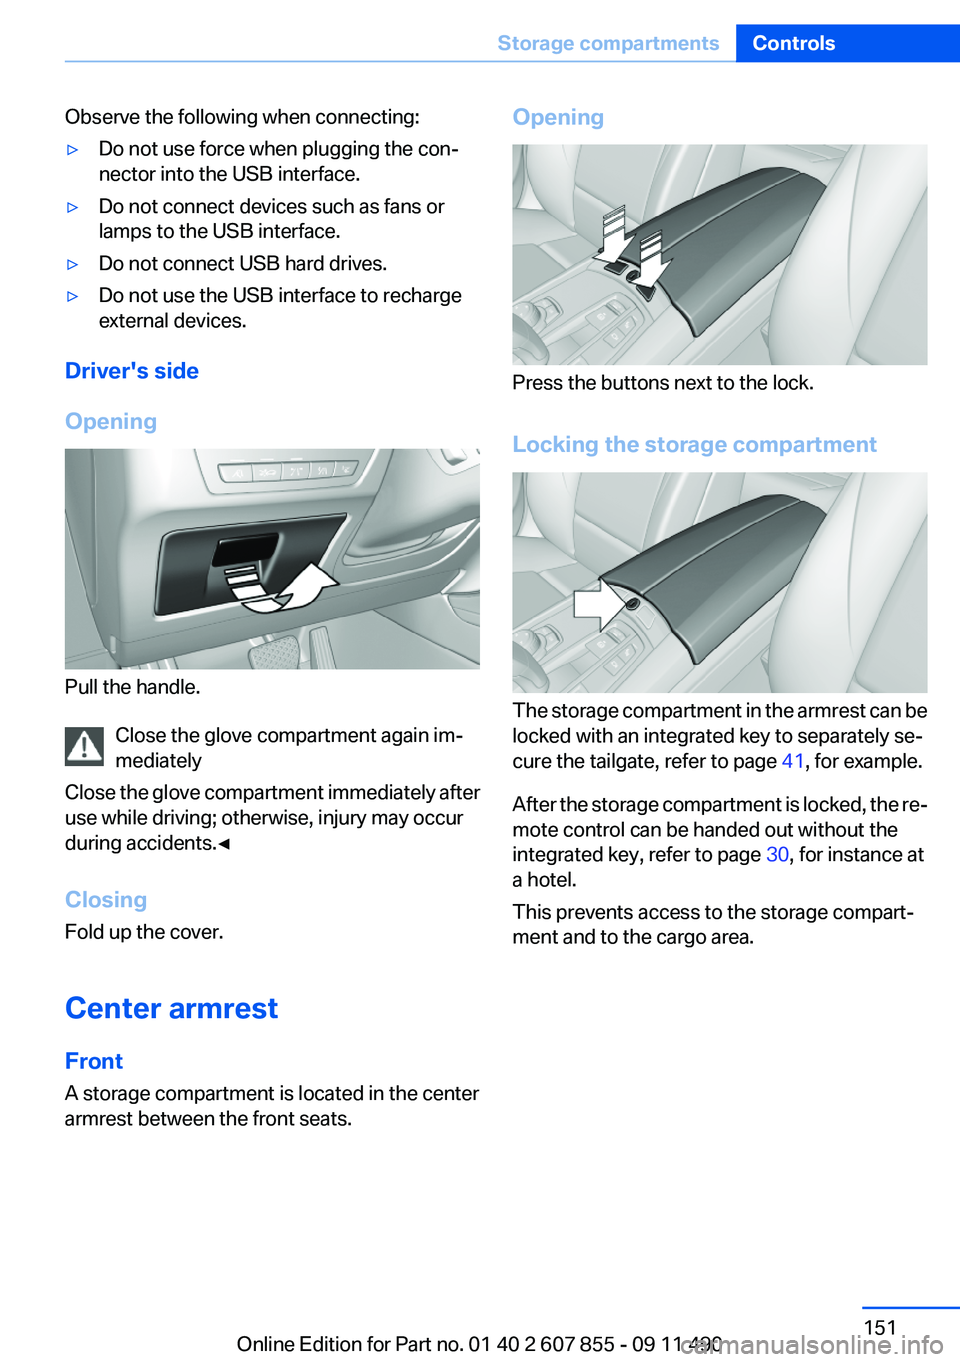
Opening
Pull the handle. Close the glove compartment again im‐
mediately
Close the glove compartment immediately after
use while driving; otherwise, injury may occur
during accidents.◀
Closing
Fold up the cover.
Center armrest
Front
A storage compartment is located in the center
armrest between the front seats.
Opening
Press the buttons next to the lock.
Locking the storage compartment
The storage compartment in the armrest can be
locked with an integrated key to separately se‐
cure the tailgate, refer to page 41, for example.
After the storage compartment is locked, the re‐
mote control can be handed out without the
integrated key, refer to page 30, for instance at
a hotel.
This prevents access to the storage compart‐
ment and to the cargo area.
Seite 151Storage compartmentsControls151
Online Edition for Part no. 01 40 2 607 855 - 09 11 490
Page 152 of 321
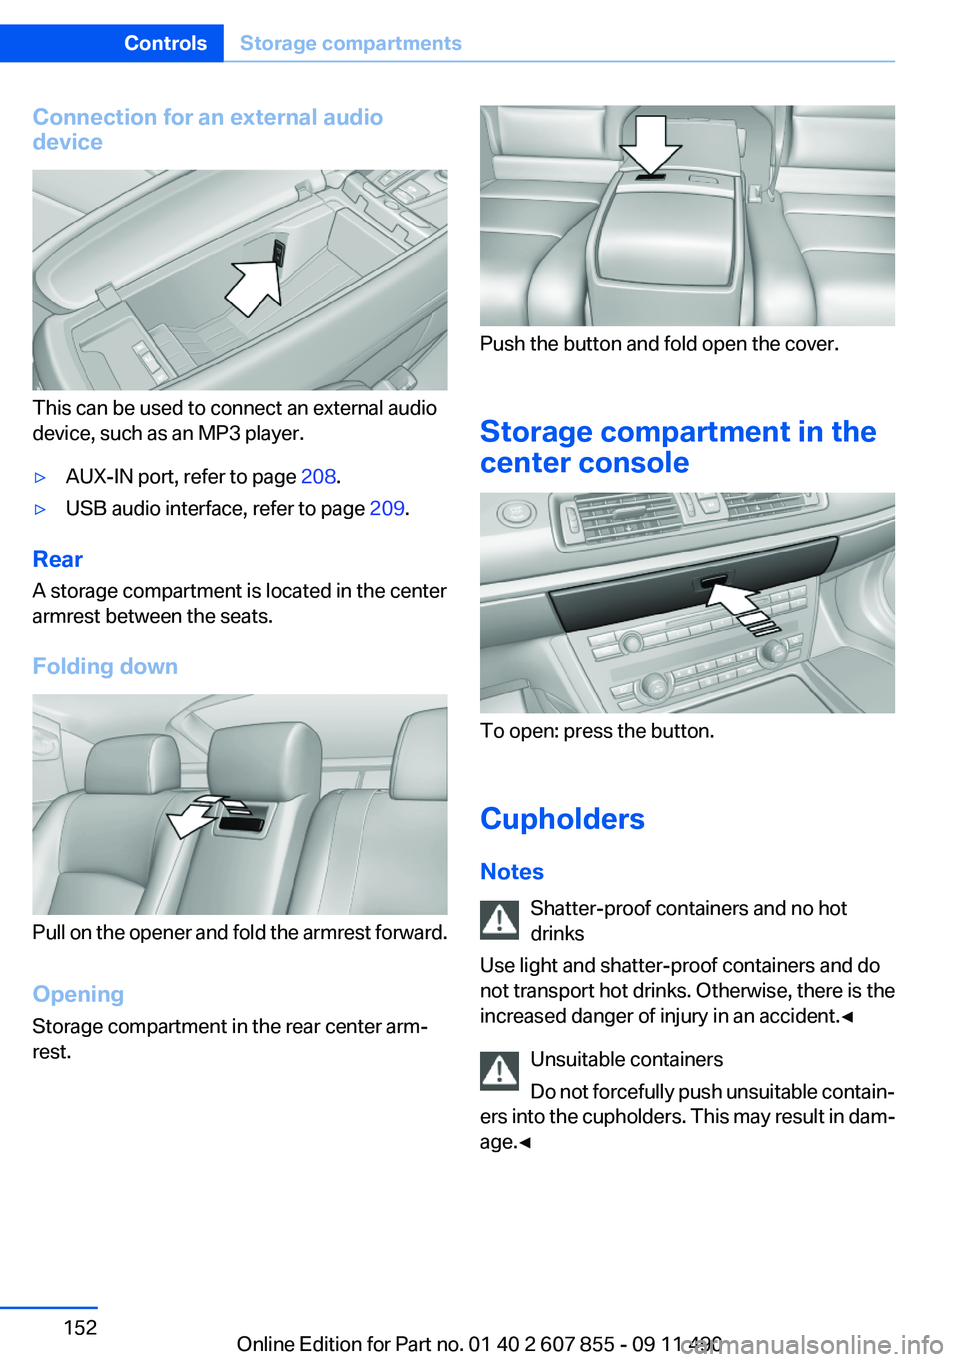
Connection for an external audio
device
This can be used to connect an external audio
device, such as an MP3 player.
▷AUX-IN port, refer to page 208.▷USB audio interface, refer to page 209.
Rear
A storage compartment is located in the center
armrest between the seats.
Folding down
Pull on the opener and fold the armrest forward.
Opening
Storage compartment in the rear center arm‐
rest.
Push the button and fold open the cover.
Storage compartment in the
center console
To open: press the button.
Cupholders
Notes Shatter-proof containers and no hot
drinks
Use light and shatter-proof containers and do
not transport hot drinks. Otherwise, there is the
increased danger of injury in an accident.◀
Unsuitable containers
Do not forcefully push unsuitable contain‐
ers into the cupholders. This may result in dam‐
age.◀
Seite 152ControlsStorage compartments152
Online Edition for Part no. 01 40 2 607 855 - 09 11 490