2012 BMW 535I GRAN TURISMO rear entertainment
[x] Cancel search: rear entertainmentPage 5 of 321
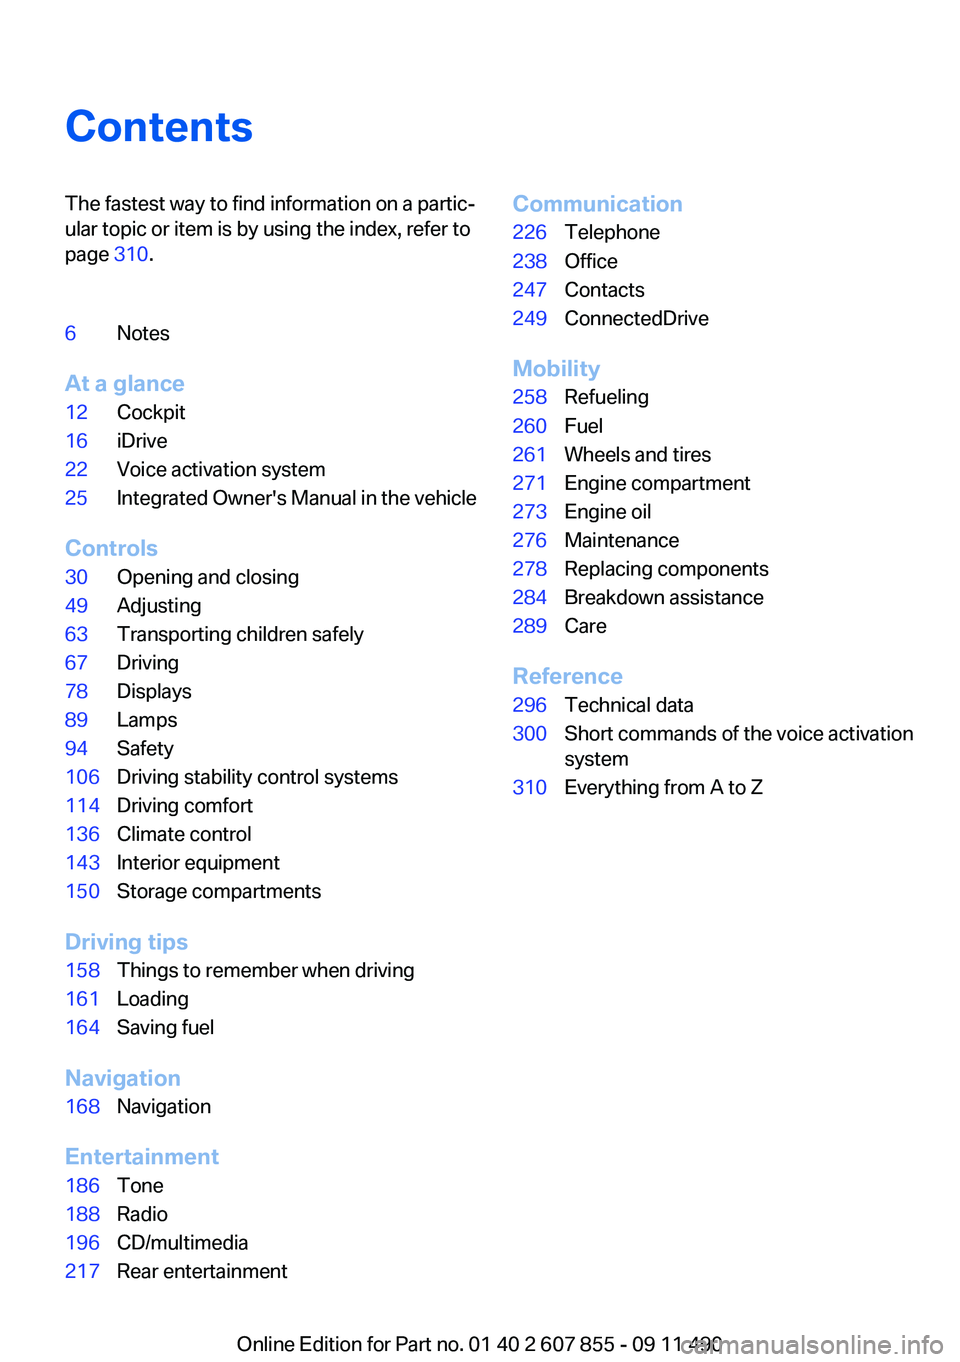
ContentsThe fastest way to find information on a partic‐
ular topic or item is by using the index, refer to
page 310.6Notes
At a glance
12Cockpit16iDrive22Voice activation system25Integrated Owner's Manual in the vehicle
Controls
30Opening and closing49Adjusting63Transporting children safely67Driving78Displays89Lamps94Safety106Driving stability control systems114Driving comfort136Climate control143Interior equipment150Storage compartments
Driving tips
158Things to remember when driving161Loading164Saving fuel
Navigation
168Navigation
Entertainment
186Tone188Radio196CD/multimedia217Rear entertainmentCommunication226Telephone238Office247Contacts249ConnectedDrive
Mobility
258Refueling260Fuel261Wheels and tires271Engine compartment273Engine oil276Maintenance278Replacing components284Breakdown assistance289Care
Reference
296Technical data300Short commands of the voice activation
system310Everything from A to Z
Online Edition for Part no. 01 40 2 607 855 - 09 11 490
Page 20 of 321
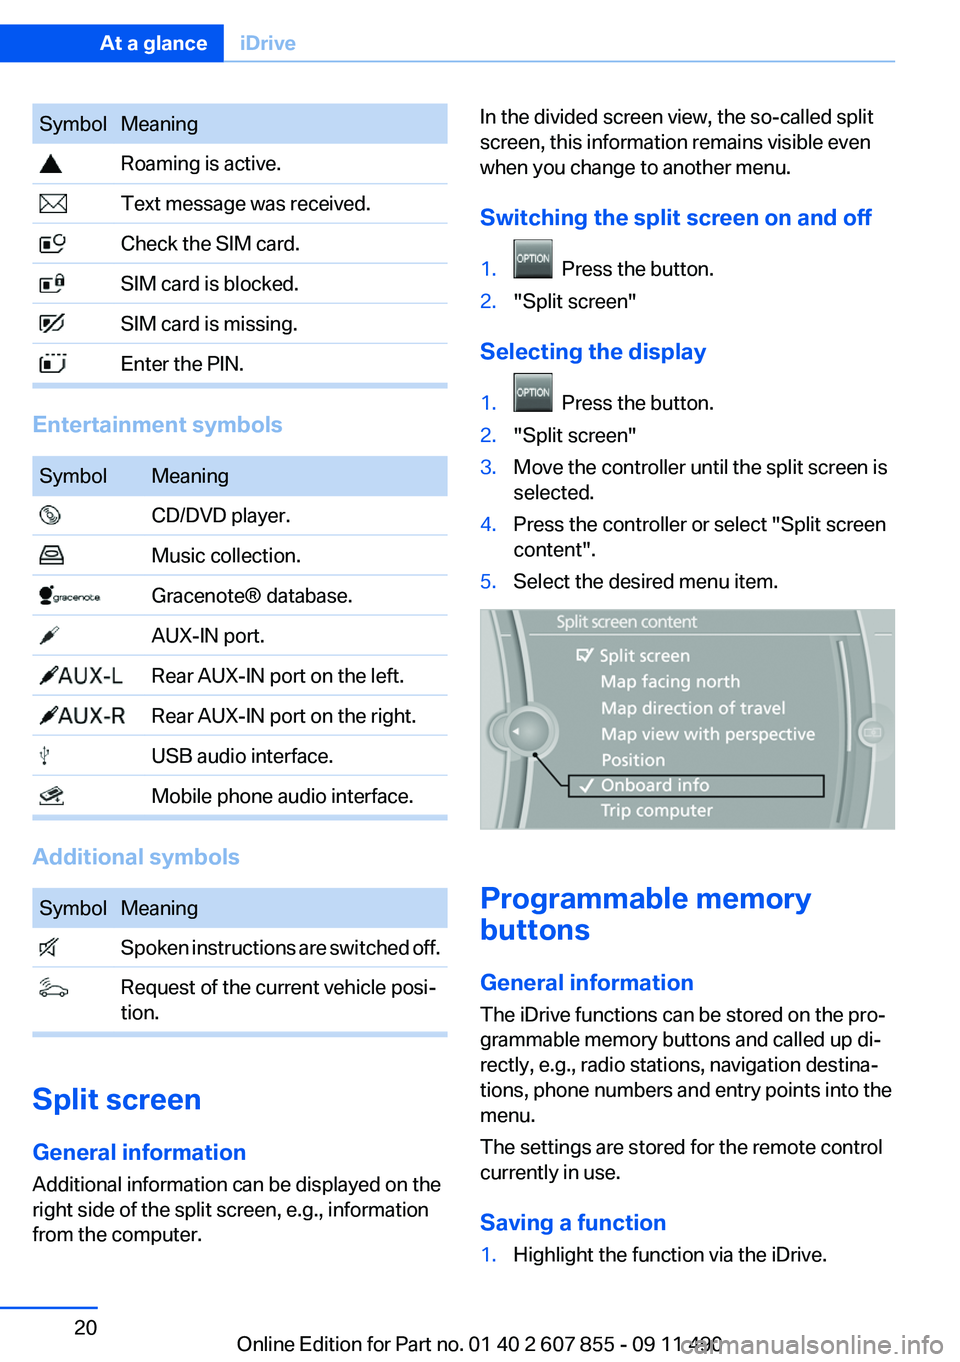
SymbolMeaning Roaming is active. Text message was received. Check the SIM card. SIM card is blocked. SIM card is missing. Enter the PIN.
Entertainment symbols
SymbolMeaning CD/DVD player. Music collection. Gracenote® database. AUX-IN port. Rear AUX-IN port on the left. Rear AUX-IN port on the right. USB audio interface. Mobile phone audio interface.
Additional symbols
SymbolMeaning Spoken instructions are switched off. Request of the current vehicle posi‐
tion.
Split screen
General information
Additional information can be displayed on the
right side of the split screen, e.g., information
from the computer.
In the divided screen view, the so-called split
screen, this information remains visible even
when you change to another menu.
Switching the split screen on and off1. Press the button.2."Split screen"
Selecting the display
1. Press the button.2."Split screen"3.Move the controller until the split screen is
selected.4.Press the controller or select "Split screen
content".5.Select the desired menu item.
Programmable memory
buttons
General information
The iDrive functions can be stored on the pro‐
grammable memory buttons and called up di‐
rectly, e.g., radio stations, navigation destina‐
tions, phone numbers and entry points into the
menu.
The settings are stored for the remote control
currently in use.
Saving a function
1.Highlight the function via the iDrive.Seite 20At a glanceiDrive20
Online Edition for Part no. 01 40 2 607 855 - 09 11 490
Page 186 of 321
ToneVehicle equipment
All standard, country-specific and optional
equipment that is offered in the model series is
described in this chapter. Therefore, equipment
is also described that is not available in a vehicle,
e. g., because of the selected optional equip‐
ment or country variant. This also applies for
safety-related functions and systems.
General information
The sound settings are stored for the remote
control currently in use.
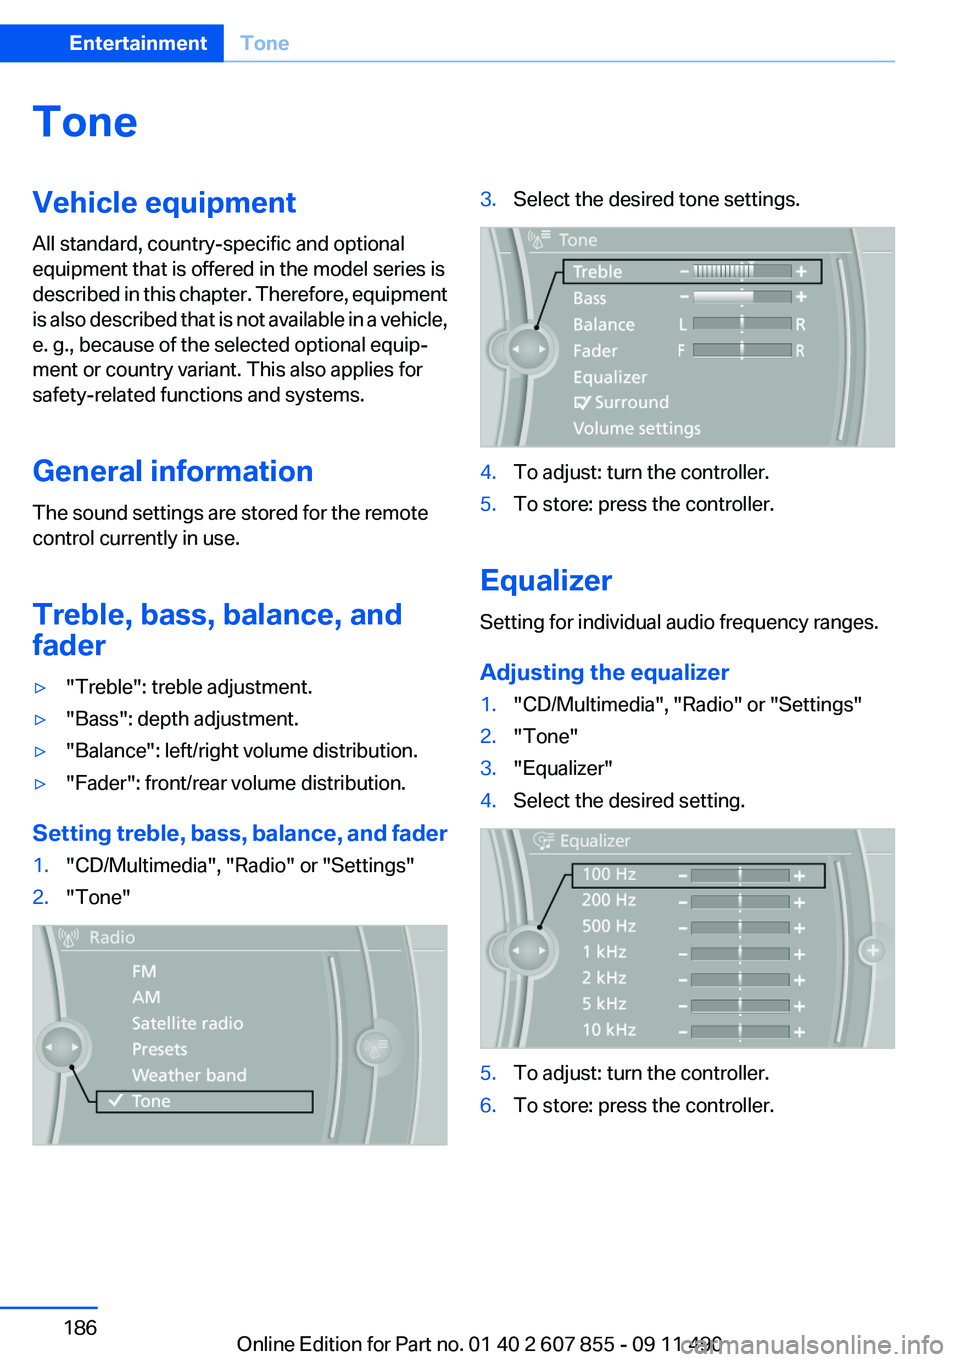
Treble, bass, balance, and
fader▷"Treble": treble adjustment.▷"Bass": depth adjustment.▷"Balance": left/right volume distribution.▷"Fader": front/rear volume distribution.
Setting treble, bass, balance, and fader
1."CD/Multimedia", "Radio" or "Settings"2."Tone"3.Select the desired tone settings.4.To adjust: turn the controller.5.To store: press the controller.
Equalizer
Setting for individual audio frequency ranges.
Adjusting the equalizer
1."CD/Multimedia", "Radio" or "Settings"2."Tone"3."Equalizer"4.Select the desired setting.5.To adjust: turn the controller.6.To store: press the controller.Seite 186EntertainmentTone186
Online Edition for Part no. 01 40 2 607 855 - 09 11 490
Page 196 of 321
CD/multimediaVehicle equipment
All standard, country-specific and optional
equipment that is offered in the model series is
described in this chapter. Therefore, equipment
is also described that is not available in a vehicle,
e. g., because of the selected optional equip‐
ment or country variant. This also applies for
safety-related functions and systems.
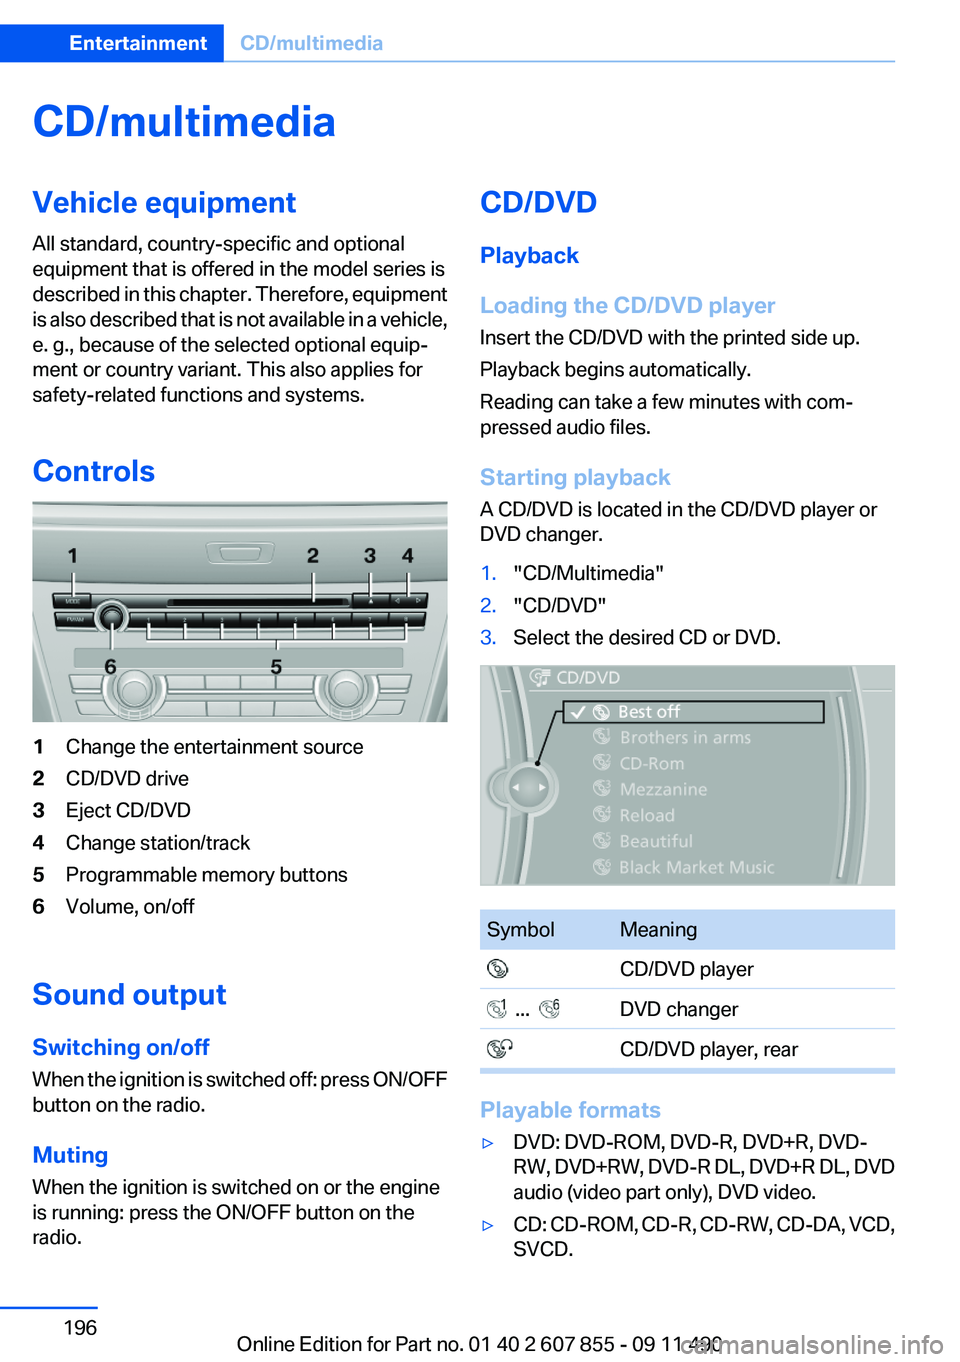
Controls1Change the entertainment source2CD/DVD drive3Eject CD/DVD4Change station/track5Programmable memory buttons6Volume, on/off
Sound output
Switching on/off
When the ignition is switched off: press ON/OFF
button on the radio.
Muting
When the ignition is switched on or the engine
is running: press the ON/OFF button on the
radio.
CD/DVD
Playback
Loading the CD/DVD player
Insert the CD/DVD with the printed side up.
Playback begins automatically.
Reading can take a few minutes with com‐
pressed audio files.
Starting playback
A CD/DVD is located in the CD/DVD player or
DVD changer.1."CD/Multimedia"2."CD/DVD"3.Select the desired CD or DVD.SymbolMeaning CD/DVD player ... DVD changer CD/DVD player, rear
Playable formats
▷DVD: DVD-ROM, DVD-R, DVD+R, DVD-
RW, DVD+RW, DVD-R DL, DVD+R DL, DVD
audio (video part only), DVD video.▷CD: CD-ROM, CD-R, CD-RW, CD-DA, VCD,
SVCD.Seite 196EntertainmentCD/multimedia196
Online Edition for Part no. 01 40 2 607 855 - 09 11 490
Page 208 of 321
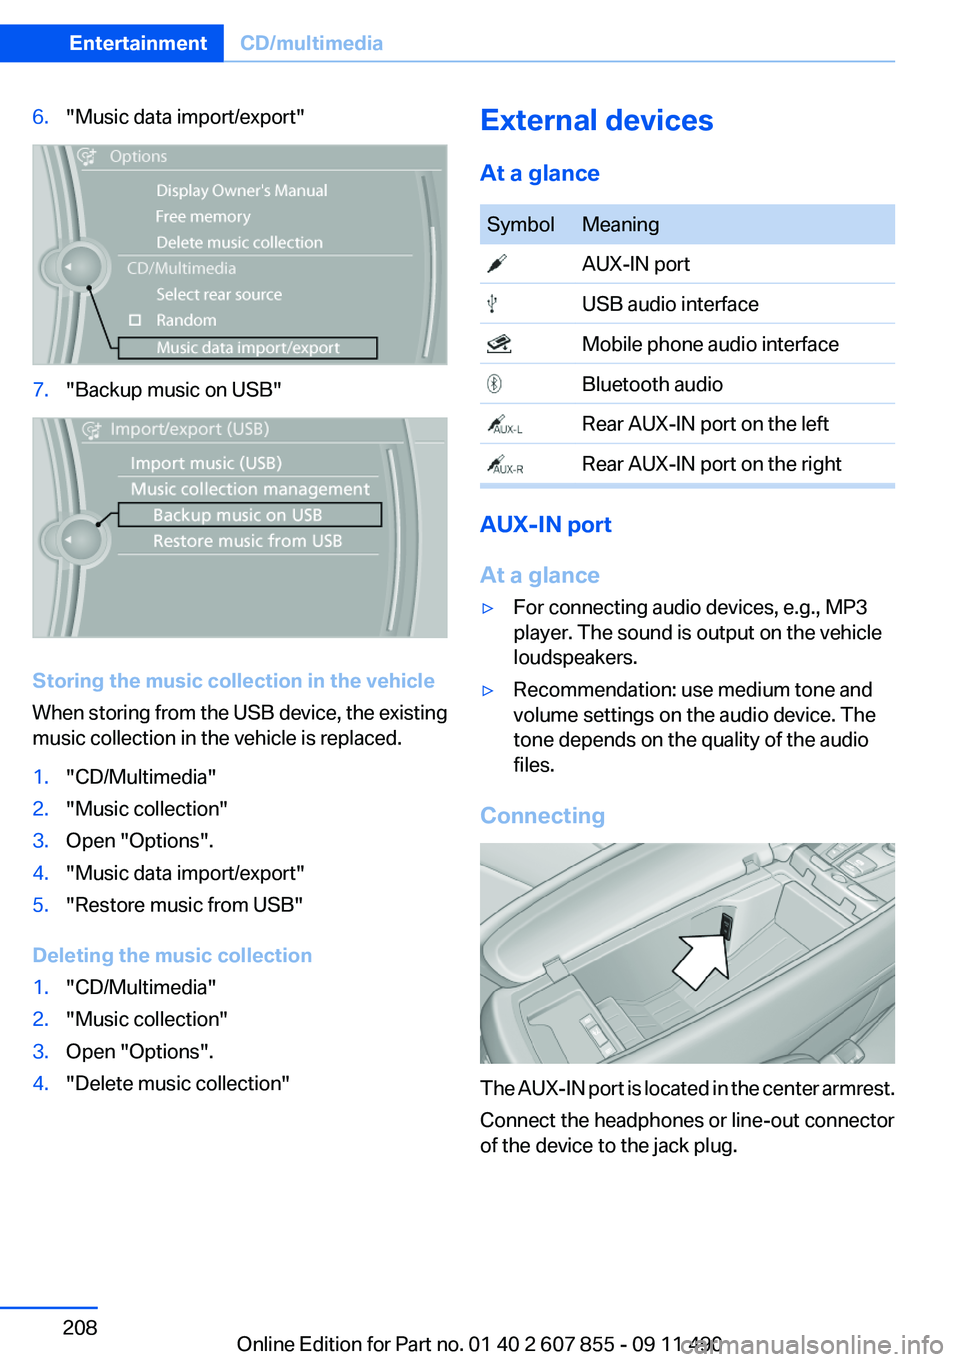
6."Music data import/export"7."Backup music on USB"
Storing the music collection in the vehicle
When storing from the USB device, the existing
music collection in the vehicle is replaced.
1."CD/Multimedia"2."Music collection"3.Open "Options".4."Music data import/export"5."Restore music from USB"
Deleting the music collection
1."CD/Multimedia"2."Music collection"3.Open "Options".4."Delete music collection"External devices
At a glanceSymbolMeaning AUX-IN port USB audio interface Mobile phone audio interface Bluetooth audio Rear AUX-IN port on the left Rear AUX-IN port on the right
AUX-IN port
At a glance
▷For connecting audio devices, e.g., MP3
player. The sound is output on the vehicle
loudspeakers.▷Recommendation: use medium tone and
volume settings on the audio device. The
tone depends on the quality of the audio
files.
Connecting
The AUX-IN port is located in the center armrest.
Connect the headphones or line-out connector
of the device to the jack plug.
Seite 208EntertainmentCD/multimedia208
Online Edition for Part no. 01 40 2 607 855 - 09 11 490
Page 217 of 321
Rear entertainmentVehicle equipment
All standard, country-specific and optional
equipment that is offered in the model series is
described in this chapter. Therefore, equipment
is also described that is not available in a vehicle,
e. g., because of the selected optional equip‐
ment or country variant. This also applies for
safety-related functions and systems.
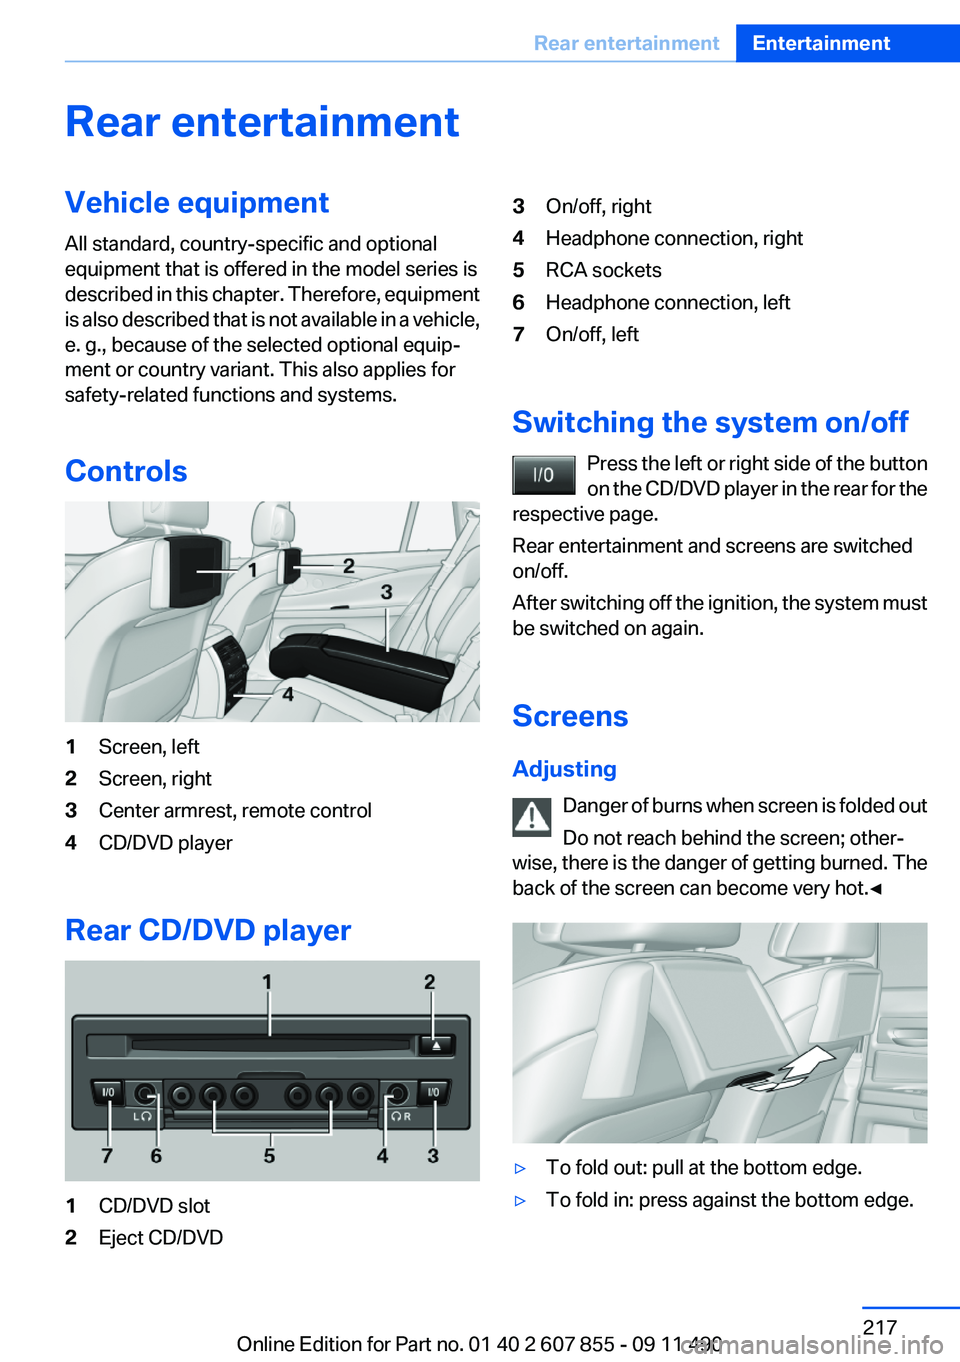
Controls1Screen, left2Screen, right3Center armrest, remote control4CD/DVD player
Rear CD/DVD player
1CD/DVD slot2Eject CD/DVD3On/off, right4Headphone connection, right5RCA sockets6Headphone connection, left7On/off, left
Switching the system on/off Press the left or right side of the button
on the CD/DVD player in the rear for the
respective page.
Rear entertainment and screens are switched
on/off.
After switching off the ignition, the system must
be switched on again.
Screens
Adjusting Danger of burns when screen is folded out
Do not reach behind the screen; other‐
wise, there is the danger of getting burned. The
back of the screen can become very hot.◀
▷To fold out: pull at the bottom edge.▷To fold in: press against the bottom edge.Seite 217Rear entertainmentEntertainment217
Online Edition for Part no. 01 40 2 607 855 - 09 11 490
Page 218 of 321
Notes▷Do not cover lower screen edge, since this
is where the sensors and the infrared inter‐
face are installed.▷When loading the rear seats and adjusting
the backrest of the front seat, fold in the
screens.▷When using the through-loading system,
fold the screens down.▷When cleaning the screen, follow the care
instructions, refer to page 292.
Remote control
In the center armrest in the rear
Storage is possible in a vertical or horizontal po‐
sition in the center armrest.
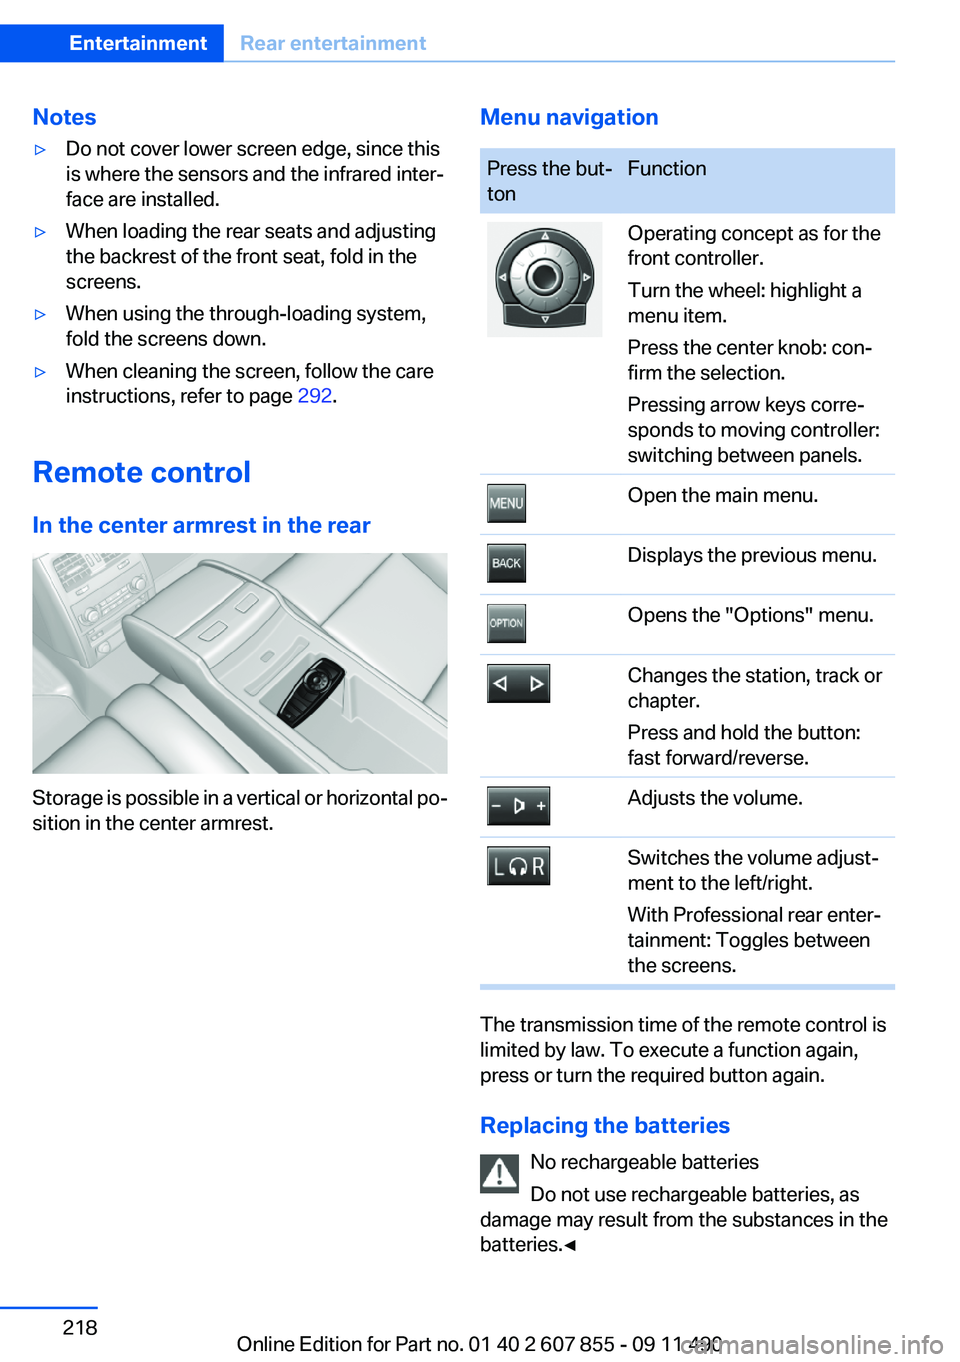
Menu navigationPress the but‐
tonFunctionOperating concept as for the
front controller.
Turn the wheel: highlight a
menu item.
Press the center knob: con‐
firm the selection.
Pressing arrow keys corre‐
sponds to moving controller:
switching between panels.Open the main menu.Displays the previous menu.Opens the "Options" menu.Changes the station, track or
chapter.
Press and hold the button:
fast forward/reverse.Adjusts the volume.Switches the volume adjust‐
ment to the left/right.
With Professional rear enter‐
tainment: Toggles between
the screens.
The transmission time of the remote control is
limited by law. To execute a function again,
press or turn the required button again.
Replacing the batteries No rechargeable batteries
Do not use rechargeable batteries, as
damage may result from the substances in the
batteries.◀
Seite 218EntertainmentRear entertainment218
Online Edition for Part no. 01 40 2 607 855 - 09 11 490
Page 219 of 321
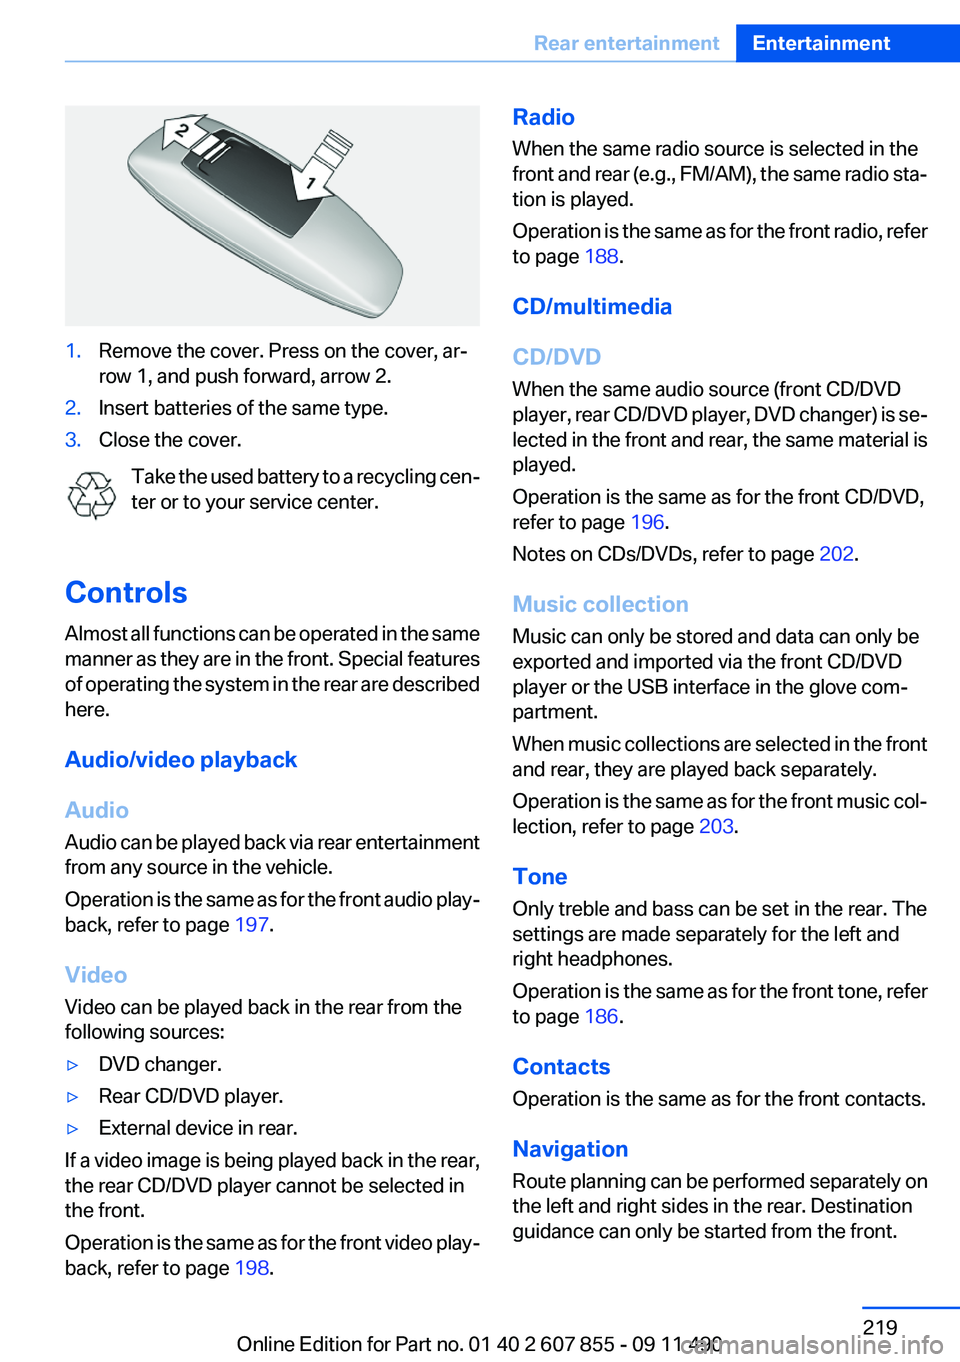
1.Remove the cover. Press on the cover, ar‐
row 1, and push forward, arrow 2.2.Insert batteries of the same type.3.Close the cover.
Take the used battery to a recycling cen‐
ter or to your service center.
Controls
Almost all functions can be operated in the same
manner as they are in the front. Special features
of operating the system in the rear are described
here.
Audio/video playback
Audio
Audio can be played back via rear entertainment
from any source in the vehicle.
Operation is the same as for the front audio play‐
back, refer to page 197.
Video
Video can be played back in the rear from the
following sources:
▷DVD changer.▷Rear CD/DVD player.▷External device in rear.
If a video image is being played back in the rear,
the rear CD/DVD player cannot be selected in
the front.
Operation is the same as for the front video play‐
back, refer to page 198.
Radio
When the same radio source is selected in the
front and rear (e.g., FM/AM), the same radio sta‐
tion is played.
Operation is the same as for the front radio, refer
to page 188.
CD/multimedia
CD/DVD
When the same audio source (front CD/DVD
player, rear CD/DVD player, DVD changer) is se‐
lected in the front and rear, the same material is
played.
Operation is the same as for the front CD/DVD,
refer to page 196.
Notes on CDs/DVDs, refer to page 202.
Music collection
Music can only be stored and data can only be
exported and imported via the front CD/DVD
player or the USB interface in the glove com‐
partment.
When music collections are selected in the front
and rear, they are played back separately.
Operation is the same as for the front music col‐
lection, refer to page 203.
Tone
Only treble and bass can be set in the rear. The
settings are made separately for the left and
right headphones.
Operation is the same as for the front tone, refer
to page 186.
Contacts
Operation is the same as for the front contacts.
Navigation
Route planning can be performed separately on
the left and right sides in the rear. Destination
guidance can only be started from the front.Seite 219Rear entertainmentEntertainment219
Online Edition for Part no. 01 40 2 607 855 - 09 11 490