2012 BMW 335IS CONVERTIBLE ESP
[x] Cancel search: ESPPage 40 of 314

39
Opening and closing
Controls
Unlocking
Grasp the handle on the driver's or front pas-
senger door completely, arrow 1
.
This corresponds to pressing the button.
Locking
Touch the surface on the door handle, arrow 2,
with your finger for approx. 1 second.
This corresponds to pressing the but-
ton.
To preserve the battery, please make
sure that the ignition and all electrical
consumers are switched off before locking the
vehicle. <
Coupe: convenient closing
Keep pressing the surface, arrow 2, with your
finger.
Convertible: window and convertible
top operation
With the ignition at radio readiness or beyond,
you can open and close the windows and the
convertible top when a remote control is
located inside the vehicle.
Unlocking the trunk lid separately
Press the button on the ou tside of the trunk lid.
This corresponds to pressing the button.
If the vehicle detects that a remote con-
trol has been accident ally left inside the
locked vehicle's cargo area after the trunk lid is
closed, the lid will reopen. The hazard warning
flashers flash and a signal sounds. <
Switching on radio readiness
Pressing the Start/Stop button switches on
radio readiness.
Do not depress the brake or the clutch; other-
wise, the engine will start immediately.
Starting the engine
The engine can be started or the ignition can be
switched on when a remote control is inside the
vehicle. It is not necessary to insert a remote
control into the ignition lock, refer to page 61.
Switching off the engine in cars with
automatic transmission
The engine can only be switched off when the
selector lever is in po sition P, refer to page 63.
To switch the engine off when the selector lever
is in position N, the remote control must be in
the ignition lock.
Malfunction
Local radio waves can in terfere with the func-
tion of Comfort Access, for example when a
mobile phone is in the immediate vicinity of the
remote control or by when a mobile phone is
being charged in the vehicle.
If this happens, open or close the vehicle via the
buttons on the remote co ntrol or using the inte-
grated key. To start the engine afterward, insert
the remote control into the ignition lock.
Warning lamps
The warning lamp in the instrument
cluster lights up when you attempt to
start the engine: the engine cannot
be started. The remote co ntrol is not inside the
vehicle or is malfunctioning.
Take the remote contro l with you inside the
vehicle or have it checked. If necessary, insert
another remote control in to the ignition lock.
Online Edition for Part no. 01 40 2 609 333 - \251 08/11 BMW AG
Page 42 of 314
41
Opening and closing
Controls
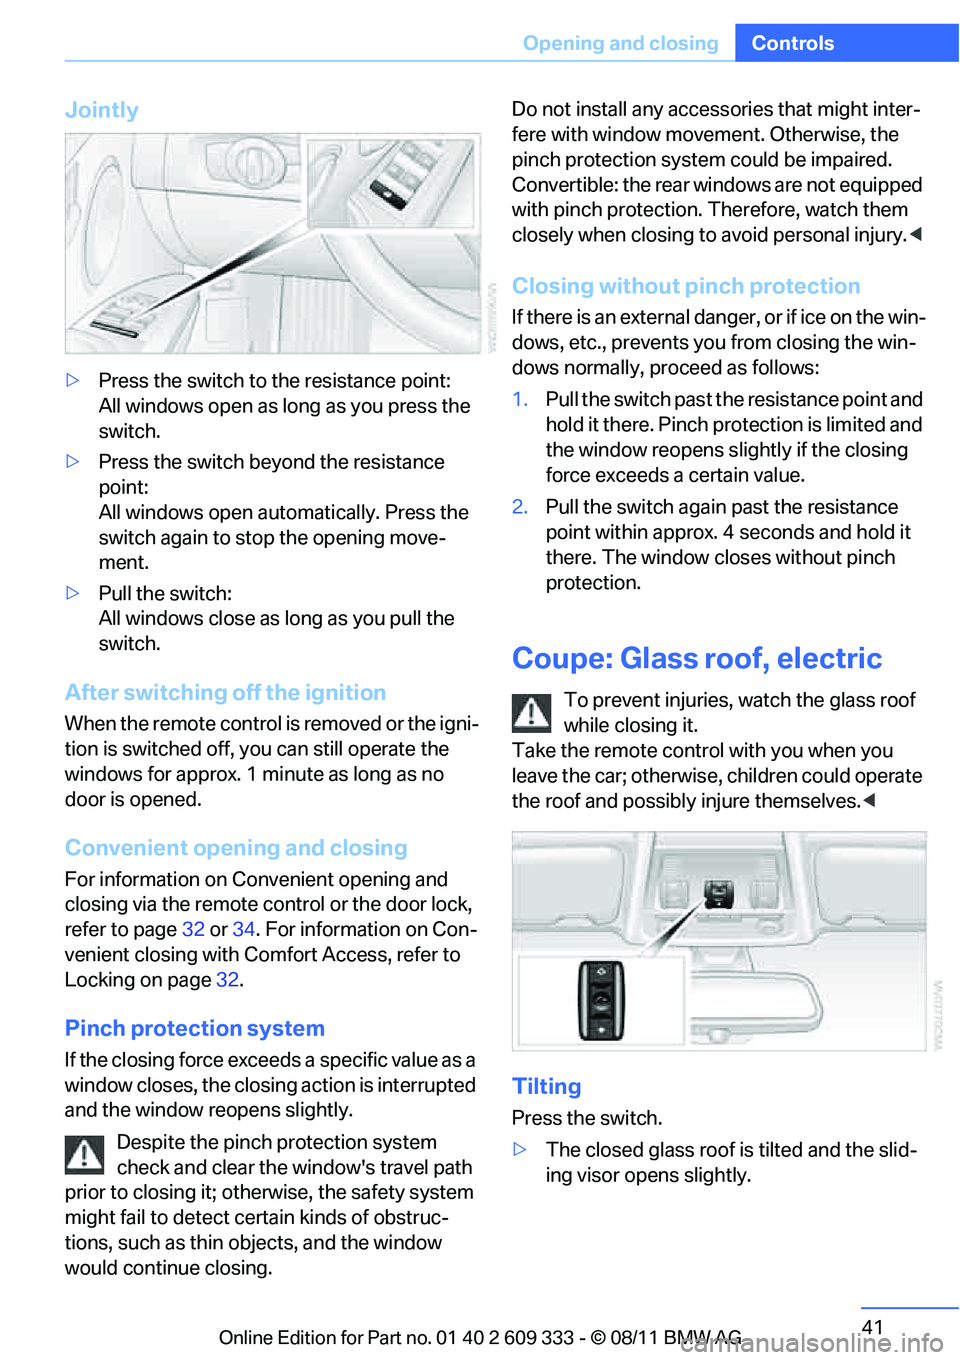
Jointly
>
Press the switch to the resistance point:
All windows open as long as you press the
switch.
> Press the switch beyond the resistance
point:
All windows open automatically. Press the
switch again to stop the opening move-
ment.
> Pull the switch:
All windows close as long as you pull the
switch.
After switching off the ignition
When the remote control is removed or the igni-
tion is switched off, you can still operate the
windows for approx. 1 minute as long as no
door is opened.
Convenient opening and closing
For information on Convenient opening and
closing via the remote control or the door lock,
refer to page 32 or34. For information on Con-
venient closing with Co mfort Access, refer to
Locking on page 32.
Pinch protection system
If the closing force exceeds a specific value as a
window closes, the closing action is interrupted
and the window reopens slightly.
Despite the pinch protection system
check and clear the window's travel path
prior to closing it; otherwise, the safety system
might fail to detect certain kinds of obstruc-
tions, such as thin objects, and the window
would continue closing. Do not install any accessories that might inter-
fere with window movement. Otherwise, the
pinch protection system could be impaired.
Convertible: the rear windows are not equipped
with pinch protection. Therefore, watch them
closely when closing to avoid personal injury.
<
Closing without pinch protection
If there is an external danger, or if ice on the win-
dows, etc., prevents you from closing the win-
dows normally, proceed as follows:
1. Pull the switch past the resistance point and
hold it there. Pinch protection is limited and
the window reopens slightly if the closing
force exceeds a certain value.
2. Pull the switch again past the resistance
point within approx. 4 seconds and hold it
there. The window closes without pinch
protection.
Coupe: Glass roof, electric
To prevent injuries, watch the glass roof
while closing it.
Take the remote contro l with you when you
leave the car; otherwise, children could operate
the roof and possibly injure themselves. <
Tilting
Press the switch.
>The closed glass roof is tilted and the slid-
ing visor opens slightly.
Online Edition for Part no. 01 40 2 609 333 - \251 08/11 BMW AG
Page 43 of 314
42
ControlsOpening and closing
Opening, closing
>Push the switch rearward to the resistance
point:
The glass roof and the sliding visor open
together as long as you hold the switch in
this position.
> Push the switch rearward past the resis-
tance point:
The glass roof and the sliding visor open
automatically. Briefly press the switch again
to stop the opening movement.
You can close the glass roof in a similar manner
by pressing the switch forwards. The sliding
visor remains open and ca n be closed by hand.
For information on Convenient opening and
closing via the remote control or door lock, refer
to page 32 or 34.
After switching off the ignition
When the remote control is removed or the igni-
tion is switched off, you can still operate the roof
for approx. 1 minute as long as no door has
been opened.
Pinch protection system
If the glass roof encounters an obstruction dur-
ing closing from approximately the middle of
the opening in the roof, or during closing from
the tilted position, the closing movement is
interrupted and the glass roof is opened again
slightly.
Despite the pinch protection system
check and clear the roof's travel path prior
to closing it; otherwise, the safety system might
fail to detect certain kinds of obstructions, such
as very thin objects, and the roof would con-
tinue closing. <
Closing without pinch protection
If there is an external danger, press the switch
forward past the resist ance point. The roof
closes without pinch protection.
Following interruptions in electrical
power supply
After a power failure, there is a possibility that
the glass roof can only be tilted. The system
must be initialized. BM W recommends having
this work performed by your BMW center.
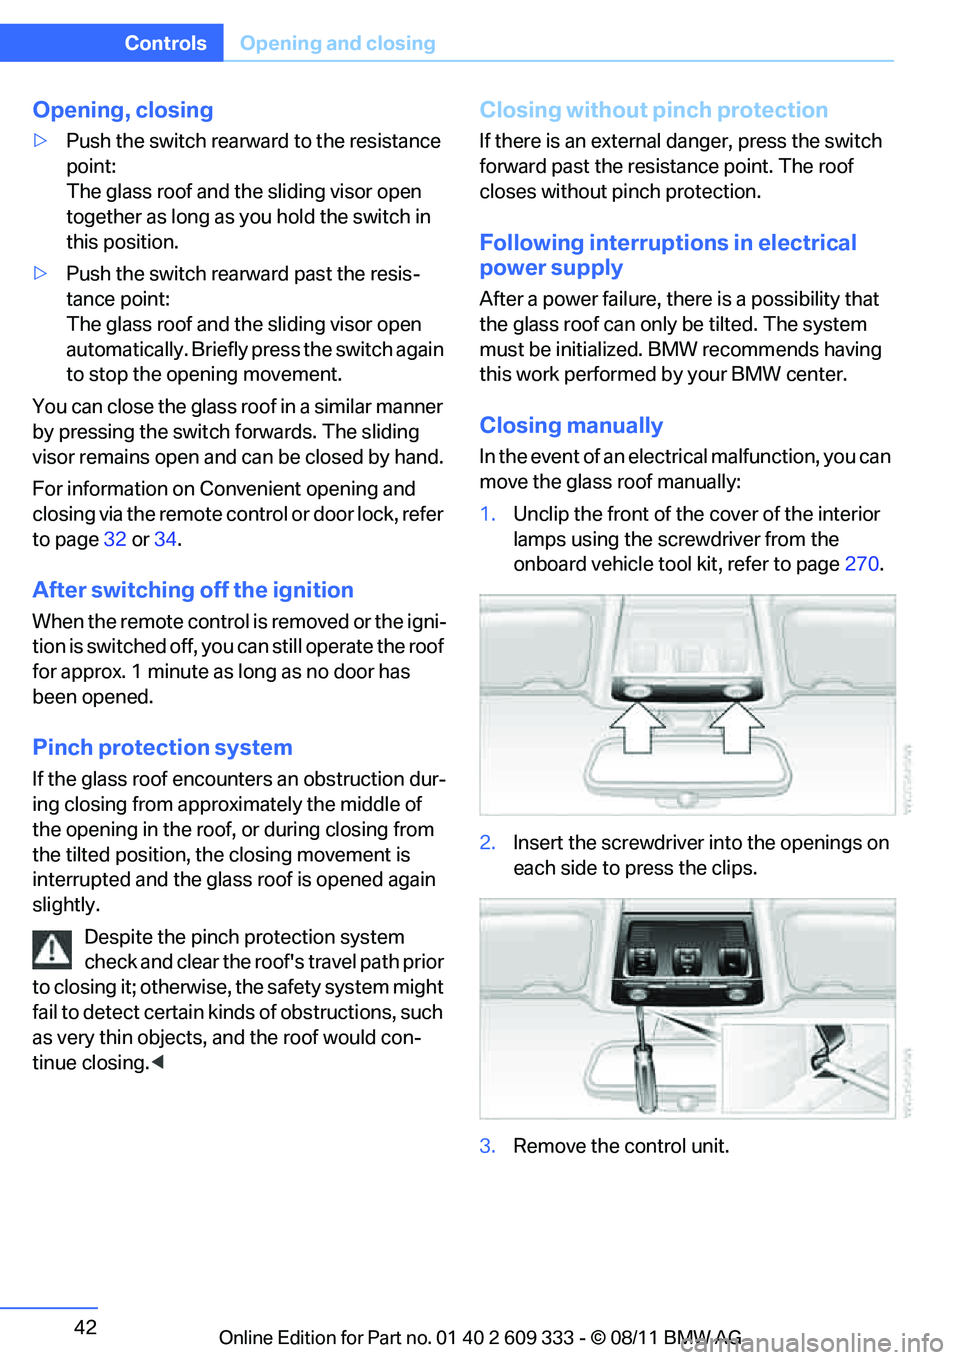
Closing manually
In the event of an electrical malfunction, you can
move the glass roof manually:
1.Unclip the front of the cover of the interior
lamps using the screwdriver from the
onboard vehicle tool kit, refer to page 270.
2. Insert the screwdriver into the openings on
each side to press the clips.
3. Remove the control unit.
Online Edition for Part no. 01 40 2 609 333 - \251 08/11 BMW AG
Page 49 of 314
48
ControlsAdjustments
injure your abdomen in the event of a frontal
collision.
Avoid wearing bulky clot hing and regularly pull
the belt in the upper-body area taut; otherwise,
its restraining effect could be impaired.<
Safety belts, refer to page 53.
Seats
Note before adjusting
Never attempt to adjust your seat while
the vehicle is moving. The seat could
respond with unexpected movement, and the
ensuing loss of vehicle co ntrol could lead to an
accident.
On the front passenger seat as well, do not
incline the backrest too fa r to the rear while the
vehicle is being driven; otherwise, there is a
danger in the event of an accident of sliding
under the safety belt, eliminating the protection
normally provided by the belt. <
Comply with the instructions on head restraint
height on page 50, and on damaged safety
belts on page 54.
Manual adjustment
Observe the adjustment instructions on
page 48 to ensure the best possible per-
sonal protection. <
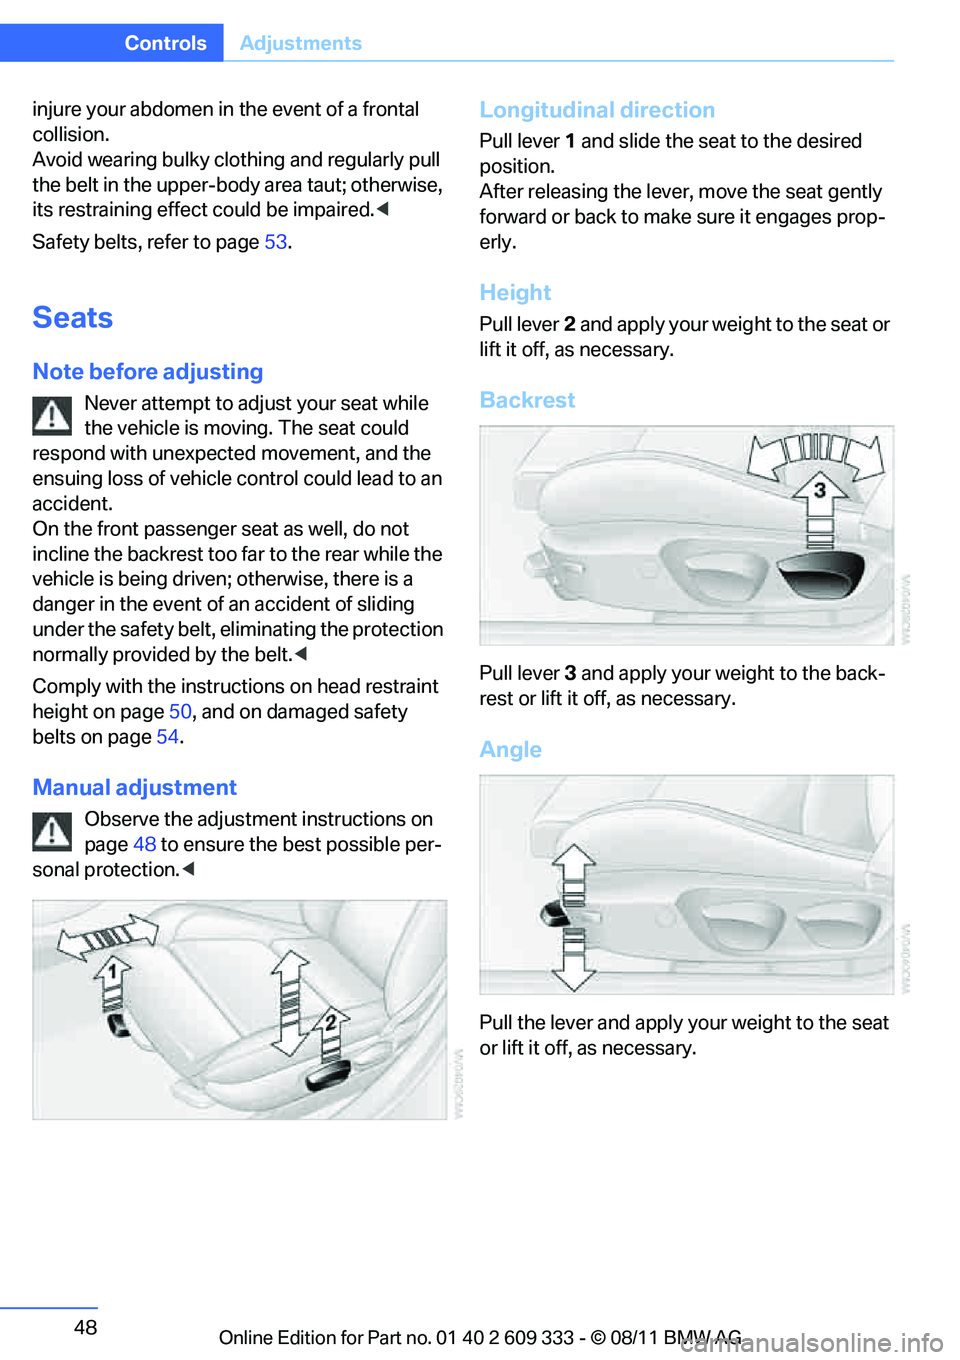
Longitudinal direction
Pull lever1 and slide the seat to the desired
position.
After releasing the lever, move the seat gently
forward or back to make sure it engages prop-
erly.
Height
Pull lever 2 and apply your weight to the seat or
lift it off, as necessary.
Backrest
Pull lever 3 and apply your we ight to the back-
rest or lift it off, as necessary.
Angle
Pull the lever and apply yo ur weight to the seat
or lift it off, as necessary.
Online Edition for Part no. 01 40 2 609 333 - \251 08/11 BMW AG
Page 50 of 314
49
Adjustments
Controls
Thigh support
Pull the lever and move the thigh support for-
ward or back.
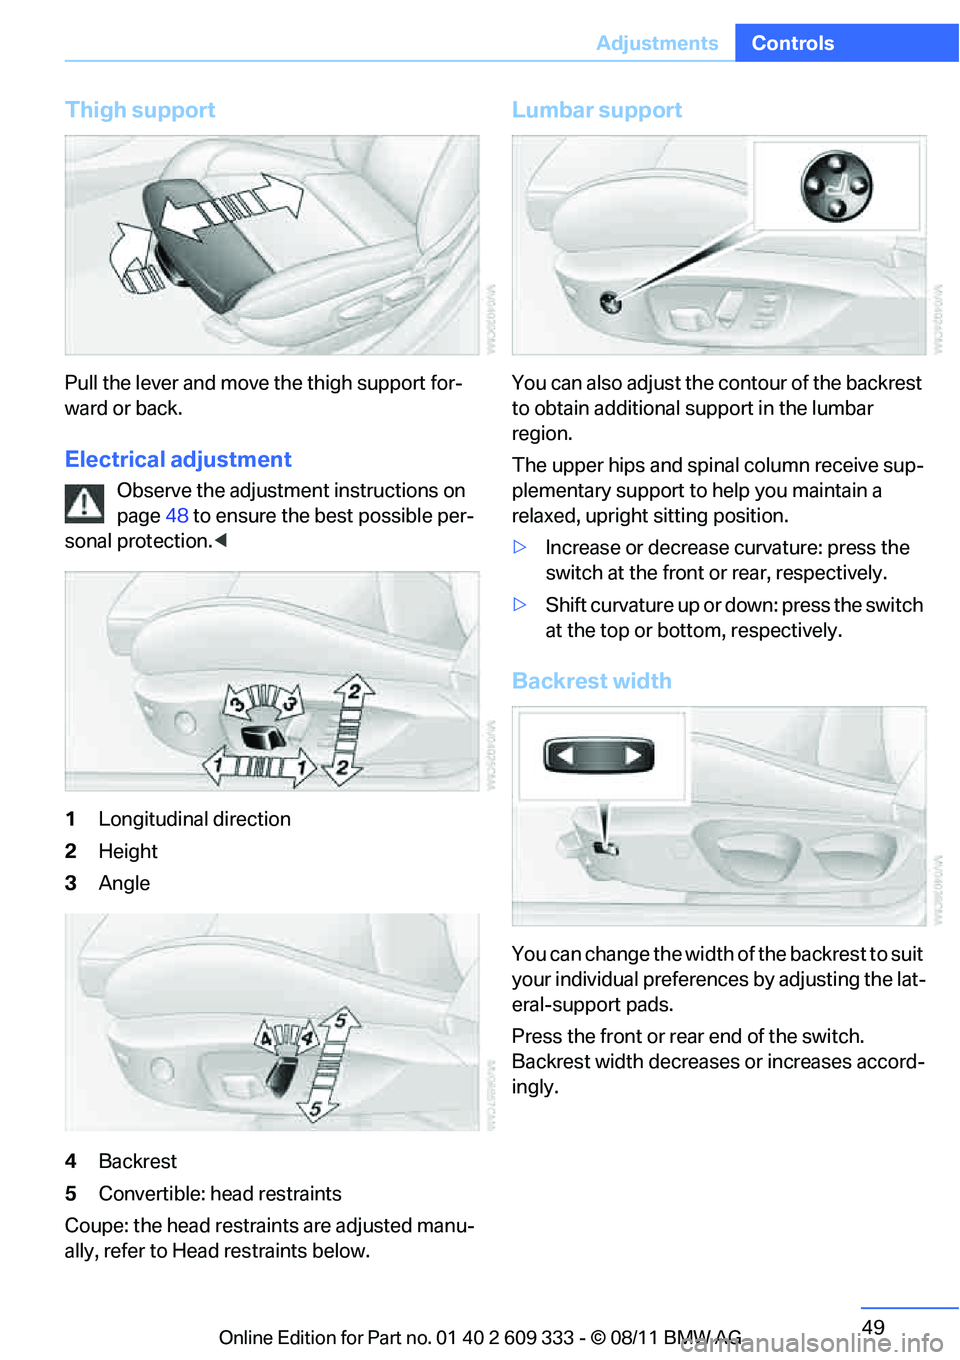
Electrical adjustment
Observe the adjustment instructions on
page
48 to ensure the best possible per-
sonal protection. <
1 Longitudinal direction
2 Height
3 Angle
4 Backrest
5 Convertible: head restraints
Coupe: the head restraints are adjusted manu-
ally, refer to Head restraints below.
Lumbar support
You can also adjust the contour of the backrest
to obtain additional support in the lumbar
region.
The upper hips and spinal column receive sup-
plementary support to help you maintain a
relaxed, upright sitting position.
> Increase or decrease curvature: press the
switch at the front or rear, respectively.
> Shift curvature up or down: press the switch
at the top or bottom, respectively.
Backrest width
You can change the width of the backrest to suit
your individual preferences by adjusting the lat-
eral-support pads.
Press the front or rear end of the switch.
Backrest width decreases or increases accord-
ingly.
Online Edition for Part no. 01 40 2 609 333 - \251 08/11 BMW AG
Page 55 of 314
54
ControlsAdjustments
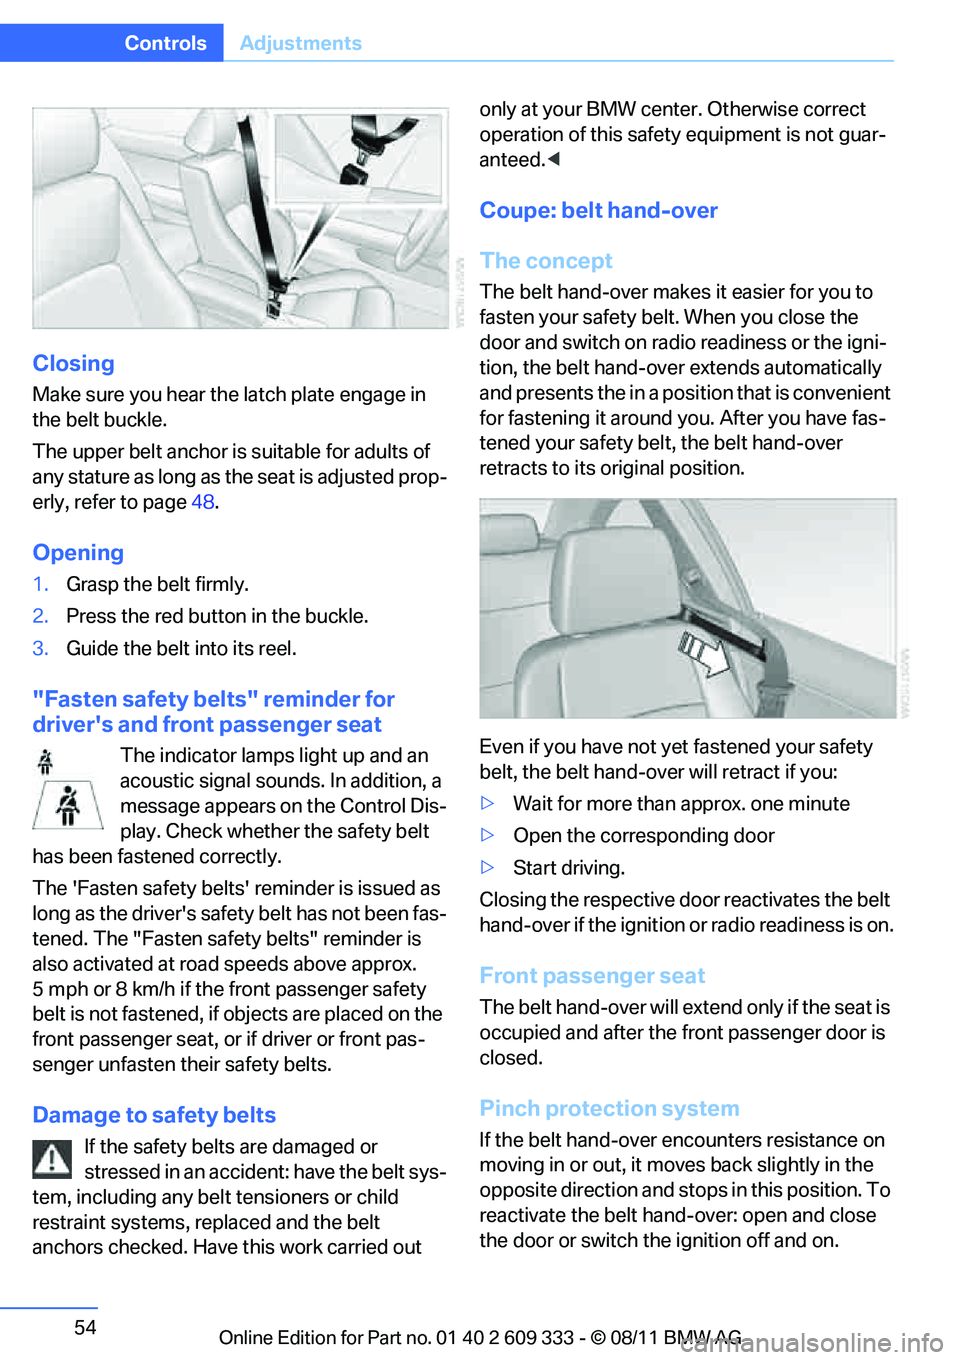
Closing
Make sure you hear the latch plate engage in
the belt buckle.
The upper belt anchor is suitable for adults of
any stature as long as the seat is adjusted prop-
erly, refer to page 48.
Opening
1. Grasp the belt firmly.
2. Press the red button in the buckle.
3. Guide the belt into its reel.
"Fasten safety belts" reminder for
driver's and front passenger seat
The indicator lamps light up and an
acoustic signal sounds. In addition, a
message appears on the Control Dis-
play. Check whether the safety belt
has been fastened correctly.
The 'Fasten safety belts' reminder is issued as
long as the driver's safety belt has not been fas-
tened. The "Fasten safety belts" reminder is
also activated at road speeds above approx.
5 mph or 8 km/h if the front passenger safety
belt is not fastened, if objects are placed on the
front passenger seat, or if driver or front pas-
senger unfasten their safety belts.
Damage to safety belts
If the safety belt s are damaged or
stressed in an accident: have the belt sys-
tem, including any belt tensioners or child
restraint systems, replaced and the belt
anchors checked. Have this work carried out only at your BMW center. Otherwise correct
operation of this safety
equipment is not guar-
anteed. <
Coupe: belt hand-over
The concept
The belt hand-over makes it easier for you to
fasten your safety belt. When you close the
door and switch on radio readiness or the igni-
tion, the belt hand-ove r extends automatically
and presents the in a position that is convenient
for fastening it around you. After you have fas-
tened your safety belt , the belt hand-over
retracts to its original position.
Even if you have not ye t fastened your safety
belt, the belt hand-over will retract if you:
> Wait for more than approx. one minute
> Open the corresponding door
> Start driving.
Closing the respective do or reactivates the belt
hand-over if the ignition or radio readiness is on.
Front passenger seat
The belt hand-over will exte nd only if the seat is
occupied and after the front passenger door is
closed.
Pinch protection system
If the belt hand-over en counters resistance on
moving in or out, it mo ves back slightly in the
opposite direction and stops in this position. To
reactivate the belt hand -over: open and close
the door or switch the ignition off and on.
Online Edition for Part no. 01 40 2 609 333 - \251 08/11 BMW AG
Page 76 of 314

75
Driving
Controls
If --- mph or --- km/h temporarily appears
in the instrument cluster display, it is pos-
sible that the system prerequisites for operation
are currently not met.
Calling up Check Control messages, refer to
page 93.<
Malfunction
The warning lamp lights up. A mes-
sage appears on th e Control Display.
The cruise control is malfunctioning.
You can continue your journey. Have the sys-
tem checked.
Active Cruise Control
The concept
With Active Cruise Cont rol, you can select a
desired speed which is not only automatically
maintained when driving on open roadways, but
also varied to maintain a selected distance set-
ting as slower traffic is encountered.
Active Cruise Control is a technological
advance over the familiar cruise control and is a
welcome relief from the constant adjustment of
speed that can accompany driving in traffic on
highways or other high -speed thoroughfares.
Especially on longer trips, the system can
reduce fatigue and tension, while increasing
your enjoyment of driving. Please use it safely
and responsibly.
Within the limits of its capability, the system
automatically adap ts the car's speed to that of a
slower vehicle in front of you. You can specify
the distance to be main tained from the vehicle
in front in four stages. For safety reasons, the
distance is speed-dependent. Based on your
selected distance setti ng, the system automat-
ically decreases the thro ttle setting and lightly
applies the brakes if necessary. The vehicle
brake lamps will automatically illuminate to sig-
nal a following driver to take action. In addition,
it may be necessary for the vehicle or the driver
to downshift, depending on the kind of trans- mission your vehicle is equipped with, to main-
tain the distance setting
selected. If the vehicle
ahead speeds up or when the lane ahead
becomes clear, your vehi cle will accelerate to
the speed you have selected by increasing the
throttle setting and shifting gears automatically
or by the driver as needed. Your selected speed
will be held when driving downhill, too.
Since this Active Cruise Control system is a
new technology and operates differently from
conventional cruise co ntrol systems which you
may be accustomed to, you are strongly urged
to read all of the pages relating to this system
before use. Pay special attention to the System
limitations section beginning on page 80.
Braking sensation
>If you step on the brake pedal while the sys-
tem is braking, peda l sensation will be
slightly different from the usual.
> Possible noises during automatic braking
are normal.
Manual transmission
You can shift gears while cruise control is acti-
vated. The system is deactivated when you
drive at very low engine speeds for an extended
period.
Range of applications
The minimum desired speed is 20 mph or
30 km/h, the maximum desired speed is
110 mph or 180 km/h.
As with conventional cruise control sys-
tems, Active Cruise Control in no way
diminishes or substitutes for the driver’s own
personal responsibility, alertness and aware-
ness in adjusting speed, braking or otherwise
controlling the vehicle. The driver should
decide when to use the system on the basis of
road, traffic, visibility, and weather conditions.
Active Cruise Control is intended for use on
highway-type roadways where traffic is moving
relatively smoothly. Do not use this system in
city driving; heavy traffic such as during rush
Online Edition for Part no. 01 40 2 609 333 - \251 08/11 BMW AG
Page 77 of 314
76
ControlsDriving
hour; on curvy, winding ro ads, slippery roads or
roads with sharp curves such as highway off-
ramps; during inclement weather such as snow,
strong rain or fog; or when entering inter-
changes, service/parkin g areas or toll booths.
It is also important to regulate your vehicle's
speed and distance setting within applicable
legal limits. Always be ready to take action or
apply the brakes if necessary, especially when
the system is actively fo llowing a vehicle in front
of you. Otherwise, driving situations could
result that pose the risk of accidents. <
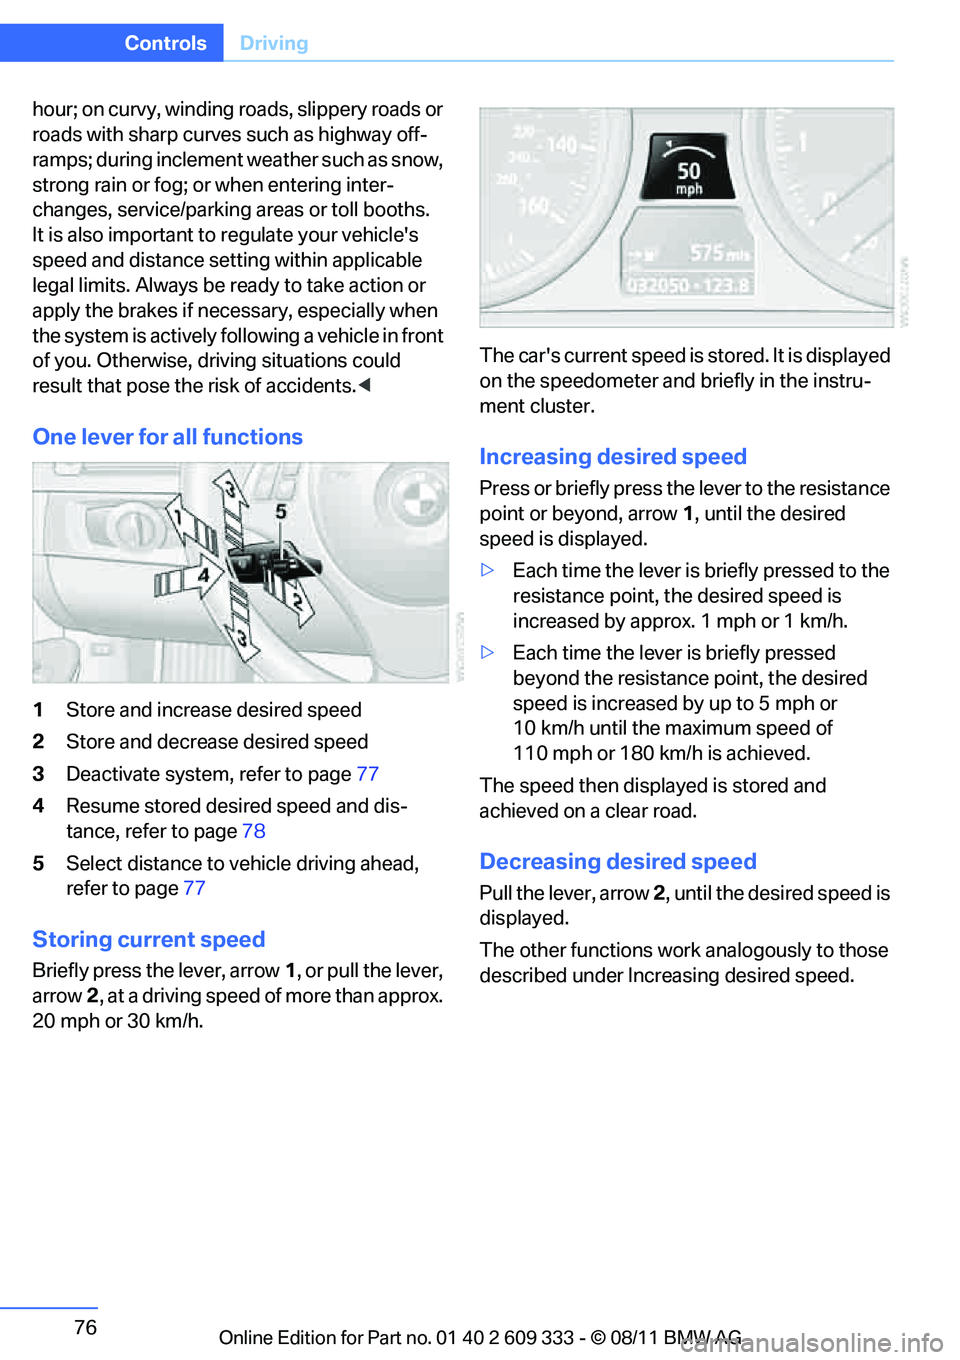
One lever for all functions
1Store and increase desired speed
2 Store and decrease desired speed
3 Deactivate system, refer to page 77
4 Resume stored desired speed and dis-
tance, refer to page 78
5 Select distance to vehicle driving ahead,
refer to page 77
Storing current speed
Briefly press the lever, arrow 1, or pull the lever,
arrow 2, at a driving speed of more than approx.
20 mph or 30 km/h. The car's current speed is stored. It is displayed
on the speedometer and briefly in the instru-
ment cluster.
Increasing desired speed
Press or briefly press the lever to the resistance
point or beyond, arrow
1, until the desired
speed is displayed.
> Each time the lever is briefly pressed to the
resistance point, the desired speed is
increased by approx. 1 mph or 1 km/h.
> Each time the lever is briefly pressed
beyond the resistance point, the desired
speed is increased by up to 5 mph or
10 km/h until the maximum speed of
110 mph or 180 km/h is achieved.
The speed then displayed is stored and
achieved on a clear road.
Decreasing de sired speed
Pull the lever, arrow 2, until the desired speed is
displayed.
The other functions work analogously to those
described under Increasing desired speed.
Online Edition for Part no. 01 40 2 609 333 - \251 08/11 BMW AG