2012 BMW 335I tow
[x] Cancel search: towPage 183 of 325
Detours can also be accepted if the traffic mes‐
sages are called up in the list.1."Navigation"2."Map"3. "Traffic Info"4."Detour information"5. "Detour"
Dynamic destination guidance
The route is automatically changed in the event
of traffic obstructions.
▷The system does not point out traffic ob‐
structions along the original route.▷Traffic bulletins continue to be displayed on
the map.▷Depending on road type and the kind and
extent of the traffic obstruction, the calcu‐
lated route may lead through the traffic ob‐
struction.▷Dangerous situations are displayed regard‐
less of the setting.
Activating dynamic destination guidance
1."Navigation"2."Options" Open.3."Dynamic guidance"
Navigation data
Information on the navigation data
1."Navigation"2."Options" Open.3." Navigation system version": information on
the data version is displayed.
Updating the navigation data
General information
Navigation data are stored in the vehicle and can
be updated.
Current navigation data and the authorization
code are available from your service center.▷Depending on the data volume, a data up‐
date may take several hours.▷Update during the trip to preserve battery.▷During the update, only the basic functions
of the navigation system are available.▷The status of the update can be viewed.▷The system restarts after the update.▷Remove the data carrier with the navigation
data after the update.
Performing an update
1.Insert the navigation DVD into the DVD
player with the labeled side facing up.2.Follow the instructions on the Control Dis‐
play.3.Enter the navigation DVD authorization
code.4.Change the DVD, if necessary.
After interrupting your trip, follow the instruc‐
tions on the Control Display.
Viewing the status
1. Press the button.2."Navigation update"
What to do if...
▷The current transmission position cannot be
displayed?
The vehicle is located in an unrecognized
region, is in a poor reception area, or the
system is currently determining the posi‐
tion. Reception is usually best when you
have an unobstructed view of the sky.▷The destination without street information is
not used for route guidance?
When city has been input, no downtown can
be determined.Seite 183Navigation systemNavigation183
Online Edition for Part no. 01 40 2 608 633 - 11 09 490
Page 268 of 325
Treadwear
The treadwear grade is a comparative rating
based on the wear rate of the tire when tested
under controlled conditions on a specified gov‐
ernment test course. For example, a tire graded
150 would wear one and one-half, 1 g, times as
well on the government course as a tire graded
100. The relative performance of tires depends
upon the actual conditions of their use, however,
and may depart significantly from the norm due
to variations in driving habits, service practices
and differences in road characteristics and cli‐
mate.
Traction
The traction grades, from highest to lowest, are
AA, A, B, and C.
Those grades represent the tire's ability to stop
on wet pavement as measured under controlled
conditions on specified government test surfa‐
ces of asphalt and concrete. A tire marked C may
have poor traction performance.
The traction grade assigned to this tire is based
on straight-ahead braking traction tests, and
does not include acceleration, cornering, hydro‐
planing, or peak traction characteristics.
Temperature
The temperature grades are A, the highest, B,
and C, representing the tire's resistance to the
generation of heat and its ability to dissipate
heat when tested under controlled conditions
on a specified indoor laboratory test wheel. Sus‐
tained high temperature can cause the material
of the tire to degenerate and reduce tire life, and
excessive temperature can lead to sudden tire
failure. The grade C corresponds to a level of
performance which all passenger car tires must
meet under the Federal Motor Vehicle Safety
Standard No. 109. Grades Band A represent
higher levels of performance on the laboratory
test wheel than the minimum required by law.Temperature grade for this tire
The temperature grade for this tire is es‐
tablished for a tire that is properly inflated and
not overloaded. Excessive speed, underinfla‐
tion, or excessive loading, either separately or in
combination, can cause heat buildup and pos‐
sible tire failure.
If necessary, have the vehicle towed.◀
RSC – Run-flat tires
Run-flat tires, refer to page 271, are labeled with
a circular symbol containing the letters RSC
marked on the sidewall.
M+S
Winter and all-season tires with better cold
weather performance than summer tires.
Tire tread
Summer tires
Do not drive with a tire tread depth of less than
0.12 in/3 mm.
There is an increased danger of hydroplaning if
the tread depth is less than 0.12 in/3 mm.
Winter tires
Do not drive with a tire tread depth of less than
0.16 in/4 mm.
Below a tread depth of 0.16 in/4 mm, tires are
less suitable for winter operation.Seite 268MobilityWheels and tires268
Online Edition for Part no. 01 40 2 608 633 - 11 09 490
Page 269 of 325
Minimum tread depth
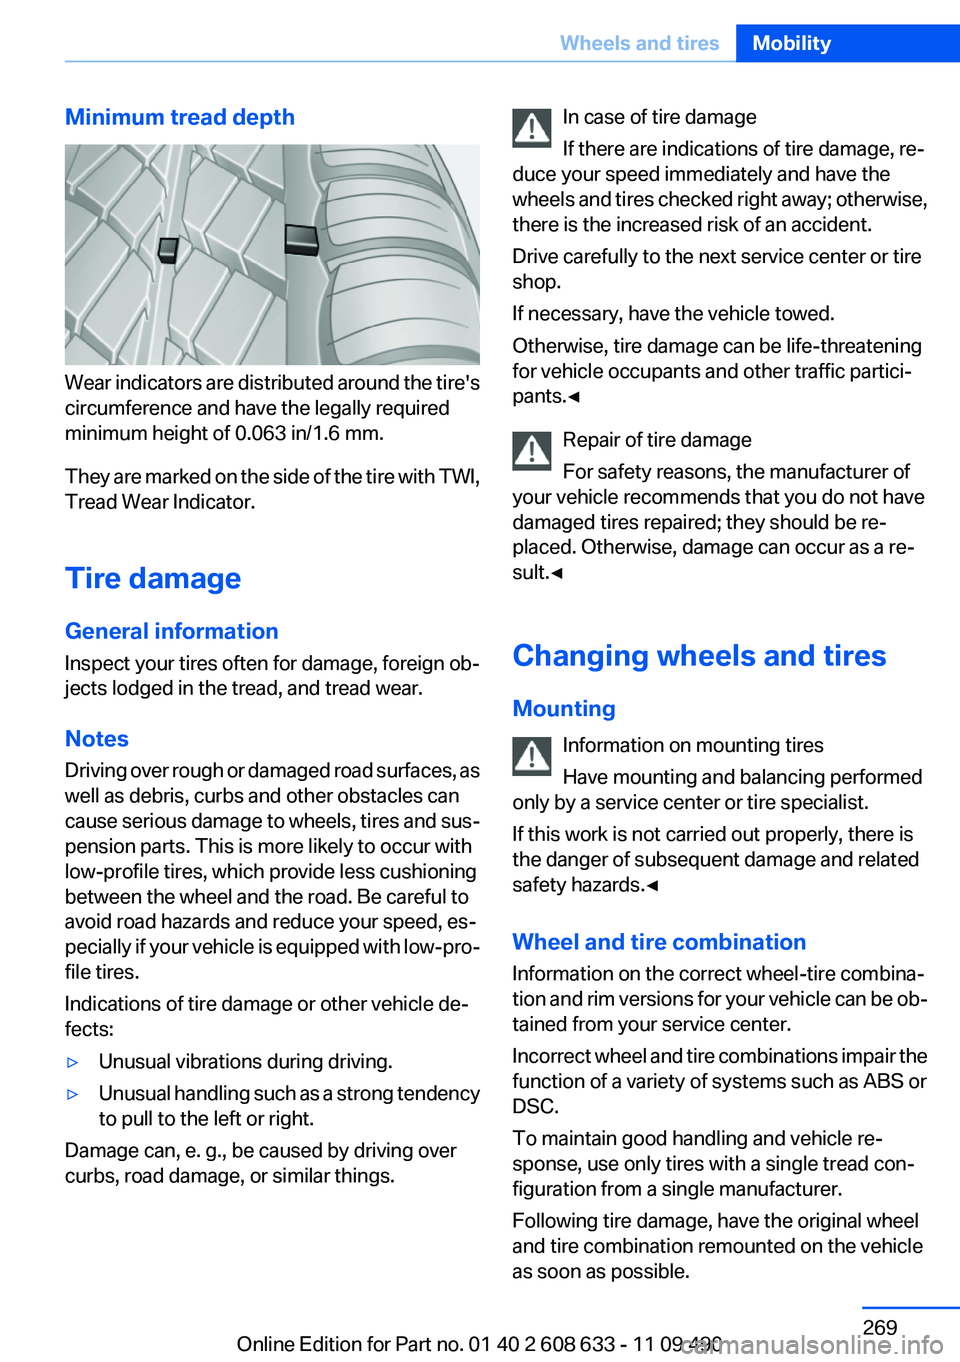
Wear indicators are distributed around the tire's
circumference and have the legally required
minimum height of 0.063 in/1.6 mm.
They are marked on the side of the tire with TWI,
Tread Wear Indicator.
Tire damage
General information
Inspect your tires often for damage, foreign ob‐
jects lodged in the tread, and tread wear.
Notes
Driving over rough or damaged road surfaces, as
well as debris, curbs and other obstacles can
cause serious damage to wheels, tires and sus‐
pension parts. This is more likely to occur with
low-profile tires, which provide less cushioning
between the wheel and the road. Be careful to
avoid road hazards and reduce your speed, es‐
pecially if your vehicle is equipped with low-pro‐
file tires.
Indications of tire damage or other vehicle de‐
fects:
▷Unusual vibrations during driving.▷Unusual handling such as a strong tendency
to pull to the left or right.
Damage can, e. g., be caused by driving over
curbs, road damage, or similar things.
In case of tire damage
If there are indications of tire damage, re‐
duce your speed immediately and have the
wheels and tires checked right away; otherwise,
there is the increased risk of an accident.
Drive carefully to the next service center or tire
shop.
If necessary, have the vehicle towed.
Otherwise, tire damage can be life-threatening
for vehicle occupants and other traffic partici‐
pants.◀
Repair of tire damage
For safety reasons, the manufacturer of
your vehicle recommends that you do not have
damaged tires repaired; they should be re‐
placed. Otherwise, damage can occur as a re‐
sult.◀
Changing wheels and tires
Mounting Information on mounting tires
Have mounting and balancing performed
only by a service center or tire specialist.
If this work is not carried out properly, there is
the danger of subsequent damage and related
safety hazards.◀
Wheel and tire combination
Information on the correct wheel-tire combina‐
tion and rim versions for your vehicle can be ob‐
tained from your service center.
Incorrect wheel and tire combinations impair the
function of a variety of systems such as ABS or
DSC.
To maintain good handling and vehicle re‐
sponse, use only tires with a single tread con‐
figuration from a single manufacturer.
Following tire damage, have the original wheel
and tire combination remounted on the vehicle
as soon as possible.Seite 269Wheels and tiresMobility269
Online Edition for Part no. 01 40 2 608 633 - 11 09 490
Page 286 of 325

5.Remove the connecting line from the clip on
the bulb holder.6.Release the catch at the top on the connec‐
tor of the connecting line and remove the
connector from the bulb holder.
Replacing the bulbs
1.Loosen the four fasteners, arrow 1, on the
bulb holder and remove the bulb holder from
the tail lamp, arrow 2.2.Press the defective bulb gently into the
socket, turn counterclockwise and remove.3.Proceed in the reverse order to insert the
new bulb and attach the bulb holder. Make
sure that the bulb holder engages in all fas‐
teners.
Installing the tail lamp
1.Connect the connecting line to the tail lamp
and secure the bulb holder in the clip.2.Make sure that the sealing ring is on the
centering pin, arrow 2, and is not damaged.3.Position and firmly press the outer part of
the tail lamp onto the rubber mount, arrow 1
and the inner part onto the centering com‐ponent, arrow 2. Make sure that the tail lamp
engages in the rubber mount.4.Screw the two nuts onto the tail lamp and
mount the cover.
Lamps in the trunk lid
General information
Follow the General instructions on lamps and
bulbs, refer to page 279.
Reversing lamps: 21-watt bulb, P21W
Inner brake lamps: 21-watt bulb, H21W
Accessing the lamps
1.Use the screwdriver from the onboard vehi‐
cle tool kit to loosen and completely remove
the six screws on the trim.2.Carefully loosen the trim from the trunk lid,
starting at the edge and working toward the
area around the recessed grips. Make sure
that the trim does not become stuck.3.Carefully swing out the trim.Seite 286MobilityReplacing components286
Online Edition for Part no. 01 40 2 608 633 - 11 09 490
Page 293 of 325

3.Let both engines run for several minutes.4.Disconnect the jumper cables in the reverse
order.
Check the battery and recharge if necessary.
Tow-starting and towing
Automatic transmission: transporting
your vehicle
Note
Your vehicle is not permitted to be towed.
Therefore, contact a service center in the event
of a breakdown.
Do not have the vehicle towed
Have your vehicle transported on a loading
platform only; otherwise, damage may occur.◀
Tow truck
Do not lift the vehicle
Do not lift the vehicle by the tow fitting or
body and chassis parts; otherwise, damage may
result.◀
Use the tow fitting screwed in at the front for
maneuvering the vehicle only.
Manual transmission
Gearshift lever in neutral position.
Towing
Follow the towing instructions
Follow all towing instructions; otherwise,
vehicle damage or accidents may occur.◀▷Make sure that the ignition is switched on;
otherwise, the low beams, tail lamps, turn
signals, and windshield wipers may be un‐
available.▷Do not tow the vehicle with the rear axle
tilted, as the front wheels could turn.▷When the engine is stopped, there is no
power assist. Consequently, more force
needs to be applied when braking and steer‐
ing.▷Larger steering wheel movements are re‐
quired.
Tow truck
Have your vehicle transported with a tow truck
with a so-called lift bar or on a flat bed.
Do not lift the vehicle
Do not lift the vehicle by the tow fitting or
body and chassis parts; otherwise, damage may
result.◀
Towing other vehicles
General information Light towing vehicle
Your vehicle must not be lighter than the
vehicle being towed; otherwise, it will not be
possible to control vehicle response.◀
Seite 293Breakdown assistanceMobility293
Online Edition for Part no. 01 40 2 608 633 - 11 09 490
Page 294 of 325
Attaching the tow bar/tow rope correctly
Attach the tow bar or tow rope to the tow
fitting; connecting it to other vehicle parts may
cause damage.◀▷Switch on the hazard warning system, de‐
pending on local regulations.▷If the electrical system has failed, clearly
identify the vehicle being towed by placing
a sign or a warning triangle in the rear win‐
dow.
Tow bar
The tow fittings used should be on the same
side on both vehicles.
Should it prove impossible to avoid mounting
the tow bar at an offset angle, please observe
the following:
▷Maneuvering capability is limited during cor‐
nering.▷The tow bar will generate lateral forces if it
is secured with an offset.
Tow rope
When starting to tow the vehicle, make sure that
the tow rope is taut.
To avoid jerking and the associated stresses on
the vehicle components when towing, always
use nylon ropes or nylon straps.
Attaching the tow rope correctly
Only secure the tow rope on the tow fit‐
ting; otherwise, damage can occur when it is se‐
cured on other parts of the vehicle.◀
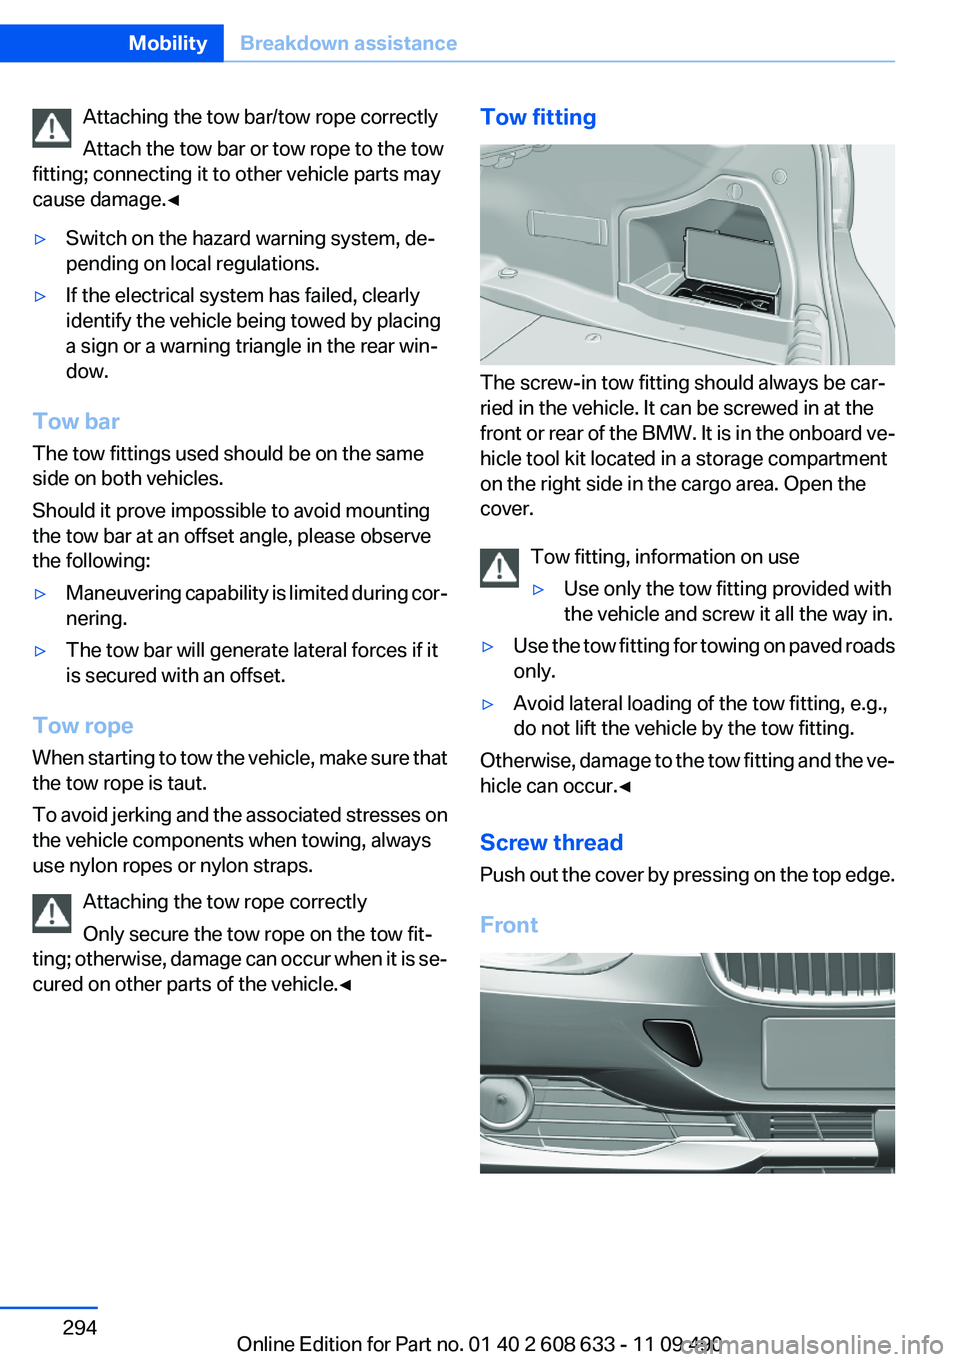
Tow fitting
The screw-in tow fitting should always be car‐
ried in the vehicle. It can be screwed in at the
front or rear of the BMW. It is in the onboard ve‐
hicle tool kit located in a storage compartment
on the right side in the cargo area. Open the
cover.
Tow fitting, information on use
▷Use only the tow fitting provided with
the vehicle and screw it all the way in.▷Use the tow fitting for towing on paved roads
only.▷Avoid lateral loading of the tow fitting, e.g.,
do not lift the vehicle by the tow fitting.
Otherwise, damage to the tow fitting and the ve‐
hicle can occur.◀
Screw thread
Push out the cover by pressing on the top edge.
Front
Seite 294MobilityBreakdown assistance294
Online Edition for Part no. 01 40 2 608 633 - 11 09 490
Page 295 of 325

Rear
Tow-starting
Automatic transmission
Do not tow-start the vehicle.
Due to the automatic transmission, the engine
cannot be started by tow-starting.
Have the cause of the starting difficulties rem‐
edied.
Manual transmission
If possible, do not tow-start the vehicle but start
the engine by jump-starting, refer to page 291.
If the vehicle is equipped with a catalytic con‐
verter, only tow-start while the engine is cold.
1.Switch on the hazard warning system and
comply with local regulations.2.Ignition, refer to page 59, on.3.Engage third gear.4.Have the vehicle tow-started with the clutch
pressed and slowly release the clutch. After
the engine starts, immediately press on the
clutch again.5.Stop at a suitable location, remove the tow
bar or rope, and switch off the hazard warn‐
ing system.6.Have the vehicle checked.Seite 295Breakdown assistanceMobility295
Online Edition for Part no. 01 40 2 608 633 - 11 09 490
Page 308 of 325
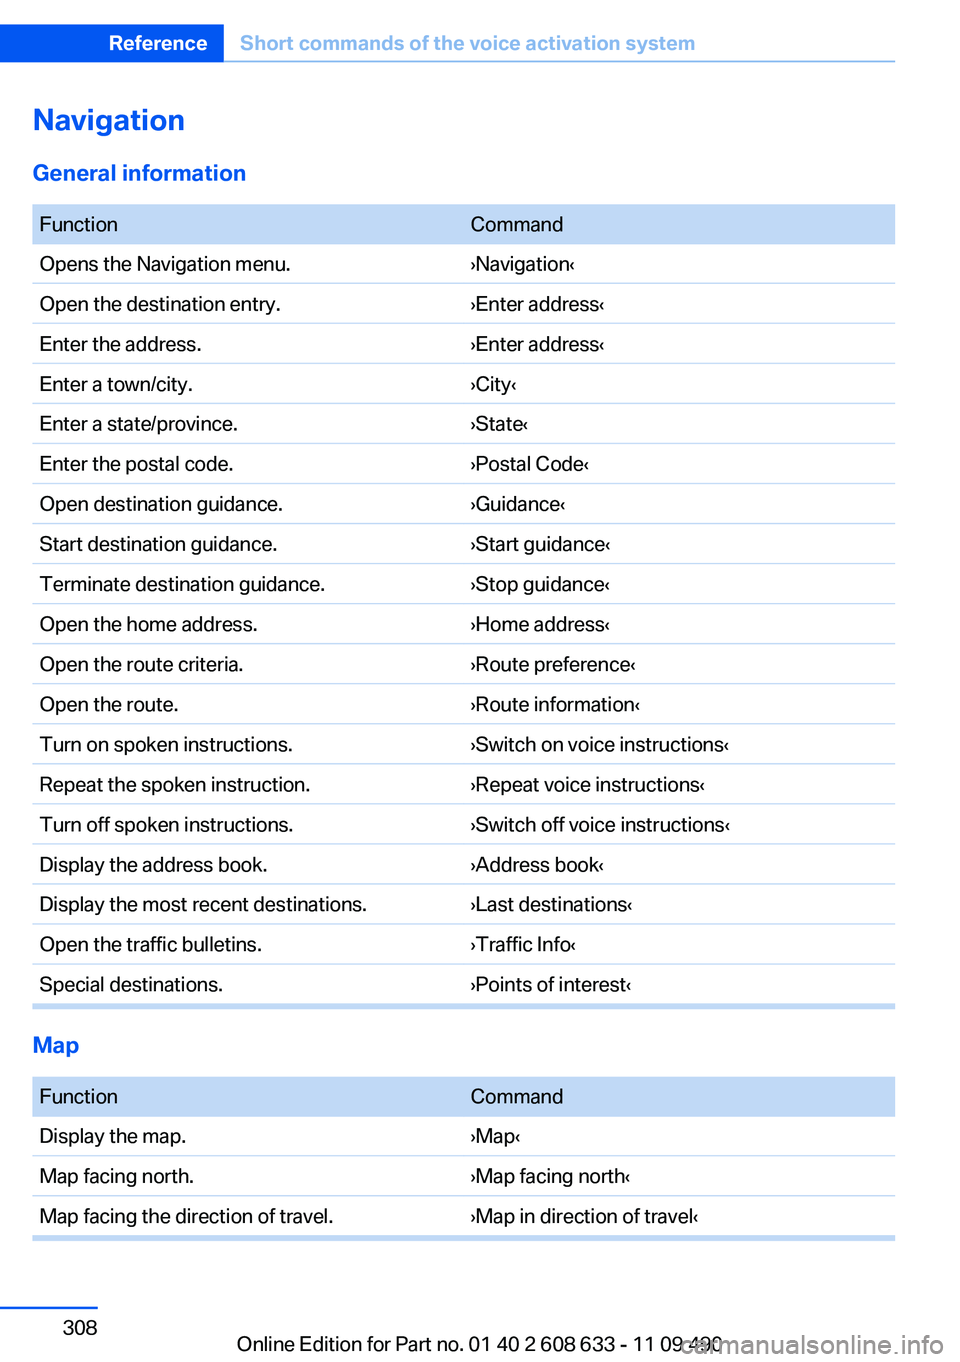
Navigation
General information
FunctionCommandOpens the Navigation menu.›Navigation‹Open the destination entry.›Enter address‹Enter the address.›Enter address‹Enter a town/city.›City‹Enter a state/province.›State‹Enter the postal code.›Postal Code‹Open destination guidance.›Guidance‹Start destination guidance.›Start guidance‹Terminate destination guidance.›Stop guidance‹Open the home address.›Home address‹Open the route criteria.›Route preference‹Open the route.›Route information‹Turn on spoken instructions.›Switch on voice instructions‹Repeat the spoken instruction.›Repeat voice instructions‹Turn off spoken instructions.›Switch off voice instructions‹Display the address book.›Address book‹Display the most recent destinations.›Last destinations‹Open the traffic bulletins.›Traffic Info‹Special destinations.›Points of interest‹
Map
FunctionCommandDisplay the map.›Map‹Map facing north.›Map facing north‹Map facing the direction of travel.›Map in direction of travel‹Seite 308ReferenceShort commands of the voice activation system308
Online Edition for Part no. 01 40 2 608 633 - 11 09 490