2012 BMW 328I settings
[x] Cancel search: settingsPage 64 of 268

Driving
62 Unusually rapid flashing of the indicator
lamp indicates that a turn signal indicator
has failed.<
Indicating a turn briefly
Press the lever as far as the resistance point for
as long as you wish to indicate a turn.
Triple turn signal activation
Press the lever as far as the resistance point.
The turn signals flash three times.
You can activate or deactivate this function.
iDrive, for operating principle refer to page16.
1.Open the start menu.
2.Press the controller to open the menu.
3.Select "Settings" and press the controller.
4.Select "Vehicle / Tires" and press the con-
troller.
5.If necessary, move the highlight marker to
the uppermost field. Turn the controller
until "Lighting" is selected and press the
controller.
6.Select "Triple turn signal" and press the
controller.
Triple turn signaling is activated.
Wiper system
1Switching on wipers
2Switching off wipers or brief wipe
3Activating/deactivating intermittent wipe or
rain sensor
*
4Cleaning windshield and headlamps*
5Setting speed for intermittent wipe, or sen-
sitivity of the rain sensor
Switching on wipers
Press the lever upward, arrow 1.
The lever automatically returns to its initial posi-
tion when released.
Normal wiper speed
Press once.
The system switches to operation in the inter-
mittent mode when the vehicle is stationary.
Fast wiper speed
Press twice or press beyond the resistance
point.
The system switches to normal speed when the
vehicle is stationary.
Intermittent wipe or rain sensor*
If the car is not equipped with a rain sensor, the
intermittent-wipe time is a preset.
If the car is equipped with a rain sensor, the time
between wipes is controlled automatically and
depends on the intensity of the rainfall. The
sensor is mounted on the windshield, directly in
front of the interior rearview mirror.
Page 78 of 268
Everything under control
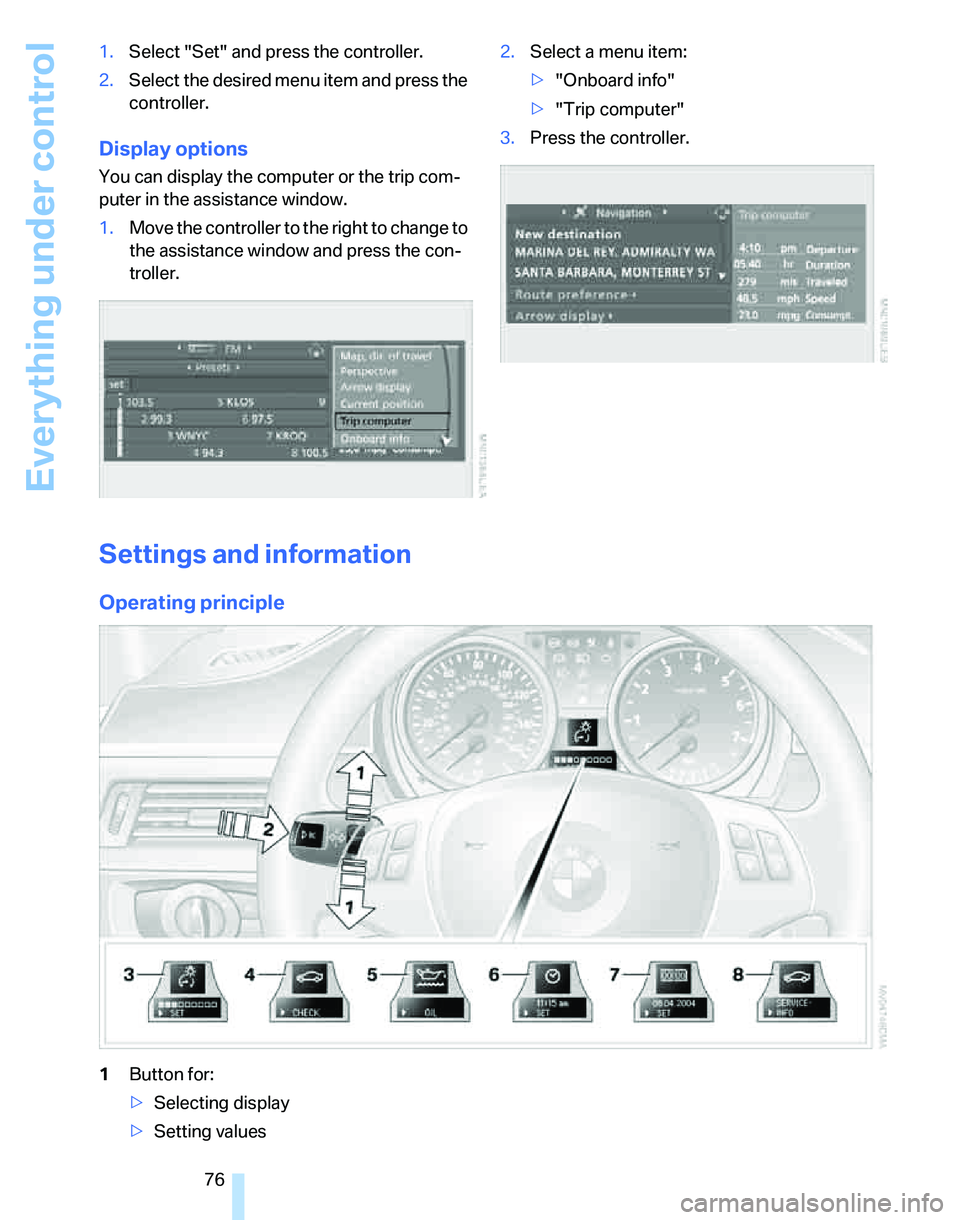
76 1.Select "Set" and press the controller.
2.Select the desired menu item and press the
controller.
Display options
You can display the computer or the trip com-
puter in the assistance window.
1.Move the controller to the right to change to
the assistance window and press the con-
troller.2.Select a menu item:
>"Onboard info"
>"Trip computer"
3.Press the controller.
Settings and information
Operating principle
1Button for:
>Selecting display
>Setting values
Page 79 of 268

Controls
77Reference
At a glance
Driving tips
Communications
Navigation
Entertainment
Mobility
2Button for:
>Confirming selected display or set val-
ues
>Calling up computer information74
3When the lights are on: instrument lighting
brightness1004Calling up Check Control82
5Checking oil level215
6Setting the time80
7Setting the date81
8Viewing service requirement display77
Exiting displays
The outside-temperature reading and the time
reappear when you press button2 or if you
make no entries within approx. 15 seconds. If
required, complete the current setting first.
Units of measure
You can set units of measure. The settings are
stored for the remote control currently in use,
refer also to Personal Profile on page28.
iDrive, for operating principle refer to page16.
1.Open the start menu.
2.Press the controller to open the menu.
3.Select "Settings" and press the controller.
4.Select "Language / Units" and press the
controller.
5.If necessary, move the highlight marker to
the uppermost field. Turn the controller
until "Units" is selected and press the con-
troller.
6.Select the desired menu item and press the
controller.
7.Select the desired measurement unit and
press the controller.
Service requirements
The remaining driving distance and the date of
the next scheduled service are displayed briefly
immediately after you start the engine or switch
on the ignition.
The extent of service work required can
be read out from the remote control by
your BMW Service Advisor.<
For certain maintenance operations, you can
view the respective distance remaining or due
date individually in the instrument cluster.
1.Push button 1 in the turn indicator lever up
or down repeatedly until the appropriate
symbol appears in the display, accompa-
nied by the words "SERVICE-INFO".
2.Press button 2.
3.Use button 1 to scroll through the individual
service items.
Page 82 of 268
Everything under control
80
Clock
The settings are stored for the remote control
currently in use, refer also to Personal Profile on
page28.
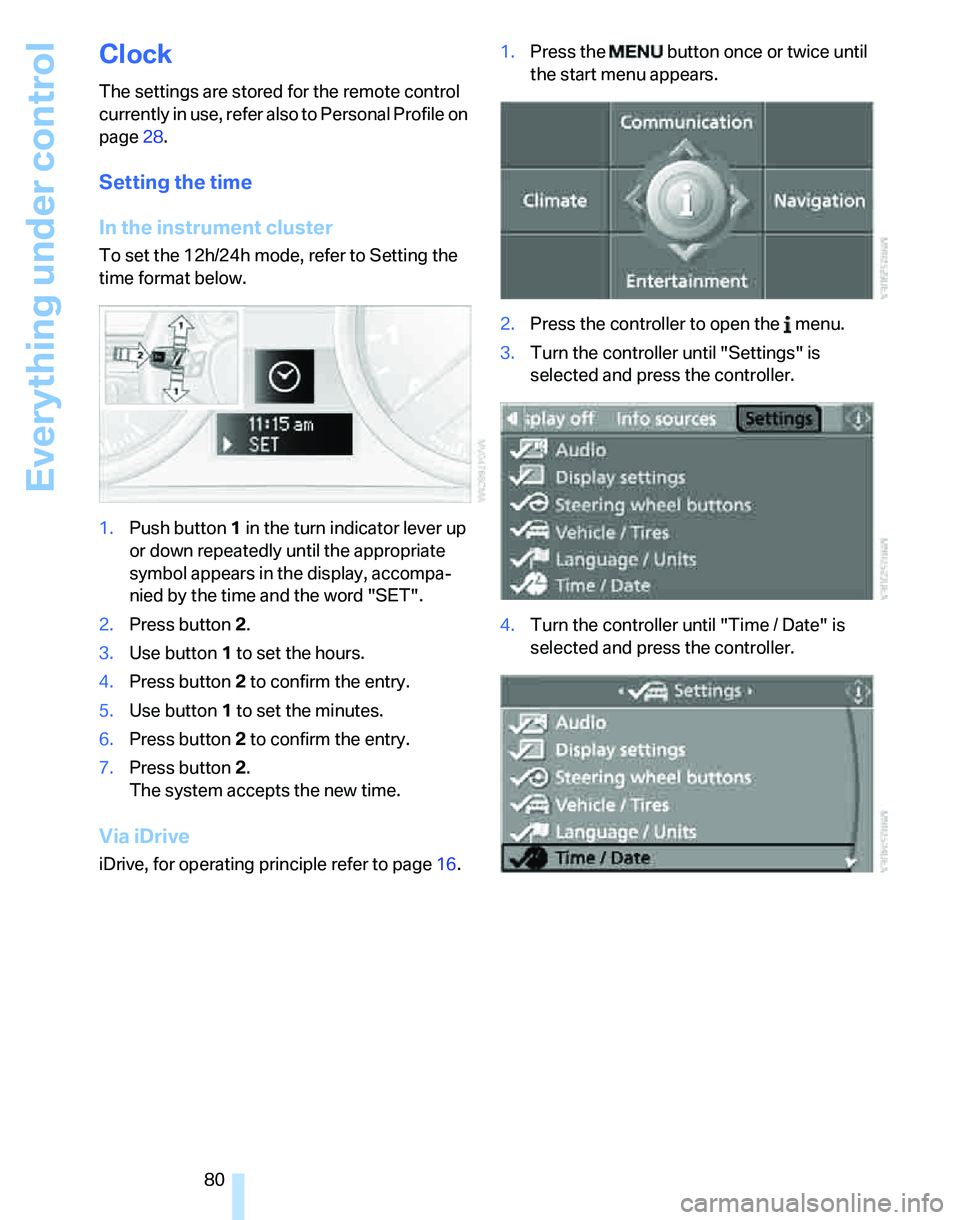
Setting the time
In the instrument cluster
To set the 12h/24h mode, refer to Setting the
time format below.
1.Push button 1 in the turn indicator lever up
or down repeatedly until the appropriate
symbol appears in the display, accompa-
nied by the time and the word "SET".
2.Press button 2.
3.Use button 1 to set the hours.
4.Press button 2 to confirm the entry.
5.Use button 1 to set the minutes.
6.Press button 2 to confirm the entry.
7.Press button 2.
The system accepts the new time.
Via iDrive
iDrive, for operating principle refer to page16.1.Press the button once or twice until
the start menu appears.
2.Press the controller to open the menu.
3.Turn the controller until "Settings" is
selected and press the controller.
4.Turn the controller until "Time / Date" is
selected and press the controller.
Page 83 of 268
Controls
81Reference
At a glance
Driving tips
Communications
Navigation
Entertainment
Mobility
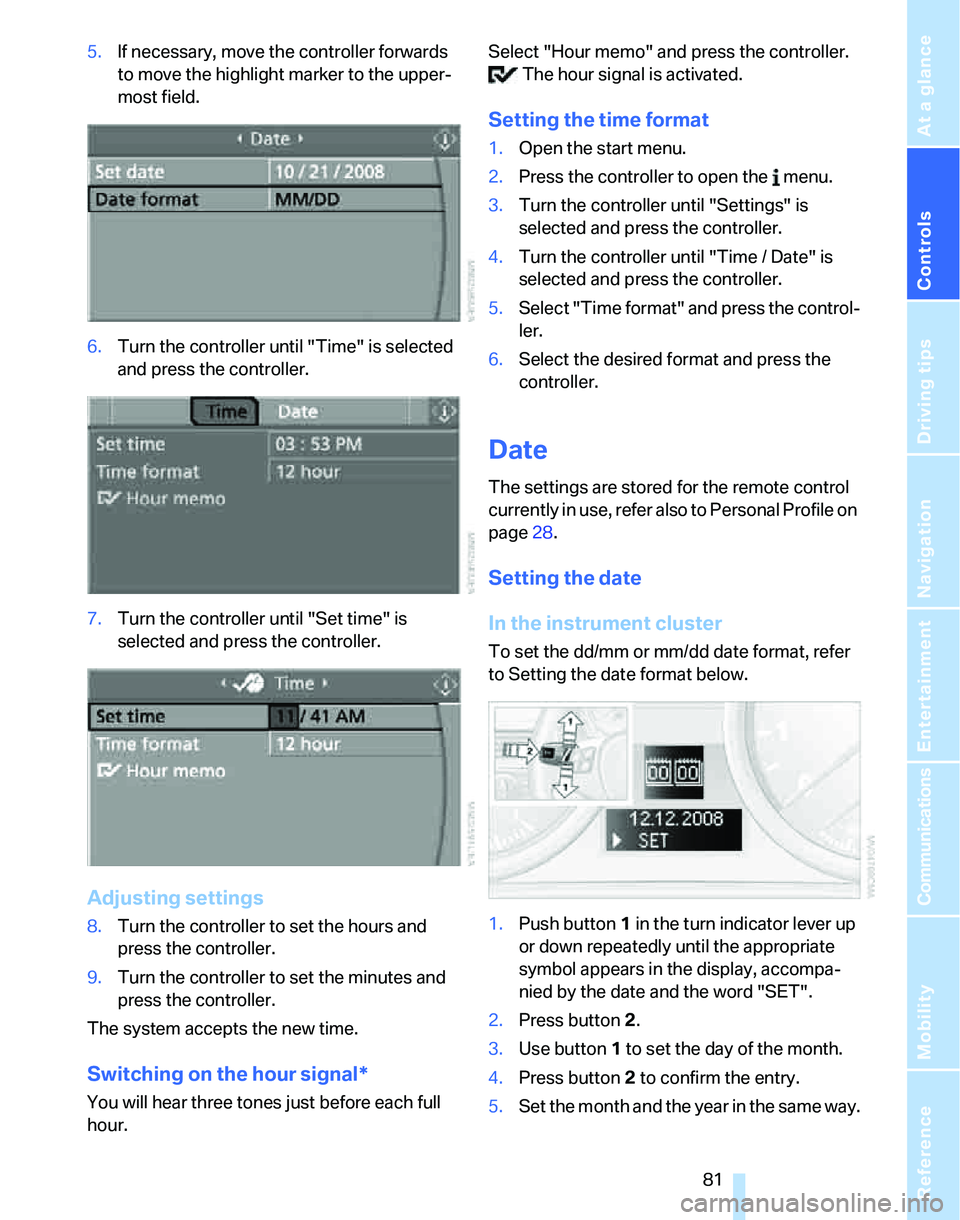
5.If necessary, move the controller forwards
to move the highlight marker to the upper-
most field.
6.Turn the controller until "Time" is selected
and press the controller.
7.Turn the controller until "Set time" is
selected and press the controller.
Adjusting settings
8.Turn the controller to set the hours and
press the controller.
9.Turn the controller to set the minutes and
press the controller.
The system accepts the new time.
Switching on the hour signal*
You will hear three tones just before each full
hour.Select "Hour memo" and press the controller.
The hour signal is activated.
Setting the time format
1.Open the start menu.
2.Press the controller to open the menu.
3.Turn the controller until "Settings" is
selected and press the controller.
4.Turn the controller until "Time / Date" is
selected and press the controller.
5.Select "Time format" and press the control-
ler.
6.Select the desired format and press the
controller.
Date
The settings are stored for the remote control
currently in use, refer also to Personal Profile on
page28.
Setting the date
In the instrument cluster
To set the dd/mm or mm/dd date format, refer
to Setting the date format below.
1.Push button 1 in the turn indicator lever up
or down repeatedly until the appropriate
symbol appears in the display, accompa-
nied by the date and the word "SET".
2.Press button 2.
3.Use button 1 to set the day of the month.
4.Press button 2 to confirm the entry.
5.Set the month and the year in the same way.
Page 84 of 268

Everything under control
82 6.Press button 2.
The system stores the new date.
Via iDrive
iDrive, for operating principle refer to page16.
1.Open the start menu.
2.Press the controller to open the menu.
3.Turn the controller until "Settings" is
selected and press the controller.
4.Select "Date" and press the controller.
5.Select "Set date" and press the controller.
The first date display setting is selected.
6.Turn the controller to make the adjustment.
7.Press the controller to apply the setting.
The next setting is highlighted.
8.Make the remaining adjustments. After the
last adjustment, the date is stored.
Setting the date format
1.Open the start menu.
2.Press the controller to open the menu.
3.Turn the controller until "Settings" is
selected and press the controller.
4.Turn the controller until "Time / Date" is
selected and press the controller.
5.Select "Date format" and press the control-
ler.
6.Select the desired format and press the
controller.
Check Control
The concept
The Check Control monitors vehicle functions
and alerts you to any malfunctions in the sys-
tems monitored. Such a Check Control mes-
sage includes indicator and warning lamps in
the instrument cluster and, in some circum-
stances, an acoustic signal as well as text mes-
sages at the bottom of the Control Display.
Indicator and warning lamps
Indicator and warning lamps can light up in both
the indicator area 1 and the display 2 in various
combinations and colors.
indicates that Check Control messages have
been stored. You can view the Check Control
messages whenever it is convenient for you.
Page 87 of 268
Controls
85Reference
At a glance
Driving tips
Communications
Navigation
Entertainment
Mobility
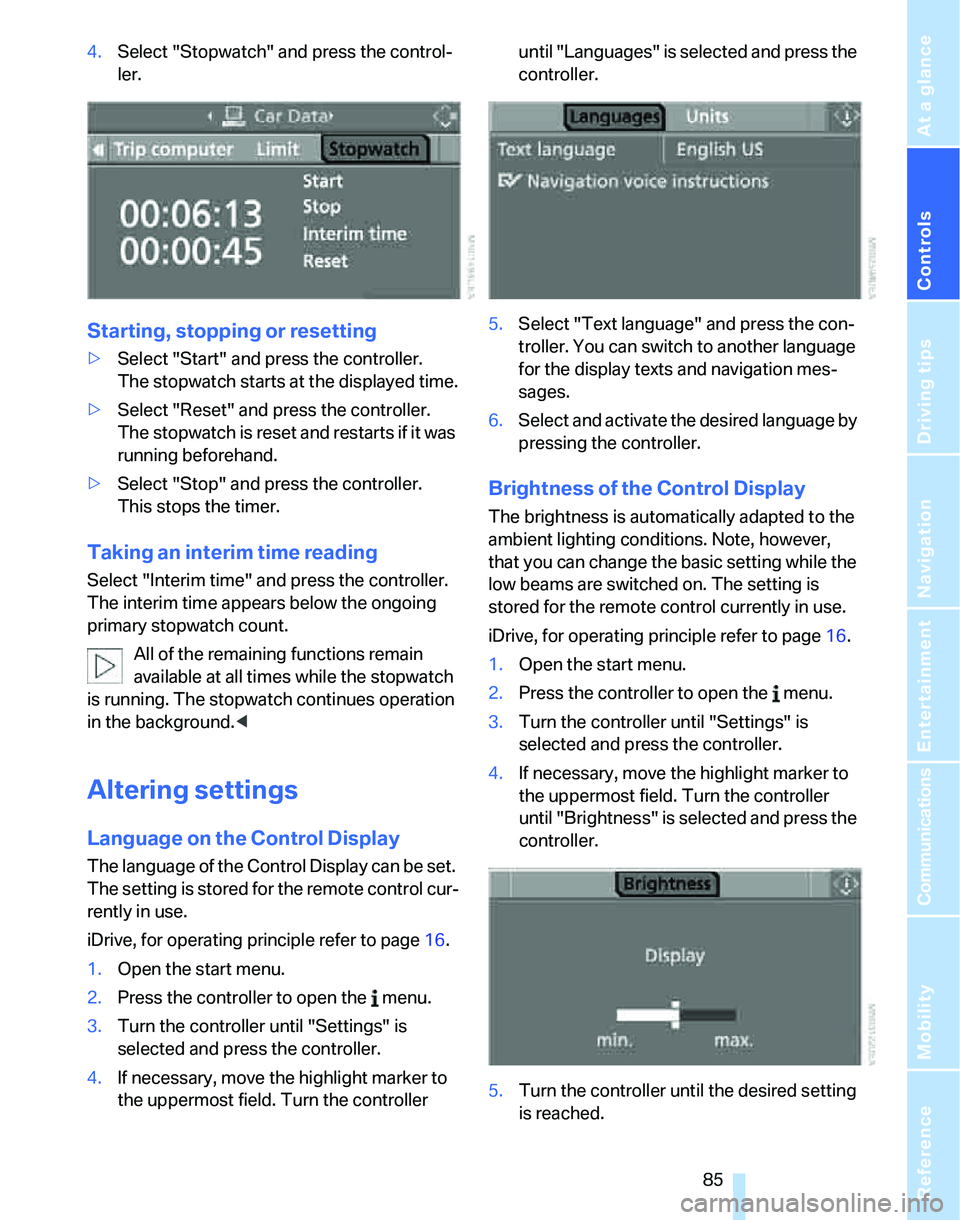
4.Select "Stopwatch" and press the control-
ler.
Starting, stopping or resetting
>Select "Start" and press the controller.
The stopwatch starts at the displayed time.
>Select "Reset" and press the controller.
The stopwatch is reset and restarts if it was
running beforehand.
>Select "Stop" and press the controller.
This stops the timer.
Taking an interim time reading
Select "Interim time" and press the controller.
The interim time appears below the ongoing
primary stopwatch count.
All of the remaining functions remain
available at all times while the stopwatch
is running. The stopwatch continues operation
in the background.<
Altering settings
Language on the Control Display
The language of the Control Display can be set.
The setting is stored for the remote control cur-
rently in use.
iDrive, for operating principle refer to page16.
1.Open the start menu.
2.Press the controller to open the menu.
3.Turn the controller until "Settings" is
selected and press the controller.
4.If necessary, move the highlight marker to
the uppermost field. Turn the controller until "Languages" is selected and press the
controller.
5.Select "Text language" and press the con-
troller. You can switch to another language
for the display texts and navigation mes-
sages.
6.Select and activate the desired language by
pressing the controller.
Brightness of the Control Display
The brightness is automatically adapted to the
ambient lighting conditions. Note, however,
that you can change the basic setting while the
low beams are switched on. The setting is
stored for the remote control currently in use.
iDrive, for operating principle refer to page16.
1.Open the start menu.
2.Press the controller to open the menu.
3.Turn the controller until "Settings" is
selected and press the controller.
4.If necessary, move the highlight marker to
the uppermost field. Turn the controller
until "Brightness" is selected and press the
controller.
5.Turn the controller until the desired setting
is reached.
Page 88 of 268
Technology for driving comfort and safety
86
Technology for driving comfort and safety
PDC Park Distance Control*
The concept
The PDC assists you with maneuvering in tight
parking spaces. Acoustic signals and a visual
indicator
warn you of the presence of an object
behind your vehicle. To measure the distance,
there are four ultrasonic sensors in either
bumper.
These sensors have a range of approx. 6.5 ft/
2 m. However, an acoustic warning does not
sound until an object is approx. 24 in/60 cm
from the corner sensors, or approx. 5 ft/1.50 m
from the center sensors.
PDC is a parking aid that can indicate
objects when they are approached
slowly, as is usually the case when parking.
Avoid approaching an object at high speed, oth-
erwise physical circumstances may lead to the
system warning being issued too late.<
Switching on automatically
With the engine running or the ignition switched
on, the system is activated automatically after
approx. 1 second when you engage reverse
gear or move the automatic transmission selec-
tor lever to position R. Wait this short period
before driving.
Signal tones
When nearing an object, its position is indicated
correspondingly by an interval tone. As the dis-
tance between vehicle and object decreases,
the intervals between the tones become
shorter. If the distance to the nearest object
falls to below roughly 1 ft/30 cm, then a contin-
uous tone sounds.
An interval tone is interrupted after approx.
3seconds
>if you remain in front of an object that has
been detected by only one of the corner
sensors
>if you are driving parallel to a wall.
Malfunction
The indicator lamp in the instrument
cluster comes on. PDC is malfunc-
tioning. A message appears on the
Control Display. Have the system checked.
To avoid this problem, keep the sensors clean
and free of ice or snow in order to ensure that
they will continue to operate effectively. When
using a high-pressure cleaner, do not spray the
sensors for extended periods of time and only
from a distance of at least 4 in/10 cm.
PDC with visual warning
You can also have the system show distances
to objects on the Control Display. The contours
of distant objects are shown on the Control Dis-
play even before the acoustic signal sounds.
The setting is stored for the remote control cur-
rently in use.
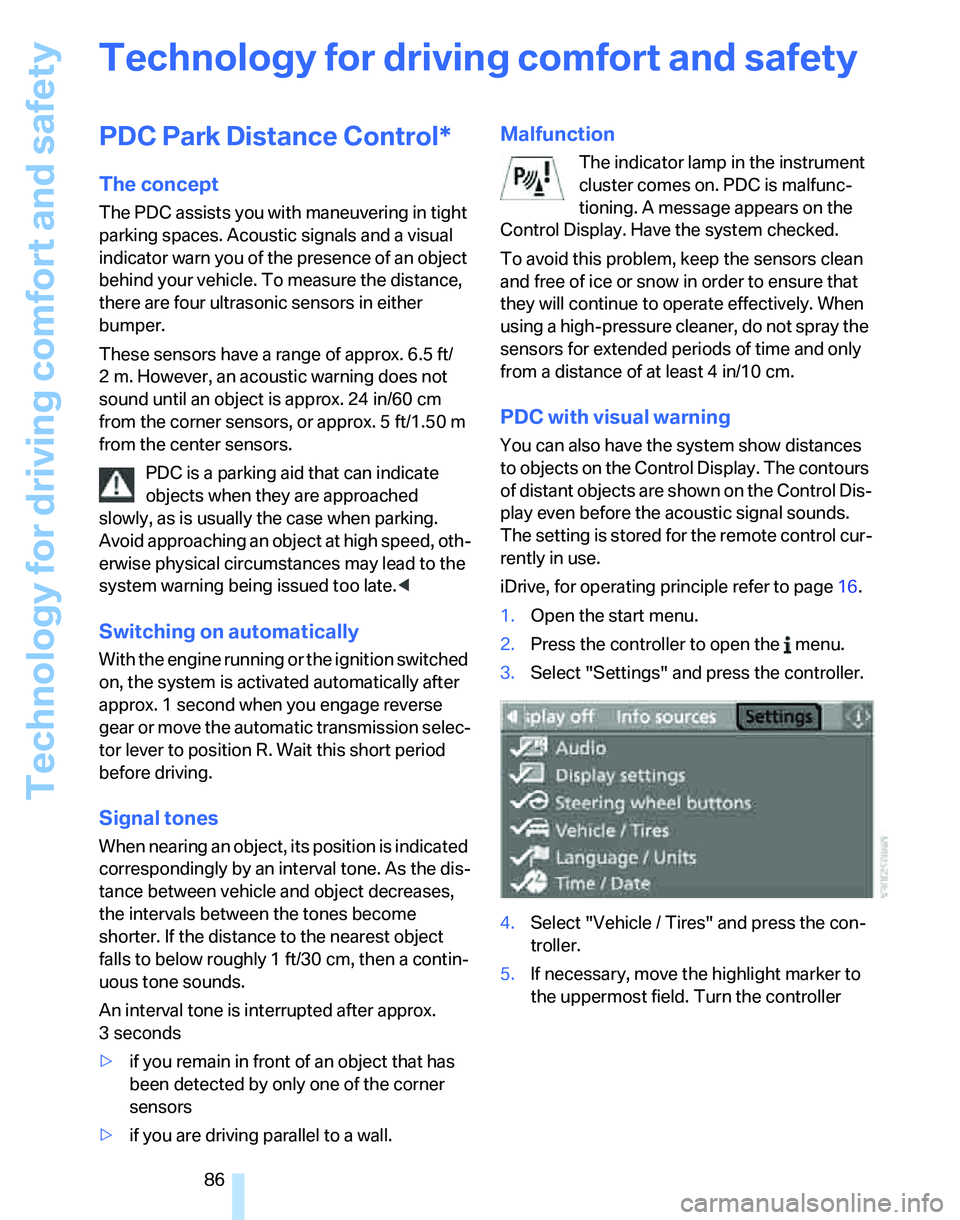
iDrive, for operating principle refer to page16.
1.Open the start menu.
2.Press the controller to open the menu.
3.Select "Settings" and press the controller.
4.Select "Vehicle / Tires" and press the con-
troller.
5.If necessary, move the highlight marker to
the uppermost field. Turn the controller