2012 BMW 328I CONVERTIBLE change wheel
[x] Cancel search: change wheelPage 103 of 314
102
ControlsTechnology for driving comfort and safety
Tire Pressure Monitor TPM
The concept
Check the inflation pressure in the four installed
tires. The system notifies you if there is a signif-
icant loss of pressure in one or more tires.
Functional requirement
The system must have been reset while the
inflation pressure was correct; otherwise, reli-
able signaling of a flat tire is not ensured.
Always use wheels with TPM electronics to
ensure that the system will operate properly.
Each time a tire inflation pressure has been cor-
rected or a wheel or tire has been changed,
reset the system.
System limitations
Sudden serious tire damage caused by
external influences cannot be indicated in
advance. <
The system does not function correctly if it has
not been reset. For example, a flat tire may be
indicated even though th e tire inflation pres-
sures are correct.
The system is inactive an d cannot indicate a flat
tire:
> When a wheel without TPM electronics is
installed.
> Interference with TPM by other systems or
devices with the same transmission fre-
quency.
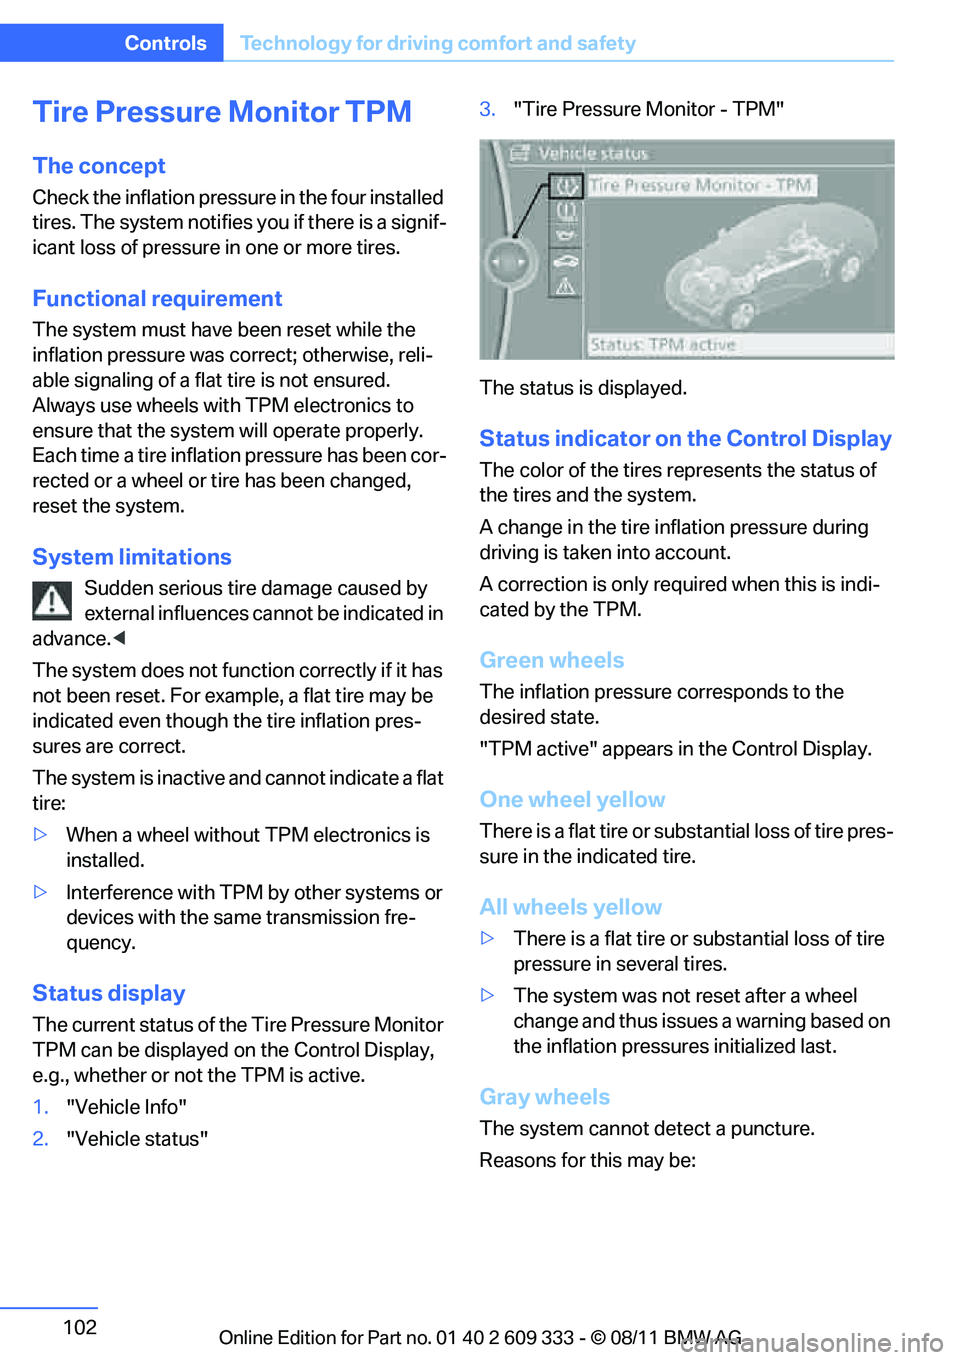
Status display
The current status of the Tire Pressure Monitor
TPM can be displayed on the Control Display,
e.g., whether or not the TPM is active.
1. "Vehicle Info"
2. "Vehicle status" 3.
"Tire Pressure Monitor - TPM"
The status is displayed.
Status indicator on the Control Display
The color of the tires represents the status of
the tires and the system.
A change in the tire in flation pressure during
driving is taken into account.
A correction is only requ ired when this is indi-
cated by the TPM.
Green wheels
The inflation pressure corresponds to the
desired state.
"TPM active" appears in the Control Display.
One wheel yellow
There is a flat tire or substantial loss of tire pres-
sure in the indicated tire.
All wheels yellow
> There is a flat tire or substantial loss of tire
pressure in several tires.
> The system was not reset after a wheel
change and thus issues a warning based on
the inflation pressure s initialized last.
Gray wheels
The system cannot de tect a puncture.
Reasons for this may be:
Online Edition for Part no. 01 40 2 609 333 - \251 08/11 BMW AG
Page 104 of 314
103
Technology for driving comfort and safety
Controls
>
TPM is being reset.
> Interference from systems or devices that
use the same radio frequency.
> Malfunction.
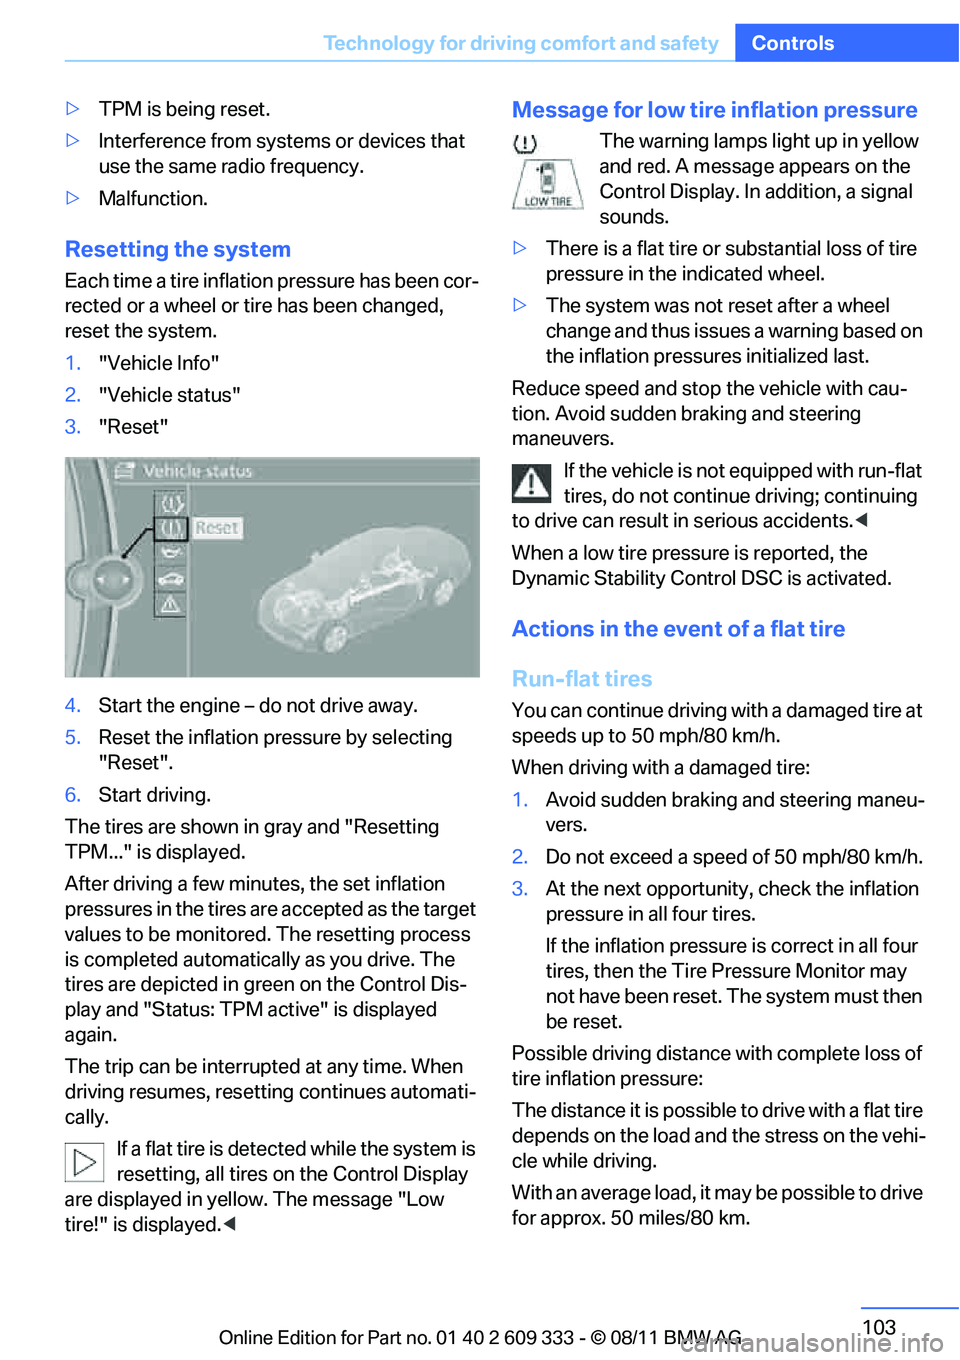
Resetting the system
Each time a tire inflation pressure has been cor-
rected or a wheel or tire has been changed,
reset the system.
1."Vehicle Info"
2. "Vehicle status"
3. "Reset"
4. Start the engine – do not drive away.
5. Reset the inflation pr essure by selecting
"Reset".
6. Start driving.
The tires are shown in gray and "Resetting
TPM..." is displayed.
After driving a few minu tes, the set inflation
pressures in the tires are accepted as the target
values to be monitored. The resetting process
is completed automatically as you drive. The
tires are depicted in green on the Control Dis-
play and "Status: TPM active" is displayed
again.
The trip can be interrupted at any time. When
driving resumes, resetting continues automati-
cally.
If a flat tire is detected while the system is
resetting, all tires on the Control Display
are displayed in yellow. The message "Low
tire!" is displayed. <
Message for low tire inflation pressure
The warning lamps light up in yellow
and red. A message appears on the
Control Display. In addition, a signal
sounds.
> There is a flat tire or substantial loss of tire
pressure in the indicated wheel.
> The system was not reset after a wheel
change and thus issues a warning based on
the inflation pressure s initialized last.
Reduce speed and stop the vehicle with cau-
tion. Avoid sudden braking and steering
maneuvers. If the vehicle is not equipped with run-flat
tires, do not continue driving; continuing
to drive can result in serious accidents.<
When a low tire pressure is reported, the
Dynamic Stability Control DSC is activated.
Actions in the event of a flat tire
Run-flat tires
You can continue driving with a damaged tire at
speeds up to 50 mph/80 km/h.
When driving with a damaged tire:
1. Avoid sudden braking and steering maneu-
vers.
2. Do not exceed a speed of 50 mph/80 km/h.
3. At the next opportunity, check the inflation
pressure in all four tires.
If the inflation pressure is correct in all four
tires, then the Tire Pressure Monitor may
not have been reset. The system must then
be reset.
Possible driving distance with complete loss of
tire inflation pressure:
The distance it is possible to drive with a flat tire
depends on the load and the stress on the vehi-
cle while driving.
With an average load, it may be possible to drive
for approx. 50 miles/80 km.
Online Edition for Part no. 01 40 2 609 333 - \251 08/11 BMW AG
Page 105 of 314
104
ControlsTechnology for driving comfort and safety
When driving with damaged tires, the handling
characteristics ch ange, e.g. the vehicle will skid
sooner when braking, braking distances will be
longer, or self-steerin g response will change.
Adapt your driving style accordingly. Avoid
turning abruptly and driving over obstacles
such as curbs, potholes, etc.
Since the possible driving distance depends to
a considerable degree on the strain exerted on
the vehicle while driving, it can be shorter or,
with a gentle driving style, can also be longer,
depending on the speed, road condition, out-
side temperature, vehicle load, etc.
Drive cautiously and do not exceed a
speed of 50 mph/80 km/h.
When there is a tire pressure loss, the handling
characteristics change, e.g. there will be
reduced directional stability during braking,
braking distances will be longer, and self-steer-
ing response will change. <
Vibrations or loud noises while driving can
indicate complete fa ilure of the tire.
Reduce your speed and bring the vehicle to a
stop; otherwise, tire components may become
detached, which could result in an accident. Do
not continue driving; instead, contact your
BMW center. <
Message for unsuccessful system
reset
Yellow warning lamp lights up. A
message appears on the Control Dis-
play.
The system has detected a wheel change, but
was not reset. A reliable warning is not possible
at the current inflation pressures.
Check the tire inflation pressure and reset the
system, refer to page 103.
Malfunction
The small warning lamp flashes in
yellow and then lights up continu-
ously; the large warning lamp lights
up in yellow. The tires appear in gray in the Control Display. No punctures can be
detected.
Display in the follo
wing situations:
> A wheel without TPM electronics has been
installed:
Have it checked by your BMW center.
> Malfunction
Have the system checked.
> Tire Pressure Monitor was unable to com-
plete the resetting process. Reset the sys-
tem again.
The small warning lamp flashes in
yellow and then lights up continu-
ously; the large warning lamp lights
up in yellow. The tires appear in gray
in the Control Display. No punctures can be
detected.
Display in the follo wing situations:
> Interference from systems or devices that
use the same radio frequency:
The system automatica lly becomes active
again when the vehicl e moves out of the
interference zone.
Declaration according to
NHTSA/FMVSS 138
Tire Pressure Monitoring Systems
Each tire should be checked monthly when cold
and inflated to the inflation pressure recom-
mended by the vehicle manufacturer on the
vehicle placard or tire infl ation pressure label. If
your vehicle has tires of a different size than the
size indicated on the vehicle placard or tire infla-
tion pressure label, yo u should determine the
proper tire inflation pressure for those tires. As
an added safety feature, your vehicle has been
equipped with a tire pressure monitoring sys-
tem, TPMS, that illuminate s a low tire pressure
telltale when one or more of your tires are signif-
icantly underinflated. Accordingly, when the
low tire pressure telltal e illuminates, you should
stop and check your tires as soon as possible,
and inflate them to the proper pressure. Driving
on a significantly underi nflated tire causes the
Online Edition for Part no. 01 40 2 609 333 - \251 08/11 BMW AG
Page 120 of 314
119
Climate
Controls
ALL program
Press the button.
The current temperature setting
on the driver's side is transferred to
the front passenger side.
If the temperature setting on the driver's side is
changed, the temperature on the front passen-
ger side is changed as well.
The program is switched off when the setting is
adjusted on the front passenger side or the but-
ton is pressed again.
Defrosting windows and removing
condensation
Press the button.
Quickly removes ice and conden-
sation from the windshield and
front side windows.
For this purpose, also switch on the cooling
function.
Switching cooling function on/off
The passenger compartment can only be
cooled while the engine is running.
Press the button.
The air is cooled and dehumidified
and – depending on the tempera-
ture setting – warmed again.
Depending on the weathe r, the windshield may
fog up briefly when the engine is started.
Pressing the AUTO button automatically
switches on the cooling function.
Rear window defroster
Press the button.
The defroster is switched off auto-
matically after a certain time.
Depending on your vehicle's equipment, the
upper wires serve as an antenna and are not
part of the rear window defroster.
Switching the system on/off
Switching off
With the blower at its lowest set-
ting, press the left side of the but-
ton to switch off the automatic cli-
mate control.
All displays are cleared except for the rear win-
dow defroster if it is switched on.
The outside air supply is blocked when
the automatic climate control is switched
off. If the air quality de teriorates or the window
fogs over, switch the system back on and
increase the air volume. <
Switching on
Press any button except the ALL or the rear
window defroster button to reactivate the auto-
matic climate control.
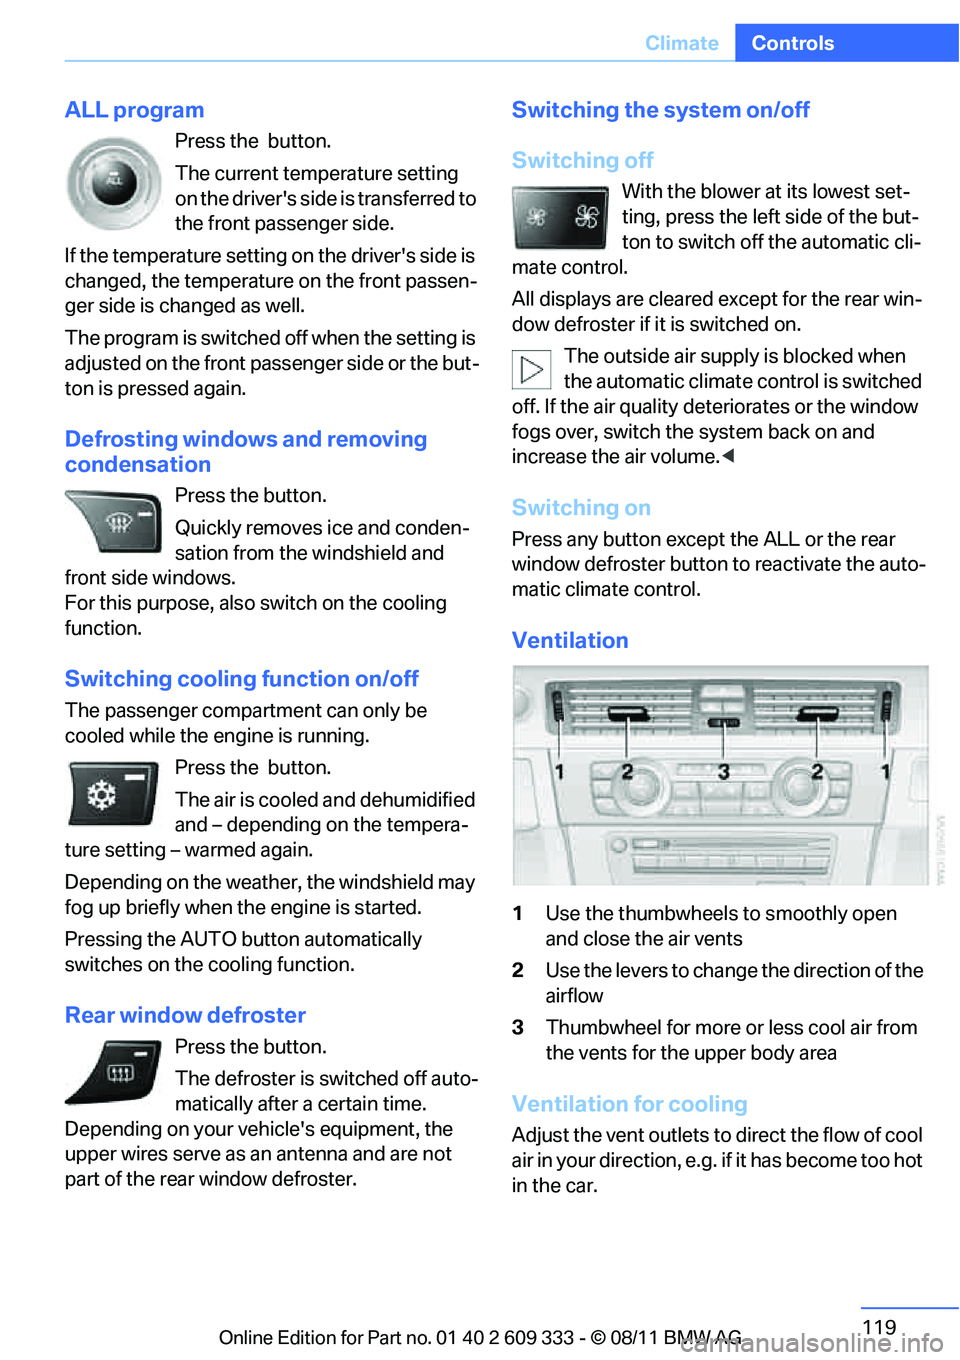
Ventilation
1Use the thumbwheels to smoothly open
and close the air vents
2 Use the levers to change the direction of the
airflow
3 Thumbwheel for more or less cool air from
the vents for the upper body area
Ventilation for cooling
Adjust the vent outlets to direct the flow of cool
air in your direction, e.g. if it has become too hot
in the car.
Online Edition for Part no. 01 40 2 609 333 - \251 08/11 BMW AG
Page 121 of 314
120
ControlsClimate
Draft-free ventilation
Set the vent outlets so that the air flows past
you and not straight at you.
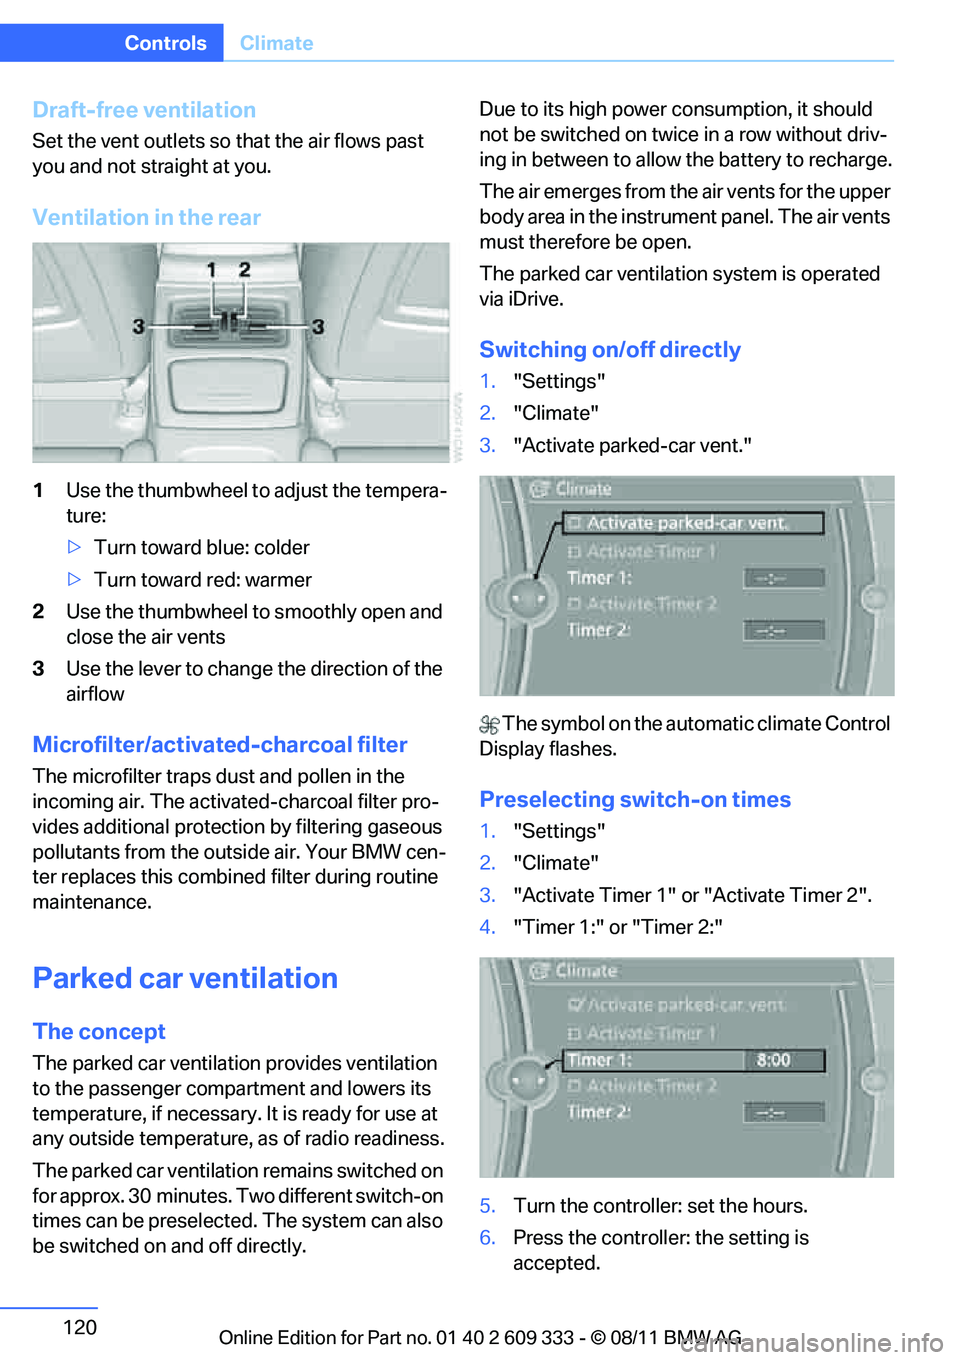
Ventilation in the rear
1Use the thumbwheel to adjust the tempera-
ture:
> Turn toward blue: colder
> Turn toward red: warmer
2 Use the thumbwheel to smoothly open and
close the air vents
3 Use the lever to change the direction of the
airflow
Microfilter/activate d-charcoal filter
The microfilter traps dust and pollen in the
incoming air. The activated-charcoal filter pro-
vides additional protecti on by filtering gaseous
pollutants from the outside air. Your BMW cen-
ter replaces this combined filter during routine
maintenance.
Parked car ventilation
The concept
The parked car ventilation provides ventilation
to the passenger compartment and lowers its
temperature, if necessary. It is ready for use at
any outside temperature, as of radio readiness.
The parked car ventilation remains switched on
for approx. 30 minutes. Two different switch-on
times can be preselected. The system can also
be switched on and off directly. Due to its high power consumption, it should
not be switched on twice in a row without driv-
ing in between to allow
the battery to recharge.
The air emerges from the air vents for the upper
body area in the instrument panel. The air vents
must therefore be open.
The parked car ventilation system is operated
via iDrive.
Switching on/off directly
1. "Settings"
2. "Climate"
3. "Activate parked-car vent."
The symbol on the automatic climate Control
Display flashes.
Preselecting switch-on times
1. "Settings"
2. "Climate"
3. "Activate Timer 1" or "Activate Timer 2".
4. "Timer 1:" or "Timer 2:"
5. Turn the controller: set the hours.
6. Press the controller: the setting is
accepted.
Online Edition for Part no. 01 40 2 609 333 - \251 08/11 BMW AG
Page 171 of 314
170
EntertainmentOn/off and tone
On/off and tone
Vehicle equipment
In this chapter, all pr oduction, country, and
optional equipment that is offered in the model
range is described. Equipment is also described
that is not available because of, for example,
selected options or country version. This also
applies to safety related functions and systems.
General information
The following audio and video sources share
the same control elements and adjustments:
> Radio
> CD/DVD player
> CD changer
> Video
> External devices, e.g. MP3 player
Controls
The audio and video sources can be controlled
using the:
>Buttons near th e CD/DVD player
> iDrive
> Buttons on the steering wheel, refer to
page 11
> Programmable memory keys, refer to
page 23
> Voice activation system
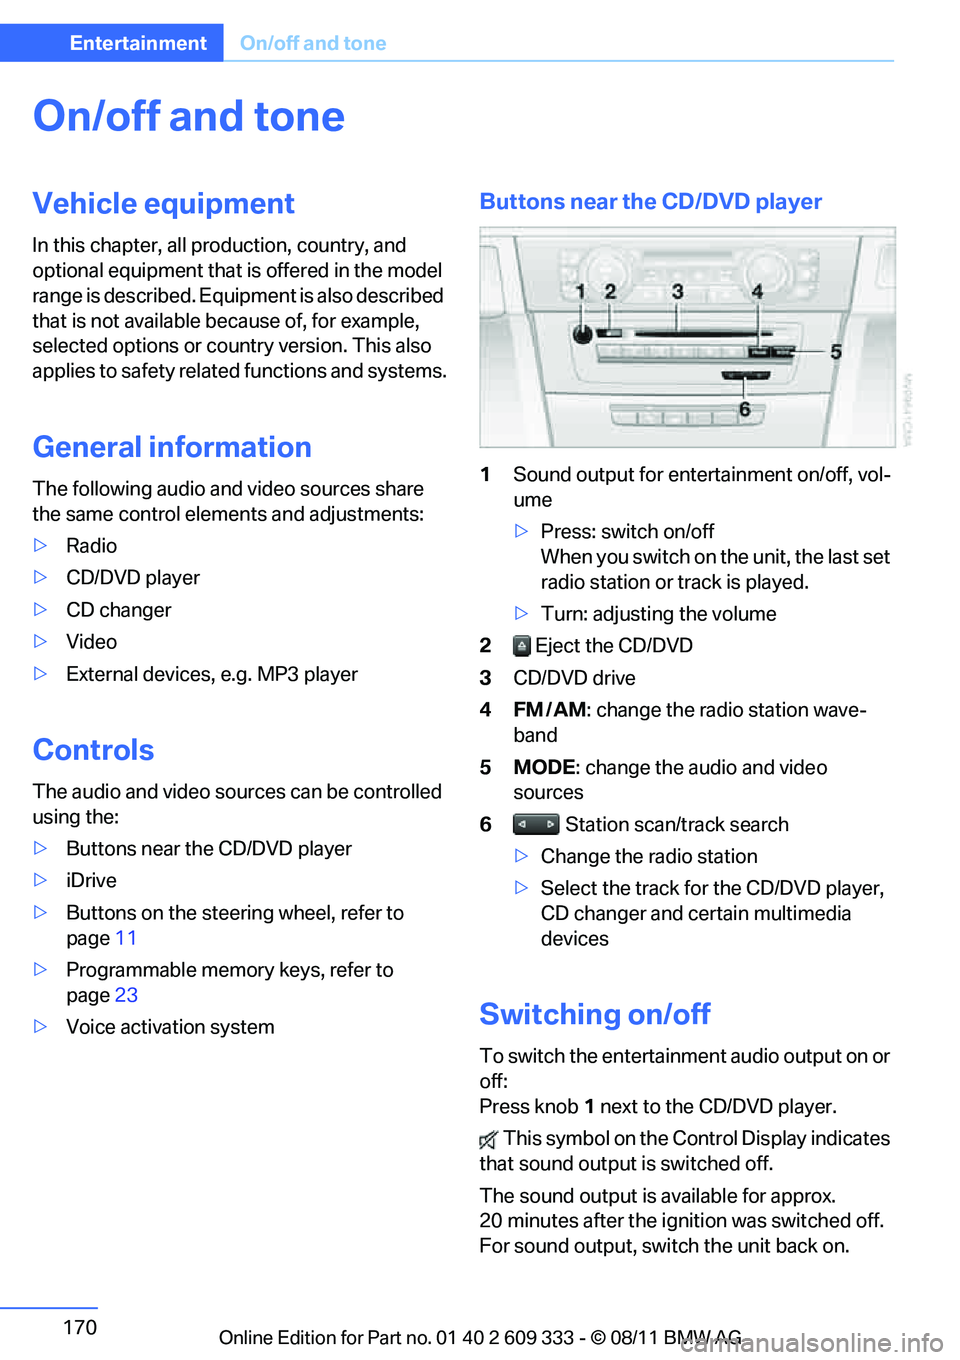
Buttons near the CD/DVD player
1Sound output for entertainment on/off, vol-
ume
>Press: switch on/off
When you switch on the unit, the last set
radio station or track is played.
> Turn: adjusting the volume
2 Eject the CD/DVD
3 CD/DVD drive
4FM/AM : change the radio station wave-
band
5MODE : change the audio and video
sources
6 Station scan/track search
> Change the radio station
> Select the track for the CD/DVD player,
CD changer and certain multimedia
devices
Switching on/off
To switch the entertainment audio output on or
off:
Press knob 1 next to the CD/DVD player.
This symbol on the Co ntrol Display indicates
that sound output is switched off.
The sound output is available for approx.
20 minutes after the ignition was switched off.
For sound output, switch the unit back on.
Online Edition for Part no. 01 40 2 609 333 - \251 08/11 BMW AG
Page 274 of 314
273
Replacing components
Mobility
Backup lamp
If these lamps malfunctio
n, please contact your
BMW center.
Turn signal, brake, license plate,
parking, and tail lamps
These lamps use LED technology for operation.
If they malfunction, please contact your BMW
center.
Coupe: Brake Force Display lamp in the
trunk lid
H21W bulb, 21 watts
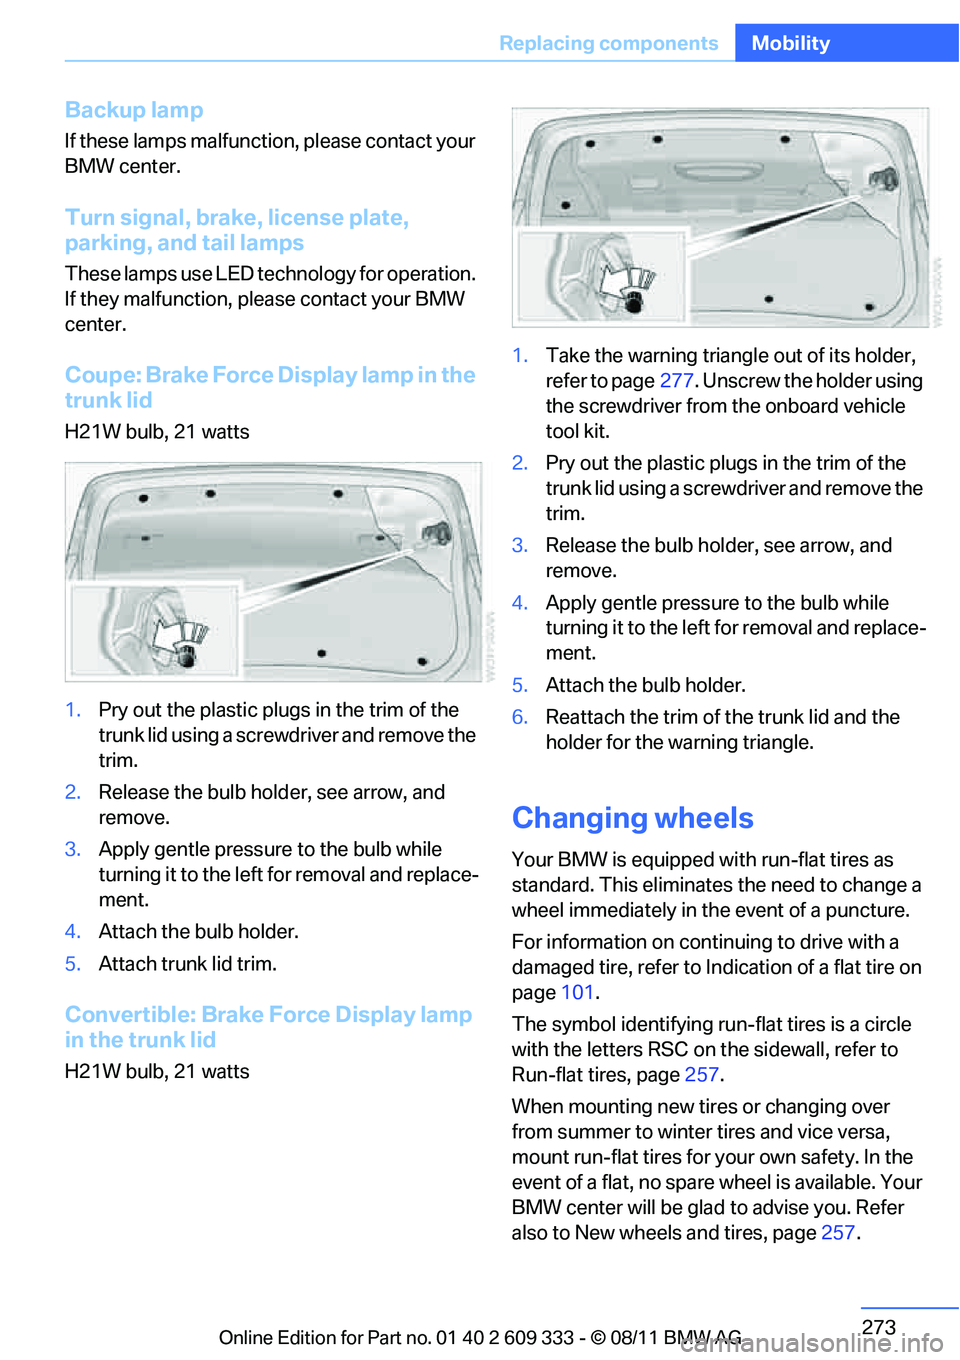
1. Pry out the plastic plugs in the trim of the
trunk lid using a screwdriver and remove the
trim.
2. Release the bulb hold er, see arrow, and
remove.
3. Apply gentle pressure to the bulb while
turning it to the left for removal and replace-
ment.
4. Attach the bulb holder.
5. Attach trunk lid trim.
Convertible: Brake Force Display lamp
in the trunk lid
H21W bulb, 21 watts 1.
Take the warning triangle out of its holder,
refer to page 277. Unscrew the holder using
the screwdriver from the onboard vehicle
tool kit.
2. Pry out the plastic plugs in the trim of the
trunk lid using a screwd river and remove the
trim.
3. Release the bulb holder, see arrow, and
remove.
4. Apply gentle pressure to the bulb while
turning it to the left for removal and replace-
ment.
5. Attach the bulb holder.
6. Reattach the trim of the trunk lid and the
holder for the warning triangle.
Changing wheels
Your BMW is equipped with run-flat tires as
standard. This eliminates the need to change a
wheel immediately in the event of a puncture.
For information on continuing to drive with a
damaged tire, refer to Indication of a flat tire on
page 101.
The symbol identifying run- flat tires is a circle
with the letters RSC on the sidewall, refer to
Run-flat tires, page 257.
When mounting new tires or changing over
from summer to winter tires and vice versa,
mount run-flat tires for your own safety. In the
event of a flat, no spare wheel is available. Your
BMW center will be glad to advise you. Refer
also to New wheels and tires, page 257.
Online Edition for Part no. 01 40 2 609 333 - \251 08/11 BMW AG
Page 301 of 314

300
ReferenceEverything from A to Z
Car care, refer to Care 266
Care 266
– automatic car washes 266
– care products 266
– carpets 269
– CD/DVD drives 269
– chrome parts 268
– displays 269
– exterior 266
– fine wood parts 269
– headlamps 267
– high-pressure washer 267
– interior 268
– leather 268
– light-alloy wheels 268
– paintwork 267
– plastic parts 269
– retractable hardtop 267
– rubber seals 268
– safety belts 269
– sensors and cameras 269
– upholstery and cloth
trim 268
– washing the car manually 267
– windows 267
Cargo, securing 143
Cargo area
– capacity 287
– Comfort Access 39
– folding up the floor
panel 132
– lamp, refer to Interior lamps 114
– opening from inside 35
– opening from outside 36
Cargo loading 141
– securing cargo 143
– stowing cargo 142
– vehicle 141
Car jack
– jacking points 274
Car key, refer to Integrated
key/remote control 30Car phone
– installation location, refer to
Center armrest 126
– refer to separate Owner's Manual
Car phone, refer to Telephone 204
Car shampoo 269
Catalytic converter, refer to Hot exhaust system 140
Center armrest 126
Center brake lamp
– replacing bulb 273
Center console, refer to
Around the center
co
nsole 14
Central locking
– from inside 35
– from outside 31
Central locking system 31
– Comfort Access 38
– hotel function 36
– setting unlocking characteristics 32
Changes, technical, refer to
For your own safety 5
Changing bulbs, refer to Lamps and bulbs 270
Changing gears 68
Changing the language on the Control Display 94
Changing the measurement units on the Control
Display 87
Changing wheels 273
Chassis number, refer to Engine compartment 259
Check Control 92
Child restraint fixing system LATCH 58
Child restraint systems 57
Child seats, refer to Transporting children
safely 57
Chrome parts 269
Chrome polish 269 Cigarette lighter, refer to
Lighter 129
Cleaning headlamps 72
– washer fluid 72
Cleaning your BMW, refer to
Care 266
Climate control
– automatic air
distribution 118
Clock 82
– 12h/24h mode 91
– setting the time and date 90
– setting time 90
Closing
– from inside 35
– from outside 32
Clothes hooks 127
Cockpit 10
Cold start, refer to Starting the
engine 62
Comfort Access 38
– replacing the battery 40
Comfort access, refer to Comfort Access 38
Comfort area, refer to Around
the center console 14
Compartment for remote control, refer to Ignition
lock 61
Compass 124
Computer 84
– displays on Control Displa
y84
Computer, refer to iDrive 18
Concierge service 229
Condensation, refer to When the vehicle is parked 141
Condition Based Service CBS 264
Configuring settings, refer to
Personal Profile 30
Confirmation signal for vehicle locking/unlocking 33
ConnectedDrive 228
Connecting vacuum cleaner, refer to Connecting
electrical appliances 129
Online Edition for Part no. 01 40 2 609 333 - \251 08/11 BMW AG