2012 BMW 128I COUPE navigation
[x] Cancel search: navigationPage 101 of 272

Controls
99Reference
At a glance
Driving tips
Communications
Navigation
Entertainment
Mobility
Climate
1Airflow directed toward the windshield and
side windows
2Air to the upper body area:
Draft-free ventilation102
3Air to the footwell
4Air distribution, manual
5Temperature, left side
6Maximum cooling
7AUTO program
8Air volume, manual adjustment; AUTO
intensity
9Display10Automatic recirculated air control AUC/
Recirculated air mode
11Temperature, right side
12ALL program
13Defrosting windows and removing conden-
sation
14Switching cooling function on/off manually
15Rear window defroster
16Seat heating
*, right side50
17Interior temperature sensor, please keep
clear
18Seat heating
*, left side50
Page 103 of 272

Controls
101Reference
At a glance
Driving tips
Communications
Navigation
Entertainment
Mobility
the automatic climate control is optimized for
driving with the soft top down. In addition, the
air volume is increased as vehicle speed
increases.
The effectiveness of the Convertible Pro-
gram can be enhanced considerably by
installing the wind deflector.<
Adjusting air volume manually
To be able to manually adjust the air volume,
switch off the AUTO program first.
Press the left side of the button to
reduce the air volume. Press the
right side of the button to increase
it.
The air flow rate is lowered or switched off
entirely to reduce the drain on the battery. The
display remains the same.
Automatic recirculated air control
AUC/Recirculated air mode
You can respond to unpleasant odors or pollut-
ants in the immediate environment by tempo-
rarily suspending the supply of outside air. The
system then recirculates the air currently within
the vehicle.
Press the button repeatedly to
select an operating mode:
>LED off: outside air flows in continuously.
>Left-hand LED on, AUC mode: a sensor
detects pollutants in the outside air and
controls the shut-off automatically.
>Right-hand LED on, recirculated air mode:
the supply of outside air is permanently
shut off. If the windows fog over, switch off
recirculated air mode and increase the air
volume, if necessary. Make sure that air can
flow onto the windshield.
The recirculated air mode should not be
used continuously for lengthy periods;
otherwise, the quality of the air inside the car
will gradually deteriorate.<
Via the button on the steering wheel
You can switch quickly between the recircu-
lated air mode and the previous mode using a
button
on the steering wheel, refer to page11.
ALL program
Press the button.
The current temperature setting
on the driver's side is transferred to
the front passenger side.
If the temperature setting on the driver's side is
changed, the temperature on the front passen-
ger side is changed as well.
The program is switched off when the setting is
adjusted on the front passenger side or the but-
ton is pressed again.
Defrosting windows and removing
condensation
Press the button.
Quickly removes ice and conden-
sation from the windshield and
front side windows.
For this purpose, also switch on the cooling
function.
Switching cooling function on/off
The passenger compartment can only be
cooled while the engine is running.
Press the button.
The air is cooled and dehumidified
and – depending on the tempera-
ture setting – warmed again.
Depending on the weather, the windshield may
fog up briefly when the engine is started.
Pressing the AUTO button automatically
switches on the cooling function.
Rear window defroster
Press the button.
The defroster is switched off auto-
matically after a certain time.
Depending on your vehicle's equipment, the
upper wires serve as an antenna and are not
part of the rear window defroster.
Page 105 of 272
Controls
103Reference
At a glance
Driving tips
Communications
Navigation
Entertainment
Mobility
The symbol on the automatic climate control
display flashes.
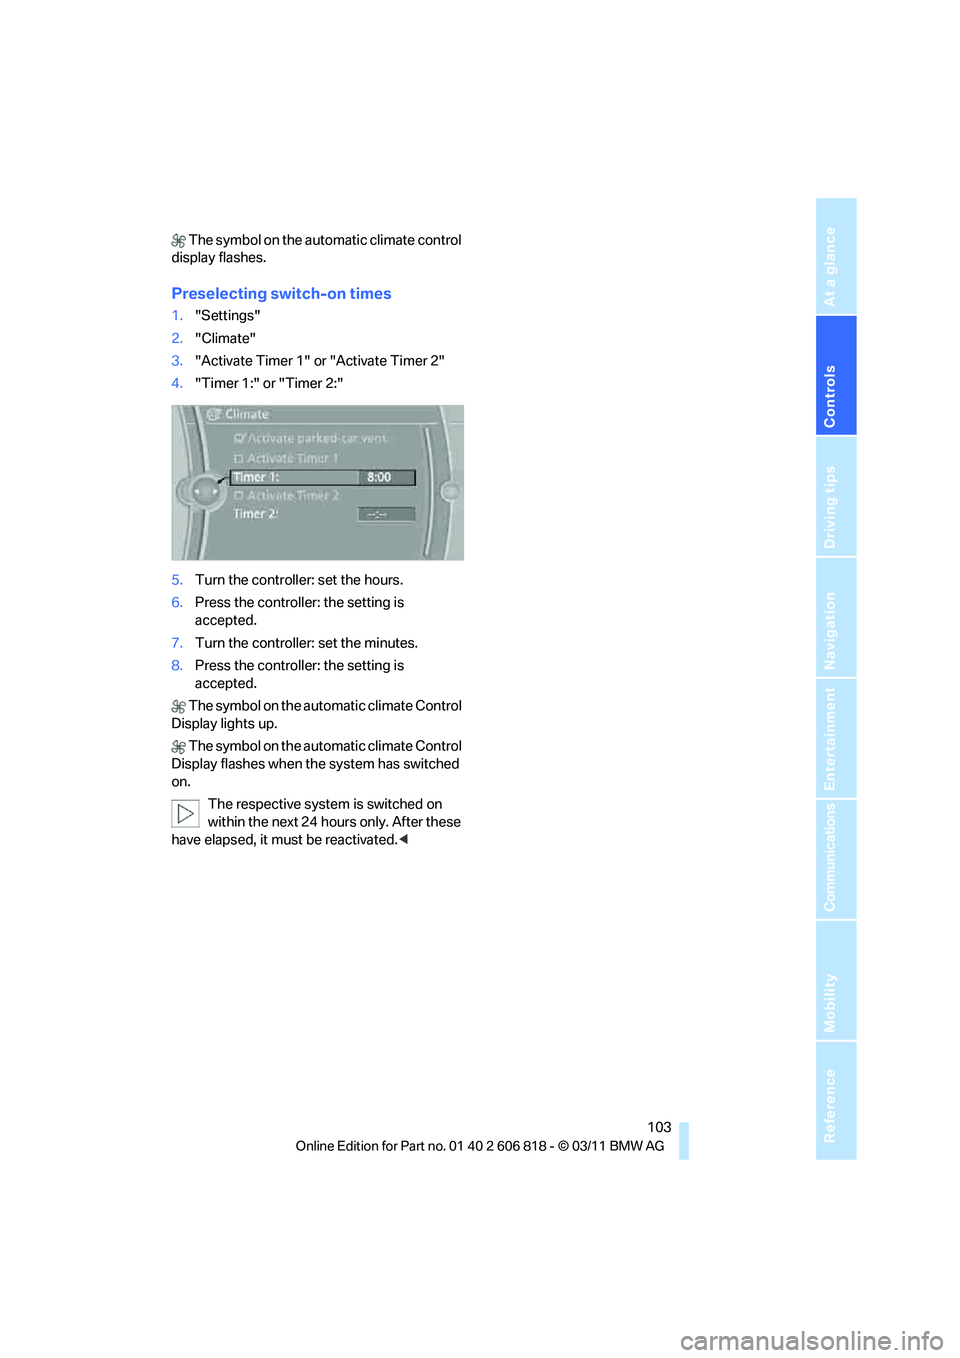
Preselecting switch-on times
1."Settings"
2."Climate"
3."Activate Timer 1" or "Activate Timer 2"
4."Timer 1:" or "Timer 2:"
5.Turn the controller: set the hours.
6.Press the controller: the setting is
accepted.
7.Turn the controller: set the minutes.
8.Press the controller: the setting is
accepted.
The symbol on the automatic climate Control
Display lights up.
The symbol on the automatic climate Control
Display flashes when the system has switched
on.
The respective system is switched on
within the next 24 hours only. After these
have elapsed, it must be reactivated.<
Page 107 of 272
Controls
105Reference
At a glance
Driving tips
Communications
Navigation
Entertainment
Mobility
button and then press and release the but-
ton on the hand-held transmitter several
times, holding it for 2 seconds each time.
5.To program other original hand-held trans-
mitters, repeat steps 3 and 4.
The corresponding memory button1 is now
programmed with the signal of the original
hand-held transmitter.
You can operate the device while the ignition is
switched on.
If the device fails to function even after
repeated programming, check whether
the original hand-held transmitter uses an alter-
nating-code system. To do so, either read the
instructions for the original hand-held transmit-
ter or hold down the programmed memory but-
ton 1 of the integrated universal remote control.
If the LED2 on the integrated universal remote
control flashes rapidly and then remains lit for
about two seconds, the original hand-held
transmitter uses an alternating-code system.
If it uses an alternating-code system, program
the memory buttons1 as described under
Alternating-code hand-held transmitters.<
Alternating-code hand-held
transmitters
To program the integrated universal remote
control, consult the operating instructions for
the device to be set. You will find information
there on the possibilities for synchronization.
When programming hand-held transmitters
that employ an alternating code, please observe
the following supplementary instructions:
Programming will be easier with the aid of
a second person.<
1.Park your vehicle within the range of the
remote-controlled device.
2.Program the integrated universal remote
control as described above in the section
Fixed-code hand-held transmitters.
3.Locate the button on the receiver of the
device to be set, e.g. on the drive unit.
4.Press the button on the receiver of the
device to be set. After step 4, you have
approx. 30 seconds for step 5.5.Press and hold the programmed memory
button1 of the integrated universal remote
control for about 3 seconds.
Repeat this operation, if necessary up to
three times.
The corresponding memory button1 is now
programmed with the signal of the original
hand-held transmitter.
If you have any questions, please contact
your BMW center.<
Deleting all stored programs
Press the left and right memory buttons1 for
approx. 20 seconds until the LED2 flashes rap-
idly: all stored programs are deleted.
Reassigning individual programs
1.Hold the original hand-held transmitter at a
distance of approx. 1 to 3 in/2.5 to 8 cm
from the memory buttons1.
The required distance between the
hand-held transmitter and the mem-
ory buttons1 depends on the system of the
respective original hand-held transmitter
used.<
2.Press the desired memory button1 of the
integrated universal remote control.
If the LED2 flashes slowly after approx.
20 seconds, press the transmit key of the
original hand-held transmitter. Release
both buttons as soon as the LED2 flashes
rapidly. If the LED2 does not flash rapidly
after approx. 60 seconds, alter the distance
and repeat this step.
Canada: if the LED2 does not flash rapidly
after approx. 60 seconds, alter the distance
and repeat this step or, if the programming
by means of the hand-held transmitter was
interrupted, press and hold the memory
button and then press and release the but-
ton on the hand-held transmitter several
times, holding it for 2 seconds each time.
Page 109 of 272
Controls
107Reference
At a glance
Driving tips
Communications
Navigation
Entertainment
Mobility
Calibrating the digital compass
The digital compass must be calibrated in the
following situations:
>An incorrect compass direction is shown.
>The compass direction shown does not
change although the direction of travel
does.
>Not all compass directions are shown.
Procedure
1.Make sure that no large metal objects or
overhead power lines are in the vicinity of
your vehicle and that you have enough
space to drive in a circle.
2.Set the currently valid compass zone.
3.Convertible: ensure that the convertible top
is fully closed.
4.Press the adjustment button for approx.
6-7 seconds to call up C. Then drive in at
least one full circle at a speed of no more
than 4 mph/7 km/h.
If calibration is successful, the display
changes from C to a compass direction.
5.Convertible: open the convertible top fully
and repeat step 4.
Setting right-hand/left-hand steering
Your digital compass is factory-set to right-
hand or left-hand steering, in accordance with
your vehicle.
Set the language
You can set the language of the display:
Press the adjustment button for approx.
12-13 seconds. Briefly press the adjustment
button again to switch between English, "E",
and German, "O".
The setting is automatically saved after approx.
10 seconds.
Glove compartment
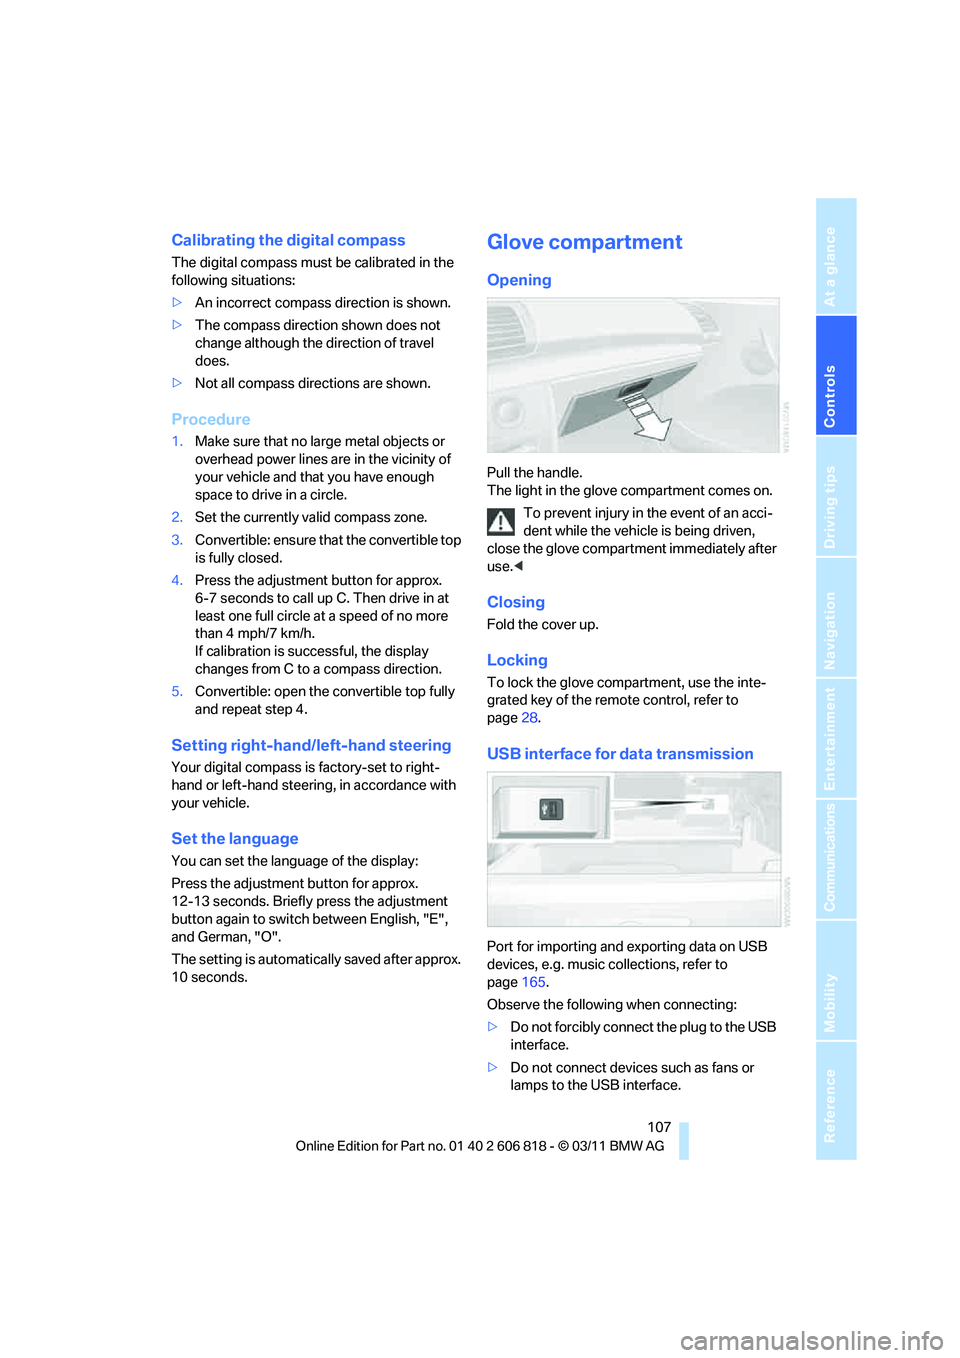
Opening
Pull the handle.
The light in the glove compartment comes on.
To prevent injury in the event of an acci-
dent while the vehicle is being driven,
close the glove compartment immediately after
use.<
Closing
Fold the cover up.
Locking
To lock the glove compartment, use the inte-
grated key of the remote control, refer to
page28.
USB interface for data transmission
Port for importing and exporting data on USB
devices, e.g. music collections, refer to
page165.
Observe the following when connecting:
>Do not forcibly connect the plug to the USB
interface.
>Do not connect devices such as fans or
lamps to the USB interface.
Page 111 of 272
Controls
109Reference
At a glance
Driving tips
Communications
Navigation
Entertainment
Mobility
Ashtray*
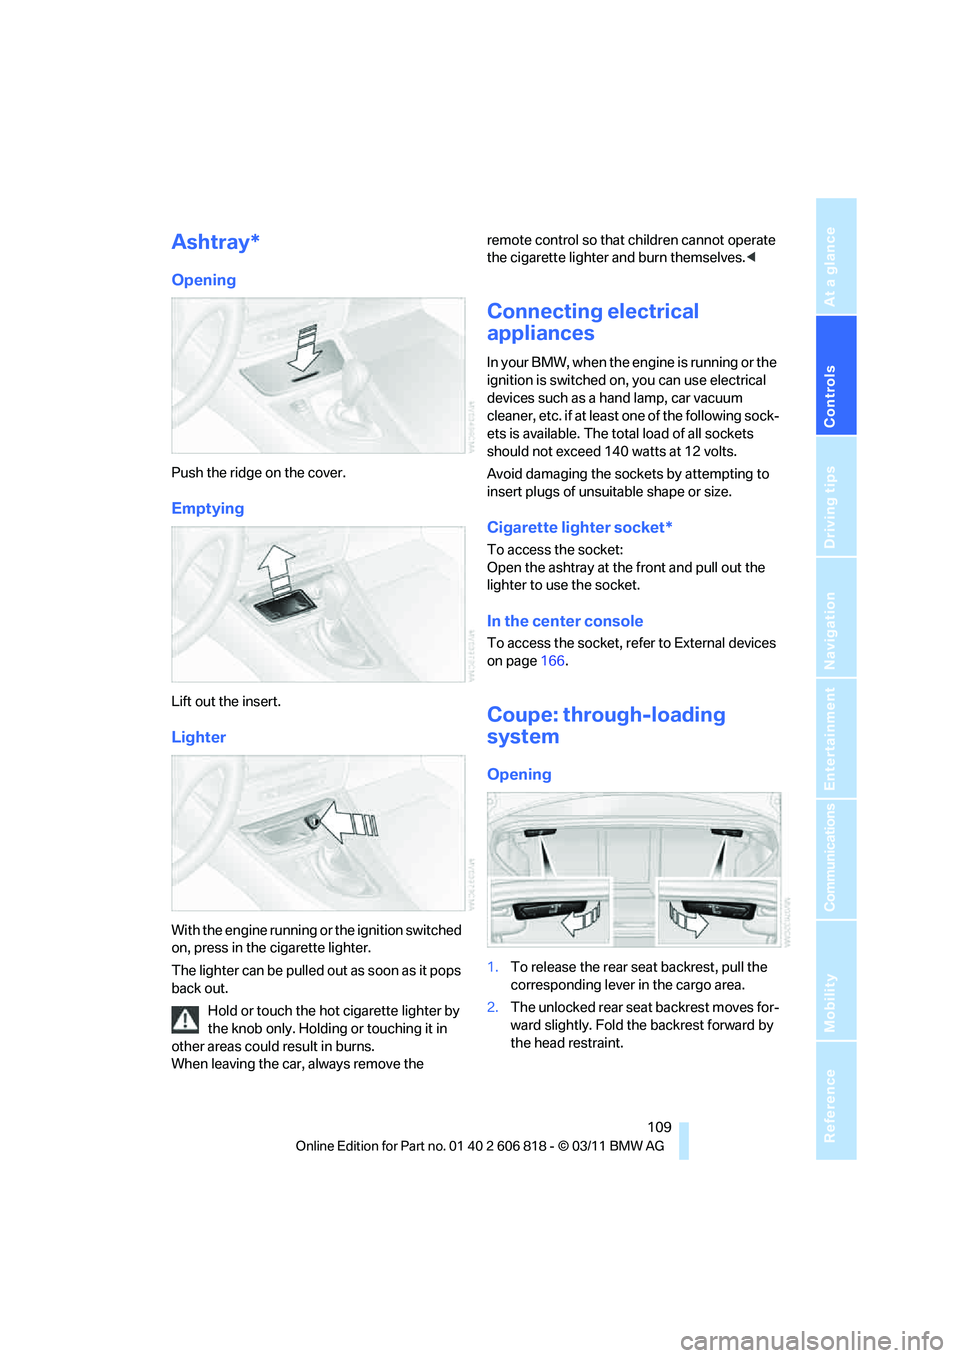
Opening
Push the ridge on the cover.
Emptying
Lift out the insert.
Lighter
With the engine running or the ignition switched
on, press in the cigarette lighter.
The lighter can be pulled out as soon as it pops
back out.
Hold or touch the hot cigarette lighter by
the knob only. Holding or touching it in
other areas could result in burns.
When leaving the car, always remove the remote control so that children cannot operate
the cigarette lighter and burn themselves.<
Connecting electrical
appliances
In your BMW, when the engine is running or the
ignition is switched on, you can use electrical
devices such as a hand lamp, car vacuum
cleaner, etc. if at least one of the following sock-
ets is available. The total load of all sockets
should not exceed 140 watts at 12 volts.
Avoid damaging the sockets by attempting to
insert plugs of unsuitable shape or size.
Cigarette lighter socket*
To access the socket:
Open the ashtray at the front and pull out the
lighter to use the socket.
In the center console
To access the socket, refer to External devices
on page166.
Coupe: through-loading
system
Opening
1.To release the rear seat backrest, pull the
corresponding lever in the cargo area.
2.The unlocked rear seat backrest moves for-
ward slightly. Fold the backrest forward by
the head restraint.
Page 113 of 272
Controls
111Reference
At a glance
Driving tips
Communications
Navigation
Entertainment
Mobility
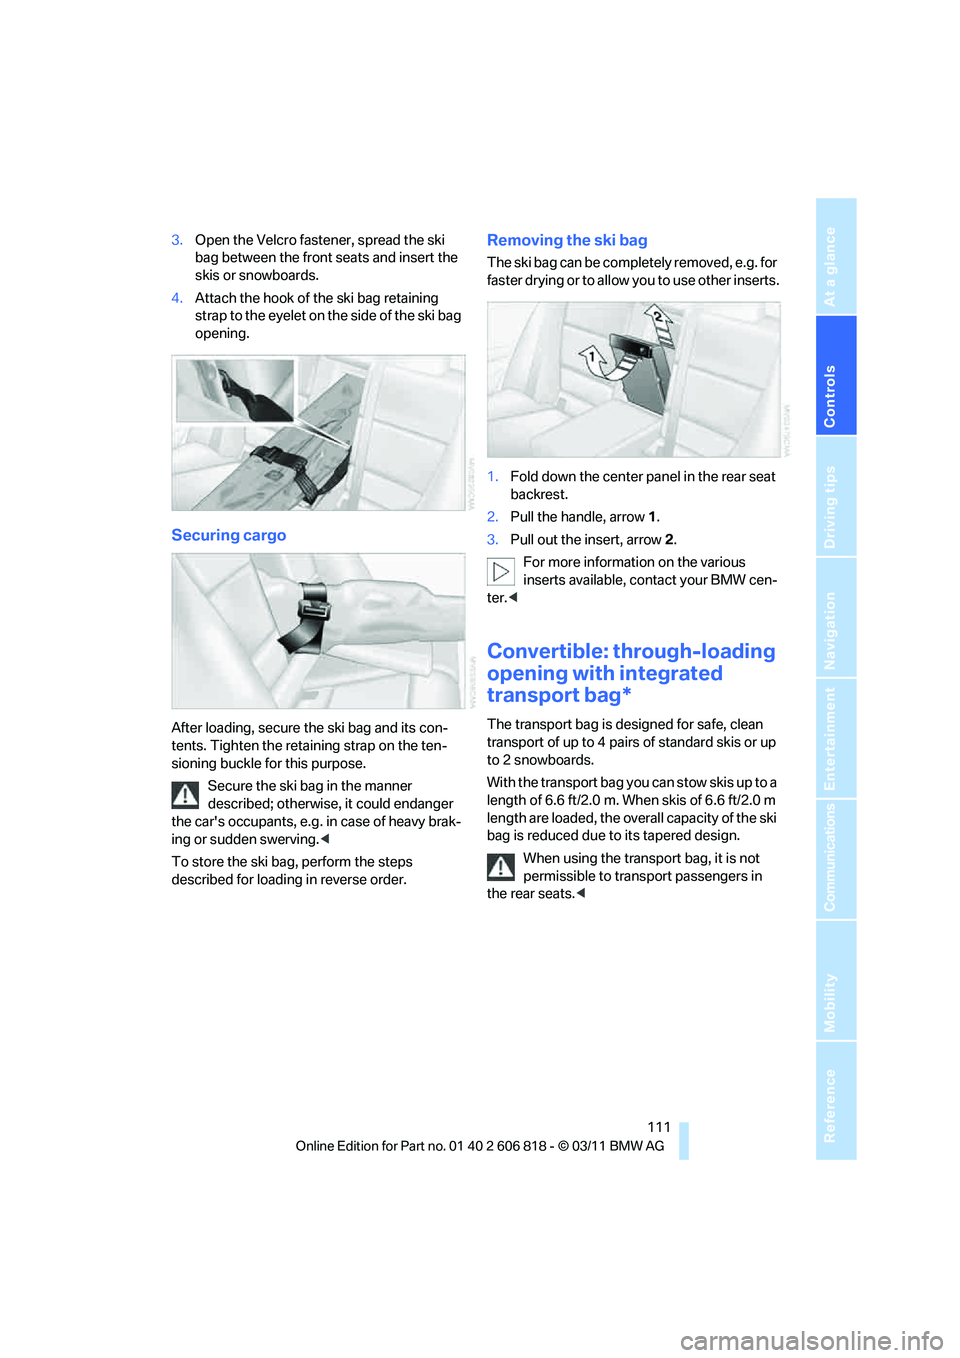
3.Open the Velcro fastener, spread the ski
bag between the front seats and insert the
skis or snowboards.
4.Attach the hook of the ski bag retaining
strap to the eyelet on the side of the ski bag
opening.
Securing cargo
After loading, secure the ski bag and its con-
tents. Tighten the retaining strap on the ten-
sioning buckle for this purpose.
Secure the ski bag in the manner
described; otherwise, it could endanger
the car's occupants, e.g. in case of heavy brak-
ing or sudden swerving.<
To store the ski bag, perform the steps
described for loading in reverse order.
Removing the ski bag
The ski bag can be completely removed, e.g. for
faster drying or to allow you to use other inserts.
1.Fold down the center panel in the rear seat
backrest.
2.Pull the handle, arrow1.
3.Pull out the insert, arrow 2.
For more information on the various
inserts available, contact your BMW cen-
ter.<
Convertible: through-loading
opening with integrated
transport bag*
The transport bag is designed for safe, clean
transport of up to 4 pairs of standard skis or up
to 2 snowboards.
With the transport bag you can stow skis up to a
length of 6.6 ft/2.0 m. When skis of 6.6 ft/2.0 m
length are loaded, the overall capacity of the ski
bag is reduced due to its tapered design.
When using the transport bag, it is not
permissible to transport passengers in
the rear seats.<
Page 115 of 272

Controls
113Reference
At a glance
Driving tips
Communications
Navigation
Entertainment
Mobility