Page 126 of 324

125
Controls
Interior Lights/Interior Convenience ItemsInterior Lights
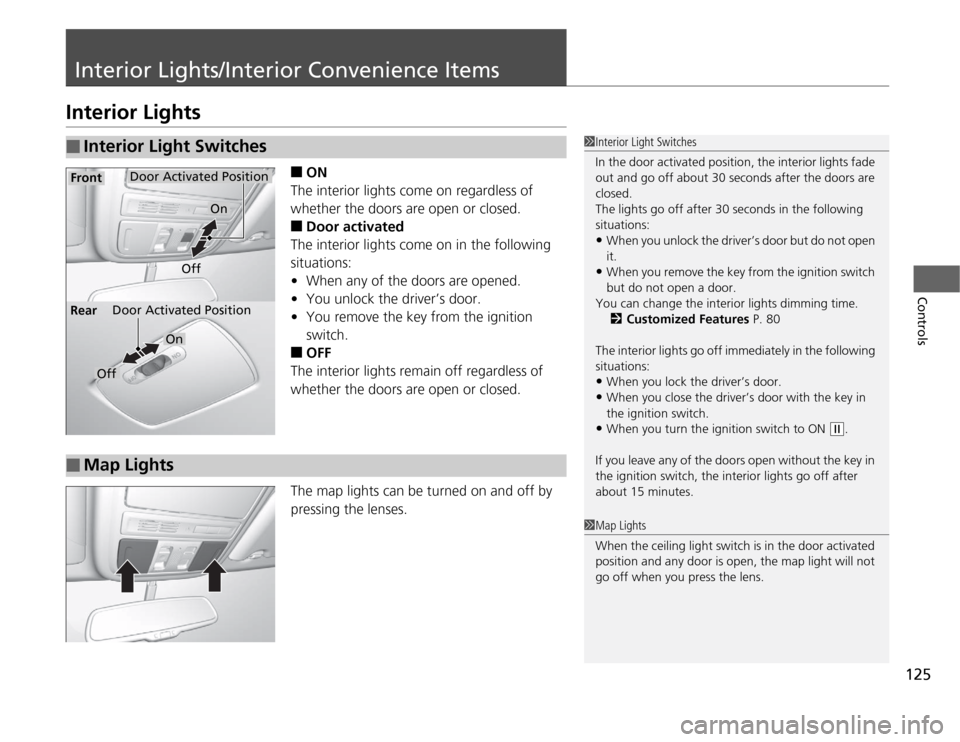
■
ON
The interior lights come on regardless of
whether the doors are open or closed.
■
Door activated
The interior lights come on in the following
situations:
•When any of the doors are opened.
•You unlock the driver’s door.
•You remove the key from the ignition
switch.
■
OFF
The interior lights remain off regardless of
whether the doors are open or closed.
The map lights can be turned on and off by
pressing the lenses.
■
Interior Light Switches
1Interior Light Switches
In the door activated position, the interior lights fade
out and go off about 30 seconds after the doors are
closed.
The lights go off after 30 seconds in the following
situations:•When you unlock the driver’s door but do not open
it.•When you remove the key from the ignition switch
but do not open a door.
You can change the interior lights dimming time.
2Customized Features P. 80
The interior lights go off immediately in the following
situations:•When you lock the driver’s door.•When you close the driver’s door with the key in
the ignition switch.•When you turn the ignition switch to ON
(w
.
If you leave any of the doors open without the key in
the ignition switch, the interior lights go off after
about 15 minutes.
Door Activated Position
Off
Front
Door Activated Position
On
Off Rear
On
■
Map Lights
1Map Lights
When the ceiling light switch is in the door activated
position and any door is open, the map light will not
go off when you press the lens.
Page 127 of 324
126
uuInterior Lights/Interior Convenience ItemsuInterior Convenience Items
Controls
Interior Convenience Items
Pull the handle to open the glove box. You
can lock the glove box with the master key.■
Detachable shelf
The shelf in the glove box is detachable. To
remove it, disengage the tabs.
■
Glove Box
1Glove Box
The glove box light comes on when the parking lights
are on.
3
WARNING
An open glove box can cause serious injury
to your passenger in a crash, even if the
passenger is wearing the seat belt.
Always keep the glove box closed while
driving.
Glove Box
To Lock
Shelf
Page 128 of 324
Continued
127
uuInterior Lights/Interior Convenience ItemsuInterior Convenience Items
Controls
Pull the handle to open the console
compartment.
To use the console lid as an armrest, slide it to
the desired position while pulling up the
release lever.
You can keep beverage bottles and cans cool
with the air conditioning system.
1.Turn the dial counterclockwise to open the
air vent in the console compartment.
2.Turn on the climate control system and
adjust the temperature to cool.
3.Set the mode control or .
uThe cool air is diverted through the air
vent.
■
Console Compartment
1Console Compartment
Use only resealable containers or keep unopened
cans in the console compartment.
Spilled liquids can damage the upholstery and
electrical components in the console compartment.
When the heater begins to divert warm air, the
airflow into the console compartment is shut off.
Close
Open
Page 142 of 324
141
Features
Audio System Basic OperationTo use the audio system function, the ignition switch must be in ACCESSORY
(q
or
ON
(w
.
Use the selector knob or MENU button to
access some audio functions.
Press to switch between the normal and
extended display for some functions. The
extended display has three segments to
display detailed information.
Selector knob: Rotate left or right to scroll
through the available choices. Press to set
your selection.
MENU button: Press to select any setting
such as the clock, sound control, or the
compass. Press this button again to cancel the
menu display mode.
RETURN button: Press to go back to the
previous display.
1Audio System Basic Operation
These indications are used to show how to operate
the selector knob.
Rotate to select.
Press to ENTER.
RETURN
Button
Selector
Knob
MENU
Button
Menu Display
Page 143 of 324
142
uuAudio System Basic OperationuAdjusting the Sound
Features
Adjusting the Sound
Press the MENU button, and rotate to
adjust the setting. Rotate to scroll through
the following choices:
1Adjusting the Sound
When the adjustment level reaches the center, you
will see C in the display.
The SVC has four modes: OFF, LOW, MID, and
HIGH.
SVC adjusts the volume level based on the vehicle
speed. As you go faster, audio volume increases. As
you slow down, audio volume decreases.
FADER is selectable.
Selector
Knob
MENU
Button
RETURN
Button
BASS
TREBLE
FADER
BALANCE
SUBW
SVC
CLOCK ADJUST
Speed-sensitive
Volume
CompensationSubwoofer
Clock setting
Page 162 of 324

161
Features
General Information on the Audio SystemXM® Radio Service1.You need your radio ID ready before registering for subscription.
To see the ID in the display: Turn the selector knob until 0 appears.
2.Have your radio ID and credit card number ready, and either call or visit the XM®
website to subscribe.
Press the (XM®) button and stay in this mode for about 30 minutes until the
service is activated. Make sure your vehicle is in an open area with good reception.
LOADING: XM® is loading the audio or program information.
OFF AIR: The channel is not currently broadcasting.
UPDATING: The encryption code is being updated. Channels 0 and 1 still work
normally.
NO SIGNAL: The signal is too weak in the current location.
--------: No such channel exists, the channel is not part of your subscription, or the
artist or title information is unavailable.
ANTENNA: There is a problem with the XM® antenna. Contact a dealer.■
Subscribing to XM® Radio
■
Receiving XM® Radio
■
XM® Radio Display Messages
1Subscribing to XM® Radio
Contact Information for XM® Radio:
US: XM® Radio at www.siriusxm.com or (800) 852-
9696
Canada: XM® Canada at www.xmradio.ca, or (877)
209-00791Receiving XM® Radio
The XM® satellites are in orbit over the equator;
therefore, objects south of the vehicle may cause
satellite reception interruptions. Satellite signals are
more likely to be blocked by tall buildings and
mountains the farther north you travel from the
equator.
You may experience reception problems under the
following circumstances:•In a location with an obstruction to the south of
your vehicle.•In tunnels•On the lower level of a multi-tiered road•Large items carried on the roof rack
Page 165 of 324
164
uuGeneral Information on the Audio SystemuCompatible iPod® and USB Flash Drives
Features
Compatible iPod® and USB Flash Drives•Use a recommended USB flash drive of 256 MB or higher.
•Some digital audio players may not be compatible.
•Some USB flash drives (e.g., a device with security lockout) may not work.
•Some software files may not allow for audio play or text data display.
•Some versions of MP3, WMA, or AAC formats may be unsupported.■
iPod® Model Compatibility
Model
iPod classic® 80GB/160GBiPod classic® 120GBiPod classic® 160GB (launch in 2009)iPod® (5th generation)iPod nano®iPod touch®■
USB Flash Drives
1iPod® Model Compatibility
This system may not work with all software versions
of these devices.1USB Flash Drives
Files on the USB flash drive are played in their stored
order. This order may be different from the order
displayed on your PC or device.
Page 178 of 324

Continued
177
uuBluetooth® HandsFreeLink®uHFL Menus
Features
This command group allows you to change or customize HFL basic settings.■
To set a four-digit passcode to lock the HFL system for security
1.Say “System Setup.”
2.Say “Security.”
3.Follow the HFL prompts and say the four-digit number of your choice.
4.Follow the HFL prompts and confirm the number.
■
To change the security passcode
1.Say “System Setup.”
2.Say “Change Passcode” after the prompts.
3.Say the new four-digit passcode after the HFL prompts.
4.Follow the HFL prompts.
■
To select a ring tone or a prompt as the incoming call notification
1.Say “System Setup.”
2.Say “Call Notification” after the prompts.
3.Say “Ring Tone” or “Prompt” after the prompts. For no audible notification, say
“Off.”
■
System Setup
1System Setup
Press the button before a command.
Once a passcode is set, you are required to enter the
passcode with every new key cycle to use HFL.
If you forget the code, go to your dealer to have the
passcode reset. You can also cancel the passcode by
clearing all the data stored in the HFL system.
2To clear the system P. 178
The default setting of the incoming notification is a
ring tone.