Page 158 of 324

157
uuAudio System Basic OperationuPlaying Bluetooth® Audio
Features
1.Make sure that your phone is linked to HFL.
2.Press the AUX button.
Check the following if the phone is not recognized:
Another HFL-compatible phone, which is not compatible for Bluetooth® Audio, is
already linked.■
To pause or resume a file
1.Press the MENU button.
2.Rotate to select RESUME/PAUSE, then press .
Each time you press , the setting switches between PAUSE and RESUME.
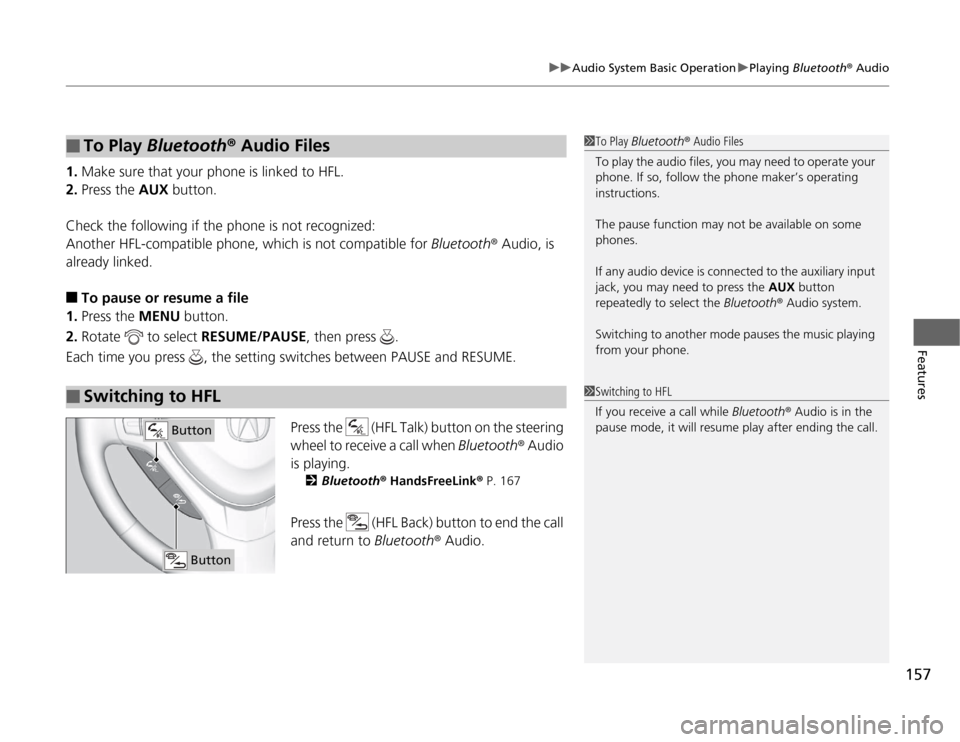
Press the (HFL Talk) button on the steering
wheel to receive a call when Bluetooth® Audio
is playing.
2Bluetooth® HandsFreeLink® P. 167
Press the (HFL Back) button to end the call
and return to Bluetooth® Audio.
■
To Play Bluetooth® Audio Files
■
Switching to HFL
1To Play Bluetooth® Audio Files
To play the audio files, you may need to operate your
phone. If so, follow the phone maker’s operating
instructions.
The pause function may not be available on some
phones.
If any audio device is connected to the auxiliary input
jack, you may need to press the AUX button
repeatedly to select the Bluetooth® Audio system.
Switching to another mode pauses the music playing
from your phone.1Switching to HFL
If you receive a call while Bluetooth® Audio is in the
pause mode, it will resume play after ending the call.
Button
Button
Page 183 of 324

182Driving
Before DrivingDriving PreparationCheck the following items before you start driving.
•Make sure there are no obstructions on the windows, door mirrors, exterior
lights, or other parts of the vehicle.
uRemove any frost, snow, or ice.
uRemove any snow on the roof, as this can slip down and obstruct your field of
vision while driving. If frozen solid, remove ice once it has softened.
uWhen removing ice from around the wheels, be sure not to damage the wheel
or wheel components.
•Make sure the hood is securely closed.
uIf the hood opens while driving, your front view will be blocked.
•Make sure the tires are in good condition.
uCheck air pressure, check for damage and excessive wear.
2Checking and Maintaining Tires P. 259
•Make sure there are no people or objects behind or around the vehicle.
uThere are blind spots from the inside.■
Exterior Checks
1Exterior Checks
NOTICEWhen doors are frozen shut, use warm water around
the door edges to melt any ice. Do not try to force
them open, as this can damage the rubber trim
around the doors. When done, wipe dry to avoid
further freezing.
Do not pour warm water into the key cylinder.
You will be unable to insert key if the water freezes in
the hole.
Page 184 of 324

Continued
183
uuBefore DrivinguDriving Preparation
Driving
•Store or secure all items on board properly.
uCarrying too much cargo, or improperly storing it, can affect your vehicle’s
handling, stability, stopping distance, and tires, and make it unsafe.
2Maximum Load Limit P. 185
•Do not pile items higher than the seat height.
uThey can block your view and may be thrown forward in the event of sudden
braking.
•Do not place anything in the front seat footwells. Make sure to secure the floor
mat.
uAn object or unsecured floor mat can interfere with your brake and accelerator
pedal operation while driving.
•If you have any animals on board, do not let them move around in the vehicle.
uThey may interfere with driving and a crash could occur.
•Securely close and lock all doors and the trunk.
2Locking/Unlocking the Doors from the Inside P. 93
•Adjust your seating position properly.
uAdjust the head restraint, too.
2Adjusting the Seats P. 116
2Adjusting the Head Restraints P. 118
•Adjust the mirrors and steering wheel properly for your driving.
uAdjust them while sitting in the proper driving position.
2Adjusting the Mirror P. 114
2Adjusting the Steering Wheel P. 113
■
Interior Checks
1Interior Checks
The headlight aim is set by the factory, and does not
need to be adjusted. However, if you regularly carry
heavy items in the trunk or tow a trailer, have the
aiming readjusted at a dealer or by a qualified
technician.
Page 190 of 324

189
uuTowing a TraileruDriving Safely with a Trailer
Continued
Driving
Driving Safely with a Trailer•Have the trailer properly serviced and keep it in good condition.
•Make sure that all the weights and load in the vehicle and trailer are within limits.
2Towing Load Limits P. 187
•Securely attach the hitch, safety chains, and other necessary parts to the trailer.
•Securely store all the items in and on the trailer so that they do not shift while
driving.
•Check if the lights and brakes on the trailer are working properly.
•Check the pressures of the trailer tires, including the spare.
•Drive slower than normal.
•Obey posted speed limits for vehicles with trailers.
•Use the
(D
position when towing a trailer on level roads.
•Turn more slowly and with a wider turning arc than normal.
•Allow more time and distance for braking.
•Do not brake or turn suddenly.
■
Things You Need To Know Before Towing a Trailer
■
Towing Speeds and Gears
■
Turning and Braking
1Driving Safely with a Trailer
Parking
In addition to the normal precautions, place wheel
chocks at each of the trailer’s tires.
Automatic transmission models
Page 198 of 324

197
uuWhen DrivinguShifting
Continued
Driving
Use the paddle shifters to change between 1st and 5th gears without removing your
hands from the steering wheel. The transmission will switch to the sequential shift
mode.■
When the shift lever is in
(D
:
The vehicle will go into the sequential shift mode momentarily, and the gear position
indicator will come on.
Once you start traveling at a constant speed, the sequential shift mode will
automatically switch off, and the gear position indicator will go off.
Hold the
(+
paddle shifter for two seconds to return to normal drive.
■
When the shift lever is in
(S
:
The vehicle will go into the sequential shift mode, and the
(M
(sequential shift)
indicator and gear position indicator will come on. At speeds of 6 mph (10 km/h) or
less, the vehicle automatically shifts down into 1st gear. It will not automatically shift
up, even if vehicle speed increases.
You can only pull away in 1st or 2nd gear.
When switching out of the sequential shift mode, move the shift lever from
(S
to
(D
. When the sequential shift mode is canceled, the sequential shift mode indicator
and shift indicator go off.
■
Sequential Shift Mode
Page 202 of 324
201
uuWhen DrivinguCruise Control
Continued
Driving
Cruise ControlMaintains a constant vehicle speed without having to keep your foot on the
accelerator. Use cruise control on freeways or open roads where you can travel at a
constant speed with little acceleration or deceleration.
1Cruise Control
It may not be possible to maintain a constant speed
when driving uphill or downhill.
3
WARNING
Improper use of the cruise control can lead
to a crash.
Use the cruise control only when traveling
on open highways in good weather.
■
Shift positions for cruise control:
In
(D
or
(S
, in 2nd gear or
higher When to use
Always keep sufficient distance
between you and the vehicle in
front of you.
Automatic transmission models■
Vehicle speed for cruise control:
Desired speed in a range above
roughly 25 mph (40 km/h) ~
How to use
CRUISE MAIN is on in the
instrument panel.
Cruise control is ready to use.
■
Press the
CRUISE
button on
the steering wheel.
Page 204 of 324

203
uuWhen DrivinguCruise Control
Driving
Increase or decrease the vehicle speed using the accelerator and brake pedals, and
set the vehicle speed with the DECEL/SET button on the steering wheel.■
To Adjust the Vehicle Speed
1To Adjust the Vehicle Speed
Vehicle speed can be increased or decreased also
using the RES/ACCEL or DECEL/SET buttons on the
steering wheel.
RES/ACCEL Button•Each time you press the button, vehicle speed is
increased by about 1 mph (1.6 km/h).•If you keep it pressed, vehicle speed increases until
you release it. This speed is then set.
DECEL/SET Button•Each time you press it, vehicle speed decreases by
about 1 mph (1.6 km/h).•If you keep it pressed, vehicle speed decreases until
you release it. This speed is then set.
To decrease speed To increase speed
Decrease vehicle speed with the
brake pedal, then take your foot off
the brake pedal.Use the accelerator pedal to
increase vehicle speed.
The vehicle speed is set
when the button is
released.DECEL/SET
Button
Press and Release
Page 210 of 324

209
uuWhen DrivinguTire Pressure Monitoring System (TPMS) - Required Federal Explanation
Driving
Please note that the TPMS is not a substitute for proper tire
maintenance, and it is the driver’s responsibility to maintain
correct tire pressure, even if under-inflation has not reached the
level to trigger illumination of the TPMS low tire pressure telltale.
Your vehicle has also been equipped with a TPMS malfunction
indicator to indicate when the system is not operating properly.
The TPMS malfunction indicator is combined with the low tire
pressure telltale. When the system detects a malfunction, the
telltale will flash for approximately one minute and then remain
continuously illuminated. This sequence will continue upon
subsequent vehicle start-ups as long as the malfunction exists.
When the malfunction indicator is illuminated, the system may
not be able to detect or signal low tire pressure as intended.
TPMS malfunctions may occur for a variety of reasons, including
the installation of replacement or alternate tires or wheels on the
vehicle that prevent the TPMS from functioning properly.
Always check the TPMS malfunction telltale after replacing one or
more tires or wheels on your vehicle to ensure that the
replacement or alternate tires and wheels allow the TPMS to
continue to function properly.