Page 144 of 324
143
uuAudio System Basic OperationuPlaying the AM/FM Radio
Continued
Features
Playing the AM/FM Radio
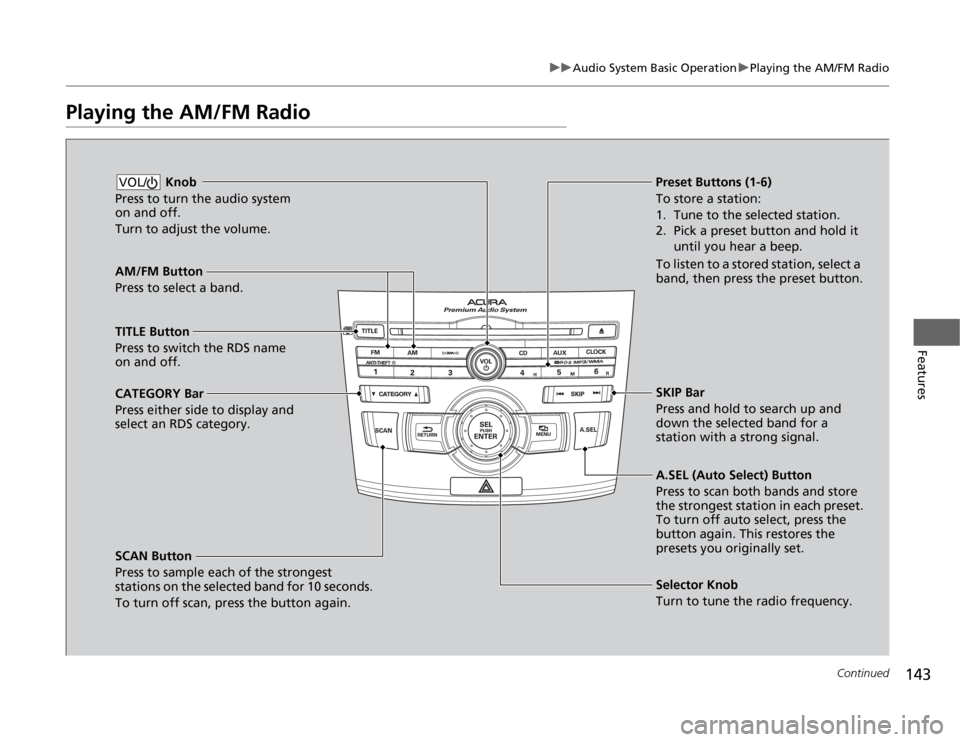
AM/FM Button
Press to select a band.
SCAN Button
Press to sample each of the strongest
stations on the selected band for 10 seconds.
To turn off scan, press the button again. Knob
Press to turn the audio system
on and off.
Turn to adjust the volume.VOL/
Preset Buttons (1-6)
To store a station:
1. Tune to the selected station.
2. Pick a preset button and hold it
until you hear a beep.
To listen to a stored station, select a
band, then press the preset button.
Selector Knob
Turn to tune the radio frequency.
TITLE Button
Press to switch the RDS name
on and off.
CATEGORY Bar
Press either side to display and
select an RDS category.SKIP Bar
Press and hold to search up and
down the selected band for a
station with a strong signal.
A.SEL (Auto Select) Button
Press to scan both bands and store
the strongest station in each preset.
To turn off auto select, press the
button again. This restores the
presets you originally set.
Page 145 of 324
uuAudio System Basic OperationuPlaying the AM/FM Radio
144Features
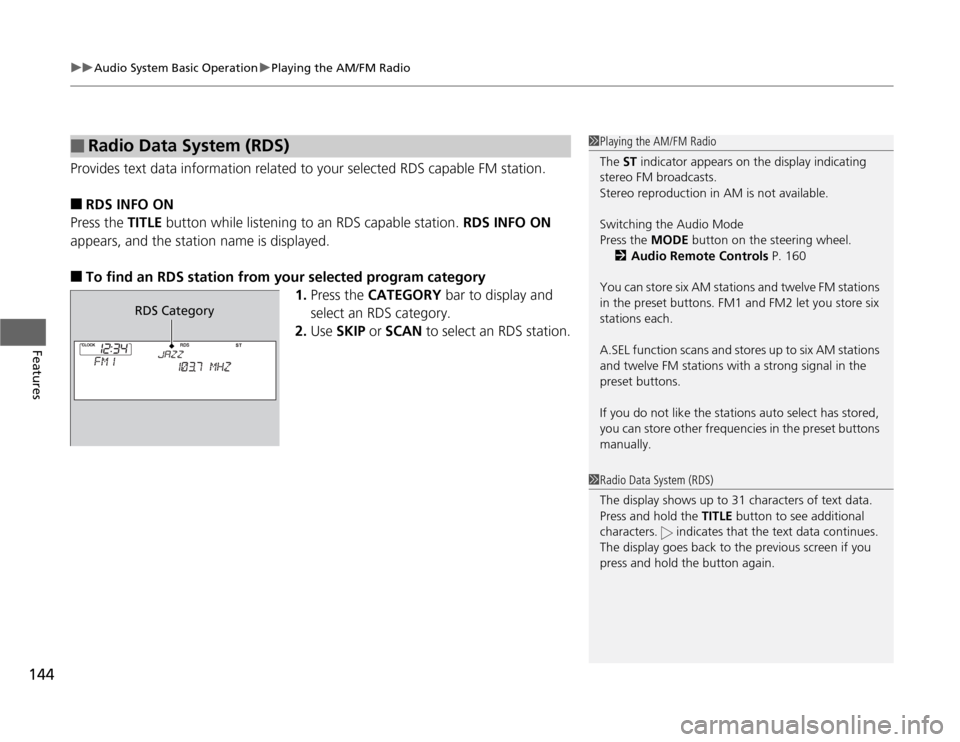
Provides text data information related to your selected RDS capable FM station.■
RDS INFO ON
Press the TITLE button while listening to an RDS capable station. RDS INFO ON
appears, and the station name is displayed.
■
To find an RDS station from your selected program category
1.Press the CATEGORY bar to display and
select an RDS category.
2.Use SKIP or SCAN to select an RDS station.
■
Radio Data System (RDS)
1Playing the AM/FM Radio
The ST indicator appears on the display indicating
stereo FM broadcasts.
Stereo reproduction in AM is not available.
Switching the Audio Mode
Press the MODE button on the steering wheel.
2Audio Remote Controls P. 160
You can store six AM stations and twelve FM stations
in the preset buttons. FM1 and FM2 let you store six
stations each.
A.SEL function scans and stores up to six AM stations
and twelve FM stations with a strong signal in the
preset buttons.
If you do not like the stations auto select has stored,
you can store other frequencies in the preset buttons
manually.1Radio Data System (RDS)
The display shows up to 31 characters of text data.
Press and hold the TITLE button to see additional
characters. indicates that the text data continues.
The display goes back to the previous screen if you
press and hold the button again.
RDS Category
Page 146 of 324
145
uuAudio System Basic OperationuPlaying the XM® Radio
Continued
Features
Playing the XM® Radio
(XM®) Button
Press to select XM® Radio.
TITLE Button
Press and release to cycle the
display between the name, title,
and category.
CATEGORY Bar
Press either side to display and
select an XM® Radio category.
SCAN Button
Press to sample all channels (in the channel
mode), or channels within a category (in the
category mode).
Each sampling continues for a few seconds.
Press SCAN again to cancel scanning and
continue listening to the channel. Knob
Press to turn the audio system
on and off.
Turn to adjust the volume.
VOL/Preset Buttons (1-6)
To store the channel:
1. Select the channel.
2. Pick a preset button and hold it
until you hear a beep.
To listen to a stored station, select
XM, then press the preset button.
SKIP Bar
Press to skip to the previous or
next channel.
MENU Button
Press to display the menu items.
Selector Knob
Turn to select channels.
Page 147 of 324
uuAudio System Basic OperationuPlaying the XM® Radio
146Features
1.Press the button to select the XM® radio band (XM1 or XM2).
2.Press and hold the TITLE button to switch between the channel mode and
category mode.
If you press the MENU button, rotate to select MODE/CATEGORY or MODE
CHANNEL. Each time you press , the mode switches between them.
Press the button to enter the setting.
3.Select a channel using the TUNE ( ), SKIP, CATEGORY, SCAN, or Preset
buttons.
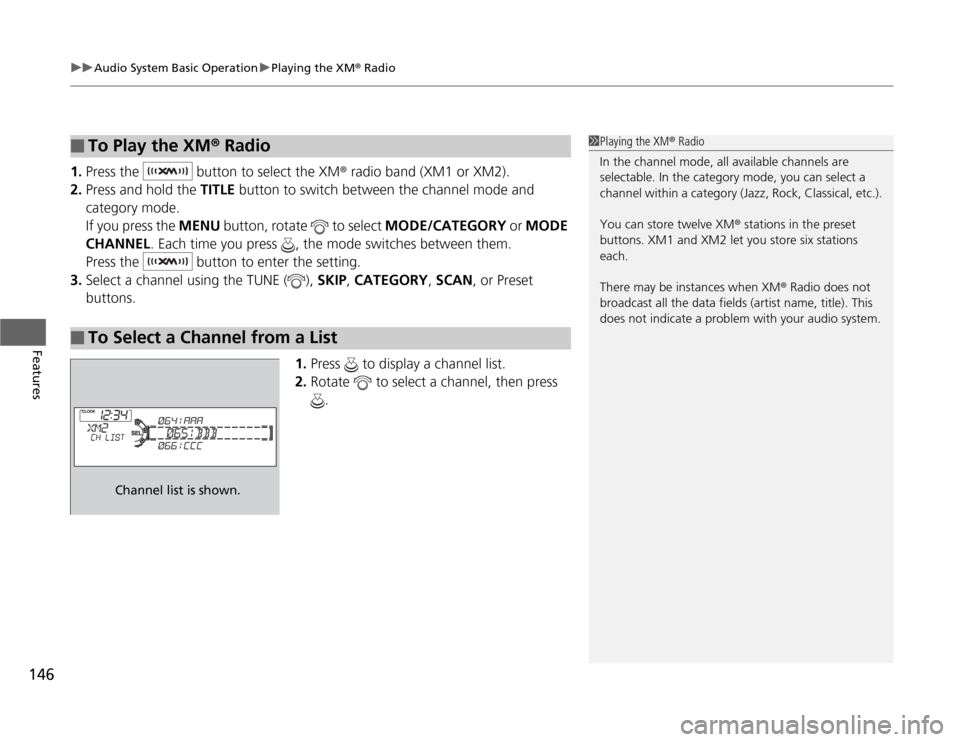
1.Press to display a channel list.
2.Rotate to select a channel, then press
.■
To Play the XM® Radio
■
To Select a Channel from a List
1Playing the XM® Radio
In the channel mode, all available channels are
selectable. In the category mode, you can select a
channel within a category (Jazz, Rock, Classical, etc.).
You can store twelve XM® stations in the preset
buttons. XM1 and XM2 let you store six stations
each.
There may be instances when XM® Radio does not
broadcast all the data fields (artist name, title). This
does not indicate a problem with your audio system.
Channel list is shown.
Page 161 of 324
160Features
Audio Remote ControlsAllows you to operate the audio system while driving.
MODE Button
Cycles through the audio modes as follows:
FM1 FM2 AM XM1 XM2 CD AUX
VOL Button
Press : Increases the volume
Press : Decreases the volume
CH Button
•When listening to radio
Press
(+
: Selects the next preset radio station.
Press
(-
: Selects the previous preset radio station.
•When listening to a CD, USB flash drive or iPod®, or Bluetooth® audio
Press
(+
: Skips to the next song.
Press
(-
: Goes back to the beginning of the current or previous song.
1Audio Remote Controls
The CD mode appears only when a CD is loaded.
When in the AUX mode, the following are operable
from the remote controls:•iPod®/USB flash drive connected to the USB
adapter cable•Bluetooth® audio (with some phones only)
MODE Button
VOL (Volume)
Button
CH (Channel)
Button
Page 178 of 324
Continued
177
uuBluetooth® HandsFreeLink®uHFL Menus
Features
This command group allows you to change or customize HFL basic settings.■
To set a four-digit passcode to lock the HFL system for security
1.Say “System Setup.”
2.Say “Security.”
3.Follow the HFL prompts and say the four-digit number of your choice.
4.Follow the HFL prompts and confirm the number.
■
To change the security passcode
1.Say “System Setup.”
2.Say “Change Passcode” after the prompts.
3.Say the new four-digit passcode after the HFL prompts.
4.Follow the HFL prompts.
■
To select a ring tone or a prompt as the incoming call notification
1.Say “System Setup.”
2.Say “Call Notification” after the prompts.
3.Say “Ring Tone” or “Prompt” after the prompts. For no audible notification, say
“Off.”
■
System Setup
1System Setup
Press the button before a command.
Once a passcode is set, you are required to enter the
passcode with every new key cycle to use HFL.
If you forget the code, go to your dealer to have the
passcode reset. You can also cancel the passcode by
clearing all the data stored in the HFL system.
2To clear the system P. 178
The default setting of the incoming notification is a
ring tone.
Page 207 of 324
206
uuWhen DrivinguTPMS (Tire Pressure Monitoring System)
Driving
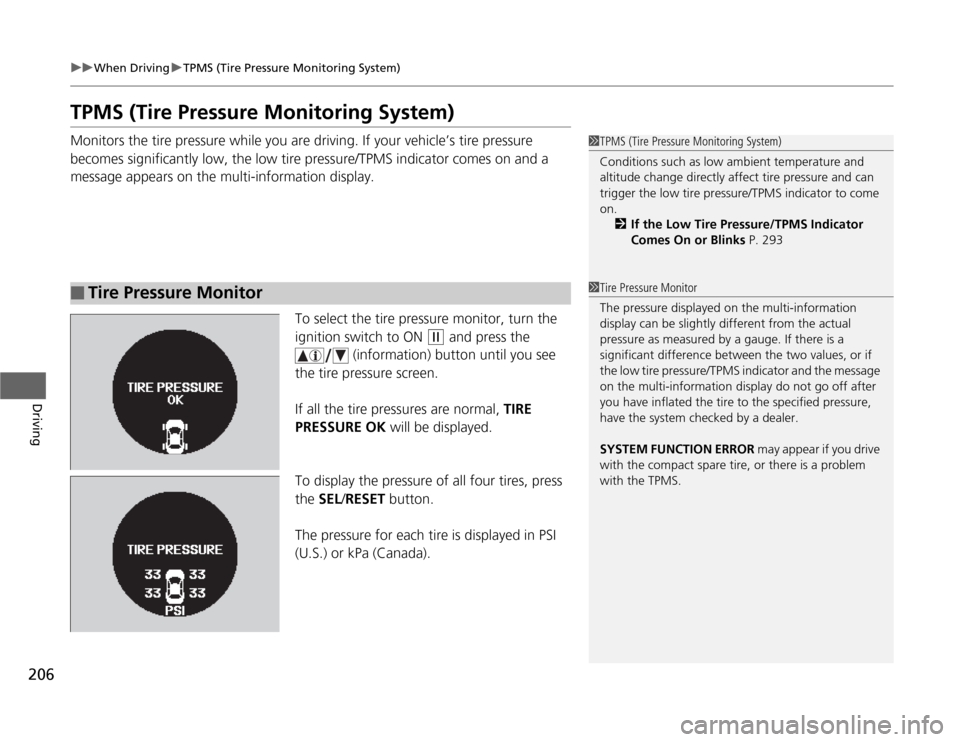
TPMS (Tire Pressure Monitoring System)Monitors the tire pressure while you are driving. If your vehicle’s tire pressure
becomes significantly low, the low tire pressure/TPMS indicator comes on and a
message appears on the multi-information display.
To select the tire pressure monitor, turn the
ignition switch to ON
(w
and press the
(information) button until you see
the tire pressure screen.
If all the tire pressures are normal, TIRE
PRESSURE OK will be displayed.
To display the pressure of all four tires, press
the SEL/RESET button.
The pressure for each tire is displayed in PSI
(U.S.) or kPa (Canada).
■
Tire Pressure Monitor
1TPMS (Tire Pressure Monitoring System)
Conditions such as low ambient temperature and
altitude change directly affect tire pressure and can
trigger the low tire pressure/TPMS indicator to come
on.
2If the Low Tire Pressure/TPMS Indicator
Comes On or Blinks P. 2931Tire Pressure Monitor
The pressure displayed on the multi-information
display can be slightly different from the actual
pressure as measured by a gauge. If there is a
significant difference between the two values, or if
the low tire pressure/TPMS indicator and the message
on the multi-information display do not go off after
you have inflated the tire to the specified pressure,
have the system checked by a dealer.
SYSTEM FUNCTION ERROR may appear if you drive
with the compact spare tire, or there is a problem
with the TPMS.
Page 208 of 324
207
uuWhen DrivinguTPMS (Tire Pressure Monitoring System)
Driving
If any tire has low pressure, LOW TIRE
PRESSURE is displayed on the multi-
information display. Check the pressure of
each tire by pressing the SEL/RESET button.
CHECK TIRE PRESSURE is displayed when a
tire has significantly low pressure. The specific
tire is displayed on the screen.
1TPMS (Tire Pressure Monitoring System)
Tire pressure checked and inflated in:•Warm weather can become under-inflated in
colder weather.•Cold weather can become over-inflated in warmer
weather.
The low tire pressure/TPMS indicator will not come
on as a result of over inflation.