Page 156 of 650

�Î
You can customize the door lock/
unlock settings (see page ).
Youcanopenorclosethewindows
and the moonroof by using the key
in the driver’s door (see page ).
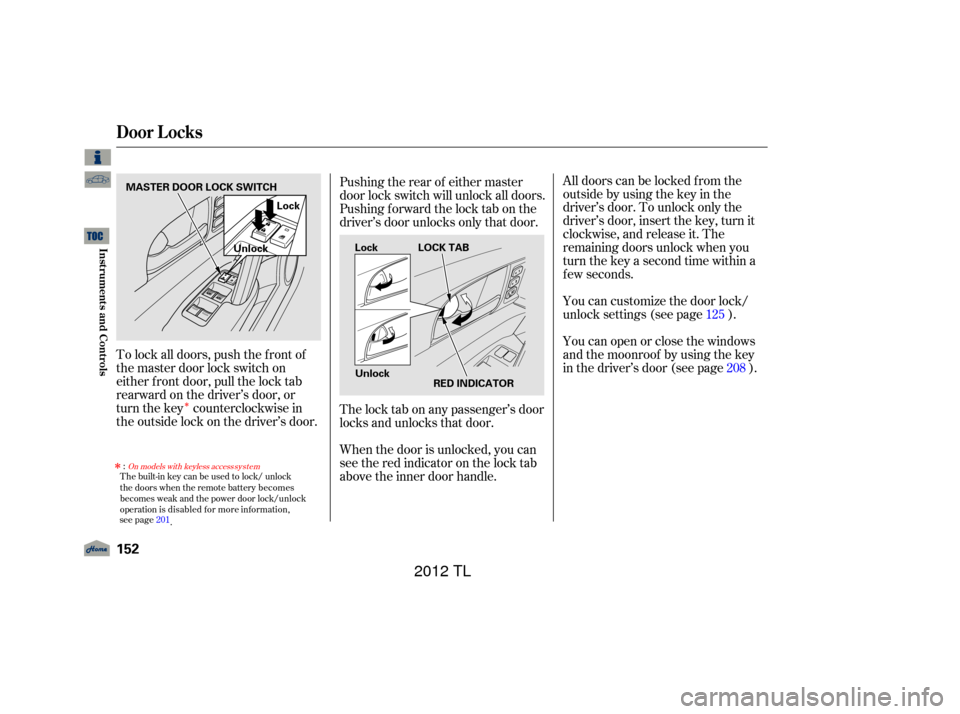
To lock all doors, push the f ront of
the master door lock switch on
either f ront door, pull the lock tab
rearward on the driver’s door, or
turn the key counterclockwise in
the outside lock on the driver’s door. All doors can be locked f rom the
outsidebyusingthekeyinthe
driver’s door. To unlock only the
driver’s door, insert the key, turn it
clockwise, and release it. The
remaining doors unlock when you
turn the key a second time within a
f ew seconds.
When the door is unlocked, you can
seetheredindicatoronthelocktab
above the inner door handle. The lock tab on any passenger’s door
locks and unlocks that door. Pushing the rear of either master
door lock switch will unlock all doors.
Pushing f orward the lock tab on the
driver’s door unlocks only that door. 125208
Door L ocks
152
MASTER DOOR LOCK SWITCH
UnlockLock
LOCK TAB
RED INDICATOR
Lock
Unlock
11/01/14 18:19:45 31TK4630_157
Inst rument s and Cont rols
The built-in key can be used to lock/ unlock
the doors when the remote battery becomes
becomes weak and the power door lock/unlock
operation is disabled for more information,
s ee
page
201
.
�Î
:On models with keyless access system
2012 TL
Page 229 of 650

The standard audio system has
many f eatures. This section
describes those f eatures and how to
use them. The climate control system in your
vehicle provides a comfortable
driving environment in all weather
conditions.
Your vehicle has an anti-theft audio
system that requires a code number
to enable it.
The security system helps to dis-
courage vandalism and thef t of your
vehicle................
Climate Control System . 226
Using Automatic Climate ...................................
Control .228 Dual Temperature and Mode
...................................
Control .232
..........
Climate Control Sensors . 234
................................
Audio System .235
................................
Audio System .236
..........
Playing the AM/FM Radio . 237
................
Playing the XM
Radio . 246
.................................
Playing Discs .253
...
Disc Changer Error Messages . 263
............................
PlayinganiPod
. 264
.................
iPod
Error Messages . 271
Playing a USB Flash Memory ........................................
Device .272
USB Flash Memory Device ........................
Error Messages .280
.............
Audio System . 281
................................
Audio System .285
..........
Playing the AM/FM Radio . 286
................
Playing the XM
Radio . 299
................................
Playing a Disc .307
.......
Disc Player Error Messages . 319
Playing Hard Disc Drive (HDD) ..........................................
Audio .320
............................
PlayinganiPod
. 354 .................
iPod
Error Messages . 363
Playing a USB Flash Memory ........................................
Device .364
USB Flash Memory Device ........................
Error Messages .375
.............
Audio System . 376
..................
Protecting Your Discs . 381
............
AM/FM Radio Reception . 385
................
Remote Audio Controls . 387
......................
Auxiliary Input Jack .389
.................
Radio Thef t Protection . 390
..........................
Setting the Clock .391
............................
Security System .395
.........................................
Compass .397
...............................
Cruise Control .401
HomeLink
Universal ................................
Transceiver .404
HandsFreeLink
(Models without navigation
..................................
system) .407
HandsFreeLink
(Models with navigation
..................................
system) .424
..
AcuraLink
(U.S. models only) . 449
...
Rearview Camera and Monitor . 465
Models without navigation system
BluetoothModels with navigation system Bluetooth
BluetoothBluetooth
Features
Features
225
11/01/14 18:32:53 31TK4630_230
2012 TL
Page 240 of 650

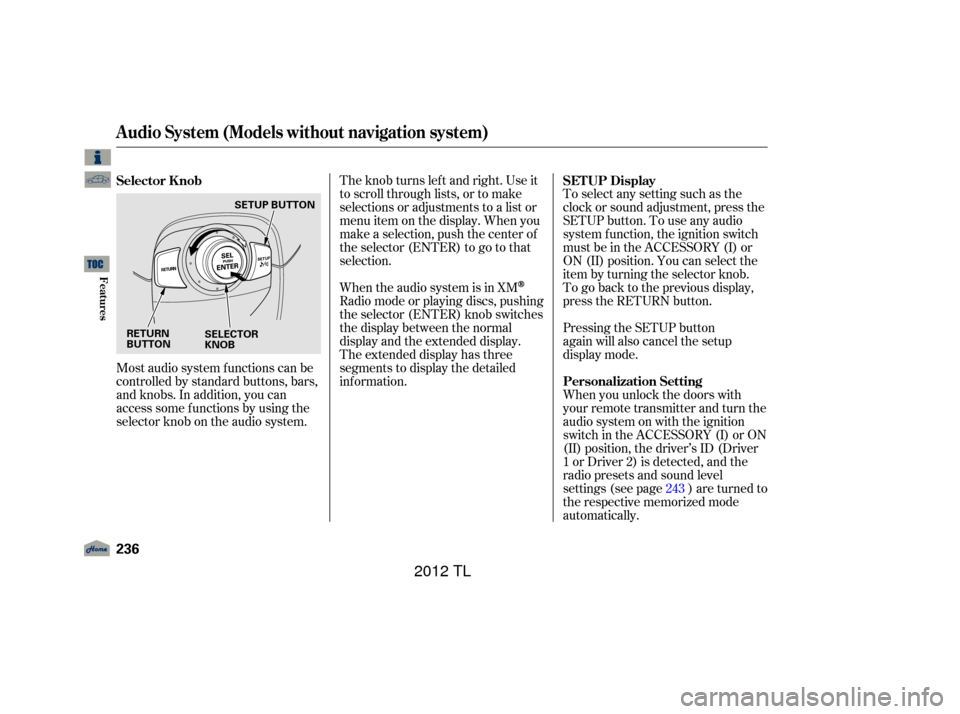
Most audio system f unctions can be
controlled by standard buttons, bars,
and knobs. In addition, you can
access some f unctions by using the
selector knob on the audio system.The knob turns lef t and right. Use it
to scroll through lists, or to make
selections or adjustments to a list or
menu item on the display. When you
make a selection, push the center of
the selector (ENTER) to go to that
selection.
When the audio system is in XM
Radio mode or playing discs, pushing
the selector (ENTER) knob switches
the display between the normal
display and the extended display.
The extended display has three
segments to display the detailed
inf ormation.
To select any setting such as the
clock or sound adjustment, press the
SETUP button. To use any audio
system f unction, the ignition switch
must be in the ACCESSORY (I) or
ON (II) position. You can select the
item by turning the selector knob.
To go back to the previous display,
press the RETURN button.
Pressing the SETUP button
again will also cancel the setup
display mode.
When you unlock the doors with
your remote transmitter and turn the
audio system on with the ignition
switch in the ACCESSORY (I) or ON
(II) position, the driver’s ID (Driver
1orDriver2)isdetected,andthe
radio presets and sound level
settings (see page ) are turned to
the respective memorized mode
automatically.
243
Selector K nob
SET UP Display
Personalization Setting
Audio System (Models without navigation system)
236
RETURN
BUTTON SELECTOR
KNOBSETUP BUTTON
11/01/14 18:34:54 31TK4630_241
Features
2012 TL
Page 395 of 650
To set the time, press the CLOCK
button until you hear a beep. The
displayed time begins to blink.
Change the hours by pressing the H
(hour) button until the numbers
advance to the desired time. Change
the minutes by pressing the M
(minute) button until the numbers
advance to the desired time.
Press the CLOCK button again to
enter the set time.
CONT INUED
On models without navigation system
Setting the Clock
Features
391
On models without navigation systemMINUTE BUTTON
(PRESET 5) RESET BUTTON
(PRESET 6) CLOCK BUTTON
HOUR BUTTON
(PRESET 4)
11/01/17 13:15:59 31TK4630_396
2012 TL
Page 396 of 650

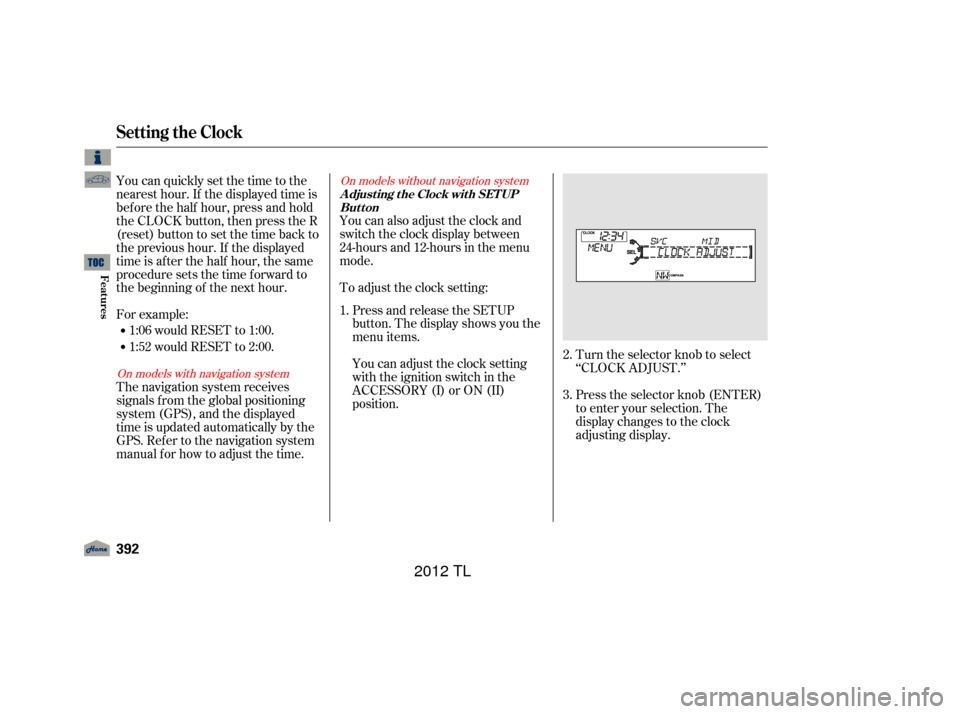
Turn the selector knob to select
‘‘CLOCK ADJUST.’’
Press the selector knob (ENTER)
to enter your selection. The
display changes to the clock
adjusting display.
You can also adjust the clock and
switch the clock display between
24-hours and 12-hours in the menu
mode.
To adjust the clock setting:
Press and release the SETUP
button. The display shows you the
menu items.
You can adjust the clock setting
with the ignition switch in the
ACCESSORY (I) or ON (II)
position.
You can quickly set the time to the
nearest hour. If the displayed time is
bef ore the half hour, press and hold
the CLOCK button, then press the R
(reset) button to set the time back to
the previous hour. If the displayed
time is af ter the half hour, the same
procedure sets the time f orward to
the beginning of the next hour.
For example:
The navigation system receives
signals f rom the global positioning
system (GPS), and the displayed
time is updated automatically by the
GPS. Ref er to the navigation system
manual f or how to adjust the time.
1:06 would RESET to 1:00.
1:52 would RESET to 2:00.
1.
2.
3.
On models with navigation systemOn models without navigation system
Setting the Clock
A djust ing t he Clock wit h SET UP
Button
392
11/01/14 19:01:52 31TK4630_397
Features
2012 TL
Page 397 of 650
�Ú
CONT INUED
Turn the selector knob to select
the item which you want to adjust.
Turning the selector knob will
change the selected item between
the clock display setting, hours,
minutes, and SET. The selected
item is indicated with inPress the selector knob (ENTER)
to enter your selection. The
display will return to the clock
adjusting display. Turn the selector knob to change
the setting between 12H and 24H.
Turn the selector knob to count
the numbers up or down. To set the time, turn the selector
knob and select the hours or the
minutes, then press the knob to
enter your selection. The display
changes to the setting display.
5.
6.
7.
8.
4.
Setting the Clock
Features
393
MINUTE SETTING
11/01/14 19:02:04 31TK4630_398
the display.
2012 TL
Page 398 of 650
Press either the RETURN or
SETUPbuttontogobacktothe
normal display. To enter the clock setting, turn
the selector knob to select ‘‘SET,’’
then press the knob. The display
will return to the menu item
display.
Press the selector knob (ENTER)
to enter your selection. The
display will return to the clock
adjusting display.
While setting the clock, pressing
the RETURN button will go back
to the previous display.
Pressing the SETUP button again
will cancel this setting mode.
11. 10.
9.
Setting the Clock
394
11/01/14 19:02:12 31TK4630_399
Features
2012 TL
Page 562 of 650
Remove the socket from the
headlight assembly by turning it
one-quarter turn counterclockwise.Start the engine. If you are
replacing a driver’s side bulb, turn
the steering wheel all the way to
the right. If you are replacing a
passenger’s side bulb, turn the
steering wheel to the left. Turn off
the engine.
Remove the bulb by pulling it
straight out of its socket. Install the new bulb in the socket
by pushing it straight in the socket
until it bottoms.
Insert the socket into the
headlight assembly. Turn it
clockwise to lock it in place.
Turn on the lights to make sure
the new bulb is working.
Push the under cover in place and
set the inner f ender cover in the
original position. Install the bolts
and tighten them securely. Insert
each holding clip, and lock it by
pushingonitscenter.
5.
6. 7.
8.
1.
9.
10. Replacing a Front Turn
Signal/Parking Light Bulb
Lights
558
SOCKET
BULB
11/01/14 19:31:47 31TK4630_563
Maint enance
2012 TL