Page 9 of 184

User Agreement
8 Navigation System
In using this HDD “Satellite Linked
Navigation System” (the “HDD”),
which includes HONDA MOTOR
CO., LTD. software, PIONEER
CORPORATION software, and
NAVTEQ database contents
(hereinafter referred to as “Licensors”),
you are bound by the terms and
conditions set forth below. By using
your copy of the HDD, you have
expressed your Agreement to the terms
and conditions of this Agreement. You
should, therefore, make sure that you
read and understand the following
provisions. If for any reason you do not
wish to be bound by the terms of this
Agreement, please return the HDD to
your dealer. • The HDD may not be copied,
duplicated, or otherwise modifi ed, in
whole or in part, without the express
written permission of the Licensors.
• The HDD may not be transferred or sublicensed to any third party for
profi t, rent or loan, or licensed for
reuse in any manner.
• The HDD may not be decompiled, reverse engineered or otherwise
disassembled, in whole or in part.
• The HDD may not be used in a network or by any other manner of
simultaneous use in multiple systems.
• The HDD is intended solely for personal use (or internal use where
the end-user is a business) by the
consumer. The HDD is not to be used
for commercial purposes. • The Licensors do not guarantee to the
client that the functions included in
the HDD meet the specifi c objectives
of the user.
• Licensor shall not be responsible for any damages caused by the use of
the HDD to the actual user or to any
third party.
• The warranty on the HDD shall not extend to an exchange or refund due
to misspelling, omission of letters, or
any other cosmetic discrepancy in the
contents of the HDD.
• The right to use the HDD shall expire either when the user destroys the
HDD or software, or when any of the
terms of this Agreement are violated
and the Licensors exercise the option
to revoke the license to use the HDD
or software.
Page 10 of 184

User Agreement
Navigation System9
• The terms and conditions hereof
apply to all subsequent users and
owners as well as to the original
purchaser.
• The logos of oil companies, hotels, convenience stores, and other
businesses are displayed for your
information and convenience, and
in no way imply any sponsorship,
approval or endorsement of these
companies, or their products.
The logos are trademarks of their
respective owners.
• The marks of companies displayed by this product to indicate business
locations are the marks of their
respective owners.
• The use of such marks in this product does not imply any sponsorship,
approval, or endorsement by such
companies of this product. The user shall indemnify and save
harmless the Licensors, and their
offi
cers, employees and agents, from
and against any claim, demand or
action, irrespective of the nature of the
cause of the claim, demand or action,
alleging loss, costs, expense, damages
or injuries (including injuries resulting
in death) arising out of the use or
possession of the HDD or software. Use, duplication, or disclosure of this
HDD by or on behalf of the United
States government is subject to
“Restricted Rights” as set forth at FAR
52.227-14, -19 or DFARS 252.227-
7013, as applicable. Manufacturers
are the Licensors, including HONDA
MOTOR CO., LTD., 2-1-1 Minami
Aoyama Minato-Ku Tokyo 107-8556
JAPAN., PIONEER CORPORATION,
1-4-1 Meguro Meguro-ku Tokyo 153-
8654 Japan., NAVTEQ Corporation,
425 W Randolph St. Chicago, IL
60606, USA.
Page 11 of 184

Getting Started
10 Navigation System
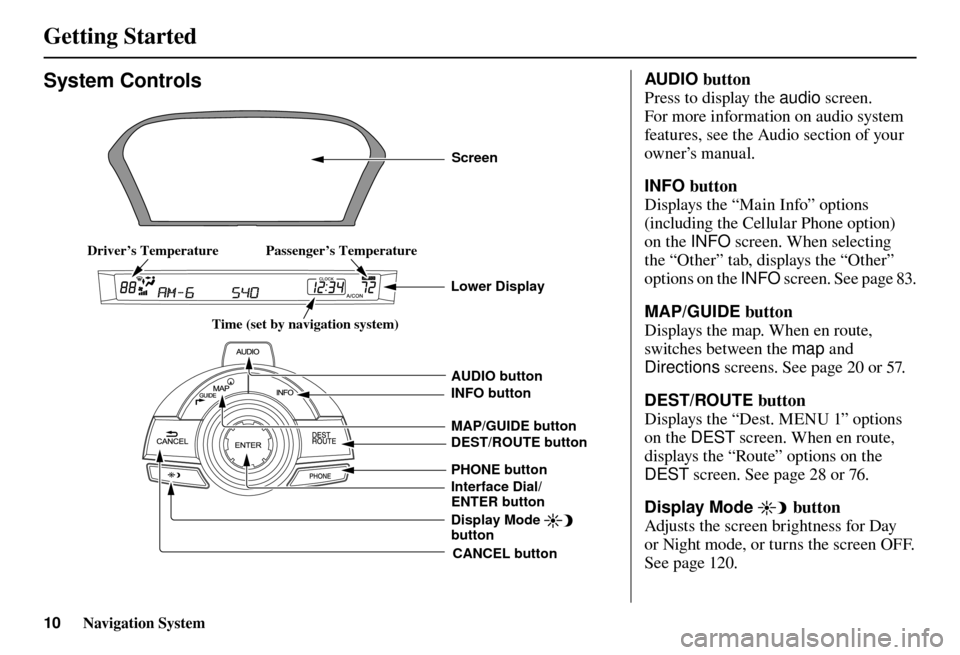
AUDIO button
Press to display the audio screen.
For more information on audio system
features, see the Audio section of your
owner’s manual.
INFO button
Displays the “Main Info” options
(including the Cellular Phone option)
on the INFO screen. When selecting
the “Other” tab, displays the “Other”
options on the INFO screen. See page 83 .
MAP/GUIDE button
Displays the map. When en route,
switches between the map and
Directions screens. See page 20 or 57 .
DEST/ROUTE button
Displays the “Dest. MENU 1” options
on the DEST screen. When en route,
displays the “Route” options on the
DEST screen. See page 28 or 76 .
Display Mode
button
Adjusts the screen brightness for Day
or Night mode, or turns the screen OFF.
See page 120 .
CANCEL button
INFO button
Interface Dial/
ENTER button PHONE button AUDIO button
MAP/GUIDE button
Lower Display
Screen
Display Mode
button
Passenger’s Temperature
Driver’s Temperature
Time (set by navigation system)
DEST/ROUTE button
System Controls
Page 12 of 184

Getting Started
Navigation System11
PHONE button
Press to display the Cellular phone
screen.
For more information, see the
Bluetooth
® HandsFreeLink® section of
your owner’s manual.
CANCEL button
Cancels the current screen and returns
to the previous screen display.
NOTE:
The BACK button on the steering
wheel performs the same basic
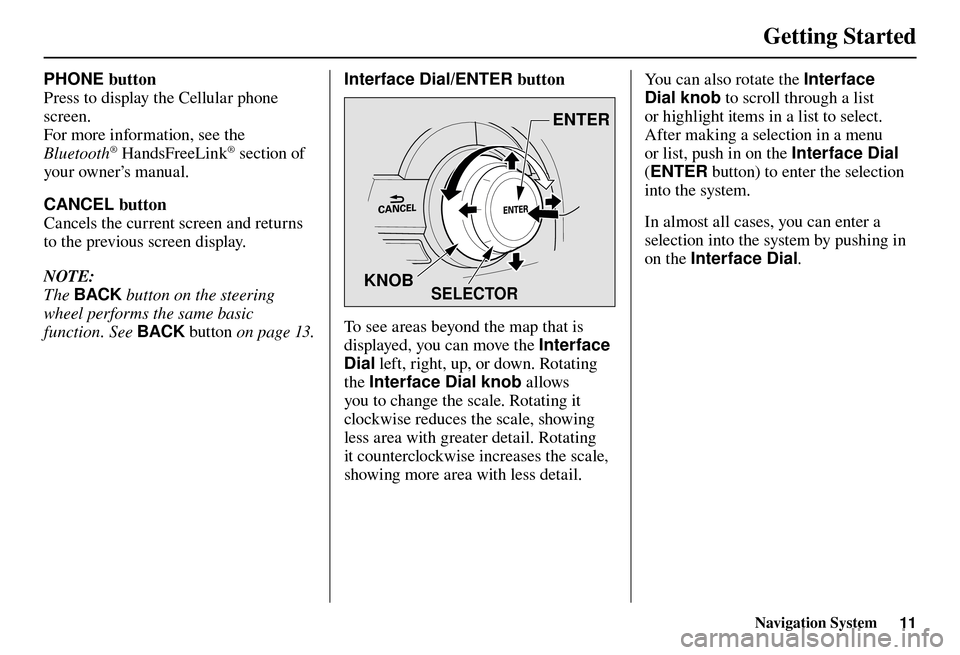
function. See BACK button o n p a g e 1 3 . Interface Dial/ENTER button
SELECTOR
ENTER
KNOB
To see areas beyond the map that is
displayed, you can move the Interface
Dial left, right, up, or down. Rotating
the Interface Dial knob allows
you to change the scale. Rotating it
clockwise reduces the scale, showing
less area with greater detail. Rotating
it counterclockwise increases the scale,
showing more area with less detail. You can also rotate the Interface
Dial knob
to scroll through a list
or highlight items in a list to select.
After making a selection in a menu
or list, push in on the Interface Dial
( ENTER button) to enter the selection
into the system.
In almost all cases, you can enter a
selection into the system by pushing in
on the Interface Dial .
Page 13 of 184

Getting Started
12 Navigation System
Screen
All selections and instructions are
displayed on the screen. The display
is not a “touch screen” - you enter
information into the system either by
voice or by using the Interface Dial .
Clean the screen with a soft, damp
cloth. You may use a mild cleaner
intended for use on computer screens.
NOTE:
Whenever you shift to R (Reverse), the
rear view behind the vehicle is shown
on the navigation system screen. See
page 127 . Lower Display
Shows a summary of the audio and
climate control information, as well as
the time. This summary is helpful as a
confi
rmation when adjusting audio or
climate by voice.
The audio summary consists of the
radio band, frequency, and volume. For
XM radio, a brief description of the
station and current music is displayed.
The climate status consists of the
driver’s and passenger’s temperature,
fan speed, ON/OFF (A/C), and vent
setting. The time is automatically set
by the navigation system. Settings
can be adjusted in SETUP (see T i m e
Adjustment on page 117 ).
Page 14 of 184

Getting Started
Navigation System13
Voice Control Basics
Your vehicle has a voice control system
that allows hands-free operation of most
of the navigation system functions. You
can also control the audio system and
the climate control system. The voice
control system uses the TA L K and
BACK buttons on the steering wheel
and a microphone near the map lights
on the ceiling.
TALK button
BACK button
PICK-UP
button
HANG-UP
button
NOTE:
While using the voice control system,
all of the speakers are muted.
Microphone (on the ceiling)
TALK button
This button activates the voice control
system. Press and release it when you
want to give a voice command. See
Voice Command Index on page 167 for a
list of voice commands. BACK button
This button has the same function as
the
CANCEL button. When you press
and release it, the display returns to the
previous screen. When the previous
screen appears, the system replays the
last prompt.
When you press this button during
voice recognition, voice recognition is
ended. (The display does not return to
the previous screen.)
Page 15 of 184

Getting Started
14 Navigation System
Using the Voice Control System
You should use the voice control system
as much as possible, and consider
manual entry using the Interface Dial
as a backup method.
Most of the system’s functions can be
controlled by voice commands activated
with the TA L K button. To control your
navigation system by voice:
• Press and release the TA L K button on
the map screen. A voice recognition
screen will be displayed. Or press and
release the TA L K button on a screen
other than the map screen. A pop-
up voice icon
will appear in the
upper left corner of the screen.
• Wait for the beep.
• Give a voice command. (Voice commands that the system recognizes
are highlighted.)
Once the microphone picks up your
command, the system changes the
display in response to the command
and prompts you for the next command.
Using the TA L K button, answer the
prompts as required. If the system does not understand a
command or you wait too long to give
a command, on the Voice Recognition
Example Commands screen, it responds
with “Pardon? No command was heard.
Please press the
TA L K button and say
a command. To return to the previous
screen, press the BACK button.” On
any other screen, it responds with
“Pardon? No command was heard.
Please press the TA L K button and
say a command.” If the system cannot
perform a command or the command is
not appropriate for the screen you are
on, a beep will sound.
You can fi nd out which voice
commands are available for a particular
screen by saying “Help.” The system
will display and read the list of
available commands to you. (When
Help is grayed out, this feature cannot
be used.)
When you speak a command, the
system generally either repeats the
command as a confi rmation or asks you
for further information. If you do not
wish to hear this feedback, you can turn
it off. However, hearing the feedback will
familiarize you with the way the system
expects commands to be phrased. See
the
Voice Recognition Tutor setting
in SET UP.
If you hear a prompt such as “Please
use the Interface Dial to...” or “Please
choose an area with the Interface
Dial ,” the system is asking for input that
cannot be performed using the voice
control system.
Improving Voice Recognition
To achieve optimum voice recognition
when using the navigation or Bluetooth®
HandsFreeLink® voice control system,
the following guidelines should be
followed:
NOTE:
Make sure the correct screen is
displayed for the voice command that
you are using. See Voice Command
Index on page 167 .
• It is best if the windows and sunroof are closed. If they are open, speak
a little louder to overcome the wind
noises.
Page 16 of 184

Getting Started
Navigation System15
• The fan speed automatically lowers
when the TA L K button is pressed.
Adjust the airfl ow from both the
dashboard and side vents so air does
not blow against the microphone on
the ceiling.
• If more than one person is speaking at the same time, the system may
misinterpret your command.
• After pressing and releasing the TA L K button, wait for the beep, then
give a voice command.
• Give a voice command in a clear, natural speaking voice without
pausing between words.
• Try to reduce any background noise.
• If you are still having trouble with the voice control system, refer to Voic e
Info on the INFO screen (Main
Info ).
NOTE:
The voice control system can only be
used from the driver’s position. The
microphone does not recognize voice
commands from anywhere else in the
vehicle.Selecting an Item (Button)
on the Screen
On most screens, there are items that
can be selected (like buttons with titles
such as OK or Return ). To select
an item on any screen, do one of the
following:
• Use the voice control system and say the name of the desired item.
Almost all selectable items on the
screen, including some listed items,
are recognized by the voice control
system.
• Move the highlighting to the desired item with the Interface Dial or its
knob , then push in on the Interface
Dial .
Tip:
If items are grayed out, this means that
they cannot be selected.
Selecting an Item in a List
To scroll through a list, do one of the
following:
• Rotate the Interface Dial knob to
scroll one item at a time.
• Use the voice control system to scroll page by page. For example, to scroll
up, say “Up” or “Previous.” To scroll
down, say “Next” or “Down.”
If you cannot fi nd the desired name,
or have made an error, return to
the previous screen by pressing the
CANCEL or the BACK button.
To select the desired item in the list, do
one of the following:
• Use the voice control system, and say the item number of the desired item.
• Rotate the Interface Dial knob to
move the highlighting to the item,
then push in on the Interface Dial .