2012 Acura MDX radio controls
[x] Cancel search: radio controlsPage 188 of 621

The climate control system in your
vehicle provides a comfortable driving
environment in all weather conditions.
The standard audio system has many
features. This section describes those
features and how to use them.
Your vehicle has an anti-theft audio
system that requires a code number to
enable it.
The security system helps do
discourage vandalism and theft to your
vehicle.
Climate Control System
................
182
Rear Climate Controls
................
187
Audio System
...............................
192
Playing the AM/FM Radio (Models
without navigation system)
.......
193
Playing the XM
®Radio (Models
without navigation system)
.......
197
Playing Discs (Models without
navigation system)
...................
203Disc Changer Error Message
(Models without navigation
system)
................................
211
Audio System (Models with
navigation system)
...................
212
Playing the AM/FM Radio (Models
with navigation system)
............
213
Playing the XM
®Radio (Models
with navigation system)
............
226
Playing a Disc (Models with
navigation system)
...................
235
Disc Player Error Messages
(Models with navigation
system)
................................
246
Protecting Your Discs
...................
247
Playing Hard Disc Drive (HDD)
Audio (Models with navigation
system)
................................
250
Playing an iPod
®(Models with
navigation system)
...................
278
iPod
®Error Messages (Models
with navigation system)
............
286
Playing a USB Flash Memory
Device (Models with navigation
system)
................................
287USB Flash Memory Device Error
Messages (Models with
navigation system)
................
297
Bluetooth
®Audio System (Models
with navigation system)
............
298
AM/FM Radio Reception
..............
303
Remote Audio Controls
.................
305
Auxiliary Input Jack
......................
307
Radio Theft Protection
..................
308
Setting the Clock and Calendar
.....
309
Rear Entertainment System
...........
310
Security System
............................
341
Compass
......................................
342
Cruise Control
..............................
345
Adaptive Cruise Control (ACC)
.....
348
HomeLink
®Universal
Transceiver
..............................
363
Bluetooth
®HandsFreeLink
®
(Models without navigation
system)
................................
365
Bluetooth
®HandsFreeLink
®
(Models with navigation
system)
................................
383
AcuraLink
®(U.S. models only)
......
402
Rearview Mirror with Rearview
Camera Display
........................
417
Features
181
Features
Page 203 of 621

Adjusting the Sound
Press the TUNE (SOUND) knob
repeatedly to display the BASS,
TREBLE, FADER, BALANCE,
SUBWOOFER, CENTER, and SVC
(speed-sensitive volume
compensation) settings.
BASS-Adjusts the bass.
TREBLE-Adjusts the treble.
FADER-Adjusts the front-to-back
strength of the sound.
BALANCE-Adjusts the side-to-
side strength of the sound.
SUBWOOFER-Adjusts the
strength of sound from the
subwoofer speaker.
CENTER-Adjusts the strength of
sound from the center speaker.SVC-Adjusts the volume level
based on the vehicle speed.
Each mode is shown in the display as
it changes. Turn the TUNE knob to
adjust the setting to your liking.
When the level reaches the center,
you will see‘‘C’’in the display.
The system will return to the audio
display about 5 seconds after you
stop adjusting a mode.
Speed-sensitive Volume
Compensation (SVC)The SVC mode controls the volume
based on vehicle speed. The faster
you go, the louder the audio volume
becomes. As you slow down, the
audio volume decreases.
The SVC has four modes: SVC OFF,
SVC LOW, SVC MID, and SVC
HIGH. Turn the TUNE knob to
adjust the setting to your liking. If
you feel the sound is too loud,
choose low. If you feel the sound is
too quiet, choose high.Audio System Lighting
You can use the instrument panel
brightness control buttons to adjust
the illumination of the audio system
(see page 133). The audio system
illuminates when the parking lights
are on, even if the radio is off.
Playing the AM/FM Radio (Models without navigation system)196
Page 211 of 621

To Play a Disc
To load or play discs, the ignition
switch must be in the ACCESSORY
(I) or ON (II) position.
You operate the disc changer with
the same controls used for the radio.
To select the disc changer, press the
DISC button. You will see‘‘DISC’’in
the display. The disc and track
numbers, and the elapsed time are
shown in the display. You can also
select the displayed information with
the TITLE button (see page 205).
The system will continuously play a
disc until you change modes.Do not use discs with adhesive labels.
The label can curl up and cause the
disc to jam in the unit.This audio system can also play
CD-Rs and CD-RWs compressed in
MP3 or WMA formats. When playing
a disc in MP3, you will see‘‘MP3’’in
the display. In WMA format,‘‘WMA’’
will appear in the display. The disc,
folder and track numbers are
displayed. You can select up to 255
folders or tracks.
Video CDs and DVD discs do not
work in this unit.NOTE:
If a file on an MP3 or WMA disc is
protected by digital rights
management (DRM), the audio unit
displays FORMAT, and then skips to
the next file.
Depending on the software the files
were made with, it may not be
possible to play some files, or display
some text data.Playing Discs (Models without navigation system)204
Page 231 of 621

CENTER-Adjusts the strength of
sound from the center speaker.
SUBWOOFER-To adjust the
strength of the sound from the
subwoofer speaker, select it and
press ENTER on the interface
selector. Turn the interface dial to
the desired level, and enter your
selection by pressing ENTER on the
interface selector.
Speed-sensitive Volume
Compensation (SVC)The SVC mode controls the volume
based on vehicle speed. The faster
you go, the louder the audio volume
becomes. As you slow down, the
audio volume decreases.
The SVC has four modes: OFF,
LOW, MID, and HIGH. To change
the SVC mode, select SVC, then
press ENTER on the interface
selector. The current setting is
shown on the screen. Turn the
interface dial to the desired level, and
enter your selection by pressing
ENTER on the interface selector. If
you feel the sound is too loud,
choose low. If you feel the sound is
too quiet, choose high.Dolby PL (ProLogic) II-Dolby
PL (ProLogic) II signal processing
creates multi-channel surround
sound from 2 channel stereo audio
sources. Dolby ProLogic II can only
be activated when listening to DISC
(CD-DA, MP3, WMA, AAC), XM
Radio, AUX (USB, iPod
®, AUX,
Bluetooth
®Audio), and HDD Audio.
When ProLogic II is available,‘‘PL II’’
is shown in the audio display.
When ProLogic II is not available in
the selected audio source,‘‘PL II N/
A’’is shown on the center display.
ProLogic ON/OFF settings are
independently controlled for DISC,
XM, HDD Audio, and AUX sources.
Playing the AM/FM Radio (Models with navigation system)224
Page 244 of 621

It is possible to select up to 999 files
for inclusion in CD-Rs and CD-RWs,
and up to 3,500 files for inclusion in
DVD-Rs and DVD-RWs.Do not use discs with adhesive labels.
The label can curl up and cause the disc
to jam in the unit.Manufactured under license under
U.S. Patent#'s: 5,451,942; 5,956,674;
5,974,380; 5,978,762; 6,487,535 &
other U.S. and worldwide patents
issued & pending. DTS and DTS
Digital Surround are registered
trademarks and the DTS logos and
Symbol are trademarks of DTS, Inc.
© 1996-2008 DTS, Inc. All Rights
Reserved.To Load a Disc
Insert a disc about halfway into the
disc slot. The drive will pull the disc
in the rest of the way to play it. You
operate the disc player with the same
controls used for the radio. The
number of the current track is shown
in the display. When playing a disc in
MP3, WMA or AAC, the numbers of
the current folder and file are shown.
The system will continuously play a
disc until you change modes.
For information on how to handle
and protect compact discs, see page
247.To Play a Disc
Select the disc player by pressing the
DISC button. The system will begin
playing the last selected track in the
disc. You will see the current track
position highlighted.
Title information will be displayed by
a list when the information is found
in the Gracenote
ᤎ
Album Info
(Gracenote
ᤎ
Media Database) on the
built-in hard disk drive. When you
play a CD recorded with text data,
you will see the genre, artist name,
album and track name on the screen.
When you play MP3/WMA/AAC
discs, you will see the genre, artist
name, album name and track name
on the screen. If the disc was not
recorded with this information, it will
not be displayed.
CONTINUED
Playing a Disc (Models with navigation system)
237
Features
Page 312 of 621

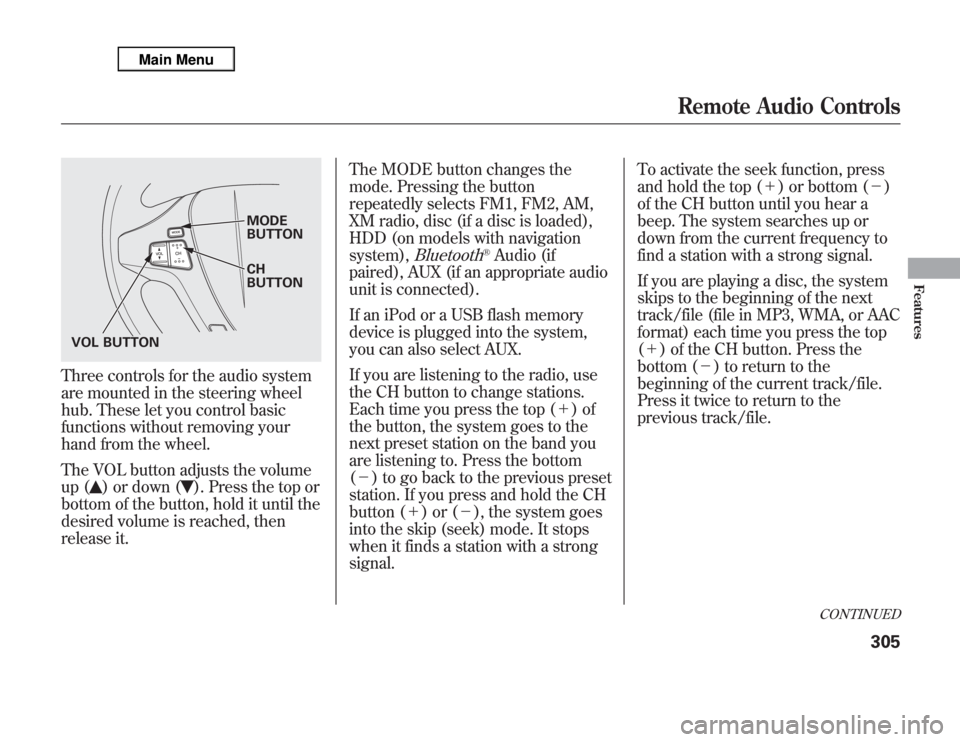
Three controls for the audio system
are mounted in the steering wheel
hub. These let you control basic
functions without removing your
hand from the wheel.
The VOL button adjusts the volume
up (
) or down (
). Press the top or
bottom of the button, hold it until the
desired volume is reached, then
release it.The MODE button changes the
mode. Pressing the button
repeatedly selects FM1, FM2, AM,
XM radio, disc (if a disc is loaded),
HDD (on models with navigation
system),
Bluetooth
®Audio (if
paired), AUX (if an appropriate audio
unit is connected).
If an iPod or a USB flash memory
device is plugged into the system,
you can also select AUX.
If you are listening to the radio, use
the CH button to change stations.
Each time you press the top (+)of
the button, the system goes to the
next preset station on the band you
are listening to. Press the bottom
(-) to go back to the previous preset
station. If you press and hold the CH
button (+)or(-), the system goes
into the skip (seek) mode. It stops
when it finds a station with a strong
signal.To activate the seek function, press
and hold the top (+) or bottom (-)
of the CH button until you hear a
beep. The system searches up or
down from the current frequency to
find a station with a strong signal.
If you are playing a disc, the system
skips to the beginning of the next
track/file (file in MP3, WMA, or AAC
format) each time you press the top
(+) of the CH button. Press the
bottom (-) to return to the
beginning of the current track/file.
Press it twice to return to the
previous track/file.
MODE
BUTTON
CH
BUTTON
VOL BUTTON
CONTINUED
Remote Audio Controls
305
Features
Page 320 of 621

To Select Rear Entertainment
from the Front Control Panel
To operate the rear entertainment
system from the front panel, press
the REAR SOURCE button. You will
hear two beeps and the indicator in
the button comes on to show that the
control panel is enabled.
If you do not operate the rear
entertainment system from the front
panel within 10 seconds, the
indicator goes off and the FRONT
SOURCE indicator comes on
automatically.
Radio controls for the front
entertainment system can also be
used to operate the rear
entertainment system.Operating the DVD Player from
the Front Control Panel
The DVD player in your rear
entertainment system can play DVD
video discs, audio CDs, MP3/WMA
discs, and DTS CDs.
Press the REAR PWR button in the
front panel or press the
button in
the rear control panel when REAR
PWR is on. The overhead screen will
open to the position it was last set.You can tilt the screen at nine
different angles from 90 to 130
degrees using the tilt button in the
rear control panel. The default
setting is 100 degrees.
To continuously adjust the angle of
the overhead screen, press and hold
the TILT button.
REAR CONTROL PANEL
OVERHEAD SCREEN
CONTINUED
Rear Entertainment System
313
Features
Page 322 of 621

SKIP-Press and hold thebutton to move forward; you will see
the time elapsed shown in the
overhead screen advancing rapidly.
Press and hold the
button to
move backward; you will see the time
elapsed shown in the overhead
screen decreasing. Release the
button when the system reaches the
point you want.
Each time you press the
button
and release it, the system skips
forward to the beginning of the next
track or chapter. Press and release
the
button to skip backward to
the beginning of the current track.
Press and release it again to skip to
the beginning of the previous track
or chapter.EJECT-Press the eject button to
remove the DVD from the drive.
To Return to Front Audio Controls
To return front panel control to the
front audio system, press the FRONT
SOURCE button. You will hear a
beep and the indicator in the button
comes on. The indicator also comes
on automatically, when you do not
operate the rear entertainment
system within 10 seconds.Using the Rear Control Panel
To turn on the rear entertainment
system from the rear control panel,
press the PWR button. Use the
DVD/AUX button, DISC/HDD
button, XM RADIO button, or FM/
AM button to select the
entertainment source. The selected
source will be shown in the display.
Make sure the rear control operation
has not been disabled with the REAR
CTRL button on the front panel.
When the audio system is off or the
front side rear power is off, the rear
control panel cannot be turned on.
CONTINUED
Rear Entertainment System
315
Features