2012 Acura MDX ad blue
[x] Cancel search: ad bluePage 11 of 621

ᤳ1: To use the horn, press the center pad of the steering wheel.
ᤳ2: If equipped
ᤳ3: Refer to the navigation system manual. For how to operate
Bluetooth
®HandsFreeLink by voice, see page 383.
BLIND SPOT INFORMATION
SYSTEM (BSI) OFF BUTTON
ᤳ2
(P. 482)VEHICLE STABILITY
ASSIST SYSTEM
OFF BUTTON
(P. 474)
MIRROR CONTROLS
(P. 166)BSI ALERT INDICATOR
ᤳ2
(P. 479)
COLLISION MITIGATION
BRAKING SYSTEM™(CMBS™)
OFF BUTTON
ᤳ2
(P.467)
HEADLIGHT WASHER
BUTTON
ᤳ2
(P. 127)
HORN
ᤳ1
STEERING WHEEL
ADJUSTMENTS
(P. 134)HEADLIGHT/TURN SIGNAL/
FRONT FOG LIGHTS
(P. 128)
STEERING WHEEL
AUDIO CONTROLS
(P. 305)WINDSHIELD
WIPERS/WASHERS
(P. 126)INSTRUMENT PANEL
BRIGHTNESS
(P. 133)
PASSENGER AIRBAG
OFF INDICATOR
(P. 37)
HAZARD WARNING
BUTTON
(P. 132)
REAR WINDOW
DEFOGGER
(P. 132)
ACCESSORY POWER
SOCKETS
(P. 177)
SEAT HEATER SWITCHES
(P. 157) /
SEAT HEATER AND SEAT
VENTILATION BUTTONS
ᤳ2
(P. 158)
ACTIVE DAMPER
SYSTEM BUTTON
ᤳ2
(P. 484) CRUISE CONTROL BUTTONS (P. 345) /
ADAPTIVE CRUISE CONTROL (ACC)
BUTTONS
ᤳ2
(P. 353) PADDLE SHIFTERS
(P. 447)
DISTANCE
BUTTONᤳ2
(P. 357)
BLUETOOTH
HANDSFREELINK
BUTTONS (P. 365)VOICE CONTROL
BUTTONS
ᤳ3
Your Vehicle at a Glance4
Page 91 of 621

HandsFreeLink™You can receive or make phone calls
from your cell phone through your
vehicle's
Bluetooth
®HandsFreeLink
®
(HFL) system without touching your
cell phone.Trip Computer
When the main menu displays‘‘TRIP
COMPUTER’’, pressing the SEL/
RESET button changes the display to
‘‘AVERAGE FUEL A/RANGE’’to
‘‘AVERAGE FUEL B/RANGE’’and
to‘‘AVERAGE SPEED/ELAPSED
TIME’’.
AVERAGE FUEL A/BThis shows your vehicle's average
fuel economy in mpg (U.S. models)
or liter/100 km (Canadian models)
since you last reset the Trip A or Trip
B.
You can customize the Trip A and
AVERAGE FUEL A reset condition
on the multi-information display (see
page 102).
Multi-Information Display84
Page 132 of 621

ᤳ1: If equipped
ᤳ2: To use the horn, press the center pad of the steering wheel.
ᤳ3: Refer to the navigation system manual. For how to operate
Bluetooth
®HandsFreeLink by voice, see page 383.
BLIND SPOT INFORMATION
SYSTEM (BSI) OFF BUTTON
ᤳ1
(P. 482)VEHICLE STABILITY
ASSIST SYSTEM
OFF BUTTON
(P. 474)
MIRROR CONTROLS
(P. 166)HEADLIGHT/TURN SIGNAL/
FRONT FOG LIGHTS
(P. 128)
STEERING WHEEL
ADJUSTMENTS (P. 134)CRUISE CONTROL BUTTONS (P. 345)/
ADAPTIVE CRUISE CONTROL (ACC)
BUTTONS
ᤳ1
(P. 353) STEERING WHEEL
AUDIO CONTROLS
(P. 305)WINDSHIELD
WIPERS/WASHERS
(P. 126)INSTRUMENT PANEL
BRIGHTNESS
(P. 133)
PASSENGER AIRBAG
OFF INDICATOR
(P. 37)
HAZARD WARNING
BUTTON
(P. 132)
REAR WINDOW
DEFOGGER
(P. 132)
ACCESSORY POWER
SOCKETS
(P. 177)
SEAT HEATER SWITCHES
(P. 157)/
SEAT HEATER AND SEAT
VENTILATION BUTTONS
ᤳ1
(P. 158)
ACTIVE DAMPER
SYSTEM BUTTON
ᤳ1
(P. 484) HORN
ᤳ2
BSI ALERT INDICATOR
ᤳ1
(P. 479)
COLLISION MITIGATION
BRAKING SYSTEM™(CMBS™)
OFF BUTTON
ᤳ1
(P. 467)
HEADLIGHT WASHER
BUTTON
ᤳ1
(P. 127)
DISTANCE
BUTTON
ᤳ1
(P. 357) PADDLE SHIFTERS
(P. 447)
BLUETOOTH
HANDSFREELINK
BUTTON (P. 365)VOICE CONTROL
BUTTONS
ᤳ3
Controls Near the Steering Wheel
125
Instruments and Controls
Page 136 of 621

When the light switch is in either of
these positions, the lights on
indicator comes on as a reminder.
This indicator stays on if you leave
the lights on and turn the ignition
switch to the ACCESSORY (I) or
LOCK (0) position.
High Beams-To switch from low
beams to high beams, push the left
lever forward until you hear a click.
The blue high beam indicator will
come on (see page 74). Pull it back to
return to low beams. To flash the
high beams, pull the lever back
lightly, then release it. The high
beams stay on as long as you hold
the lever back.AUTO-The automatic lighting
feature turns on the headlights and
all other exterior lights, when it
senses low ambient light.
To turn on automatic lighting, turn
the light switch to AUTO at any time.
The lights will come on automatically
when the outside light level becomes
low (at dusk, for example). The
lights on indicator comes on as a
reminder. The lights and indicator
will turn off automatically when the
system senses high ambient light.
The lights will remain on when you
turn off the ignition switch. They will
turn off automatically when you
remove the key and open the driver's
door. To turn them on again, either
turn the ignition switch to the ON
(II) position or turn the light switch
to the
position.Even with the automatic lighting
feature turned on, we recommend
that you turn on the lights manually
when driving at night or in a dense
fog, or when you enter dark areas
such as long tunnels or parking
facilities.
To change the‘‘AUTO LIGHT
SENSITIVITY’’setting, see page 113.
Do not leave the light switch in
AUTO if you will not be driving the
vehicle for an extended period (a
week or more). You should also turn
off the lights if you plan to leave the
engine idling or off for a long time.
CONTINUED
Turn Signal and Headlights
129
Instruments and Controls
Page 166 of 621

The ignition switch must be in the
ON (II) position to use the heaters
and the air ventilation system.
To use the heaters, press thebutton. The indicator (red) next to
the button will come on. There are
four settings in the heaters:
HI-Three indicators on.
MID-Two indicators on.
LO-One indicator on.
OFF-All indicators off.Pressing the
button while the
heater is running will switch the
system to the HI setting air
ventilation mode.
To ventilate the seat, press the
button. The indicator (blue) next to
the button will come on. The air
ventilation system has four settings:
HI-Three indicators on.
MID-Two indicators on.
LO-One indicator on.
OFF-All indicators off.
Pressing the
button while the air
ventilation is running will switch the
system to the HI setting heater
mode.Follow these precautions whenever
you use the seat heaters and the seat
ventilation:
•
If the engine is left idling for an
extended period, do not use the
seat heaters, even on the LO
setting. It can weaken the battery,
causing hard starting.
FRONT SEAT HEATER AND
SEAT VENTILATION
BUTTONS
INDICATOR
Seat Heaters and Seat Ventilation
159
Instruments and Controls
Page 188 of 621

The climate control system in your
vehicle provides a comfortable driving
environment in all weather conditions.
The standard audio system has many
features. This section describes those
features and how to use them.
Your vehicle has an anti-theft audio
system that requires a code number to
enable it.
The security system helps do
discourage vandalism and theft to your
vehicle.
Climate Control System
................
182
Rear Climate Controls
................
187
Audio System
...............................
192
Playing the AM/FM Radio (Models
without navigation system)
.......
193
Playing the XM
®Radio (Models
without navigation system)
.......
197
Playing Discs (Models without
navigation system)
...................
203Disc Changer Error Message
(Models without navigation
system)
................................
211
Audio System (Models with
navigation system)
...................
212
Playing the AM/FM Radio (Models
with navigation system)
............
213
Playing the XM
®Radio (Models
with navigation system)
............
226
Playing a Disc (Models with
navigation system)
...................
235
Disc Player Error Messages
(Models with navigation
system)
................................
246
Protecting Your Discs
...................
247
Playing Hard Disc Drive (HDD)
Audio (Models with navigation
system)
................................
250
Playing an iPod
®(Models with
navigation system)
...................
278
iPod
®Error Messages (Models
with navigation system)
............
286
Playing a USB Flash Memory
Device (Models with navigation
system)
................................
287USB Flash Memory Device Error
Messages (Models with
navigation system)
................
297
Bluetooth
®Audio System (Models
with navigation system)
............
298
AM/FM Radio Reception
..............
303
Remote Audio Controls
.................
305
Auxiliary Input Jack
......................
307
Radio Theft Protection
..................
308
Setting the Clock and Calendar
.....
309
Rear Entertainment System
...........
310
Security System
............................
341
Compass
......................................
342
Cruise Control
..............................
345
Adaptive Cruise Control (ACC)
.....
348
HomeLink
®Universal
Transceiver
..............................
363
Bluetooth
®HandsFreeLink
®
(Models without navigation
system)
................................
365
Bluetooth
®HandsFreeLink
®
(Models with navigation
system)
................................
383
AcuraLink
®(U.S. models only)
......
402
Rearview Mirror with Rearview
Camera Display
........................
417
Features
181
Features
Page 225 of 621

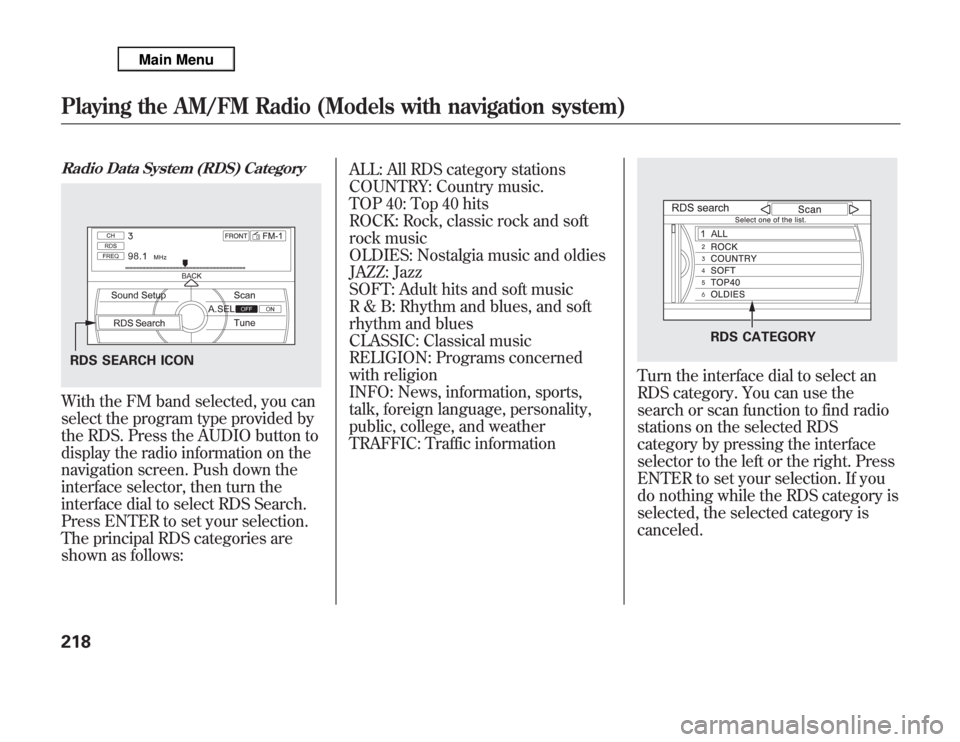
Radio Data System (RDS) CategoryWith the FM band selected, you can
select the program type provided by
the RDS. Press the AUDIO button to
display the radio information on the
navigation screen. Push down the
interface selector, then turn the
interface dial to select RDS Search.
Press ENTER to set your selection.
The principal RDS categories are
shown as follows:ALL: All RDS category stations
COUNTRY: Country music.
TOP 40: Top 40 hits
ROCK: Rock, classic rock and soft
rock music
OLDIES: Nostalgia music and oldies
JAZZ: Jazz
SOFT: Adult hits and soft music
R & B: Rhythm and blues, and soft
rhythm and blues
CLASSIC: Classical music
RELIGION: Programs concerned
with religion
INFO: News, information, sports,
talk, foreign language, personality,
public, college, and weather
TRAFFIC: Traffic information
Turn the interface dial to select an
RDS category. You can use the
search or scan function to find radio
stations on the selected RDS
category by pressing the interface
selector to the left or the right. Press
ENTER to set your selection. If you
do nothing while the RDS category is
selected, the selected category is
canceled.
RDS SEARCH ICON
RDS CATEGORY
Playing the AM/FM Radio (Models with navigation system)218
Page 231 of 621

CENTER-Adjusts the strength of
sound from the center speaker.
SUBWOOFER-To adjust the
strength of the sound from the
subwoofer speaker, select it and
press ENTER on the interface
selector. Turn the interface dial to
the desired level, and enter your
selection by pressing ENTER on the
interface selector.
Speed-sensitive Volume
Compensation (SVC)The SVC mode controls the volume
based on vehicle speed. The faster
you go, the louder the audio volume
becomes. As you slow down, the
audio volume decreases.
The SVC has four modes: OFF,
LOW, MID, and HIGH. To change
the SVC mode, select SVC, then
press ENTER on the interface
selector. The current setting is
shown on the screen. Turn the
interface dial to the desired level, and
enter your selection by pressing
ENTER on the interface selector. If
you feel the sound is too loud,
choose low. If you feel the sound is
too quiet, choose high.Dolby PL (ProLogic) II-Dolby
PL (ProLogic) II signal processing
creates multi-channel surround
sound from 2 channel stereo audio
sources. Dolby ProLogic II can only
be activated when listening to DISC
(CD-DA, MP3, WMA, AAC), XM
Radio, AUX (USB, iPod
®, AUX,
Bluetooth
®Audio), and HDD Audio.
When ProLogic II is available,‘‘PL II’’
is shown in the audio display.
When ProLogic II is not available in
the selected audio source,‘‘PL II N/
A’’is shown on the center display.
ProLogic ON/OFF settings are
independently controlled for DISC,
XM, HDD Audio, and AUX sources.
Playing the AM/FM Radio (Models with navigation system)224