Page 179 of 621
Courtesy LightsThe courtesy lights between the
front map lights come on when the
parking lights are turned on. To
adjust its brightness, press either of
the instrument panel brightness
control buttons (+or-) with the
ignition switch in the ON (II)
position.Tailgate Lights
The lights in the tailgate have an on-
off switch to control if the lights
come on when the tailgate is opened.
The tailgate lights do not come on
when any other doors are opened.Individual Interior Lights
The courtesy lights in all four doors
come on when you open any door.
The light around the ignition switch
comes on when any door is opened.
After you close the door, the ignition
switch light stays on for about 30
seconds regardless of the interior
light dimming time setting (see page
111).
COURTESY LIGHT
Interior Lights172
Page 203 of 621

Adjusting the Sound
Press the TUNE (SOUND) knob
repeatedly to display the BASS,
TREBLE, FADER, BALANCE,
SUBWOOFER, CENTER, and SVC
(speed-sensitive volume
compensation) settings.
BASS-Adjusts the bass.
TREBLE-Adjusts the treble.
FADER-Adjusts the front-to-back
strength of the sound.
BALANCE-Adjusts the side-to-
side strength of the sound.
SUBWOOFER-Adjusts the
strength of sound from the
subwoofer speaker.
CENTER-Adjusts the strength of
sound from the center speaker.SVC-Adjusts the volume level
based on the vehicle speed.
Each mode is shown in the display as
it changes. Turn the TUNE knob to
adjust the setting to your liking.
When the level reaches the center,
you will see‘‘C’’in the display.
The system will return to the audio
display about 5 seconds after you
stop adjusting a mode.
Speed-sensitive Volume
Compensation (SVC)The SVC mode controls the volume
based on vehicle speed. The faster
you go, the louder the audio volume
becomes. As you slow down, the
audio volume decreases.
The SVC has four modes: SVC OFF,
SVC LOW, SVC MID, and SVC
HIGH. Turn the TUNE knob to
adjust the setting to your liking. If
you feel the sound is too loud,
choose low. If you feel the sound is
too quiet, choose high.Audio System Lighting
You can use the instrument panel
brightness control buttons to adjust
the illumination of the audio system
(see page 133). The audio system
illuminates when the parking lights
are on, even if the radio is off.
Playing the AM/FM Radio (Models without navigation system)196
Page 348 of 621

The security system helps to protect
your vehicle and valuables from
theft. The horn sounds and a
combination of headlights, position
lights, side marker lights and
taillights flashes if someone attempts
to break into your vehicle or remove
the audio unit. This alarm continues
for two minutes, then the system
resets. To deactivate the system
before the two minutes have elapsed,
unlock the driver's door with the key
or the remote transmitter.
The security system automatically
sets 15 seconds after you lock the
doors, hood, and tailgate. For the
system to activate, you must lock the
doors from the outside with the key,
or use driver's lock tab, door lock
master switch, or remote transmitter.
The security system indicator on the
instrument panel starts blinking
immediately to show you the system
is setting itself.
Once the security system sets,
opening any door, tailgate, or hood
without using the key or the remote
transmitter, will cause the alarm to
activate. It also activates if the
ignition switch is turned to the ON
(II) position, the audio unit is
removed from the dashboard or the
wiring is cut.The security system does not set if
any door, the tailgate, or hood is not
fully closed. Before you leave the
vehicle, make sure the doors, tailgate
and hood are securely closed.
To see if the system sets after you
exit the vehicle, press the LOCK
button on the remote transmitter
within five seconds. If the system is
set, the horn will beep once.
Do not attempt to alter this system or
add other devices to it.
SECURITY SYSTEM INDICATOR
Security System
341
Features
Page 438 of 621

Modifying your vehicle, or installing
non-Acura accessories, may make
your vehicle unsafe. Before you
make any modifications or add any
accessories, be sure to read the
following information.
Accessories
Your dealer has Acura accessories
that allow you to personalize your
vehicle. These accessories have been
designed and approved for your
vehicle, and are covered by warranty.
Although non-Acura accessories may
fit on your vehicle, they may not
meet factory specifications, and could
adversely affect your vehicle's
handling, stability, and reliability.
Improper accessories or
modifications can affect your
vehicle's handling, stability, and
performance, and cause a
crash in which you can be hurt
or killed.
Follow all instructions in this
owner's manual regarding
accessories and modifications.
When properly installed, cellular
phones, alarms, two-way radios, and
low-powered audio systems should
not interfere with your vehicle's
computer controlled systems, such
as your airbags, anti-lock brakes, and
tire pressure monitoring system.Before installing any accessory:
●
Make sure the accessory does not
obscure any lights, or interfere
with proper vehicle operation or
performance.
●
Be sure electronic accessories do
not overload electrical circuits (see
page 566) or interfere with proper
operation of your vehicle.
●
Do not install accessories on the
side pillars or across the rear
windows. Accessories installed in
these areas may interfere with
proper operation of the side
curtain airbags.
●
Before installing any electronic
accessory, have the installer
contact your dealer for assistance.
If possible, have your dealer
inspect the final installation.
CONTINUED
Accessories and Modifications
431
Before Driving
Page 448 of 621
You should do the following checks
and adjustments before you drive
your vehicle.
1. Make sure all windows, mirrors,
and outside lights are clean and
unobstructed. Remove frost, snow,
or ice.
2. Check that the hood is fully
closed.
3. Visually check the tires. If a tire
looks low, use a gauge to check its
pressure.
4. Check that any items you may be
carrying are stored properly or
fastened down securely.
5. Check the seat adjustment (see
page 149).6. Check the adjustment of the inside
and outside mirrors (see page
165).
7. Check the steering wheel
adjustment (see page 134).
8. Make sure the doors and tailgate
are securely closed and locked.
9. Fasten your seat belt. Check that
your passengers have fastened
their seat belts (see page 16).10. When you start the engine, check
the gauges and indicators in the
instrument panel, and the
messages on the multi-information
display (see pages 67, 78 and 87).
Preparing to Drive
441
Driving
Page 461 of 621

Always use the parking brake when
you park your vehicle. Make sure the
parking brake is set firmly, or your
vehicle may roll if it is parked on an
incline.
Set the parking brake before you put
the transmission in Park. This keeps
the vehicle from moving and putting
pressure on the parking mechanism
in the transmission.Parking Tips
●
Make sure the moonroof and the
windows are closed.
●
Turn off the lights.
●
Place any packages, valuables, etc.
in the cargo area or take them with
you.
●
Lock the doors and the tailgate.
●
Never park over dry leaves, tall
grass, or other flammable
materials. The hot three way
catalytic converter could cause
these materials to catch on fire.
●
If the vehicle is facing uphill, turn
the front wheels away from the
curb.
●
If the vehicle is facing downhill,
turn the front wheels toward the
curb.
●
Check the indicator on the
instrument panel to verify that the
security system is set.
●
Make sure the parking brake is
fully released before driving away.
Driving with the parking brake
partially set can overheat or
damage the rear brakes.
Parking454
Page 467 of 621

As required by the FCC:
This device complies with Part 15 of the
FCC rules. Operation is subject to the
following two conditions: (1) This device
may not cause harmful interference, and
(2) this device must accept any
interference received, including
interference that may cause undesired
operation.
Changes or modifications not expressly
approved by the party responsible for
compliance could void the user's
authority to operate the equipment.
This device complies with Industry
Canada Standard RSS-210.
Operation is subject to the following two
conditions: (1) this device may not cause
interference, and (2) this device must
accept any interference that may cause
undesired operation of the device.
Braking System
Your vehicle is equipped with disc
brakes at all four wheels. A power
assist helps reduce the effort needed
on the brake pedal. The emergency
brake assist system increases the
stopping force when you depress the
brake pedal hard in an emergency
situation. The anti-lock brake system
(ABS) helps you retain steering
control when braking very hard.
Resting your foot on the pedal keeps
the brakes applied lightly, builds up
heat, and reduces their effectiveness
and reduces brake pad life. In
addition, fuel economy can be
reduced. It also keeps your brake
lights on all the time, confusing
drivers behind you.Constant application of the brakes
when going down a long hill builds
up heat and reduces their
effectiveness. Use the engine to
assist the brakes by taking your foot
off the accelerator and downshifting
to a lower gear.
Check the brakes after driving
through deep water. Apply the
brakes moderately to see if they feel
normal. If not, apply them gently and
frequently until they do. Be extra
cautious in your driving.
Tire Pressure Monitoring System (TPMS), Braking System460
Page 502 of 621

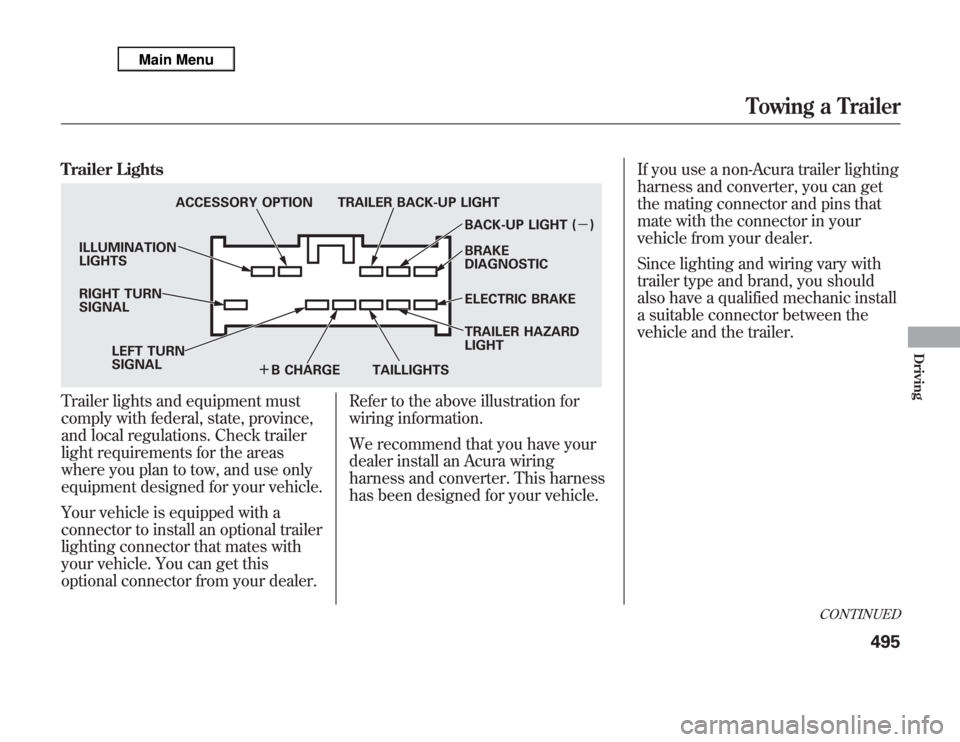
Trailer LightsTrailer lights and equipment must
comply with federal, state, province,
and local regulations. Check trailer
light requirements for the areas
where you plan to tow, and use only
equipment designed for your vehicle.
Your vehicle is equipped with a
connector to install an optional trailer
lighting connector that mates with
your vehicle. You can get this
optional connector from your dealer.Refer to the above illustration for
wiring information.
We recommend that you have your
dealer install an Acura wiring
harness and converter. This harness
has been designed for your vehicle.If you use a non-Acura trailer lighting
harness and converter, you can get
the mating connector and pins that
mate with the connector in your
vehicle from your dealer.
Since lighting and wiring vary with
trailer type and brand, you should
also have a qualified mechanic install
a suitable connector between the
vehicle and the trailer.
ACCESSORY OPTION TRAILER BACK-UP LIGHT
BACK-UP LIGHT (ᤱ)
BRAKE
DIAGNOSTIC
ELECTRIC BRAKE
TRAILER HAZARD
LIGHT
TAILLIGHTS
ᤉB CHARGE LEFT TURN
SIGNAL RIGHT TURN
SIGNAL ILLUMINATION
LIGHTS
CONTINUED
Towing a Trailer
495
Driving