Page 144 of 621
Retractable Master KeyThe master key can be retracted into
the remote transmitter. To use the
key, push the release button to
release the key from the transmitter.
The key should be fully extended. To
retract the key, push the release
button and at the same time push the
key into the remote transmitter until
it is securely latched.Always use the fully-extended key
when you insert it to the ignition
switch. If the key does not fully
extend, the immobilizer system may
not operate properly and may
prevent the engine from starting.The key may come in contact with
your finger while being retracted or
extended. Make sure your fingers do
not touch the pivot of the key when
retracting or extending the key.
RELEASE BUTTON
Push
Keys and Locks
137
Instruments and Controls
Page 145 of 621

The Immobilizer System protects
your vehicle from theft. If an
improperly coded key (or other
device) is used, the engine's fuel
system is disabled.
When you turn the ignition switch to
the ON (II) position, the immobilizer
system indicator should come on
briefly, then go off. If the indicator
starts to blink, it means the system
does not recognize the coding of the
key. Turn the ignition switch to the
LOCK (0) position, remove the key,
reinsert it, and turn the ignition
switch to the ON (II) position again.
The system may not recognize your
key's coding if another immobilizer
key or other metal object (i.e. key
chain) is near the ignition switch
when you insert the key.If the system repeatedly does not
recognize the coding of your key,
contact your dealer.
Do not attempt to alter this system or
add other devices to it. Electrical
problems could result that may make
your vehicle inoperable.
If you have lost your key and you
cannot start the engine, contact your
dealer.
Always take the ignition key with you
whenever you leave the vehicle alone.
As required by the FCC:
This device complies with Part 15 of the
FCC rules. Operation is subject to the
following two conditions: (1) This device
may not cause harmful interference, and
(2) this device must accept any
interference received, including
interference that may cause undesired
operation.
Changes or modifications not expressly
approved by the party responsible for
compliance could void the user's
authority to operate the equipment.
This device complies with Industry
Canada Standard RSS-210.
Operation is subject to the following two
conditions: (1) this device may not cause
interference, and (2) this device must
accept any interference that may cause
undesired operation of the device.
Immobilizer System138
Page 146 of 621

The ignition switch has four positions:
LOCK (0), ACCESSORY (I), ON (II),
and START (III).
LOCK (0)-You can insert or remove
the key only in this position. To turn
the key to the LOCK (0) position, the
shift lever must be in Park, and you
must push the key in slightly.
If the front wheels are turned, the anti-
theft lock may make it difficult to turn
the key. Firmly turn the steering wheel
to the left or right as you turn the key.
ACCESSORY (I)-You can operate
the audio system and the accessory
power sockets in this position.
ON (II)-This is the normal key
position when driving. Several of the
indicators on the instrument panel
come on as a test when you turn the
ignition switch from the
ACCESSORY (I) to the ON (II)
position.
START (III)-Use this position
only to start the engine. The switch
returns to the ON (II) position when
you let go of the key.You will hear a reminder beeper if
you leave the key in the ignition
switch in the LOCK (0) or the
ACCESSORY (I) position and open
the driver's door. Remove the key to
turn off the beeper.
The shift lever must be in Park
before you can remove the key from
the ignition switch.
Ignition Switch
139
Instruments and Controls
Page 165 of 621

Heat induced burns are
possible when using seat
heaters.
Persons with a diminished
ability to sense temperature (e.
g., persons with diabetes,
lower-limb nerve damage, or
paralysis) or with sensitive skin
should not use seat heaters.
In the HI setting, the heater turns off
when the seat gets warm, and turns
back on after the seat's temperature
drops.
In the LO setting, the heater runs
continuously. It does not cycle with
temperature changes.
Follow these precautions when using
the seat heaters:
●
Do not use the seat heater in the
HI setting for an extended period,
because it draws large amounts of
current from the battery.
●
If the engine is left idling for an
extended period, do not use the
seat heaters even on the LO
setting. It can weaken the battery,
causing hard starting.Seat Heaters and Seat Ventilation
If equippedBoth front seats are equipped with
seat heaters and an air ventilation
system. The passenger seat only has
heaters in the seat bottom because of
the side airbag system.Passenger's
seat
HEATERSDriver's
seat VENTS
Seat Heaters, Seat Heaters and Seat Ventilation158
Page 166 of 621

The ignition switch must be in the
ON (II) position to use the heaters
and the air ventilation system.
To use the heaters, press thebutton. The indicator (red) next to
the button will come on. There are
four settings in the heaters:
HI-Three indicators on.
MID-Two indicators on.
LO-One indicator on.
OFF-All indicators off.Pressing the
button while the
heater is running will switch the
system to the HI setting air
ventilation mode.
To ventilate the seat, press the
button. The indicator (blue) next to
the button will come on. The air
ventilation system has four settings:
HI-Three indicators on.
MID-Two indicators on.
LO-One indicator on.
OFF-All indicators off.
Pressing the
button while the air
ventilation is running will switch the
system to the HI setting heater
mode.Follow these precautions whenever
you use the seat heaters and the seat
ventilation:
•
If the engine is left idling for an
extended period, do not use the
seat heaters, even on the LO
setting. It can weaken the battery,
causing hard starting.
FRONT SEAT HEATER AND
SEAT VENTILATION
BUTTONS
INDICATOR
Seat Heaters and Seat Ventilation
159
Instruments and Controls
Page 168 of 621

AUTO REVERSE-If either front
window senses any obstacle while it
is closing automatically, it will
reverse direction and then stop. To
close the window, remove the
obstacle, then use the window switch
again.
Auto reverse stops sensing when the
window is almost closed. You should
always check that all passengers and
objects are away from the window
before closing it.If your vehicle's battery is
disconnected or goes dead, or the
driver's window fuse is removed, the
AUTO function may be disabled. If
the AUTO function is disabled, the
power window system will need to be
reset after reconnecting the battery
or installing the fuse.
1. Start the engine. Push down and
hold the driver's window switch
until the window is fully open.
2. Pull and hold the driver's window
switch to close the window
completely, then hold the switch
for about 2 seconds.
If the power windows do not operate
properly after resetting, have your
vehicle checked by your dealer.Opening the Windows and
Moonroof with the Remote
Transmitter
You can open all of the windows and
the moonroof from outside with the
remote transmitter.
1. Press the UNLOCK button once to
unlock the driver's door.
2. Press the UNLOCK button a
second time, and hold it. All the
doors unlock, and all four windows
and moonroof start to open. To
stop the windows and moonroof,
release the button.
3. To open the windows and
moonroof further, press the button
again (within 10 seconds of step 1)
and hold it. If the windows and the
moonroof stop before the desired
position, repeat steps 1 and 2.
You cannot close the windows or the
moonroof with the remote
transmitter.
CONTINUED
Power Windows
161
Instruments and Controls
Page 185 of 621
Each socket is intended to supply
power for 12 volt DC accessories that
are rated 120 watts or less (10 amps).
None of the sockets will power an
automotive type cigarette lighter
element.AC Power Outlet
On models with rear entertainment
systemThere is a 115 volt AC power outlet
inside the front console
compartment. To use the AC power
outlet, open the lids and open the
outlet cover. Insert the plug into the
receptacle slightly, turn it 90°
clockwise, then push in the plug all
the way.Always run the engine when you use
the AC power outlet.
The maximum capacity for this
power outlet is 115 volt AC at 100
watts or less. If you use an appliance
which requires more than 100 watts,
it automatically stops supplying the
power. If this happens, turn the
ignition switch off and turn it on
again.
Interior Convenience Items178
Page 260 of 621

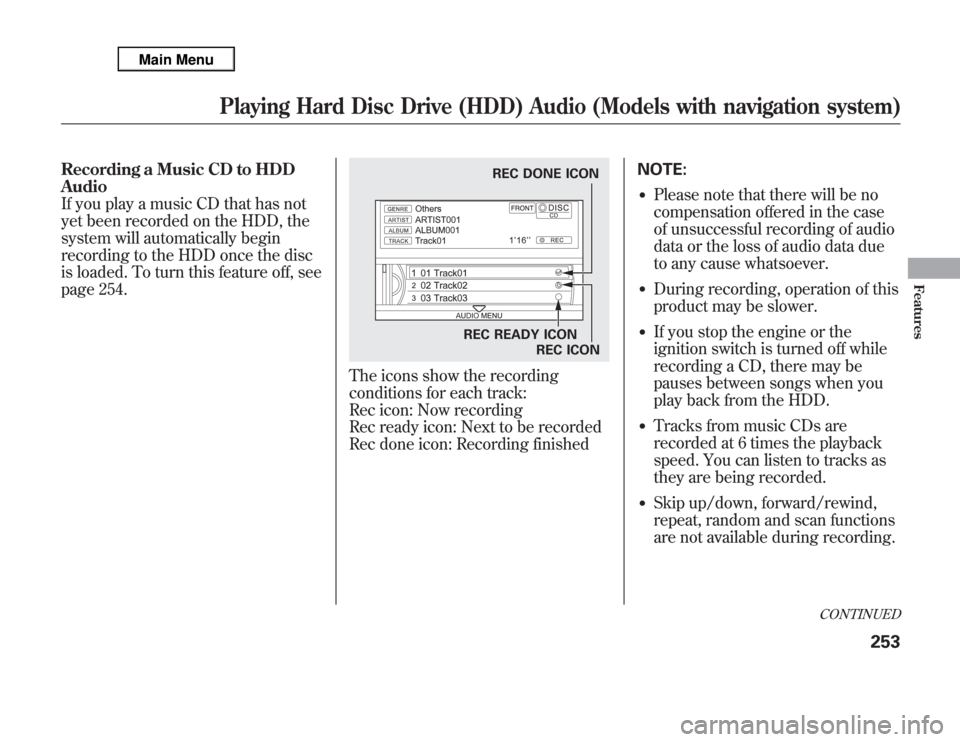
Recording a Music CD to HDD
Audio
If you play a music CD that has not
yet been recorded on the HDD, the
system will automatically begin
recording to the HDD once the disc
is loaded. To turn this feature off, see
page 254.
The icons show the recording
conditions for each track:
Rec icon: Now recording
Rec ready icon: Next to be recorded
Rec done icon: Recording finishedNOTE:
●
Please note that there will be no
compensation offered in the case
of unsuccessful recording of audio
data or the loss of audio data due
to any cause whatsoever.
●
During recording, operation of this
product may be slower.
●
If you stop the engine or the
ignition switch is turned off while
recording a CD, there may be
pauses between songs when you
play back from the HDD.
●
Tracks from music CDs are
recorded at 6 times the playback
speed. You can listen to tracks as
they are being recorded.
●
Skip up/down, forward/rewind,
repeat, random and scan functions
are not available during recording.
REC DONE ICON
REC READY ICON
REC ICON
CONTINUED
Playing Hard Disc Drive (HDD) Audio (Models with navigation system)
253
Features