Page 36 of 140
4-11
4RES
This indicates reserve. With the fuel cock lever in
this position, the fuel reserve is made available.
Turn the fuel cock lever to this position if you run
out of fuel while riding. When this occurs, refuel as
soon as possible and be sure to turn the fuel cock
lever back to “ON”!
EBU18850Starter (choke)“” Starting a cold engine requires a richer air-fuel mix-
ture, which is supplied by the starter (choke).
Move the starter (choke) in direction (a) to turn on
the starter (choke).Move the starter (choke) in direction (b) to turn off
the starter (choke).
See the “Starting a cold engine” section on page
6-1 for proper operation.
EBU18881Seat To remove the seat
Pull the seat lock lever upward and pull up the seat
at the rear.
1. Arrow mark positioned over “RES”
1. Starter (choke)“”
U1P066E0.book Page 11 Thursday, August 5, 2010 4:15 PM
Page 41 of 140

5-1
5
EBU19201
PRE-OPERATION CHECKS
EBU19224Inspect your vehicle each time you use it to make sure the vehicle is in safe operating condition. Always
follow the inspection and maintenance procedures and schedules described in the Owner’s Manual.
WARNING
EWB00481Failure to inspect or maintain the vehicle properly increases the possibility of an accident or equip-
ment damage. Do not operate the vehicle if you find any problem. If a problem cannot be corrected
by the procedures provided in this manual, have the vehicle inspected by a Yamaha dealer.Before using this vehicle, check the following points:
ITEM ROUTINE PAGE
FuelCheck fuel level in fuel tank, and add recommended fuel if neces-
sary.
Check fuel line for leakage. Correct if necessary.4-8, 5-3
Engine oilCheck oil level in engine, and add recommended oil to specified lev-
el if necessary.
Check ATV for oil leakage. Correct if necessary.5-3, 8-11
Final gear oilCheck ATV for oil leakage. Correct if necessary. 5-3, 8-18
Front brakeCheck operation. If soft or spongy, have Yamaha dealer bleed hy-
draulic system.
Check brake pads for wear, and replace if necessary.
Check brake fluid level in reservoir, and add recommended brake
fluid to specified level if necessary.
Check hydraulic system for leakage. Correct if necessary.5-3, 8-28, 8-29, 8-30
U1P066E0.book Page 1 Thursday, August 5, 2010 4:15 PM
Page 43 of 140

5-3
5
EBU19541Fuel Make sure that there is sufficient fuel in the tank.
(See page 4-8.)EBU19560Engine oil Make sure that the engine oil is at the specified lev-
el. Add oil as necessary. (See page 8-11.)EBU19590Final gear oil Make sure that the final gear oil is at the specified
level. Add oil as necessary. (See page 8-18.)EBU27671Front and rear brakes Brake levers and brake pedal�Check that there is no free play in the front brake
lever. If there is free play, have a Yamaha dealer
check the brake system.�Check for correct free play in the rear brake lever
and brake pedal. If the free play is incorrect, ad-
just it. (See page 8-31.)
�Check operation of the levers and pedal. They
should move smoothly and there should be a
firm feeling when the brake is applied. If not,
have a Yamaha dealer check them.
Brake fluid level (front brake)
Check the brake fluid level. Add fluid if necessary.
(See page 8-29.)
Brake fluid leakage (front brake)
Check to see if any brake fluid is leaking out of the
hose, joint or brake fluid reservoir of the front
brake. Apply the brake firmly for one minute. If the
lever moves slowly inward, there may be a leak in
the brake system. If there is any leakage, the brake
system should be checked by a Yamaha dealer.
Brake operation
Test the brakes at slow speed after starting out to
make sure they are working properly. If the brakes
do not provide proper braking performance, check
the brake pads and shoes for wear. (See page
8-28.)Recommended brake fluid:
DOT 4
U1P066E0.book Page 3 Thursday, August 5, 2010 4:15 PM
Page 47 of 140
6-1
6
EBU19881
OPERATION
EBU19901Read the Owner’s Manual carefully before riding
the ATV. If there is a control or function you do not
understand, ask your Yamaha dealer.
WARNING
EWB00631Read the Owner’s Manual carefully to become
familiar with all controls in order to help pre-
vent any loss of control, which could cause an
accident or injury.EBU19994Starting a cold engine NOTICEECB00150See the “Engine break-in” section on page 6-6
prior to operating the engine for the first time.1. Set the parking brake.
2. Turn the fuel cock to “ON”.
3. Turn the key to “ON” and the engine stop
switch to“”.4. Shift the transmission into neutral. The neutral
indicator light should come on. If the indicator
light does not come on, have a Yamaha deal-
er check the electrical circuit.
TIPThe engine can be started under the following con-
ditions:�The transmission is in neutral.�The rear brake lever is applied with the transmis-
sion in any gear. However, it is recommended to
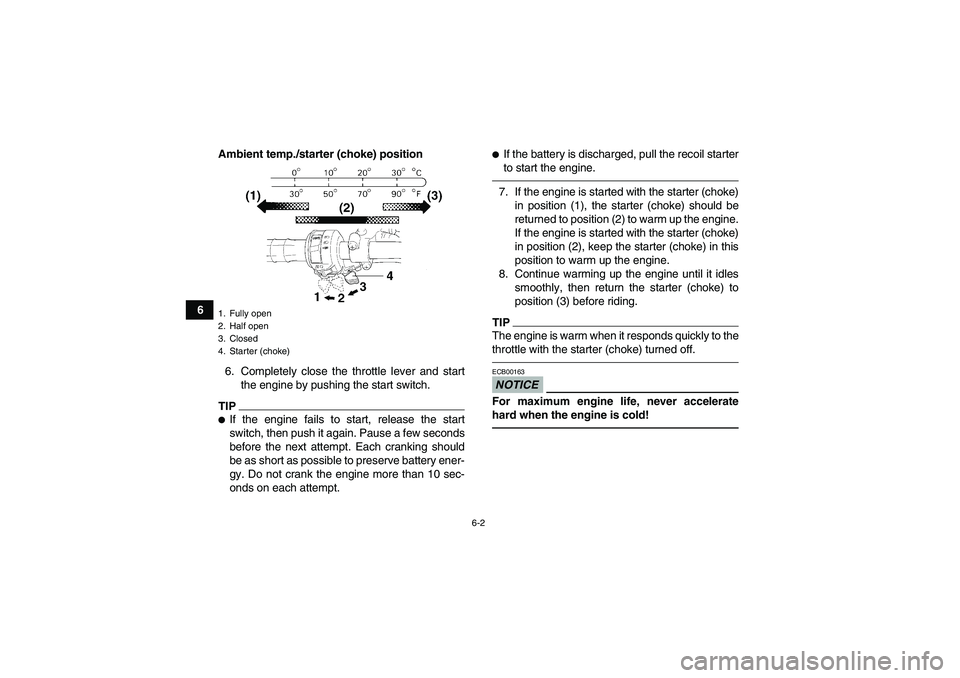
shift into neutral before starting the engine.5. Use the starter (choke) in reference to the fig-
ure:
Position (1):
Cold engine start with ambient temperature
below 5 °C (40 °F).
Position (2):
Cold engine start with ambient temperature
between 0 °C (30 °F) and 30 °C (90 °F).
Position (3):
Cold engine start with ambient temperature
above 25 °C (80 °F).
U1P066E0.book Page 1 Thursday, August 5, 2010 4:15 PM
Page 48 of 140
6-2
6Ambient temp./starter (choke) position
6. Completely close the throttle lever and start
the engine by pushing the start switch.
TIP�If the engine fails to start, release the start
switch, then push it again. Pause a few seconds
before the next attempt. Each cranking should
be as short as possible to preserve battery ener-
gy. Do not crank the engine more than 10 sec-
onds on each attempt.
�If the battery is discharged, pull the recoil starter
to start the engine.7. If the engine is started with the starter (choke)
in position (1), the starter (choke) should be
returned to position (2) to warm up the engine.
If the engine is started with the starter (choke)
in position (2), keep the starter (choke) in this
position to warm up the engine.
8. Continue warming up the engine until it idles
smoothly, then return the starter (choke) to
position (3) before riding.TIPThe engine is warm when it responds quickly to the
throttle with the starter (choke) turned off.NOTICEECB00163For maximum engine life, never accelerate
hard when the engine is cold!
1. Fully open
2. Half open
3. Closed
4. Starter (choke)U1P066E0.book Page 2 Thursday, August 5, 2010 4:15 PM
Page 49 of 140
6-3
6
EBU20291Starting a warm engine Follow the same procedure as for starting a cold
engine, with the exception that the starter (choke)
is not required when the engine is warm. Instead,
start the engine with the throttle slightly open.EBU20321Operating the drive select lever and
driving in reverse NOTICEECB00170Before shifting, stop the ATV, otherwise the
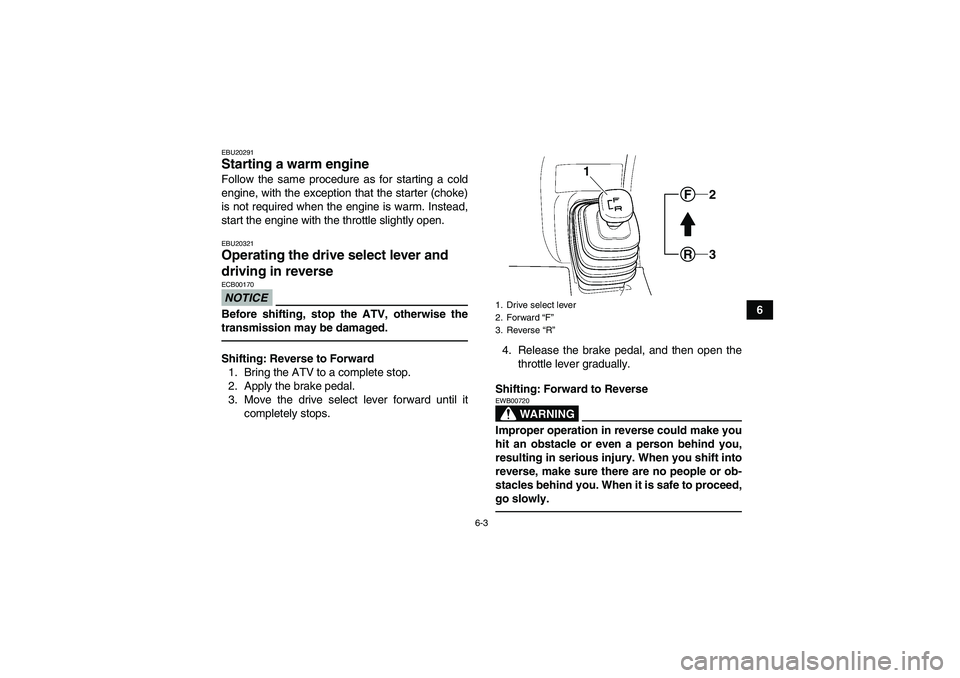
transmission may be damaged.Shifting: Reverse to Forward
1. Bring the ATV to a complete stop.
2. Apply the brake pedal.
3. Move the drive select lever forward until it
completely stops.4. Release the brake pedal, and then open the
throttle lever gradually.
Shifting: Forward to Reverse
WARNING
EWB00720Improper operation in reverse could make you
hit an obstacle or even a person behind you,
resulting in serious injury. When you shift into
reverse, make sure there are no people or ob-
stacles behind you. When it is safe to proceed,
go slowly.1. Drive select lever
2. Forward “F”
3. Reverse “R”
F
R
2
3
1
U1P066E0.book Page 3 Thursday, August 5, 2010 4:15 PM
Page 51 of 140
6-5
6
EBU20611To start out and accelerate
1. Release the throttle lever.NOTICEECB00200Always close the throttle before shifting gears,
otherwise damage to the engine and drive train
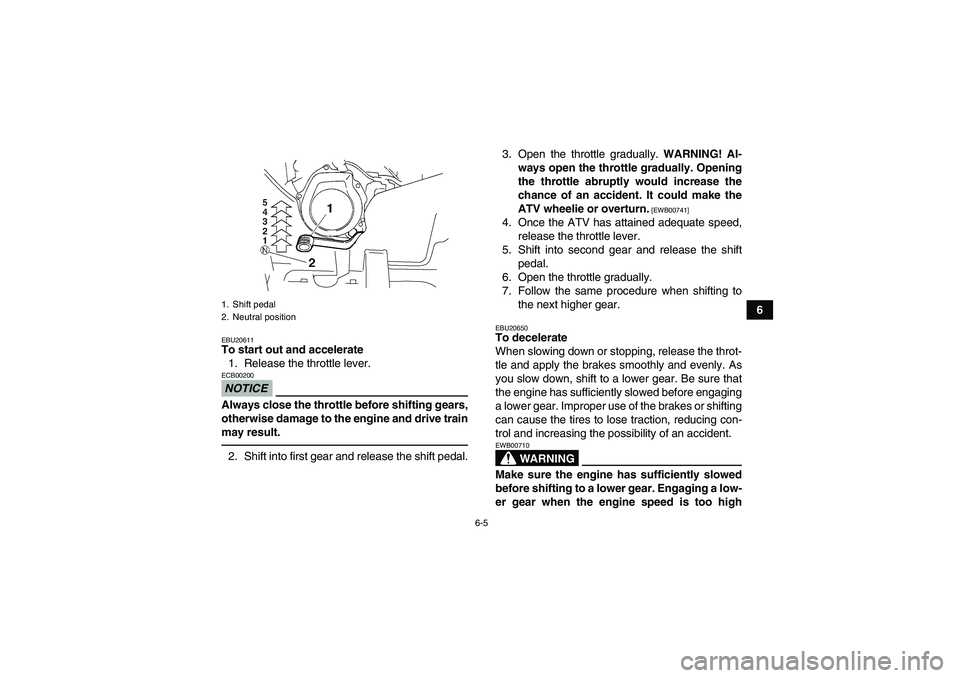
may result.2. Shift into first gear and release the shift pedal.3. Open the throttle gradually. WARNING! Al-
ways open the throttle gradually. Opening
the throttle abruptly would increase the
chance of an accident. It could make the
ATV wheelie or overturn.
[EWB00741]
4. Once the ATV has attained adequate speed,
release the throttle lever.
5. Shift into second gear and release the shift
pedal.
6. Open the throttle gradually.
7. Follow the same procedure when shifting to
the next higher gear.EBU20650To decelerate
When slowing down or stopping, release the throt-
tle and apply the brakes smoothly and evenly. As
you slow down, shift to a lower gear. Be sure that
the engine has sufficiently slowed before engaging
a lower gear. Improper use of the brakes or shifting
can cause the tires to lose traction, reducing con-
trol and increasing the possibility of an accident.
WARNING
EWB00710Make sure the engine has sufficiently slowed
before shifting to a lower gear. Engaging a low-
er gear when the engine speed is too high
1. Shift pedal
2. Neutral positionU1P066E0.book Page 5 Thursday, August 5, 2010 4:15 PM
Page 52 of 140
6-6
6could make the wheels stop rotating and lose
traction. This could cause loss of control, an
accident and injury. It could also cause engine
or drive train damage.
NOTICEECB00190Even with the transmission in the neutral posi-
tion, do not coast for long periods of time with
the engine off, and do not tow the ATV for long
distances. The transmission is properly lubri-
cated only when the engine is running. Inade-
quate lubrication may damage the
transmission.EBU20672Engine break-in TIP�For ATVs equipped with an odometer or an hour
meter, follow the figures given in km (mi) or the
figures given in hours.�For ATVs not equipped with an odometer or
hour meter, follow the figures given in hours.
There is never a more important period in the life of
your engine than the first 320 km (200 mi) or 20
hours of riding. For this reason, you should read
the following material carefully.
Since the engine is brand new, do not put an ex-
cessive load on it for the first 320 km (200 mi) or 20
hours. The various parts in the engine wear and
polish themselves to the correct operating clear-
ances. During this period, prolonged full-throttle
operation or any condition that might result in en-
gine overheating must be avoided.
0–160 km (0–100 mi) or 0–10 hours
Avoid prolonged operation above 1/2 throttle. Vary
the speed of the ATV regularly. Do not operate it at
one set throttle position.
160–320 km (100–200 mi) or 10–20 hours
Avoid prolonged operation above 3/4 throttle. Rev
the engine through the gears freely, but do not use
full throttle at any time.
320 km (200 mi) or 20 hours and beyond
The ATV can now be operated normally.
U1P066E0.book Page 6 Thursday, August 5, 2010 4:15 PM