Page 87 of 148
8-9
1
2
3
4
5
6
78
9
10
11
EBU28321
Checking the spark plugs
The spark plugs are important engine compo-
nents, which are easy to check. Since heat and de-
posits will cause any spark plug to slowly erode,
the spark plugs should be removed and checked in
accordance with the periodic maintenance and lu-
brication chart. In addition, the condition of the
spark plugs can reveal the condition of the engine.
To remove a spark plug
1. Remove the spark plug cap.
2. Remove the spark plug as shown, with thespark plug wrench included in the owner’s tool
kit.
To check the spark plugs
1. Check that the porcelain insulator around the
center electrode of each spark plug is a medi-
um-to-light tan (the ideal color when the ATV
is ridden normally).
2. Check that all spark plugs installed in the en-
gine have the same color.TIP
If any spark plug shows a distinctly different color,
the engine could be operating improperly. Do not
1. Spark plug cap
1
1. Spark plug wrench
1
Page 100 of 148
8-22
1
2
3
4
5
6
78
9
10
11
40 hours. It should be cleaned and lubricated more
often if the ATV is operated in extremely dusty ar-
eas. Each time the air filter element maintenance
is performed, check the air inlet of the air filter case
for obstructions. Check the air filter case rubber
joint to the carburetor fittings and the rubber joint
manifold fittings for an air-tight seal. Tighten all fit-
tings securely to avoid the possibility of unfiltered
air entering the engine.
EBU28311
Cleaning the spark arrester
Be sure the exhaust pipe and muffler are cool be-
fore cleaning the spark arrester.
1. Remove the screws.2. Remove the tailpipe by pulling it out of the
muffler.
3. Tap the tailpipe lightly, and then use a wire
brush to remove any carbon deposits from the
spark arrester portion of the tailpipe and inside
of the tailpipe housing.
1. Screw
1
Page 110 of 148

8-32
1
2
3
4
5
6
78
9
10
11
5. Move the throttle lever a few times and re-
check the position.
6. Install the fuel tank, side cover, radiator cover
and air filter case cover.
7. Connect the fuel hose to the fuel cock.
8. Install the seat.
EBU24020
Adjusting the engine idling speed
The engine idling speed must be checked and, if
necessary, adjusted as follows at the intervals
specified in the periodic maintenance and lubrica-tion chart.
TIP
�
A diagnostic tachometer is needed to make this
adjustment.
�
The carburetor synchronization and the throttle
cable free play must be checked, and adjusted if
necessary, before adjusting the engine idling
speed.
1. Start the engine and warm it up.
TIP
The engine is warm when it quickly responds to the
throttle.
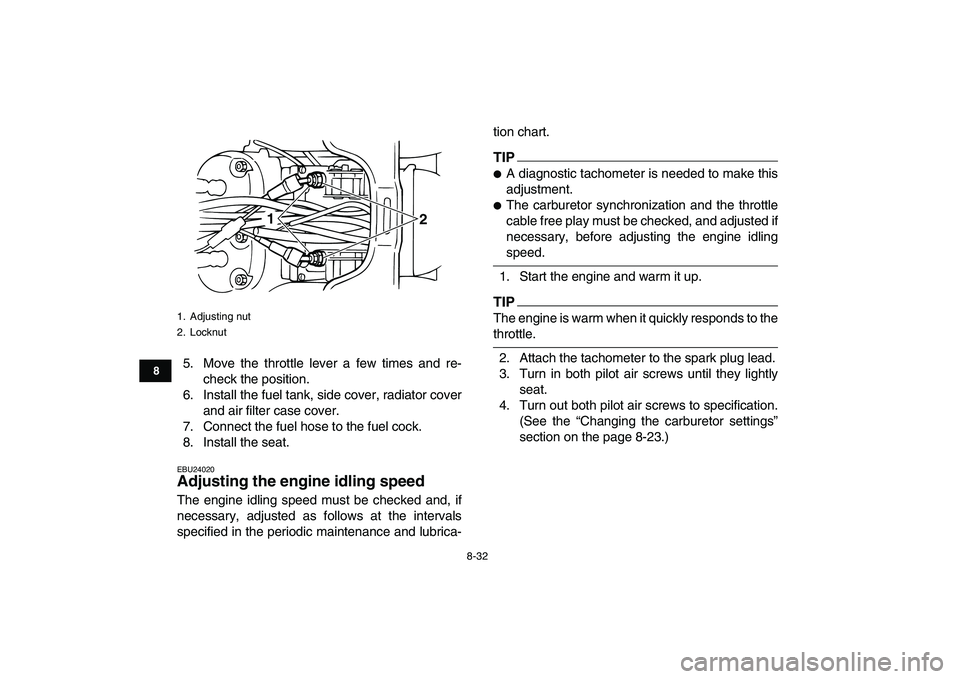
2. Attach the tachometer to the spark plug lead.
3. Turn in both pilot air screws until they lightly
seat.
4. Turn out both pilot air screws to specification.
(See the “Changing the carburetor settings”
section on the page 8-23.)
1. Adjusting nut
2. Locknut
1
2
Page 119 of 148

8-41
1
2
3
4
5
6
78
9
10
11
1/8 turn and tighten its locknut to the specified
torque.
NOTICE:
When tightening the lock-
nut, hold the adjusting bolt with a wrench
so that it does not turn together with the
locknut.
[ECB00521]
WARNING
EWB02090
Operating with improperly serviced or adjust-
ed brakes could cause the brakes to malfunc-
tion, resulting in reduced braking
performance. This could increase the chance
of a collision or accident. After adjusting the
parking brake free play, block the rear of the
ATV off the ground and spin the rear wheels.
Check to make sure there is no brake drag. If
brake drag is noticed, perform the adjustment
again.
EBU24742
Brake light switches
The brake light, which is activated by the brake
pedal and brake lever, should come on just beforebraking takes effect.
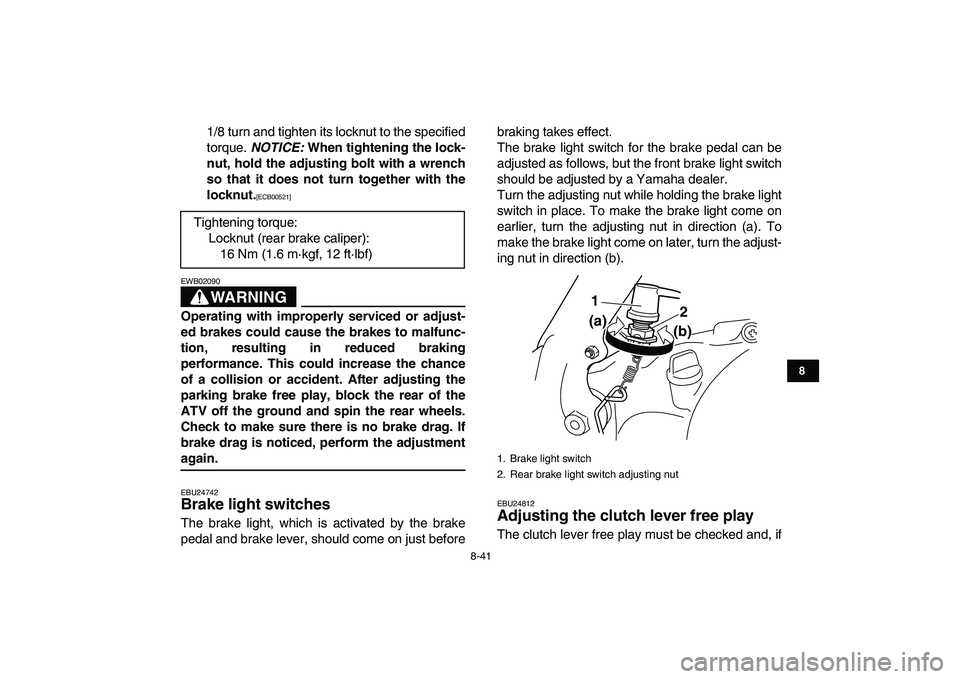
The brake light switch for the brake pedal can be
adjusted as follows, but the front brake light switch
should be adjusted by a Yamaha dealer.
Turn the adjusting nut while holding the brake light
switch in place. To make the brake light come on
earlier, turn the adjusting nut in direction (a). To
make the brake light come on later, turn the adjust-
ing nut in direction (b).
EBU24812
Adjusting the clutch lever free play
The clutch lever free play must be checked and, if Tightening torque:
Locknut (rear brake caliper):
16 Nm (1.6 m·kgf, 12 ft·lbf)
1. Brake light switch
2. Rear brake light switch adjusting nut
1
2
(a)
(b)
Page 127 of 148
8-49
1
2
3
4
5
6
78
9
10
11
Right side
EBU26882
Replacing a headlight bulb
If a headlight bulb burns out, replace it as follows.
1. Remove the headlight unit by removing the
screw.2. Remove the headlight bulb holder cover.
1. Grease nipple
1
1. Screw
1
Page 128 of 148
8-50
1
2
3
4
5
6
78
9
10
11
3. Remove the bulb holder by turning it counter-
clockwise.4. Remove the burnt-out bulb.
5. Place a new bulb into position, and then install
the bulb holder by turning it clockwise.
NOTICE:
Do not touch the glass part of the
headlight bulb to keep it free from oil, oth-
erwise the transparency of the glass, the
luminosity of the bulb, and the bulb life will
be adversely affected. Thoroughly clean
off any dirt and fingerprints on the head-
light bulb using a cloth moistened with al-
cohol or thinner.
[ECB00651]
1. Headlight bulb holder cover
1
1. Headlight bulb holder
1
Page 129 of 148
8-51
1
2
3
4
5
6
78
9
10
11
6. Install the bulb holder cover.
NOTICE:
Make
sure the bulb holder cover is securely fit-
ted over the bulb holder and seated
against the reflector.
[ECB00681]
7. Place the headlight unit in the original posi-
tion, and then install the screw.
8. Adjust the headlight beam if necessary.
EBU25551
Adjusting a headlight beam NOTICE
ECB00690
It is advisable to have a Yamaha dealer make
this adjustment.
To raise a headlight beam, turn the headlight beam
1. Do not touch the glass part of the bulb.
1
1. Headlight bulb holder cover
2. Headlight bulb holder
3. Headlight unit
1
2
3
Page 130 of 148
8-52
1
2
3
4
5
6
78
9
10
11
adjusting screw in direction (a).
To lower a headlight beam, turn the adjusting
screw in direction (b).
EBU25611
Replacing the tail/brake light bulb
If the tail/brake light bulb burns out, replace it as
follows.
1. Remove the bulb holder (together with the
bulb) by turning it counterclockwise.2. Remove the burnt-out bulb by pushing it in
and turning it counterclockwise.
1. Headlight beam adjusting screw
1
(a) (b)
1. Tail/brake light bulb holder
1