Page 227 of 294

09 Maintenance and servicing
Replacing bulbs09
��
* Option/accessory, for more information, see Introduction.227
6. Lift out the headlight housing and place it
on a soft surface to avoid scratching the
lens.
CAUTION
When disconnecting the connector, pull on
the connector itself and not on the wiring.
After the defective bulb has been replaced,
reinsert the housing in the reverse order. Check
that the retaining pin is correctly inserted.
WARNING
Active Bending Lights* – due to the high
voltage used by these headlights, these
bulbs should only be replaced by a trained
and qualified Volvo service technician.
Low beam bulb
Cover with retaining clamps
1. Open the hood and remove the headlight
housing (see page 226 for instructions).
2. Release the retaining clamps on the cover
and remove it.
3. Release the bulb's retaining spring holding
the bulb in place by pressing it first to the
left to release it and then moving it outward
and downward.
4. Pull out the bulb.
Low beam bulb
Installing a new bulb1. Insert the new bulb. It can only be installed
in one position.
2. Press the retaining spring inward and
upward and slightly to the right until it
snaps into place.
3. Press the wiring connector onto the bulb.
4. Put the plastic cover in place.
5. Press the retaining clamps back into place.
6. Reinstall the headlight housing (see
page 226).
Page 228 of 294

09 Maintenance and servicing
Replacing bulbs 09
228* Option/accessory, for more information, see Introduction.
High beam bulb
Halogen high beam bulb
1. Open the hood.
2. Remove the headlight housing (see
page 226).
NOTE
The halogen high beam bulb has a different
socket on vehicles equipped with the
optional Active Bending Lights. On these
models, pull the bulb straight out.
WARNING
Active Bending Lights* – due to the high
voltage used by these headlights, the Active
Bending Light bulbs should only be
replaced by a trained and qualified Volvo
service technician.
3. Driver's side headlight: Turn the bulb
holder counterclockwise.
Passenger's side headlight: Turn the bulb
holder clockwise.
4. Pull out the bulb holder and replace the
bulb.
5. Reinstall the bulb holder. It can only be
installed in one position.
6. Reinstall the headlight housing (see
page 226).
Parking light bulb
1. Turn the bulb holder counterclockwise,
pull it out and replace the bulb.
2. Press the bulb holder back into place. It
can only be installed in one position.
NOTE
Vehicles equipped with the optional Active
Bending Lights (headlights) have LED park-
ing lights that cannot be replaced.
Page 229 of 294
09 Maintenance and servicing
Replacing bulbs09
��
* Option/accessory, for more information, see Introduction.229 Turn signal
1. Turn the bulb holder counterclockwise and
remove it.
2. Remove the bulb from the holder by press-
ing it in and twisting it counterclockwise.
3. Insert a new bulb and reinstall the bulb
holder in the headlight housing.
Side marker light
1. Turn the bulb holder counterclockwise,
pull it out, and replace the bulb.
2. Reinstall the bulb holder. It can only be
installed in one position.
Front fog lights*
1. Switch off all lights and turn the key to
position 0.
2. Using a screwdriver or other suitable tool,
pry out the fog light cover and pull it
straight out as shown in the illustration.
> (Release the clips (1) and then pull
straight out (2).)
3. Unscrew the lamp housing's retaining
screw and remove the housing.
4. Disconnect the connector from the bulb.
5. Turn the bulb counterclockwise and pull it
out.
Page 230 of 294

09 Maintenance and servicing
Replacing bulbs 09
230
6. Press a new bulb into place and turn it
clockwise.
7.
Reinsert the bulb holder. The mark TOP
should be upward.
8. Secure the fog light housing with the
retaining screw and press the panel back
into place.
Removing the taillight bulb holder
All bulbs in the taillight cluster can be replaced
from the trunk. To access the bulb holders:
1. Switch off all lights and turn the key to
position 0.2. Remove the covers in the left/right panels
to access the bulb holders.
3. Disconnect the wiring connector from the
affected bulb holder.
4. Press the catches together and pull out the
bulb holder.
5. Replace the defective bulb.
6. Press the bulb holder into place and rein-
stall the cover.
Location of taillight bulbs
Location of taillight bulbs
Taillight/parking light/fog light
Turn signal
Back-up light
NOTE
If the message indicating a burned out bulb
remains in the information display after the
bulb has been replaced, consult a trained
and qualified Volvo service technician.
High-level brake lightThese bulbs should only be replaced by a
trained and qualified Volvo service technician.
License plate lighting
1. Switch off all lights and turn the key to
position 0.
Page 231 of 294
 carefully.
4. Replace the defective bulb.
5. Reinstall the entire bul")
09 Maintenance and servicing
Replacing bulbs09
��
231
2. Remove the screws with a screw driver.
3. Detach the lens (bulb housing) carefully.
4. Replace the defective bulb.
5. Reinstall the entire bulb housing and screw
it into place.
Footwell lighting
G020795
The footwell lighting is located under the dash-
board on the driver's and passenger's sides.
To replace a bulb:
1. Insert a screwdriver under the edge of the
lens. Turn the screwdriver gently to detach
the lens.
2. Remove the defective bulb.3. Install a new bulb.
4. Press the lens back into place.
Trunk lighting
1. Insert a screwdriver and turn it gently to
detach the bulb housing.
2. Remove the defective bulb.
3. Install a new bulb.
4. Press the bulb housing back into place.
Vanity mirror lighting
G020253
1. Insert a screwdriver under the center of the
lower edge of the mirror, turn it, and care-
fully pry up the lugs at the edge.
2. Move the screwdriver under the edge on
the left and right-hand sides (near the black
rubber sections) and pry carefully to
release the lower edge of the mirror.
3. Pry carefully and lift out the entire mirror
and the cover.
4. Remove the defective bulb and replace it
with a new one.
5. To reinstall the mirror, begin by pressing
the three lugs at the upper edge of the mir-
ror back into place.
Page 232 of 294
09 Maintenance and servicing
Replacing bulbs 09
232
6. Press the three lower lugs back into place.
Rear reading light bulbs
G020969
1. Insert a screwdriver and turn it gently to
detach the bulb housing.
2. Remove the defective bulb.
3. Install a new bulb.
4. Press the bulb housing back into place.
Page 235 of 294
09 Maintenance and servicing
Fuses09
��
235
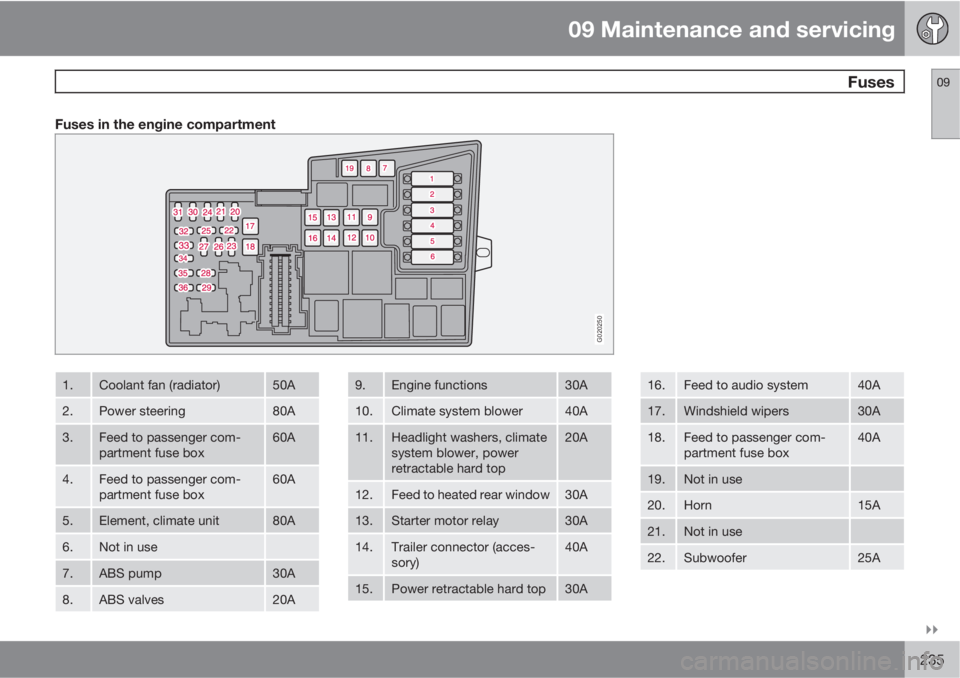
Fuses in the engine compartment
G020250
1.Coolant fan (radiator)50A
2.Power steering80A
3.Feed to passenger com-
partment fuse box60A
4.Feed to passenger com-
partment fuse box60A
5.Element, climate unit80A
6.Not in use
7.ABS pump30A
8.ABS valves20A
9.Engine functions30A
10.Climate system blower40A
11.Headlight washers, climate
system blower, power
retractable hard top20A
12.Feed to heated rear window30A
13.Starter motor relay30A
14.Trailer connector (acces-
sory)40A
15.Power retractable hard top30A
16.Feed to audio system40A
17.Windshield wipers30A
18.Feed to passenger com-
partment fuse box40A
19.Not in use
20.Horn15A
21.Not in use
22.Subwoofer25A
Page 236 of 294
09 Maintenance and servicing
Fuses 09
236* Option/accessory, for more information, see Introduction.
23.Engine control module
(ECM)/transmission control
module (TCM)10A
24.Not in use
25.Not in use
26.Ignition switch15A
27.A/C compressor10A
28.Not in use
29.Front fog lights*15A
30.Not in use
31.Not in use
32.Fuel injectors10A
33.Heated oxygen sensor, vac-
uum pump20A
34.Ignition coils, climate unit
pressure sensor10A
35.Engine sensor valves, A/C
relay, relay coil, PTC ele-
ment oil trap, canister, mass
air meter15A
36.Engine control module
(ECM), throttle sensor10A


/transmission control
module (TCM)10A
24.Not in use
25.Not in use
26.")