2011 TOYOTA VERSO S height
[x] Cancel search: heightPage 37 of 664
37
1
1-1. For safe use
For safety and security
2 To release the seat belt, press
the release button .
■Emergency locking retractor (ELR)
The retractor will lock the belt during a sudden stop or on impact. It may also
lock if you lean forward too quickly. A slow, easy motion will allow the belt to extend so that you can move around
fully.
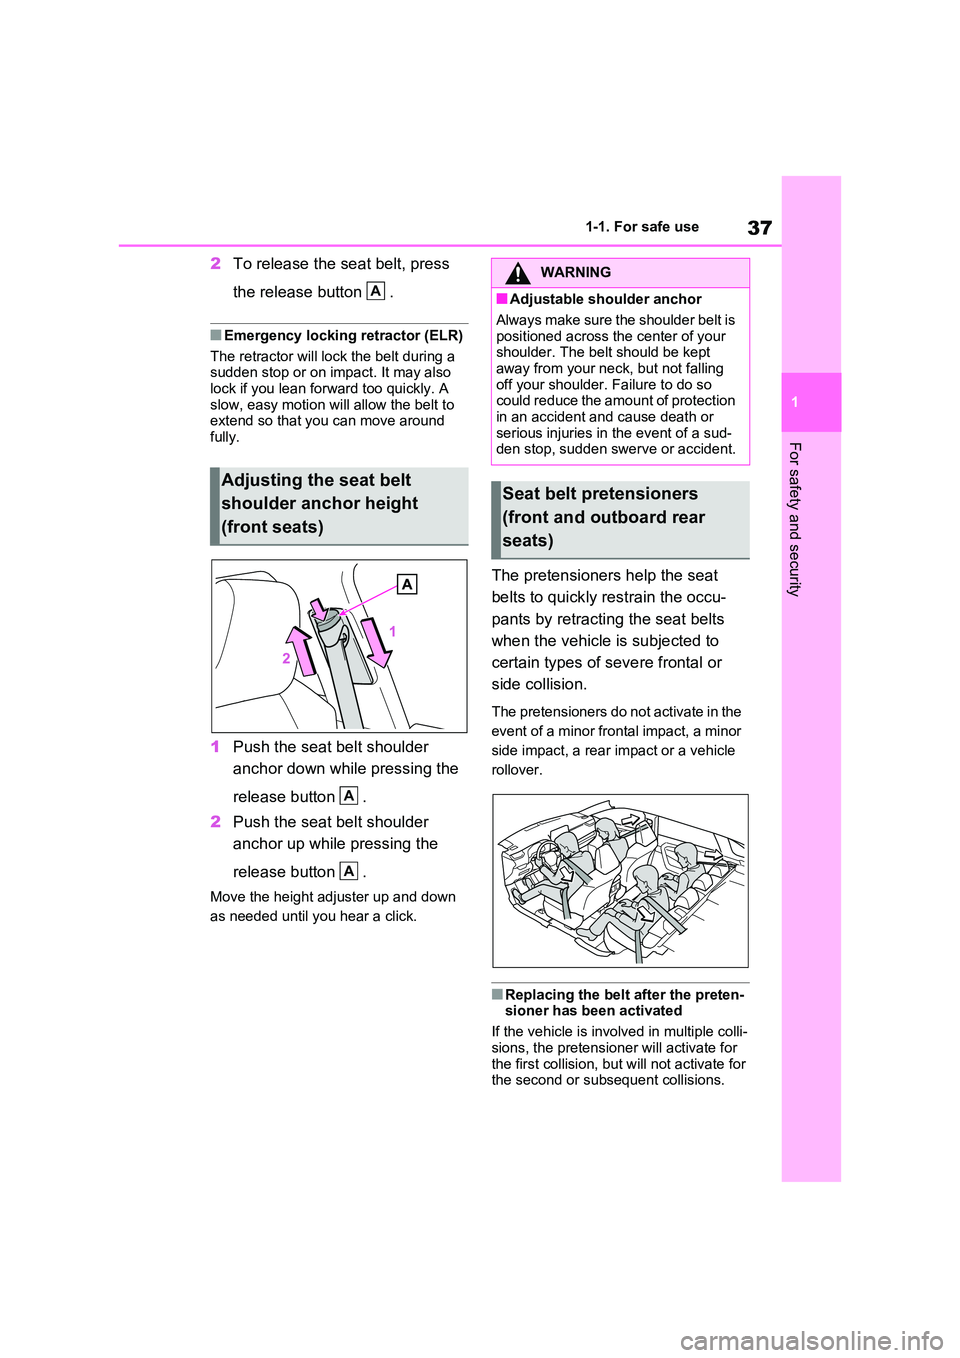
1 Push the seat belt shoulder
anchor down while pressing the
release button .
2 Push the seat belt shoulder
anchor up while pressing the
release button .
Move the height adjuster up and down
as needed until you hear a click.
The pretensioners help the seat
belts to quickly restrain the occu-
pants by retracting the seat belts
when the vehicle is subjected to
certain types of severe frontal or
side collision.
The pretensioners do not activate in the
event of a minor frontal impact, a minor
side impact, a rear impact or a vehicle
rollover.
■Replacing the belt after the preten- sioner has been activated
If the vehicle is involved in multiple colli-
sions, the pretensioner will activate for the first collision, but will not activate for the second or subsequent collisions.
Adjusting the seat belt
shoulder anchor height
(front seats)
A
A
A
WARNING
■Adjustable shoulder anchor
Always make sure the shoulder belt is
positioned across the center of your shoulder. The belt should be kept away from your neck, but not falling
off your shoulder. Failure to do so could reduce the amount of protection in an accident and cause death or
serious injuries in the event of a sud- den stop, sudden swerve or accident.
Seat belt pretensioners
(front and outboard rear
seats)
Page 55 of 664
55
1
1-2. Child safety
For safety and security
child restraint systems. ( P.58)
Check the selected child restraint
system together with the following
[Before confirming the compatibility
of each seating position with child
restraint systems].
■Before confirming the compat-
ibility of each seating position
with child restraint systems
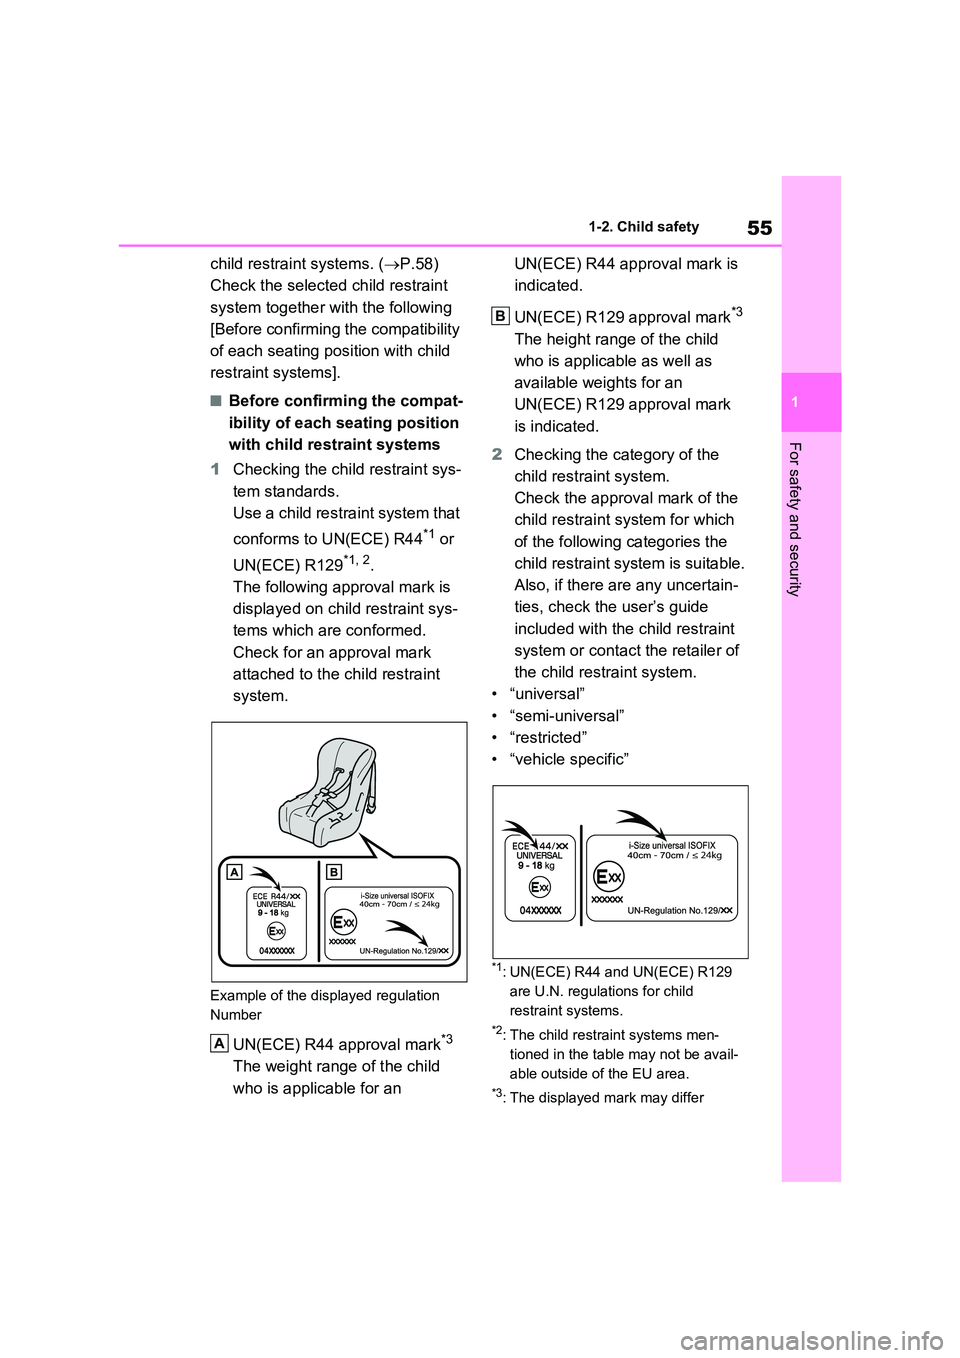
1 Checking the child restraint sys-
tem standards.
Use a child restraint system that
conforms to UN(ECE) R44*1 or
UN(ECE) R129*1, 2.
The following approval mark is
displayed on child restraint sys-
tems which are conformed.
Check for an approval mark
attached to the child restraint
system.
Example of the displayed regulation
Number
UN(ECE) R44 approval mark*3
The weight range of the child
who is applicable for an
UN(ECE) R44 approval mark is
indicated.
UN(ECE) R129 approval mark*3
The height range of the child
who is applicable as well as
available weights for an
UN(ECE) R129 approval mark
is indicated.
2 Checking the category of the
child restraint system.
Check the approval mark of the
child restraint system for which
of the following categories the
child restraint system is suitable.
Also, if there are any uncertain-
ties, check the user’s guide
included with the child restraint
system or contact the retailer of
the child restraint system.
• “universal”
• “semi-universal”
• “restricted”
• “vehicle specific”
*1: UN(ECE) R44 and UN(ECE) R129
are U.N. regulations for child
restraint systems.
*2: The child restraint systems men-
tioned in the table may not be avail-
able outside of the EU area.
*3: The displayed mark may differ
A
B
Page 56 of 664
561-2. Child safety
depending on the product.
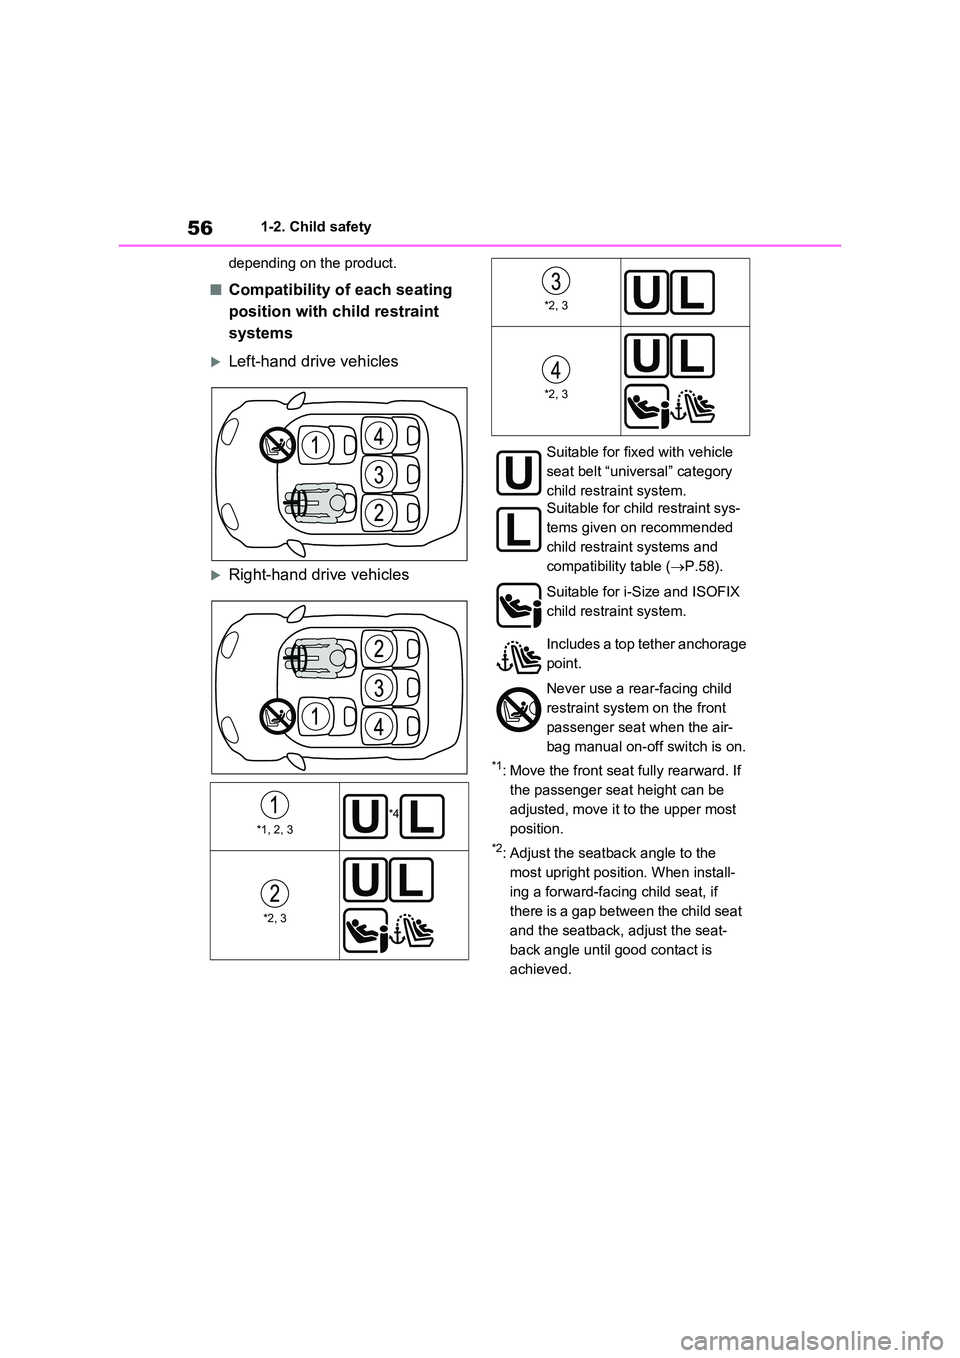
■Compatibility of each seating
position with child restraint
systems
Left-hand drive vehicles
Right-hand drive vehicles
*1: Move the front seat fully rearward. If
the passenger seat height can be
adjusted, move it to the upper most
position.
*2: Adjust the seatback angle to the
most upright position. When install-
ing a forward-facing child seat, if
there is a gap between the child seat
and the seatback, adjust the seat-
back angle until good contact is
achieved.
*1, 2, 3*4
*2, 3
*2, 3
*2, 3
Suitable for fixed with vehicle
seat belt “universal” category
child restraint system.
Suitable for child restraint sys-
tems given on recommended
child restraint systems and
compatibility table ( P.58).
Suitable for i-Size and ISOFIX
child restraint system.
Includes a top tether anchorage
point.
Never use a rear-facing child
restraint system on the front
passenger seat when the air-
bag manual on-off switch is on.
Page 58 of 664
581-2. Child safety
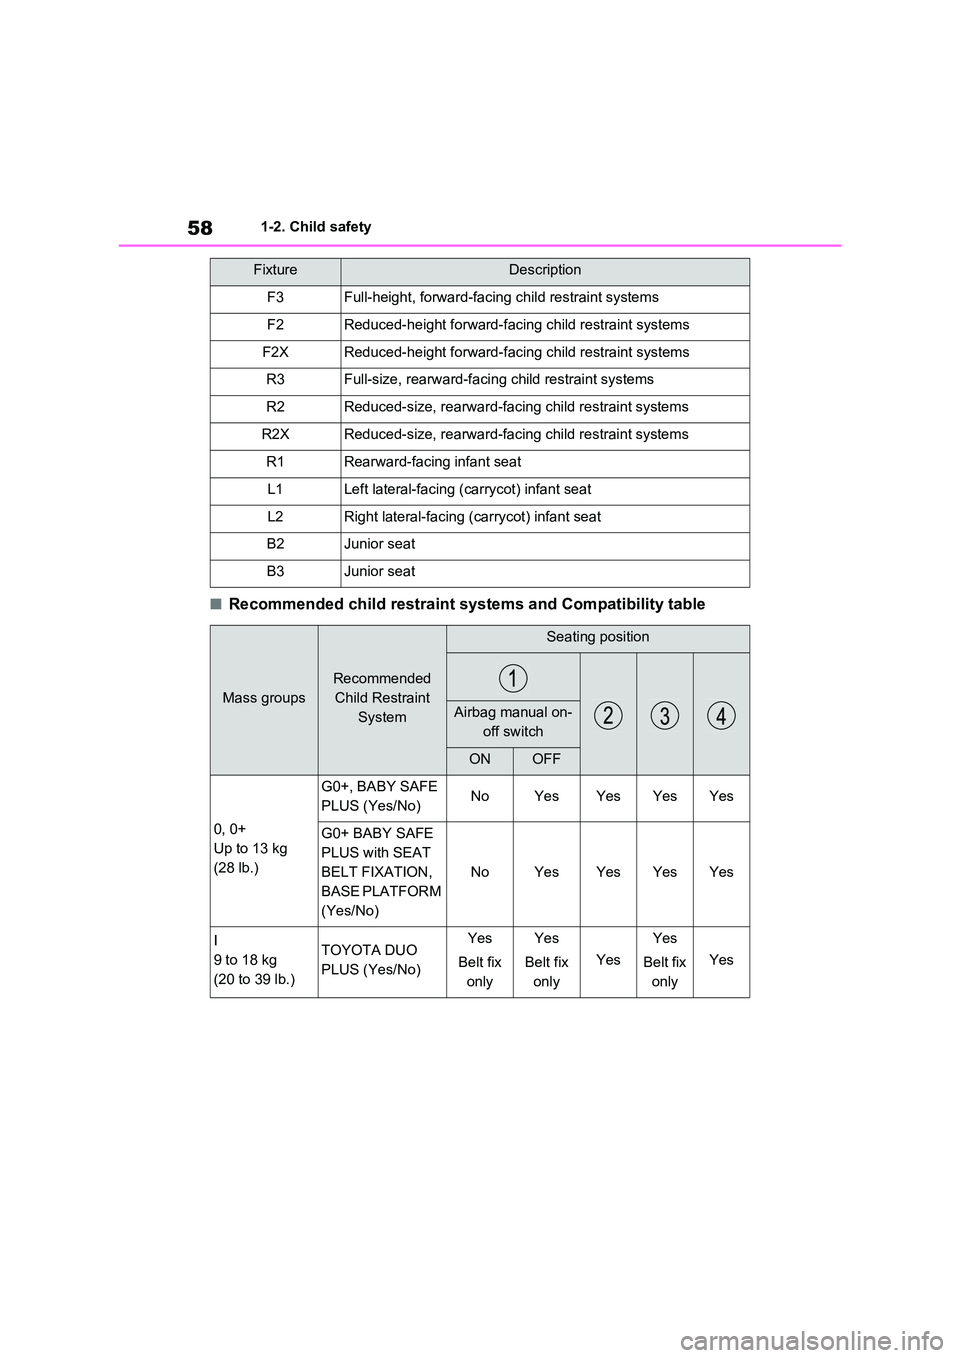
■Recommended child restraint systems and Compatibility table
FixtureDescription
F3Full-height, forward-facing child restraint systems
F2Reduced-height forward-facing child restraint systems
F2XReduced-height forward-facing child restraint systems
R3Full-size, rearward-facing child restraint systems
R2Reduced-size, rearward-facing child restraint systems
R2XReduced-size, rearward-facing child restraint systems
R1Rearward-facing infant seat
L1Left lateral-facing (carrycot) infant seat
L2Right lateral-facing (carrycot) infant seat
B2Junior seat
B3Junior seat
Mass groups
Recommended
Child Restraint
System
Seating position
Airbag manual on-
off switch
ONOFF
0, 0+
Up to 13 kg
(28 lb.)
G0+, BABY SAFE
PLUS (Yes/No)NoYesYesYesYes
G0+ BABY SAFE
PLUS with SEAT
BELT FIXATION,
BASE PLATFORM
(Yes/No)
NoYesYesYesYes
I
9 to 18 kg
(20 to 39 lb.)
TOYOTA DUO
PLUS (Yes/No)
Yes
Belt fix
only
Yes
Belt fix
only
Yes
Yes
Belt fix
only
Yes
Page 97 of 664
97
2
2-1. Plug-in hybrid system
Plug-in hybrid system
WARNING
■Hybrid battery (traction battery)
●Your vehicle contains a sealed lith-
ium-ion battery.
●Never resell, hand over or modify
the hybrid battery. To prevent acci- dents, hybrid batteries that have been removed from a disposed
vehicle are collected through any authorized Toyota retailer or Toyota authorized repairer, or any reliable
repairer. Do not dispose of the bat- tery yourself. Unless the battery is properly collected, the following
may occur, resulting in death or serious injury:
• The hybrid battery may be illegally disposed of or dumped, and it is hazardous to the environment or
someone may touch a high voltage part, resulting in an electric shock.
• The hybrid battery is intended to be used exclusively with your hybrid vehicle. If the hybrid battery is used
outside of your vehicle or modified in any way, accidents such as elec-tric shock, heat generation, smoke
generation, an explosion and elec- trolyte leakage may occur.When reselling or handing over
your vehicle, the possibility of an accident is extremely high because the person receiving the vehicle
may not be aware of these dangers.
●If your vehicle is disposed of with- out the hybrid battery having been removed, there is a danger of seri-
ous electric shock if high voltage parts, cables and their connectors are touched. In the event that your
vehicle must be disposed of, the hybrid battery must be disposed of by any authorized Toyota retailer or
Toyota authorized repairer, or any reliable repairer, or a qualified ser-vice shop. If the hybrid battery is
not disposed of properly, it may cause electric shock that can result in death or serious injury.
■Caution while driving
If the vehicle under floor area
receives strong shock or impact while driving, stop the vehicle in a safe area and check around the bottom of the
vehicle. If there is damage to the hybrid battery (traction battery) or liq-uid leakage, it may lead to a vehicle
fire, etc. Do not touch the vehicle and immediately contact any authorized Toyota retailer or Toyota authorized
repairer, or any reliable repairer.
■Modifications
Do not modify the vehicle to make the height lower.
It is easier for the hybrid battery (trac-
tion battery) in the under floor area to come in contact with the ground when the vehicle is lowered. If the hybrid
battery (traction battery) is damaged, a vehicle fire may occur which could lead to death or serious injury.
Page 136 of 664
1362-2. Charging
P.133
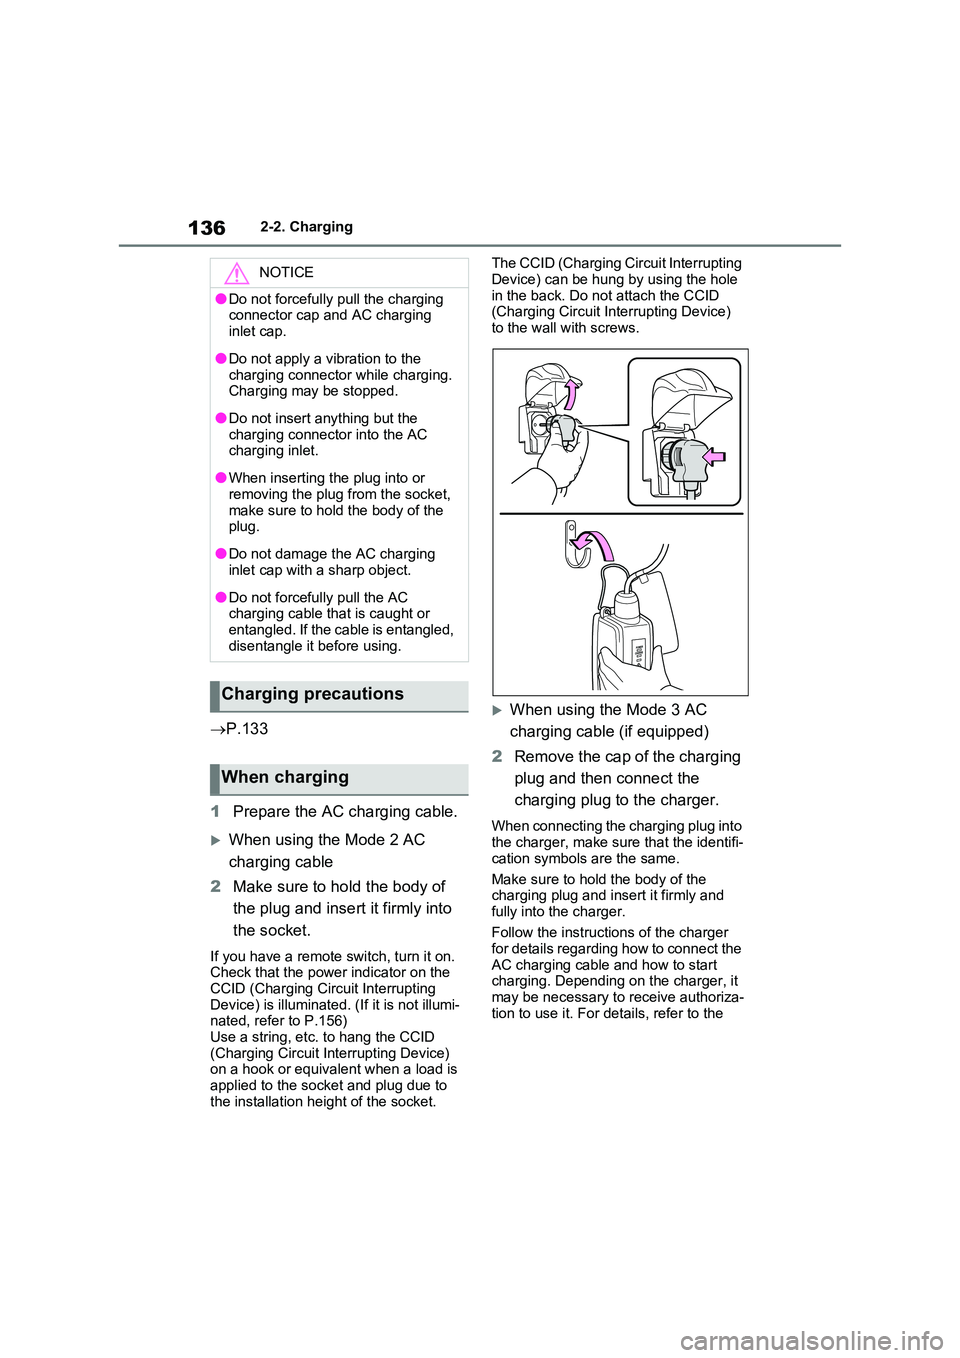
1 Prepare the AC charging cable.
When using the Mode 2 AC
charging cable
2 Make sure to hold the body of
the plug and insert it firmly into
the socket.
If you have a remote switch, turn it on. Check that the power indicator on the
CCID (Charging Circuit Interrupting Device) is illuminated. (If it is not illumi-nated, refer to P.156)
Use a string, etc. to hang the CCID (Charging Circuit Interrupting Device) on a hook or equivalent when a load is
applied to the socket and plug due to the installation height of the socket.
The CCID (Charging Circuit Interrupting
Device) can be hung by using the hole in the back. Do not attach the CCID (Charging Circuit Interrupting Device)
to the wall with screws.
When using the Mode 3 AC
charging cable (if equipped)
2 Remove the cap of the charging
plug and then connect the
charging plug to the charger.
When connecting the charging plug into the charger, make sure that the identifi-
cation symbols are the same.
Make sure to hold the body of the charging plug and insert it firmly and
fully into the charger.
Follow the instructions of the charger for details regarding how to connect the
AC charging cable and how to start charging. Depending on the charger, it may be necessary to receive authoriza-
tion to use it. For details, refer to the
NOTICE
●Do not forcefully pull the charging connector cap and AC charging
inlet cap.
●Do not apply a vibration to the
charging connector while charging. Charging may be stopped.
●Do not insert anything but the charging connector into the AC charging inlet.
●When inserting the plug into or removing the plug from the socket,
make sure to hold the body of the plug.
●Do not damage the AC charging inlet cap with a sharp object.
●Do not forcefully pull the AC charging cable that is caught or entangled. If the cable is entangled,
disentangle it before using.
Charging precautions
When charging
Page 270 of 664
2704-3. Adjusting the seats
4-3.Adjusting the sea ts
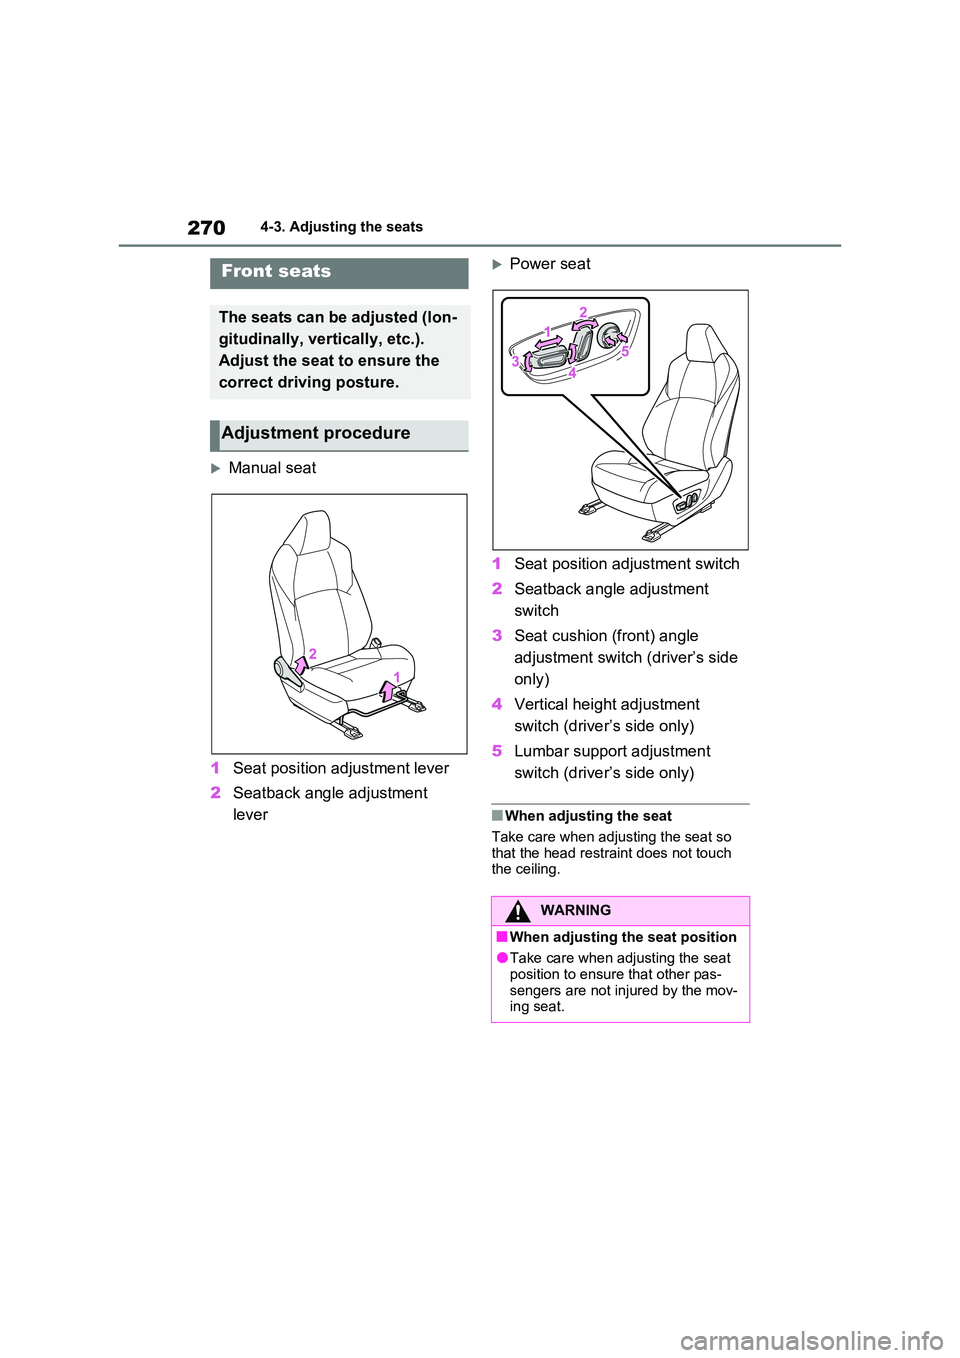
Manual seat
1 Seat position adjustment lever
2 Seatback angle adjustment
lever
Power seat
1 Seat position adjustment switch
2 Seatback angle adjustment
switch
3 Seat cushion (front) angle
adjustment switch (driver’s side
only)
4 Vertical height adjustment
switch (driver’s side only)
5 Lumbar support adjustment
switch (driver’s side only)
■When adjusting the seat
Take care when adjusting the seat so
that the head restraint does not touch the ceiling.
Front seats
The seats can be adjusted (lon-
gitudinally, vertically, etc.).
Adjust the seat to ensure the
correct driving posture.
Adjustment procedure
WARNING
■When adjusting the seat position
●Take care when adjusting the seat position to ensure that other pas-
sengers are not injured by the mov- ing seat.
Page 276 of 664
2764-3. Adjusting the seats
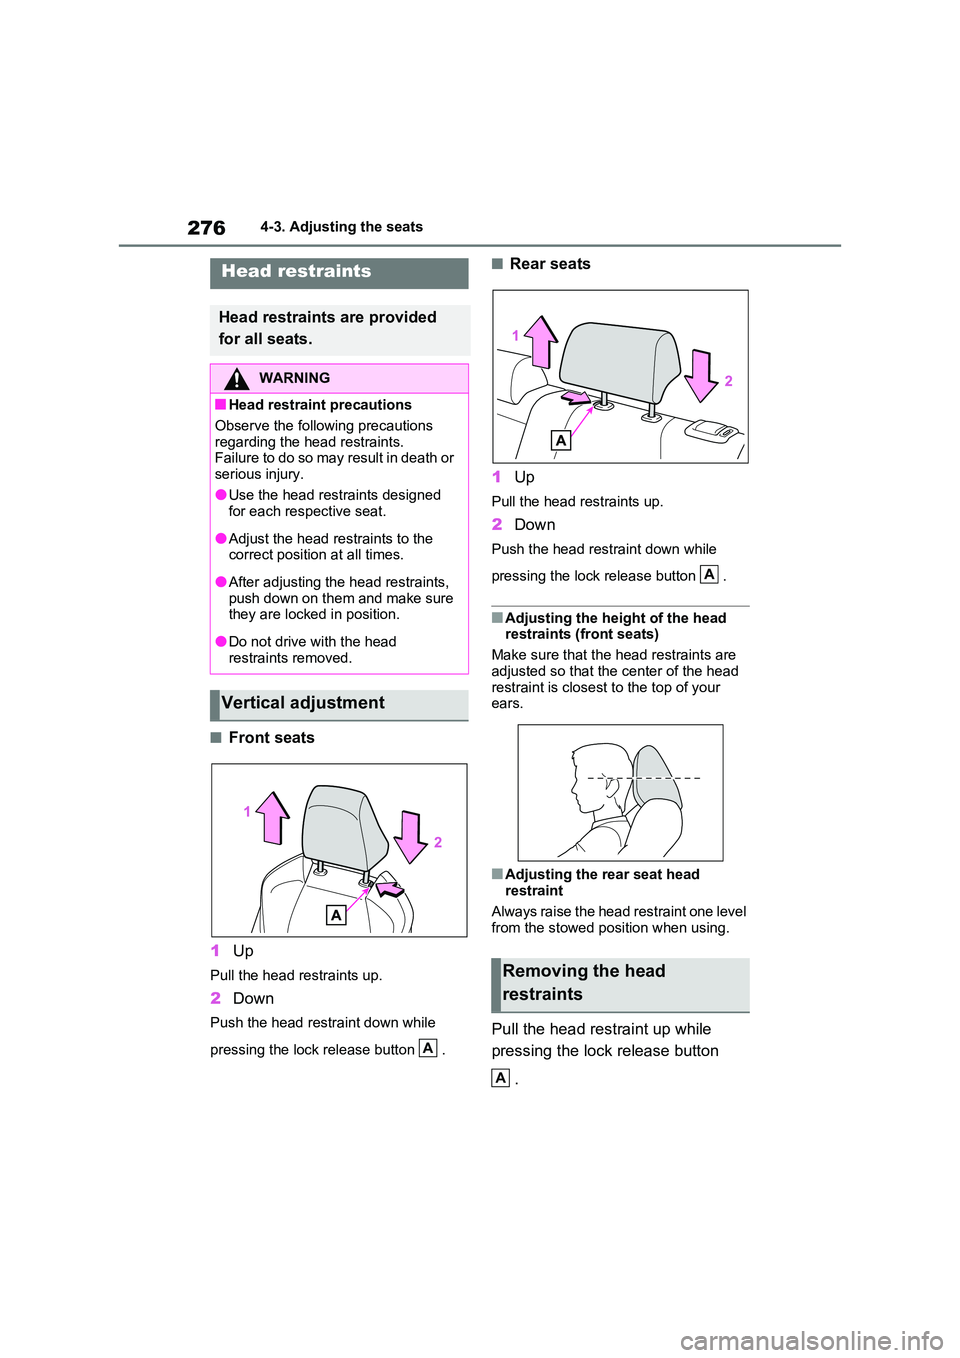
■Front seats
1 Up
Pull the head restraints up.
2Down
Push the head restraint down while
pressing the lock release button .
■Rear seats
1 Up
Pull the head restraints up.
2Down
Push the head restraint down while
pressing the lock release button .
■Adjusting the height of the head restraints (front seats)
Make sure that the head restraints are
adjusted so that the center of the head restraint is closest to the top of your ears.
■Adjusting the rear seat head restraint
Always raise the head restraint one level from the stowed position when using.
Pull the head restraint up while
pressing the lock release button
.
Head restraints
Head restraints are provided
for all seats.
WARNING
■Head restraint precautions
Observe the following precautions
regarding the head restraints. Failure to do so may result in death or serious injury.
●Use the head restraints designed for each respective seat.
●Adjust the head restraints to the correct position at all times.
●After adjusting the head restraints, push down on them and make sure they are locked in position.
●Do not drive with the head restraints removed.
Vertical adjustment
A
Removing the head
restraints
A
A