2011 TOYOTA VERSO S turn signal
[x] Cancel search: turn signalPage 394 of 664

3945-5. Using the driving support systems
BSM function:
When a vehicle is detected in a blind
spot of the outside rear view mirrors or
approaching rapidly from behind into a
blind spot, the outside rear view mirror
indicator on the detected side will illumi-
nate. If the turn signal lever is operated
toward the detected side, the outside
rear view mirror indicator will flash.
RCTA function:
When a vehicle approaching from the
right or left at the rear of the vehicle is
detected, both outside rear view mirror
indicators will flash.
Monitor screen display (RCTA
function only)
If a vehicle approaching from the right
or left at the rear of the vehicle is
detected, the RCTA icon (P.411) for
the detected side will be displayed.
BSM OFF indicator/RCTA OFF
indicator
When the Blind Spot Monitor is dis-
abled, the BSM OFF indicator illumi-
nates.
When the RCTA function is disabled,
the RCTA OFF indicator illuminates.
RCTA buzzer (RCTA function
only)
If a vehicle approaching from the right
or left at the rear of the vehicle is
detected, a buzzer will sound from
behind the rear seat.
The BSM function and the RCTA
function can be enabled/disabled
on the screen of the multi-infor-mation display. (P.186)
The BSM function/RCTA function will
be enabled each time the power switch
is turned to ON.
■Outside rear view mirror indicators
visibility
In strong sunlight, the outside rear view
mirror indicator may be difficult to see.
■Hearing the RCTA buzzer
The RCTA buzzer may be difficult to
hear over loud noises such as high
audio volume.
■When “Blind Spot Monitor Unavail-
able” or “RCTA Unavailable” is
shown on the multi-information
display
The sensor voltage has become abnor-
mal, or water, snow, mud, etc., may be
built up in the vicinity of the sensor area
of the rear bumper. (P.408)
Removing the water, snow, mud, etc.,
from the vicinity of the sensor area
should return it to normal.
Also, the sensor may not function nor-
mally when used in extremely hot or
cold weather.
■When “Blind Spot Monitor Malfunc-
tion Visit Your Dealer” or “RCTA
Malfunction Visit Your Dealer” is
shown on the multi-information
display
There may be a sensor malfunction or
misaligned. Have the vehicle inspected
at any authorized Toyota retailer or
Toyota authorized repairer, or any reli-
able repairer.
■Customization
Some functions can be customized.
(P.186)
Turning the BSM func-
tion/RCTA function on/off
C
D
E
Page 439 of 664

439
5 5-5. Using the driving support systems
Driving
■E-Four (Electronic On-Demand
AWD system)
Automatically switches from front
wheel drive to all-wheel drive
(AWD) according to the driving con-
ditions, helping to ensure reliable
handling and stability. Examples of
conditions where the system will
switch to AWD are when cornering,
going uphill, starting off or acceler-
ating, and when the road surface is
slippery due to snow, rain, etc.
■Emergency brake signal
When the brakes are applied sud-
denly, the emergency flashers
automatically flash to alert the vehi-
cle behind.
■The Secondary Collision
Brake (if equipped)
When the SRS airbag sensor
detects a collision and the system
operates, the brakes and brake
lights are automatically controlled
to reduce the vehicle speed and
help reduce the possibility of further
damage due to a secondary colli-
sion.
■When the TRC/VSC/ABS/Trailer
Sway Control systems are operat-
ing
The slip indicator light will flash while the
TRC/VSC/ABS/Trailer Sway Control
systems are operating.
■Disabling the TRC system
If the vehicle gets stuck in mud, dirt or
snow, the TRC system may reduce
power from the hybrid system to the
wheels.
Pressing to turn the system off may
make it easier for you to rock the vehicle
in order to free it.
To turn the TRC system off, quickly
press and release .
“Traction Control Turned OFF” will be
shown on the multi-information display.
Press again to turn the system back
on.
■Turning off the TRC/VSC/Trailer
Sway Control systems
To turn the TRC/VSC/Trailer Sway Con-
trol systems off, press and hold for
more than 3 seconds while the vehicle is
stopped.
The VSC OFF indicator light will come
on and the “Traction Control Turned
OFF” will be shown on the multi-infor-
mation display.
*
Press again to turn the systems
back on.
*: On vehicles with PCS (Pre-Collision
Page 441 of 664

441
5 5-5. Using the driving support systems
Driving
the TRC will turn on when vehicle
speed increases.
If both the TRC and VSC systems are
turned off, automatic re-enabling will
not occur when vehicle speed
increases.
■Operating conditions of Active Cor-
nering Assist
The system operates when the following
occurs.
●TRC/VSC can operate
●The driver is attempting to accelerate
while turning
●The system detects that the vehicle is
drifting to the outer side
●The brake pedal is released
■Reduced effectiveness of the EPS
system
The effectiveness of the EPS system is
reduced to prevent the system from
overheating when there is frequent
steering input over an extended period
of time. The steering wheel may feel
heavy as a result. Should this occur,
refrain from excessive steering input or
stop the vehicle and turn the hybrid sys-
tem off. The EPS system should return
to normal within 10 minutes.
■Operating conditions of emergency
brake signal
When the following conditions are met,
the emergency brake signal will operate:
●The emergency flashers are off.
●Actual vehicle speed is over 55 km/h (35 mph).
●The system judges from the vehicle
deceleration that it is a sudden brak-
ing operation.
■Automatic system cancelation of
emergency brake signal
The emergency brake signal will be can-
celed in any of the following situations:
●The emergency flashers are turned
on.
●The system judges from the vehicle
deceleration that is not a sudden brak-
ing operation.
■Secondary Collision Brake operat-
ing conditions (if equipped)
The system operates when the SRS air-
bag sensor detects a collision while the
vehicle is in motion. However, the sys-
tem does not operate in any of the fol-
lowing situations.
●The vehicle speed is below 10 km/h (6
mph)
●Components are damaged
■Secondary Collision Brake auto-
matic cancellation (if equipped)
The system is automatically canceled in
any of the following situations.
●The vehicle speed drops below
approximately 10 km/h (6 mph)
●A certain amount of time elapses
during operation
●The accelerator pedal is depressed a
large amount
■If a message about AWD is shown on the multi-information display
Perform the following actions.
Page 461 of 664
461
6
6-1. Using the air conditioning system and defogger
Interior features
●The outside temperature is extremely
low
●When the hybrid system is cool (for
example, after being left for a long time in low temperatures)
■Windshield defogger
When defogging the windshield using
the Remote Air Conditioning System, defogging may be insufficient due to the power being restricted more than during
normal air conditioning operation. Also, the outside of the windshield may fog up due to the outside temperature, humidity
or air conditioning set temperature.
■Using the heater via the Remote Air Conditioning System
●When the outside temperature is low, heating may feel insufficient due to restricted operation of the air condi-
tioning.
●When the outside heat exchanger
becomes frosted over, heating perfor- mance may decline due to automati-cally switching to the frost removal
operation. ( P.452)
■Security feature
Any unlocked doors will be automatically locked when the system is operating.
The emergency flashers flash to indicate that the doors have been locked or the system has been turned off.
■Conditions affecting operation
P.225
■While the Remote Air Conditioning System is operating
●Depending on the operating condition of the Remote Air Conditioning Sys-tem, the air conditioning compressor
or cooling fan may spin and an operat- ing noise may be heard.However, this does not indicate a mal-
function.
●The air conditioning operation
switches, etc. will not operate while the Remote Air Conditioning System is operating.
■Electronic key battery depletion
P.202
■When the electronic key battery is fully depleted
P.543
■Customization
Setting (e.g. Operation using “A/C” on the wireless remote control) can be changed. (Customizable features:
P.629)
WARNING
■Precautions for the Remote Air Conditioning System
●Do not use the system if people are in the vehicle. Even when the system is in use, the
internal temperature may still reach a high or low level due to features such as the automatic shut-off.
Children and pets left inside the vehicle may suffer heatstroke dehy-dration or hypothermia, or could
result in death or serious injury.
●Depending on the surrounding envi-
ronment, signals from the wireless switch may transmit further than expected. Pay appropriate attention
to the vehicle’s surroundings and use the switch only when neces-sary.
●Do not operate “A/C” on the wire-less remote control if the hood is
open. The air conditioning may operate unintentionally and objects may be drawn into the electrical
cooling fan.
NOTICE
■To prevent the hybrid battery (traction battery) from being dis-charged
Use “A/C” on the wireless remote control only when necessary.
Page 512 of 664
5127-3. Do-it-yourself maintenance
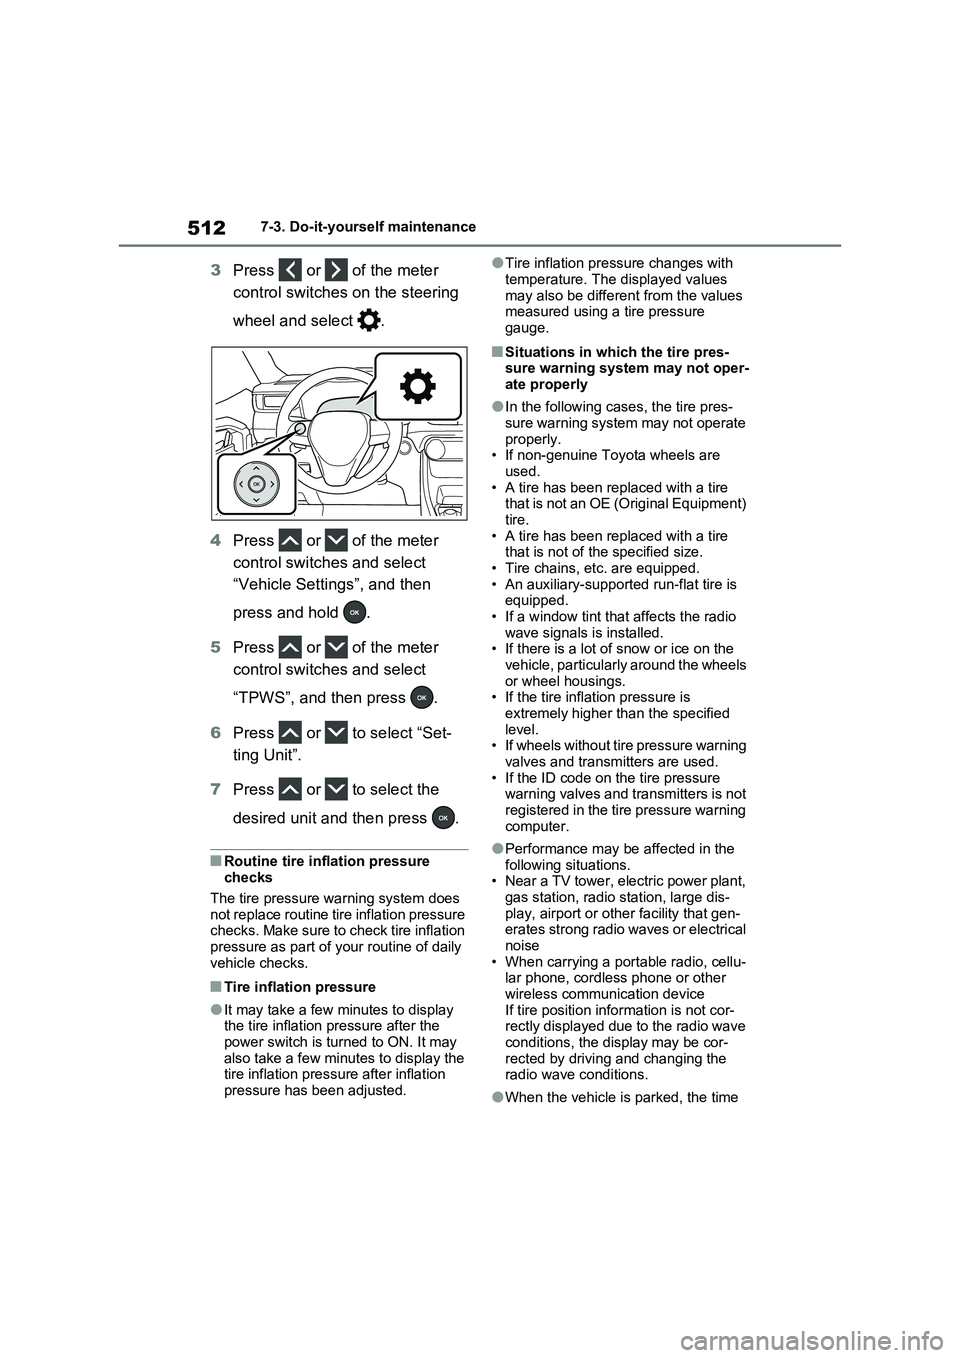
3Press or of the meter
control switches on the steering
wheel and select .
4Press or of the meter
control switches and select
“Vehicle Settings”, and then
press and hold .
5Press or of the meter
control switches and select
“TPWS”, and then press .
6Press or to select “Set-
ting Unit”.
7Press or to select the
desired unit and then press .
■Routine tire inflation pressure
checks
The tire pressure warning system does
not replace routine tire inflation pressure
checks. Make sure to check tire inflation
pressure as part of your routine of daily
vehicle checks.
■Tire inflation pressure
●It may take a few minutes to display
the tire inflation pressure after the
power switch is turned to ON. It may
also take a few minutes to display the
tire inflation pressure after inflation
pressure has been adjusted.
●Tire inflation pressure changes with
temperature. The displayed values
may also be different from the values
measured using a tire pressure
gauge.
■Situations in which the tire pres-
sure warning system may not oper-
ate properly
●In the following cases, the tire pres-
sure warning system may not operate
properly.
• If non-genuine Toyota wheels are
used.
• A tire has been replaced with a tire
that is not an OE (Original Equipment)
tire.
• A tire has been replaced with a tire
that is not of the specified size.
• Tire chains, etc. are equipped.
• An auxiliary-supported run-flat tire is
equipped.
• If a window tint that affects the radio
wave signals is installed.
• If there is a lot of snow or ice on the
vehicle, particularly around the wheels
or wheel housings.
• If the tire inflation pressure is
extremely higher than the specified
level.
• If wheels without tire pressure warning
valves and transmitters are used.
• If the ID code on the tire pressure
warning valves and transmitters is not
registered in the tire pressure warning
computer.
●Performance may be affected in the
following situations.
• Near a TV tower, electric power plant,
gas station, radio station, large dis-
play, airport or other facility that gen-
erates strong radio waves or electrical
noise
• When carrying a portable radio, cellu-
lar phone, cordless phone or other
wireless communication device
If tire position information is not cor-
rectly displayed due to the radio wave
conditions, the display may be cor-
rected by driving and changing the
radio wave conditions.
●When the vehicle is parked, the time
Page 548 of 664
5487-3. Do-it-yourself maintenance
Check the wattage of the light bulb
to be replaced. ( P.625)
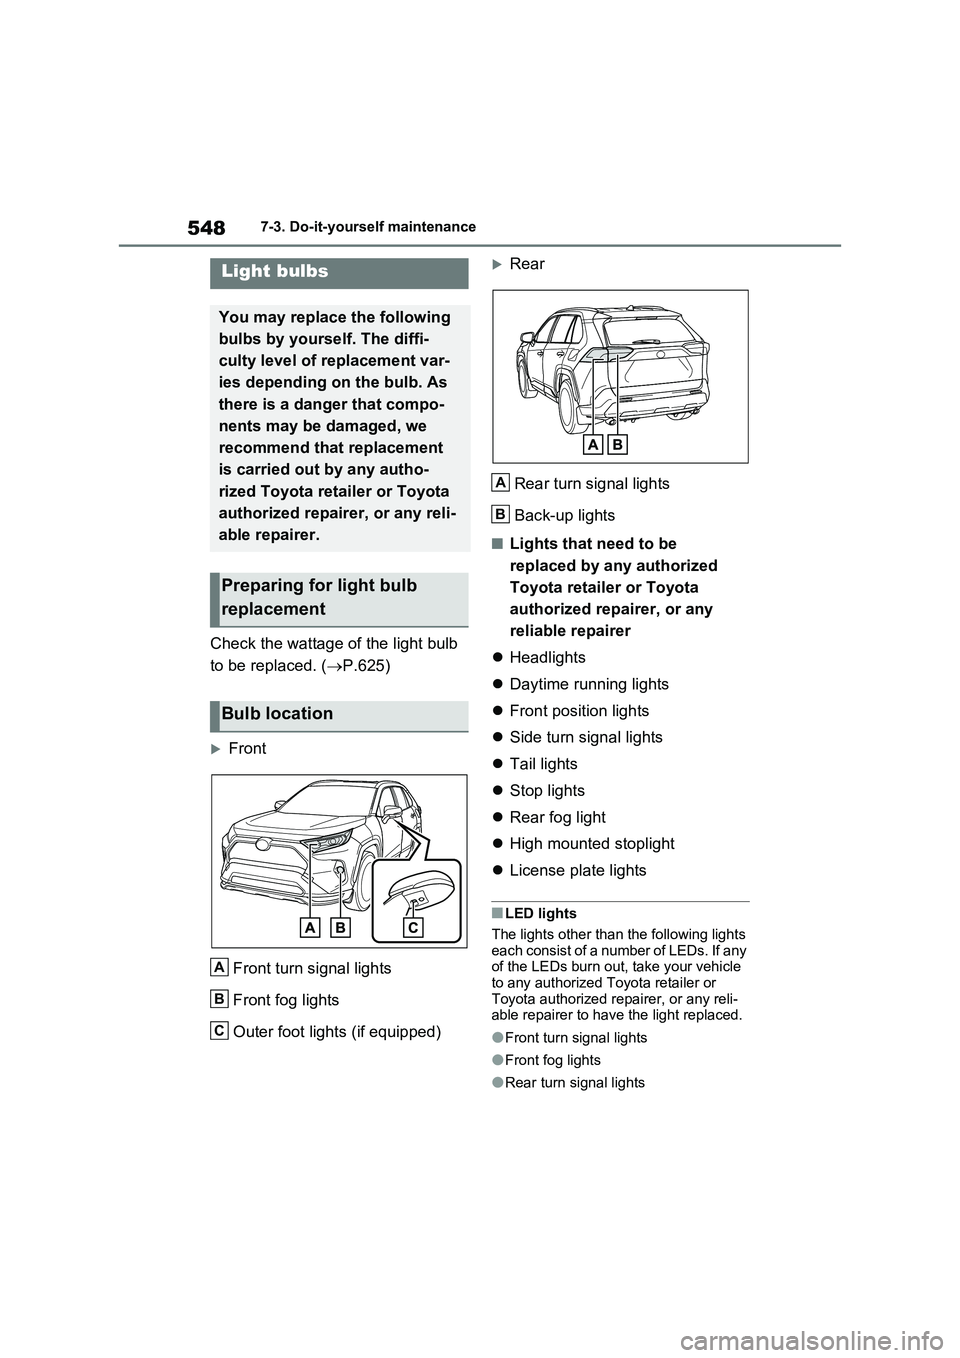
Front
Front turn signal lights
Front fog lights
Outer foot lights (if equipped)
Rear
Rear turn signal lights
Back-up lights
■Lights that need to be
replaced by any authorized
Toyota retailer or Toyota
authorized repairer, or any
reliable repairer
Headlights
Daytime running lights
Front position lights
Side turn signal lights
Tail lights
Stop lights
Rear fog light
High mounted stoplight
License plate lights
■LED lights
The lights other than the following lights each consist of a number of LEDs. If any of the LEDs burn out, take your vehicle
to any authorized Toyota retailer or Toyota authorized repairer, or any reli-able repairer to have the light replaced.
●Front turn signal lights
●Front fog lights
●Rear turn signal lights
Light bulbs
You may replace the following
bulbs by yourself. The diffi-
culty level of replacement var-
ies depending on the bulb. As
there is a danger that compo-
nents may be damaged, we
recommend that replacement
is carried out by any autho-
rized Toyota retailer or Toyota
authorized repairer, or any reli-
able repairer.
Preparing for light bulb
replacement
Bulb location
A
B
C
A
B
Page 549 of 664
549
7 7-3. Do-it-yourself maintenance
Maintenance and care
●Back-up lights
●Outer foot lights (if equipped)
■Condensation build-up on the
inside of the lens
Temporary condensation build-up on
the inside of the light lens does not indi-
cate a malfunction. Contact any autho-
rized Toyota retailer or Toyota
authorized repairer, or any reliable
repairer for more information in the fol-
lowing situations:
●Large drops of water have built up on
the inside of the lens.
●Water has built up inside the light.
■When replacing an electronic com-
ponent, such as a lights, etc.
P.547
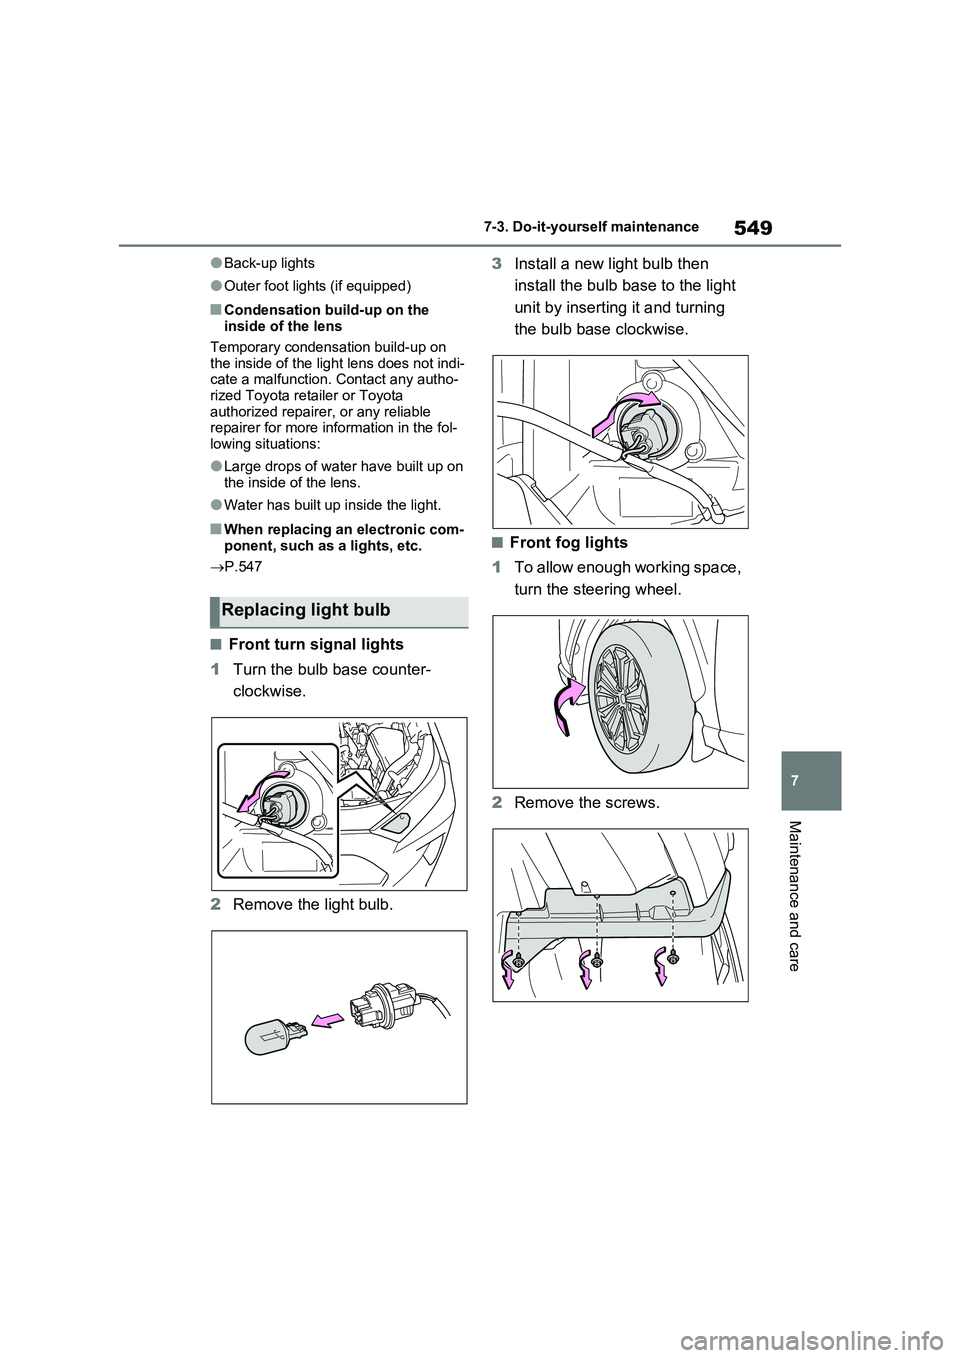
■Front turn signal lights
1Turn the bulb base counter-
clockwise.
2Remove the light bulb.3Install a new light bulb then
install the bulb base to the light
unit by inserting it and turning
the bulb base clockwise.
■Front fog lights
1To allow enough working space,
turn the steering wheel.
2Remove the screws.
Replacing light bulb
Page 551 of 664
551
7 7-3. Do-it-yourself maintenance
Maintenance and care
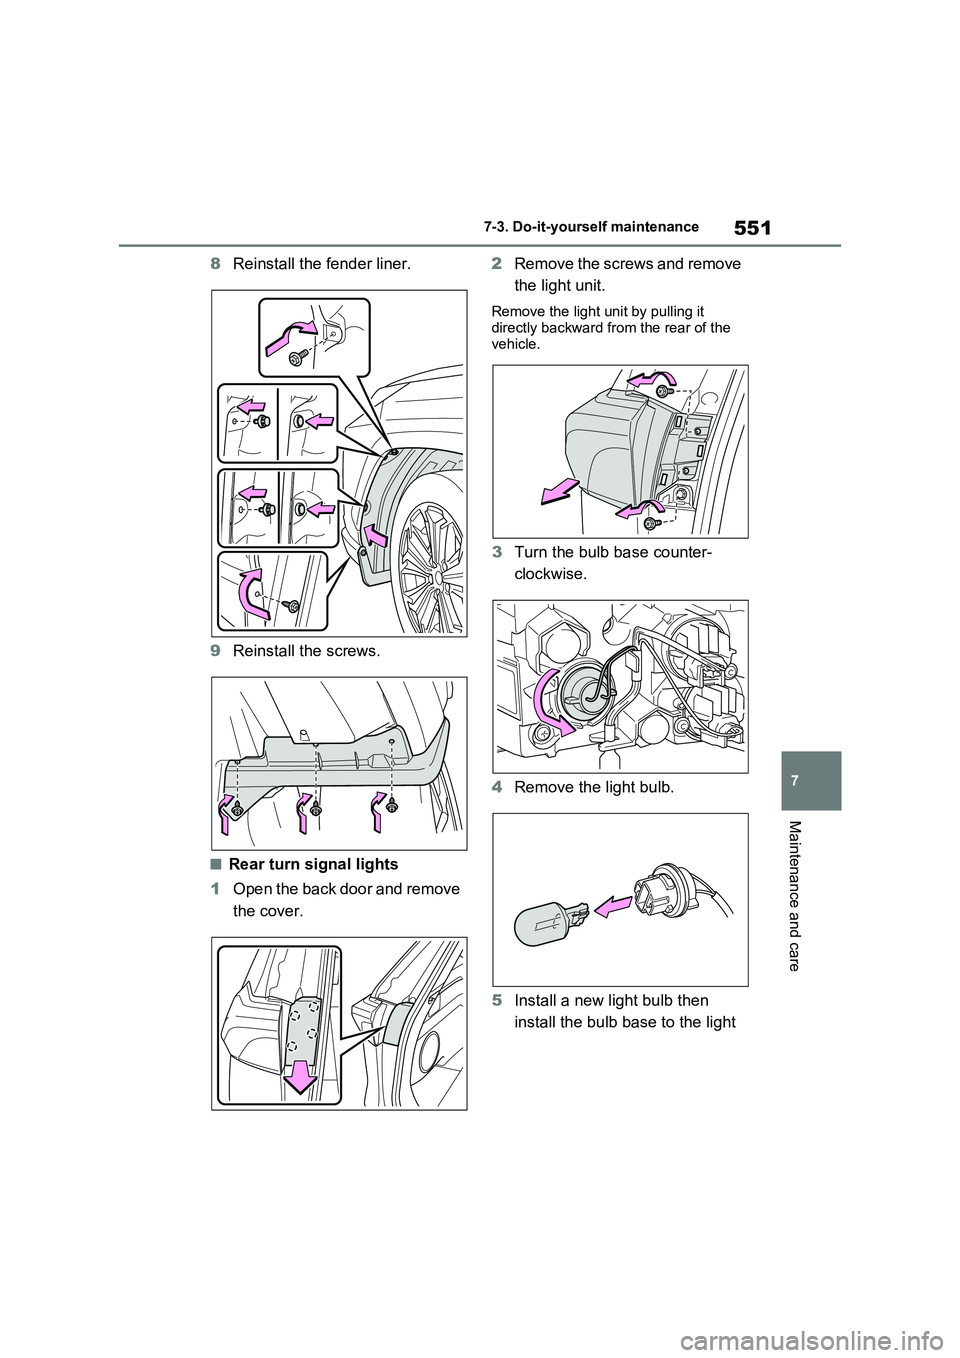
8Reinstall the fender liner.
9Reinstall the screws.
■Rear turn signal lights
1Open the back door and remove
the cover.2Remove the screws and remove
the light unit.
Remove the light unit by pulling it
directly backward from the rear of the
vehicle.
3Turn the bulb base counter-
clockwise.
4Remove the light bulb.
5Install a new light bulb then
install the bulb base to the light