Page 22 of 197
BASIC FUNCTIONS
22
1. Push the “DISP/TILT” button.
2. Touch “TILT”.
INFORMATION
To adjust the screen settings such as
brightness, see “Screen adjustment”
on page 137.
Adjustment of the angle of the display can
be done by touching “TILT”. Each touch
“TILT” will tilt the display to positions
1,2, 3 and then back to 0 in the reverse
order.
Vehicles with smart key system—
If the “ENGINE START STOP” switch is
set at OFF, the display will automatically
move back to position
0. The display will
automatically resume the previous posi-
tion when the engine switch is in ACCES-
SORY or IGNITION ON mode.
Vehicles without smart key system—
If the engine switch is set at OFF, the dis-
play will automatically move back to posi-
tion
0. The display will automatically re-
sume the previous position when the
engine switch is in “ACC” or “ON” position.
Display operation
Page 23 of 197
BASIC FUNCTIONS
23
CAUTION
Injury may result from placing a hand
or any fingers on the display while it
is moving.
NOTICE
Do not place any foreign objects on
the display while it is moving. It could
damage your navigation system.
INFORMATION
Under extremely cold conditions, the
display may react slowly or operation
sound may become louder.
Vehicles with smart key system —
When the “ENGINE START STOP” switch
is in ACCESSORY or IGNITION ON
mode, the initial screen will be displayed
and the system will begin operating.
Vehicles without smart key system —
When the engine switch is in “ACC” or
“ON” position, the initial screen will be
displayed and the system will begin oper-
ating.
CAUTION
When the vehicle is stopped with the
engine running, always apply the
parking brake for safety.
After a few seconds, the “CAUTION”
screen will be displayed.
Initial screen
Page 60 of 197
DESTINATION SEARCH
60
1. Push the “DEST” button.
2. Touch “Previous”
on the “Destina-
tion” screen.
The previous starting point and up to 100
previously set destinations are displayed
on the screen.
3. Touch the button of the desired des-
tination.
The screen changes and displays the map
location of the selected destination and the
route preference. (See “Starting route
guidance” on page 65.)
�Deleting previous points
1. Touch “Delete” for the previous
point button you want to delete.
“Delete All”: To delete all previous points
in the system.
2. To delete the point, touch “Yes”. To
cancel the deletion, touch “No”.
INFORMATION
The list of previous destinations can
also be deleted by touching “Delete
Previous Points” on the “My Places”
screen when the vehicle is stopped.
(See “ — Deleting previous points” on
page 110.)
— Destination search by
“Previous”
Page 65 of 197

DESTINATION SEARCH
65
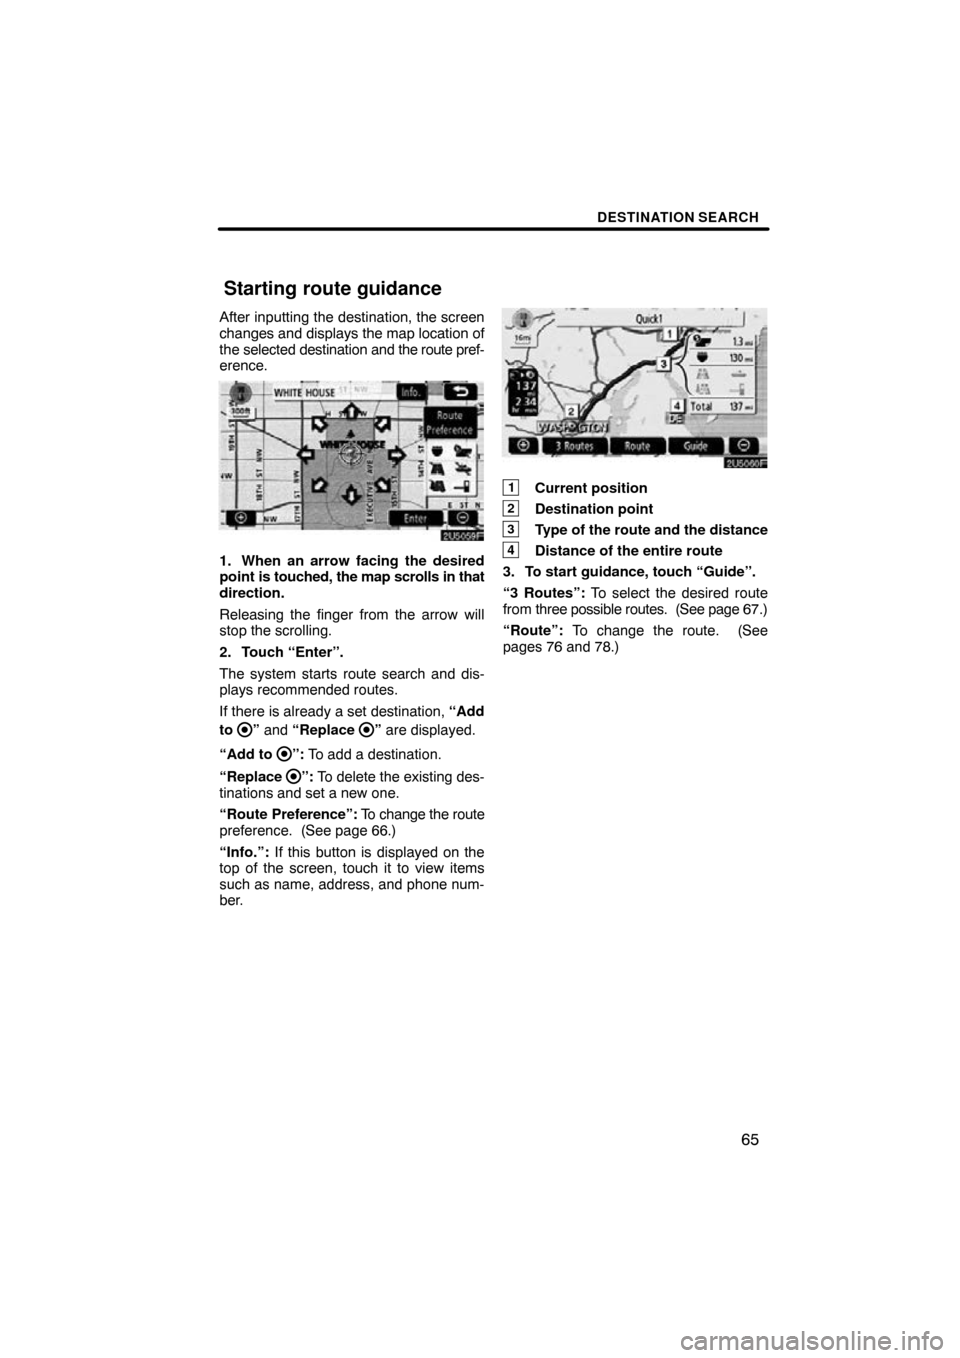
After inputting the destination, the screen
changes and displays the map location of
the selected destination and the route pref-
erence.
1. When an arrow facing the desired
point is touched, the map scrolls in that
direction.
Releasing the finger from the arrow will
stop the scrolling.
2. Touch “Enter”.
The system starts route search and dis-
plays recommended routes.
If there is already a set destination, “Add
to
” and “Replace ” are displayed.
“Add to
”: To add a destination.
“Replace
”: To delete the existing des-
tinations and set a new one.
“Route Preference”: To change the route
preference. (See page 66.)
“Info.”: If this button is displayed on the
top of the screen, touch it to view items
such as name, address, and phone num-
ber.
1Current position
2Destination point
3Type of the route and the distance
4Distance of the entire route
3. To start guidance, touch “Guide”.
“3 Routes”: To select the desired route
from three possible routes. (See page 67.)
“Route”: To change the route. (See
pages 76 and 78.)
Starting route guidance
Page 86 of 197
ROUTE GUIDANCE
86
:To indicate the next destination.
:To preview the route to the next
destination.
:To preview the route to the next
destination in fast −forward mode.
: To stop the preview.
:To review the route to the previous
destination or starting point.
: To review the route to the previous
destination or starting point in
fast−forward mode.
: To indicate the previous destina-
tion or starting point. It is possible to store the traveled route up
to 124 miles (200 km) and retrace the route
on the display.
INFORMATION
This feature is available on the map
with
more detailed map scale than 30
mile (50 km).
Touch “Map View”.
— Route trace
Page 87 of 197
ROUTE GUIDANCE
87
“Record”: To start recording the route
trace.
“Stop”: To stop recording the route trace.
If you touch “Stop” to display the following
screen.
Touching “Yes” stops recording and the
route trace remains displayed on the
screen.
Touching “No” stops recording and the
route trace is erased.
Page 145 of 197

AUDIO SYSTEM
145
This section describes some of the basic
features of your audio system. Some in-
formation may not pertain to your system.
Vehicles with smart key system —
Your audio system works when the “EN-
GINE START STOP” switch is in ACCES-
SORY or IGNITION ON mode.
Vehicles without smart key system —
Your audio system works when the engine
switch is in “ACC” or “ON” position.
NOTICE
To prevent the battery from being dis-
charged, do not leave the audio sys-
tem on longer than necessary when
the engine is not running.
This device complies with part 15 of the
FCC Rules and RSS −210. Operation is
subject to the following two conditions:
(1) This device may not cause harmful
interference, and (2) this device must
accept any interference received, in-
cluding interference that may cause un-
desired operation.
CAUTION: Changes or modifications
not expressly approved by the party re-
sponsible for compliance could void
the user’s authority to operate the
equipment.
�Laser products
�Do not take this unit apart or at-
tempt to make any changes
yourself. This is an intricate unit
that uses a laser pickup to re-
trieve information from the sur-
face of compact discs. The la-
ser is carefully shielded so that
its rays remain inside the cabi-
net. Therefore, never try to dis-
assemble the player or alter any
of its parts since you may be ex-
posed to laser rays and danger-
ous voltages.
�This product utilizes a laser.
Use of controls or adjustments
or performance of procedures
other than those specified here-
in may result in hazardous radi-
ation exposure.
Using your audio system —
— Some basics
Page 158 of 197
AUDIO SYSTEM
158
The CD player can play audio CDs, CD
text, WMA discs and MP3 discs.
�Audio CD, CD text161
. . . . . . . . .
�MP3/WMA disc 164
. . . . . . . . . . .
For appropriate discs for this changer, see
“Audio system operating hints” on page
170. (a) Inserting discs
Vehicles with smart key system —
The “ENGINE START STOP” switch must
be set at ACCESSORY or IGNITION ON
mode.
Vehicles without smart key system —
The engine switch must be set at “ACC” or
“ON” position.
1. Push the “” button.
— CD player operation