Page 17 of 24
 until you hear a beep. Push desired")
15
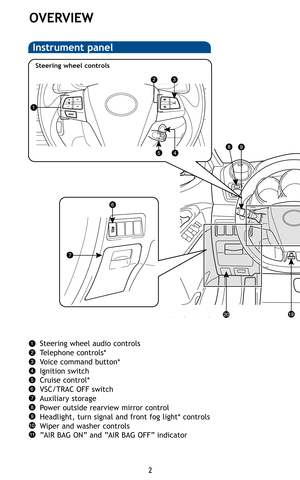
OVERVIEW
FEATURES/OPERATIONS
SAFETY AND EMERGENCY FEATURES
To preset stations Tune in the desired station and hold down a preset
button (from to or one of ) until you hear a beep. Push desired
preset button (from to or one of ) to select.
To scan stations Push and hold “SCAN” to scan preset stations. Push again
to hold selection.
“”
Use to search within the selected audio medium (radio, CD, iPod®, etc.).
“MODE”
Push to turn audio ON and to select an audio mode. Push and hold to
turn the audio system OFF.
vv
Volume control
AUX port
By inserting a mini plug into the AUX port, you can listen to music from a
portable audio device through the vehicle’s speaker system while in AUX
mode.
USB port (if equipped)
By connecting a USB-compatible portable audio device or USB memory to
the USB port, you can listen to music from the portable audio device or
USB memory through the vehicle’s speaker system while in USB mode.
Press DISC-AUX button to select
correct audio source
414843M2.qxd:414843M2 11/18/10 9:44 AM Page 15
Page 18 of 24
16
FEATURES/OPERATIONS
Airflow vent
Use “ ” or “ ” mode to reduce window fogging (system
automatically switches to fresh air mode).
Fan speed
Temperature selector
For quick cooling, turn to MAX A/C position and select
recirculated air mode (“ ” indicator ON).
Air Conditioning ON/OFF
Outside rearview mirror (if equipped)/Rear window defogger
Recirculate cabin air (fresh air when OFF)
Brightness
control
-
+
414843M2.qxd:414843M2 11/18/10 9:44 AM Page 16
Page 19 of 24
17
OVERVIEW
FEATURES/OPERATIONS
SAFETY AND EMERGENCY FEATURES
1 The set speed may also be cancelled by depressing the brake pedal.2 The set speed may be resumed once vehicle speed exceeds 25 mph.
System ON/OFF
Increase speed
Set/Decrease speedCancel1
Resume2
Pull Push
414843M2.qxd:414843M2 11/18/10 9:44 AM Page 17
Page 20 of 24
18
FEATURES/OPERATIONS
Bluetooth®technology allows dialing or receipt of calls without taking
hands from the steering wheel or using a cable to connect the compatible
telephone and the system.
Refer to “Using the hands-free phone system (for cellular phones),”
Section 3-4 in the Owner’s Manual, or go to Toyota.LetsTalk.com for more
information about phone connections and compatibility.
Vehicles without moonroofVehicles with moonroof
Steering wheel telephone switches
Start call
End call
Voice command button
Volume control
FrontRear
MicrophoneMicrophone
414843M2.qxd:414843M2 11/18/10 9:44 AM Page 18
Page 21 of 24
19
OVERVIEW
FEATURES/OPERATIONS
SAFETY AND EMERGENCY FEATURES
Designed for 12V car accessories.
The ignition switch must be in the “ACC” or “ON” position.
The ignition switch must be in the “ON” position.
Front Rear
414843M2.qxd:414843M2 11/18/10 9:44 AM Page 19
Page 22 of 24

20
Moving the lever to “LOCK” will allow the door to be opened only from
the outside.
Rear door
System reset initialization
1. Push and hold “ SET” button until the indicator blinks
three times.
2. Wait a few minutes to allow initialization to complete.
Push up, or squeeze
lock release to lower
SAFETY AND EMERGENCY FEATURES
After adjusting tire pressures, or after tires have been rotated or
replaced, turn the ignition switch to “ON” and press and hold the
“ SET” button until indicator blinks three times. Let the vehicle sit for a
few minutes to allow initialization to complete.
Refer to the load label on the door jamb or the Owner’s Manualfor tire
inflation specifications.
If the tire pressure indicator flashes for more than 60 seconds and then
remains on, take the vehicle to your local Toyota dealer.
NOTE : The warning light may come on due to temperature changes or
changes in tire pressure from natural air leakage. If the system has not
been initialized recently, setting the tire pressures to factory
specifications should turn off the light.
414843M2.qxd:414843M2 11/18/10 9:44 AM Page 20
Page 23 of 24
21
OVERVIEW
FEATURES/OPERATIONS
SAFETY AND EMERGENCY FEATURES
If belt is fully extended, then retracted even slightly, it cannot be
re-extended beyond that point, unless fully retracted again. This feature
is used to help hold child restraint systems securely.
To find more information about seat belts, and how to install a child
restraint system, refer to the Owner's Manual.
Keep as low on
hips as possible
Take up slack
Too high
(1) Turn the knobs to the “UNLOCK” position and remove the deck boards.
(2) Loosen the center fastener that secures the spare tire.
Refer to the Owner’s Manual for tire changing and jack positioning
procedures.
Spare tireJack
(1)(2)
Wheel nut wrench
Jack handle
414843M2.qxd:414843M2 11/18/10 9:44 AM Page 21
Page 24 of 24
CUSTOMER EXPERIENCE CENTER 1- 8 0 0 - 3 31- 4 3 31
00505-QRG11-MAT
Printed in U.S.A. 11/10
10-TCS-04006
10%
Cert no. SGSNA-COC-005612
4
14843M1 2414843M1 211/17/10 7:24 PM11/17/10 7:24 PM
Page:
< prev 1-8 9-16 17-24


.
Fan speed
Temperature selector
For quick cooling, turn to")


