Page 186 of 524
186 2-1. Driving procedures
UK_AURIS_HV_EE
Selecting a driving mode
The following modes can be selected to suit driving conditions.
Eco drive mode
Use Eco drive mode to help achieve low fuel consumption during trips
that involve frequent accelerating and braking. The operation of the air
conditioning system will be minimized.
Press the “ECO MODE” switch once more to cancel the Eco drive
mode.
Eco drive mode will not be canceled until the “ECO MODE” switch is
pressed, even if the “POWER” switch is turned off.
Press the “PWR MODE” switch to change the driving mode to power
mode.
Power mode
Use when high levels of response and feeling are desirable, such as
when driving in mountainous regions or when overtaking.
Press the “PWR MODE” switch once more to cancel the power mode.
Turning the “POWER” switch off will cancel power mode.
Press the “ECO MODE” switch to change the driving mode to Eco drive
mode.
Page 209 of 524

209 2-3. Operating the lights and wipers
2
When driving
UK_AURIS_HV_EE
Headlight control sensor (if equipped)
Automatic light off system (if equipped)
When the light switch is in
or : The headlights and front fog
lights turn off automatically if the “POWER” switch is turned to ACCES-
SORY mode or turned off.
When the light switch is in : The headlights and all lights turn off
automatically if the “POWER” switch is turned to ACCESSORY mode or
turned off and the driver's door is opened.
To turn the lights on again, turn to ON mode, or turn the light switch off once
and then back to
or .
Light reminder buzzer (if equipped)
A buzzer sounds when the “POWER” switch is turned off or to ACCESSORY
mode and the driver's door is opened while the lights are turned on.
Automatic headlight leveling system (vehicles with discharge head-
lights)
The level of the headlights is automatically adjusted according to the number
of passengers and the loading condition of the vehicle to ensure that the
headlights do not interfere with other road users.
Customization that can be configured at any authorized Toyota dealer
or repairer, or another duly qualified and equipped professional
Settings of the light sensor sensitivity can be changed.
(Customizable features P. 506)
Headlight control sensor is located on the
driver's side.
The sensor may not function properly if
an object is placed on the sensor, or any-
thing that blocks the sensor is affixed to
the windshield.
Doing so interferes with the sensor
detecting the level of ambient light and
may cause the automatic headlight sys-
tem to malfunction.
Page 226 of 524

226 2-4. Using other driving systems
UK_AURIS_HV_EE
Sensor detection information
Certain vehicle conditions and the surrounding environment may affect
the ability of the sensor to correctly detect obstacles. Particular instances
where this may occur are listed below.
• There is dirt, snow or ice on the sensor. (Wiping the sensor will resolve
this problem.)
• The sensor is frozen. (Thawing the sensor will resolve this problem.)
• The sensor is covered in any way.
• In harsh sunlight or intense cold weather.
• When driving bumpy, sloped or gravel roads, or over grass.
• If there is something producing ultrasonic waves nearby, such as
another vehicle’s horn, motorcycle engine noise, air braking sound
from heavy-duty vehicles, or another vehicle using the park assist sys-
tem.
• In heavy rain, or if water is splashed on the sensors.
• The vehicle is leaning considerably to one side.
• If a commercial fender pole or radio antenna is installed.
• If moving towards a high curb or a curb corner.
• If towing eyelet is installed on your vehicle.
• The bumper or sensor receives a strong impact.
• A non-genuine Toyota suspension (lowered suspension etc.) is
installed.
In addition to the examples above, there are instances in which, because of
their shapes, signs and other objects may be judged by the sensors to be
closer than they are.
The shape of the obstacle may prevent the sensor from detecting it. Pay
particular attention to the following obstacles.
• Thin objects such as wire, fencing or rope.
• Objects that absorb sound waves, such as cotton or snow.
• Objects with sharp corners.
• Low objects.
• Objects where the upper section projects out over the lower section.
Page 236 of 524

236
2-5. Driving information
UK_AURIS_HV_EE
Winter driving tips
Carry out the necessary preparations and inspections before driving
the vehicle in winter. Always drive the vehicle in a manner appropri-
ate to the prevailing weather conditions.
Pre-winter preparations
Use fluids that are appropriate to the prevailing outside tem-
peratures.
• Engine oil
• Engine/power control unit coolant
• Washer fluid
Have the vehicle fitted with four snow tires or purchase a set
of tire chains for the front tires.
Ensure that all tires are the same size and brand, and that chains
match the size of the tires.
Before driving the vehicle
Perform the following according to the driving conditions.
Do not try to forcibly open a window, scrape an outside rear
view mirror surface or move a wiper or outside rear view mir-
ror that is frozen. Pour warm water over the frozen area to
melt the ice. Wipe away the water immediately to prevent it
from freezing.
To ensure proper operation of the climate control system fan,
remove any snow that has accumulated on the air inlet vents
in front of the windshield.
Remove any ice that has accumulated on the vehicle chassis.
Periodically check for and remove any excess ice or snow
that may have accumulated in the wheel well or on the
brakes.
Page 242 of 524
242
UK_AURIS_HV_EE
3-1. Using the air conditioning
system and defogger
Air conditioning system ..... 244
Rear window and
outside rear view
mirror defoggers ............. 251
3-2. Using the audio system
Audio system types........... 252
Using the radio.................. 257
Using the CD player.......... 262
Playing back MP3 and
WMA discs...................... 267
Operating an iPod ............. 273
Operating a USB
memory........................... 280
Optimal use of the audio
system ............................ 288
Using the AUX port ........... 291
Using the steering wheel
audio switches ................ 292
Page 244 of 524
244
UK_AURIS_HV_EE
3-1. Using the air conditioning system and defogger
Air conditioning system
Using the automatic mode
Press .
The air conditioning system will begin to operate.
Press “” to increase the temperature and “” to decrease the
temperature on .
Air outlets and fan speed are automatically adjusted according to the
temperature setting.
Air outlet displayWindshield defogger Temperature control
Outside air or recirculated air mode
Fan speed
Temperature setting display OffAutomatic mode
Changes the air outlets used
Fan speed display Air conditioning
ON/OFF switch
STEP1
STEP2
Page 245 of 524
245 3-1. Using the air conditioning system and defogger
3
Interior features
UK_AURIS_HV_EE
Adjusting the settings
Adjusting the temperature setting
Press “” to increase the temperature and “” to decrease the tem-
perature on .
Adjusting the fan speed
Press “” (increase) or “” (decrease) on .
The fan speed is shown on the display. (7 levels)
Press to turn the fan off.
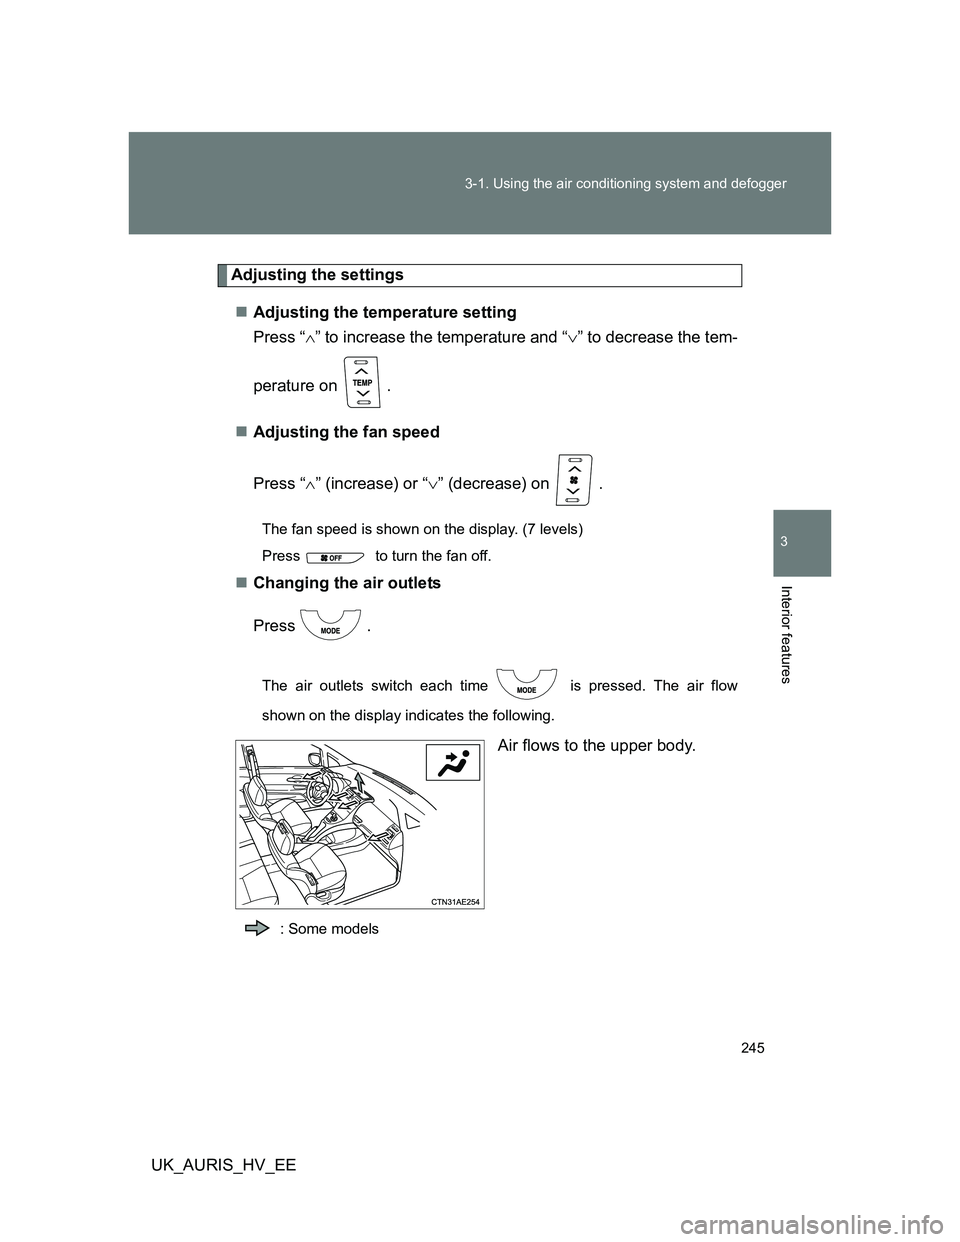
Changing the air outlets
Press .
The air outlets switch each time is pressed. The air flow
shown on the display indicates the following.
Air flows to the upper body.
: Some models
Page 246 of 524
246 3-1. Using the air conditioning system and defogger
UK_AURIS_HV_EEAir flows to the upper body and
feet.
: Some models
Mainly air flows to the feet.
: Some models
Air flows to the feet and the
windshield defogger operates.
Recirculated air mode will auto-
matically switch to outside air
mode.
: Some models
Switching air intake modes
Press .
The mode switches between outside air mode (indicator off) and recircu-
lated air mode (indicator on) each time is pressed.