2011 SUBARU TRIBECA buttons
[x] Cancel search: buttonsPage 109 of 422
2-8Keys and doors
door locking switches. &Key lock-in prevention func- tion
This function prevents the doors from
being locked with the key still in the
ignition switch. ! Behavior with key lock-in preven-
tion function operational
. With either the driver ’s or front passen-
ger ’s door open, the doors automatically
remain unlocked even if the “
”side of the
door locking switch is pushed. . It is possible to lock the all doors and
the rear gate by holding the “
”side of the
door locking switch pushed for 3 seconds
with the driver ’s door open and then
closing the driver ’s door.
! Behavior with key lock-in preven-
tion function non-operational
. If the lock lever is turned to the rear
( “ LOCK ”) position with the driver ’s door
open and the driver ’s door is then closed
with the lock lever in that position, thedriver ’s door is locked.
. If the spare key is used to lock the
driver ’s door from the outside of the
vehicle, the door is locked.
This function ’s operational/non-opera- tional setting can be changed by a
SUBARU dealer. Contact a SUBARU
dealer for details.
NOTE
When leaving the vehicle, make sure
you are holding the key before locking
the doors. Remote keyless entry system
CAUTION
. Do not expose the remote trans-
mitter to severe shocks, such as
those experienced as a result of
dropping or throwing.
. Do not take the remote transmit-
ter apart except when replacing
the battery.
. Do not get the remote transmitter
wet. If it gets wet, wipe it dry with
a cloth immediately.
. When you carry the remote trans-
mitteronanairplane,donot
press the button of the remote
transmitter while in the airplane.
When any button of the remote
transmitter is pressed, radio
waves are sent and may affect
the operation of the airplane.
When you carry the remote trans-
mitter in a bag on an airplane,
take measures to prevent the
buttons of the remote transmitter
from being pressed.
This device complies with Part 15 of
the FCC Rules and with RSS-210 of
Industry Canada. Operation is subject
Page 178 of 422
Automatic climate control system NOTE .Operate the automatic climate con-
trol system when the engine is running. . The blower fan rotates at a low
speed when the engine coolant tem-
perature is low.
For efficient defogging or dehumidify-
ing in cold weather, press the “A/C ”
button.. The vehicle has a rear air condi-
tioner. The fan speed of the rear air
conditioner can be adjusted, but other
adjustments (outlet air temperature, air
distribution, etc.) are not possible for
the rear air conditioner. For details,
refer to “Rear air conditioner ”F 4-9.
The automatic climate control system
automatically controls outlet air tempera-
ture, fan speed, airflow distribution, air
inlet control, and air conditioner compres-
sor operation. It activates when the“ AUTO ”button is pressed, and is used to
maintain a constant, comfortable climate
within the passenger compartment.
The temperature can be set within a range
of 65 to 85 8F (18 to 32 8C). &
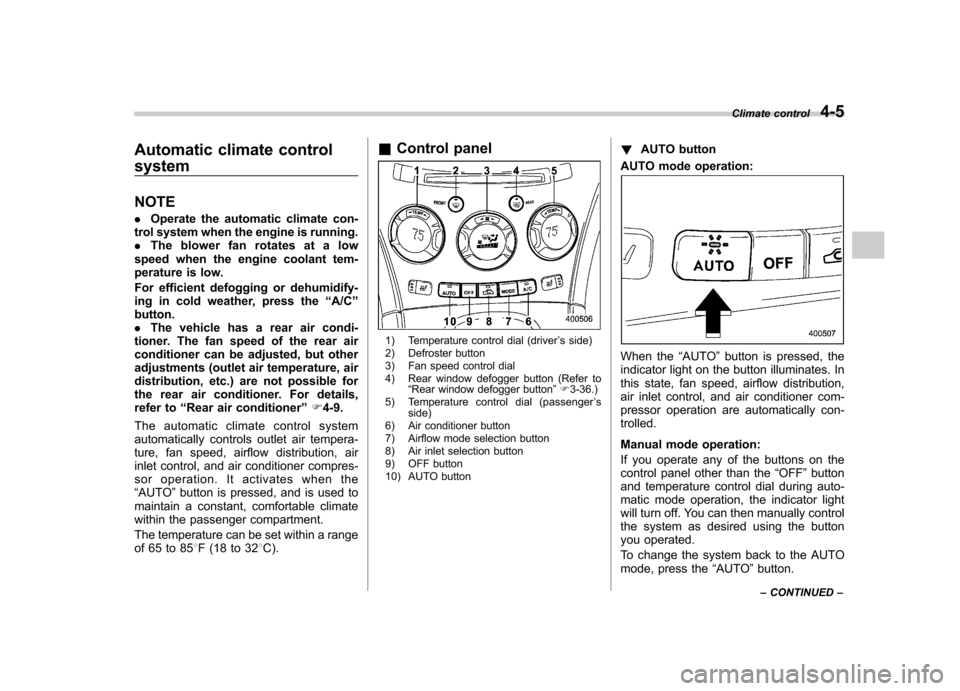
Control panel
1) Temperature control dial (driver ’s side)
2) Defroster button
3) Fan speed control dial
4) Rear window defogger button (Refer to “Rear window defogger button ”F 3-36.)
5) Temperature control dial (passenger ’s
side)
6) Air conditioner button
7) Airflow mode selection button
8) Air inlet selection button
9) OFF button
10) AUTO button !
AUTO button
AUTO mode operation:
When the “AUTO ”button is pressed, the
indicator light on the button illuminates. In
this state, fan speed, airflow distribution,
air inlet control, and air conditioner com-
pressor operation are automatically con-trolled.
Manual mode operation:
If you operate any of the buttons on the
control panel other than the “OFF ”button
and temperature control dial during auto-
matic mode operation, the indicator light
will turn off. You can then manually control
the system as desired using the button
you operated.
To change the system back to the AUTO
mode, press the “AUTO ”button.
Climate control
4-5
– CONTINUED –
Page 188 of 422
Antenna system.................................................. 5-2
Printed antenna ................................................... 5-2
FM reception ....................................................... 5-2
Installation of accessories .................................. 5-2
Audio set ............................................................. 5-3
Type A audio set ................................................. 5-3
Type B audio set ................................................. 5-3
Type A audio set (if equipped) ........................... 5-4
Radio operation. .................................................. 5-4
Compact disc player operation ........................... 5-10Type B audio set (if equipped)
.......................... 5-15
Radio operation ................................................. 5-15
Built in CD changer operation .. .......................... 5-21
Audio control buttons ....................................... 5-26
MODE button ..................................................... 5-26
Auxiliary input jack ............................................ 5-28
Rear Seat Entertainment (RSE) system operation (if equipped) ................................... 5-29
Precautions to observe when handling a compact disc ................................................... 5-29 Audio
5
Page 194 of 422

NOTE
While you are holding down either side
of the“TUNE TRACK ”button, the
tuning frequency will not stop chan-
ging even if the frequency of a recei-
vable station is reached. ! Seek tuning
If you press the “
”or “”side of the
“ SEEK FLDR ”button (7), the radio will
automatically search for a receivable
station and stop at the first one it finds.
This function may not be available, how-
ever, when radio signals are weak. In such
a situation, perform manual tuning to
select the desired station. ! Automatic tuning (SCAN)
Press the “SCAN ”button (8) to change the
radio to the SCAN mode. In this mode, the
radio scans through the radio band until a
station is found. The radio will stop at the
station for 5 seconds while displaying the
frequency, after which scanning will con-
tinue until the entire band has been
scanned from the low end to the high
end. Press the “SCAN ”button again to
cancel the SCAN mode and to stop on any
displayed frequency.
Press the “
”or “”side of the “SEEK
FLDR ”button (7) again to cancel the scan
mode and to stop on any displayed frequency.
When the
“SCAN ”button is pressed for
automatic tuning, stations are scanned in
the direction of low frequencies to high
frequencies only.
Automatic tuning may not function prop-
erly if the station reception is weakened by
distance from the station or proximity to
tall buildings and hills. ! Selecting preset stations
Presetting a station with a preset button
(10) allows you to select that station in a
single operation. Up to six, AM, FM1 and
FM2 stations each may be preset. ! How to preset stations
1. Press the “FM AM ”button (2) to select
FM1, FM2, or AM reception.
2. Press the “SCAN ”button (8) or tune
the radio manually until the desired station
frequency is displayed.
3. Press one of the preset buttons (10)
for more than 1.5 seconds to store the
frequency. If the button is pressed for less
than 1.5 seconds, the preceding selection
will remain in memory. NOTE . If the connection between the radio
and battery is broken for any reason
such as vehicle maintenance or radio removal, all stations stored in the
preset buttons are cleared. If this
occurs, it is necessary to reset the
preset buttons..
If a cell phone is placed near the
radio, it may cause the radio to emit
noise when it receives calls. This noise
does not indicate a radio malfunction. ! Satellite radio mode (if equipped)
To receive satellite radio, it is necessary to
install the SUBARU genuine satellite
receiver (optional part) and to enter into
a contract with a satellite radio network
service such as “XM
TMsatellite radio ”(for
U.S.A. only) or “Sirius satellite radio ”. For
details, please contact your SUBARU
dealer. ! Sirius satellite radio
Sirius satellite radio is a recent innovation
that allows the listener to experience
digital sound quality and to have a greater
variety of channels.
Use of satellite radio (Sirius) requires a
tuner, antenna and a service contract. For
details, please contact your SUBARU
dealer or visit Sirius Satellite Radio at
www.sirius.com or call 1-888-539-SIRIUS
(7474) for more information. Sirius, the
Sirius dog logo, channel names and logos
are trademarks of SIRIUS Satellite RadioInc. Audio
5-7
– CONTINUED –
Page 195 of 422
5-8Audio
! XM
TMsatellite radio (for U.S.A. only)
XMTMis a continental U.S. based satellite
radio service, including music, news,
sports, talk and children ’s programming.
XM
TMprovides digital quality audio and
text information, including song title and
artist name. A service fee is required to
receive the XM
TMservice. For more
information, contact XMTMatwww.xmradio.com or call 1-800-
XMRADIO (1-800-967-2346). ! Satellite radio reception
Satellite radio signals are best received in
areas with a clear view of the open sky. In
areas where there are tall buildings, trees,
tunnels or other structures that may
obstruct the signal of the satellites, there
may be signal interruptions. Other circum-
stances that may result in signal loss
include driving near a wall, steep cliff or
hill, or driving on the lower level of a multi-
tiered road or inside a parking garage.
To help reduce this condition, satellite
radio providers have installed ground-
based repeaters in heavily populated
areas. However, you may still experience
reception problems in some areas. ! Displaying satellite radio ID of tuner
When you activate satellite radio, you
should have your satellite radio tuner ID ready because each tuner is identified by
its unique satellite radio tuner ID.
The satellite radio ID will be needed when
you activate satellite radio and receive
satellite radio customer support.
The satellite radio ID can be found on the
audio display by tuning the channel to
“0 ”.
Turn the “TUNE TRACK ”button (4) to
select the satellite radio channel. ! Band selection button
Push the “SAT ”button (1) when the radio
is off to turn on the radio.
Push the “SAT ”button when the radio is
on to select SAT1, SAT2 or SAT3 recep- tion. ! Channel selection
Press “
”of the “TUNE TRACK ”button
(4) to select the next channel and press “
” of the button to select the previous
channel.
Keep pressing “
”of the button to
change to the next channel continuously
and keep pressing “
”of the button to
change to the previous channel continu-
ously. ! Category selection
Press “
”or “”of the “SEEK FLDR ”
button (7) to display the current category. Press “
”again to select the next category, and press
“
”again to select
the previous category. ! Channel scan
Press the “SCAN ”button (8) to change the
radio to the SCAN mode. In this mode, the
radio scans through the channels until a
station is found. The radio will stop at the
station for 5 seconds while displaying the
channel number, after which scanning will
continue until the entire channel has been
scanned from the low end to the high end.
Also during the category selection, chan-
nel scan can be performed in that cate-
gory.
Press the “SCAN ”button again to cancel
the SCAN mode and to stop on any
displayed channel. ! Selecting preset channels
Presetting a channel with a preset button
(10) allows you to select that channel in a
single operation. Up to six, SAT1, SAT2
and SAT3 channels each may be preset. ! How to preset channels
1. Press the “SAT ”button (1) to select
SAT1, SAT2 and SAT3 reception.
2. Press the “SCAN ”button (8) or the
“ TUNE TRACK ”button (4) to select the
channel.
3. Press one of the preset buttons (10)
Page 196 of 422

for more than 1.5 seconds to store the
channel. If the button is pressed for less
than 1.5 seconds, the preceding selection
will remain in memory. NOTE
If the connection between the radio and
battery is broken for any reason such
as vehicle maintenance or radio re-
moval, all channels stored in the preset
buttons are cleared. If this occurs, it is
necessary to reset the preset buttons. !Display selection
Press the “AUDIO ”button (5) while receiv-
ing satellite radio to change the display as follows.
! Rear seat entertainment
If your vehicle is equipped with a Rear
Seat Entertainment System, you can
enjoy audio outputs from the system
through the vehicle ’s speakers by press-
ing the “RSE AUX ”button (3). Press the
button again to return to the audio setsound. NOTE
If your vehicle is equipped with a Rear
Seat Entertainment System, refer to the
Owner
’s Manual supplement for the
Rear Seat Entertainment System for
further details. Audio
5-9
– CONTINUED –
Page 205 of 422
5-18Audio
NOTE
While you are holding down either side
of the TUNE/TRACK button, the tuning
frequency will not stop changing even
if the frequency of a receivable station
is reached. ! Seek tuning (SEEK)
If you press the “
”or “”side of the
“ SEEK FLDR ”button (7), the radio will
automatically search for a receivable
station and stop at the first one it finds.
This function may not be available, how-
ever, when radio signals are weak. In such
a situation, perform manual tuning to
select the desired station. ! Scan tuning (SCAN)
Press the “SCAN ”button (8) to change the
radio to the SCAN mode. In this mode, the
radio scans through the radio band until a
station is found. The radio will stop at the
station for 5 seconds while displaying the
frequency, after which scanning will con-
tinue until the entire band has been
scanned from the low end to the high
end. Press the “SCAN ”button again to
cancel the SCAN mode and to stop on any
displayed frequency.
Press the “
”or “”side of the “SEEK
FLDR ”button (7) again to cancel the scan
mode and to stop on any displayed frequency.
When the
“SCAN ”button is pressed for
automatic tuning, stations are scanned in
the direction of low frequencies to high
frequencies only.
Automatic tuning may not function prop-
erly if the station reception is weakened by
distance from the station or proximity to
tall buildings and hills. ! Selecting preset stations
Presetting a station with a preset button
allows you to select that station in a single
operation. Up to six AM, FM1 and FM2
stations each may be preset. ! How to preset stations
1. Press the “FM AM ”button (2) to select
FM1, FM2 or AM reception.
2. Press the “SCAN ”button (8) or tune
the radio manually until the desired station
frequency is displayed.
3. Press one of the preset buttons for
more than 1.5 seconds to store the
frequency. If the button is pressed for less
than 1.5 seconds, the preceding selection
will remain in memory. NOTE . If the connection between the radio
and battery is broken for any reason
such as vehicle maintenance or radio removal, all stations stored in the
preset buttons are cleared. If this
occurs, it is necessary to reset the
preset buttons..
If a cell phone is placed near the
radio, it may cause the radio to emit
noise when it receives calls. This noise
does not indicate a radio malfunction. ! Satellite radio mode (if equipped)
To receive satellite radio, it is necessary to
install the SUBARU genuine satellite
receiver (optional part) and to enter into
a contract with a satellite radio network
service such as “XM
TMsatellite radio ”(for
U.S.A. only) or “Sirius satellite radio ”. For
details, please contact your SUBARU
dealer. ! Sirius satellite radio
Sirius satellite radio is a recent innovation
that allows the listener to experience
digital sound quality and to have a greater
variety of channels.
Use of satellite radio (Sirius) requires a
tuner, antenna and a service contract. For
details, please contact your SUBARU
dealer or visit Sirius Satellite Radio at
www.sirius.com or call 1-888-539-SIRIUS
(7474) for more information. Sirius, the
Sirius dog logo, channel names and logos
are trademarks of SIRIUS Satellite RadioInc.
Page 206 of 422

!XMTMsatellite radio (for U.S.A. only)
XMTMis a continental U.S. based satellite
radio service, including music, news,
sports, talk and children ’s programming.
XM
TMprovides digital quality audio and
text information, including song title and
artist name. A service fee is required to
receive the XM
TMservice. For more
information, contact XMTMatwww.xmradio.com or call 1-800-
XMRADIO (1-800-967-2346). ! Satellite radio reception
Satellite radio signals are best received in
areas with a clear view of the open sky. In
areas where there are tall buildings, trees,
tunnels or other structures that may
obstruct the signal of the satellites, there
may be signal interruptions. Other circum-
stances that may result in signal loss
include driving near a wall, steep cliff or
hill, or driving on the lower level of a multi-
tiered road or inside a parking garage.
To help reduce this condition, satellite
radio providers have installed ground-
based repeaters in heavily populated
areas. However, you may still experience
reception problems in some areas. ! Displaying satellite radio ID of tuner
When you activate satellite radio, you
should have your satellite radio tuner ID ready because each tuner is identified by
its unique satellite radio tuner ID.
The satellite radio ID will be needed when
you activate satellite radio and receive
satellite radio customer support.
The satellite radio ID can be found on the
audio display by tuning the channel to
“0 ”.
Turn the “TUNE/TRACK ”button (4) to
select the satellite radio channel. ! Band selection button
Push the “SAT ”button (1) when the radio
is off to turn on the radio.
Push the “SAT ”button when the radio is
on to select SAT1, SAT2 or SAT3 recep- tion. ! Channel selection
Press “
”of the “TUNE TRACK ”button
(4) to select the next channel and press “
” of the button to select the previous
channel.
Keep pressing “
”of the button to
change to the next channel continuously
and keep pressing “
”of the button to
change to the previous channel continu-
ously. ! Category selection
Press “
”or “”of the “SEEK FLDR ”
button (7) to display the current category. Press “
”again to select the next category, and press
“
”again to select
the previous category. ! Channel scan
Press the “SCAN ”button (8) to change the
radio to the SCAN mode. In this mode, the
radio scans through the channels until a
station is found. The radio will stop at the
station for 5 seconds while displaying the
channel number, after which scanning will
continue until the entire channel has been
scanned from the low end to the high end.
Also during the category selection, chan-
nel scan can be performed in that cate-
gory.
Press the “SCAN ”button again to cancel
the SCAN mode and to stop on any
displayed channel. ! Selecting preset channels
Presetting a channel with a preset button
(10) allows you to select that channel in a
single operation. Up to six, SAT1, SAT2
and SAT3 channels each may be preset. ! How to preset channels
1. Press the “SAT ”button (1) to select
SAT1, SAT2 and SAT3 reception.
2. Press the “SCAN ”button (8) or the
“ TUNE TRACK ”button (4) to select the
channel.
3. Press one of the preset buttons (10) Audio
5-19
– CONTINUED –