Page 342 of 422
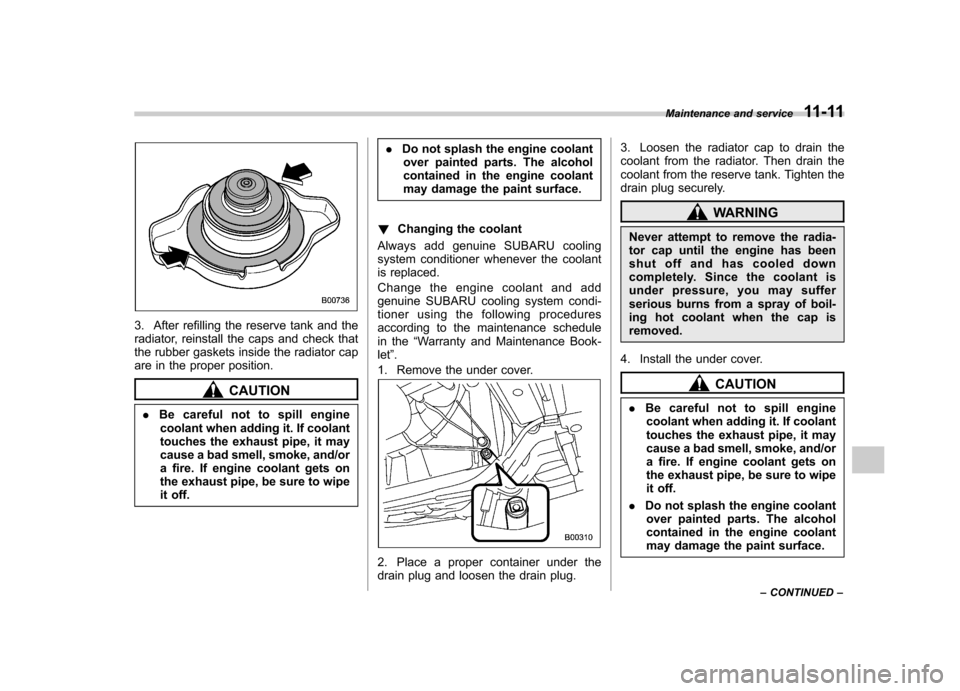
3. After refilling the reserve tank and the
radiator, reinstall the caps and check that
the rubber gaskets inside the radiator cap
are in the proper position.
CAUTION
. Be careful not to spill engine
coolant when adding it. If coolant
touches the exhaust pipe, it may
cause a bad smell, smoke, and/or
a fire. If engine coolant gets on
the exhaust pipe, be sure to wipe
it off. .
Do not splash the engine coolant
over painted parts. The alcohol
contained in the engine coolant
may damage the paint surface.
! Changing the coolant
Always add genuine SUBARU cooling
system conditioner whenever the coolant
is replaced.
Change the engine coolant and add
genuine SUBARU cooling system condi-
tioner using the following procedures
according to the maintenance schedule
in the “Warranty and Maintenance Book-
let ”.
1. Remove the under cover.
2. Place a proper container under the
drain plug and loosen the drain plug. 3. Loosen the radiator cap to drain the
coolant from the radiator. Then drain the
coolant from the reserve tank. Tighten the
drain plug securely.
WARNING
Never attempt to remove the radia-
tor cap until the engine has been
shut off and has cooled down
completely. Since the coolant is
under pressure, you may suffer
serious burns from a spray of boil-
ing hot coolant when the cap isremoved.
4. Install the under cover.
CAUTION
. Be careful not to spill engine
coolant when adding it. If coolant
touches the exhaust pipe, it may
cause a bad smell, smoke, and/or
a fire. If engine coolant gets on
the exhaust pipe, be sure to wipe
it off.
. Do not splash the engine coolant
over painted parts. The alcohol
contained in the engine coolant
may damage the paint surface. Maintenance and service
11-11
– CONTINUED –
Page 343 of 422
11-12Maintenance and service
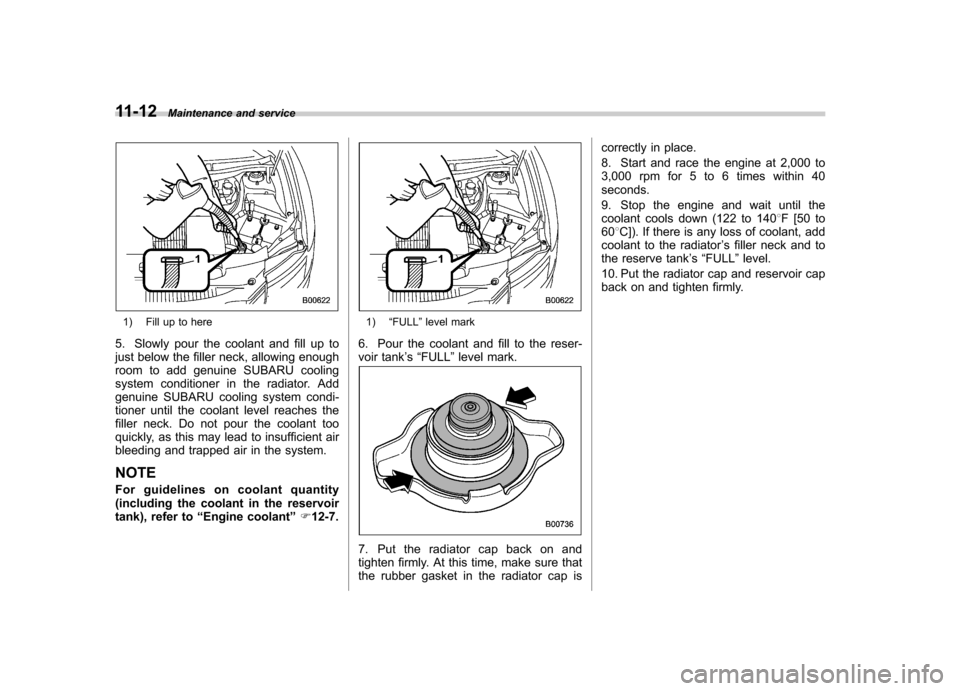
1) Fill up to here
5. Slowly pour the coolant and fill up to
just below the filler neck, allowing enough
room to add genuine SUBARU cooling
system conditioner in the radiator. Add
genuine SUBARU cooling system condi-
tioner until the coolant level reaches the
filler neck. Do not pour the coolant too
quickly, as this may lead to insufficient air
bleeding and trapped air in the system. NOTE
For guidelines on coolant quantity
(including the coolant in the reservoir
tank), refer to “Engine coolant ”F 12-7.1) “FULL ”level mark
6. Pour the coolant and fill to the reser-
voir tank ’s “FULL ”level mark.
7. Put the radiator cap back on and
tighten firmly. At this time, make sure that
the rubber gasket in the radiator cap is correctly in place.
8. Start and race the engine at 2,000 to
3,000 rpm for 5 to 6 times within 40seconds.
9. Stop the engine and wait until the
coolant cools down (122 to 140
8F [50 to
60 8C]). If there is any loss of coolant, add
coolant to the radiator ’s filler neck and to
the reserve tank ’s “FULL ”level.
10. Put the radiator cap and reservoir cap
back on and tighten firmly.
Page 344 of 422
Air cleaner element
WARNING
Do not operate the engine with the
air cleaner element removed. The air
cleaner element not only filters
intake air but also stops flames if
the engine backfires. If the air
cleaner element is not installed
when the engine backfires, you
could be burned.
CAUTION
When replacing the air cleaner ele-
ment, use a genuine SUBARU air
cleaner element. If it is not used,
there is the possibility of causing a
negative effect to the engine.
The air cleaner element functions as a
filter screen. When the element is perfo-
rated or removed, engine wear will be
excessive and engine life shortened.
It is unnecessary to clean or wash the element. &
Replacing the air cleaner element
Replace the air cleaner element according
to the maintenance schedule in the“ Warranty and Maintenance Booklet ”. Un-
der extremely dusty conditions, replace it
more frequently. It is recommended that
you always use genuine SUBARU parts.
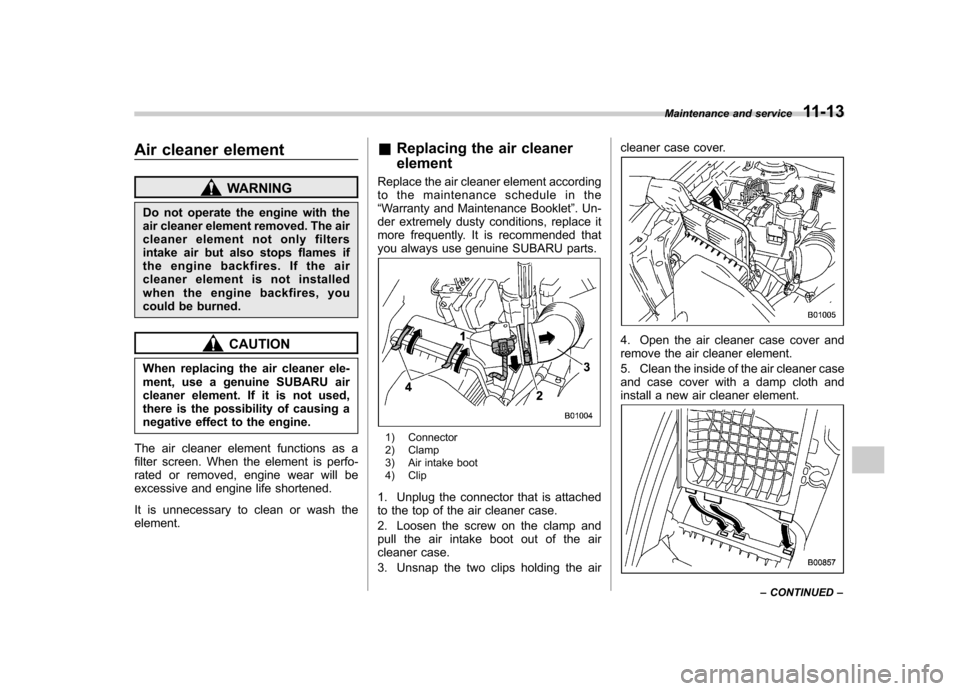
1) Connector
2) Clamp
3) Air intake boot
4) Clip
1. Unplug the connector that is attached
to the top of the air cleaner case.
2. Loosen the screw on the clamp and
pull the air intake boot out of the air
cleaner case.
3. Unsnap the two clips holding the air cleaner case cover.
4. Open the air cleaner case cover and
remove the air cleaner element.
5. Clean the inside of the air cleaner case
and case cover with a damp cloth and
install a new air cleaner element.
Maintenance and service
11-13
– CONTINUED –
Page 345 of 422
11-14Maintenance and service
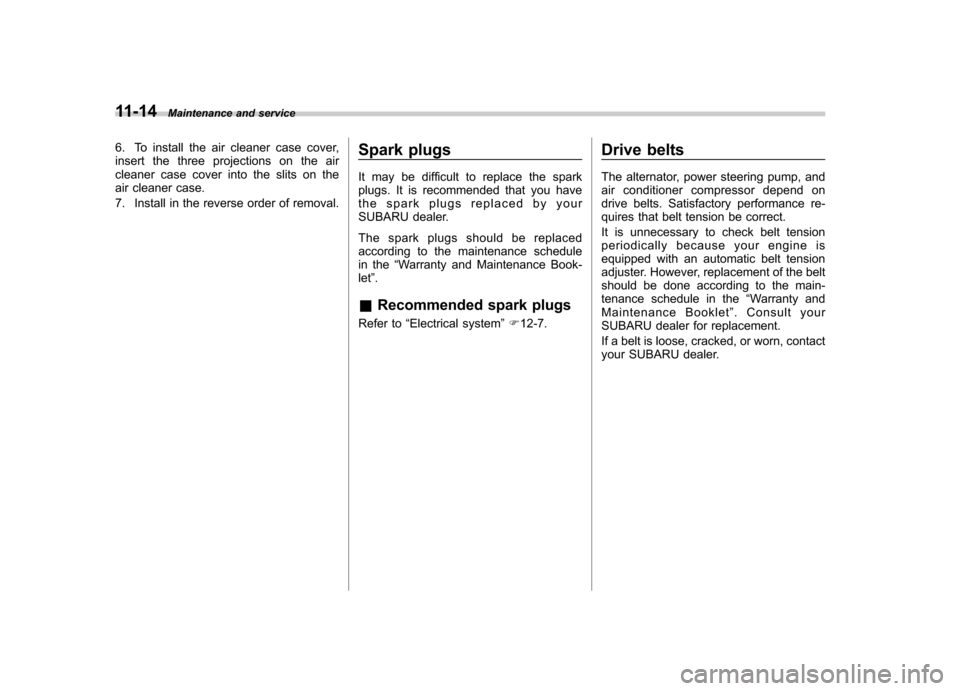
6. To install the air cleaner case cover,
insert the three projections on the air
cleaner case cover into the slits on the
air cleaner case.
7. Install in the reverse order of removal. Spark plugs
It may be difficult to replace the spark
plugs. It is recommended that you have
the spark plugs replaced by your
SUBARU dealer.
The spark plugs should be replaced
according to the maintenance schedule
in the
“Warranty and Maintenance Book-
let ”.
& Recommended spark plugs
Refer to “Electrical system ”F 12-7. Drive belts
The alternator, power steering pump, and
air conditioner compressor depend on
drive belts. Satisfactory performance re-
quires that belt tension be correct.
It is unnecessary to check belt tension
periodically because your engine is
equipped with an automatic belt tension
adjuster. However, replacement of the belt
should be done according to the main-
tenance schedule in the
“Warranty and
Maintenance Booklet ”. Consult your
SUBARU dealer for replacement.
If a belt is loose, cracked, or worn, contact
your SUBARU dealer.
Page 346 of 422
Automatic transmission fluid &Checking the fluid level
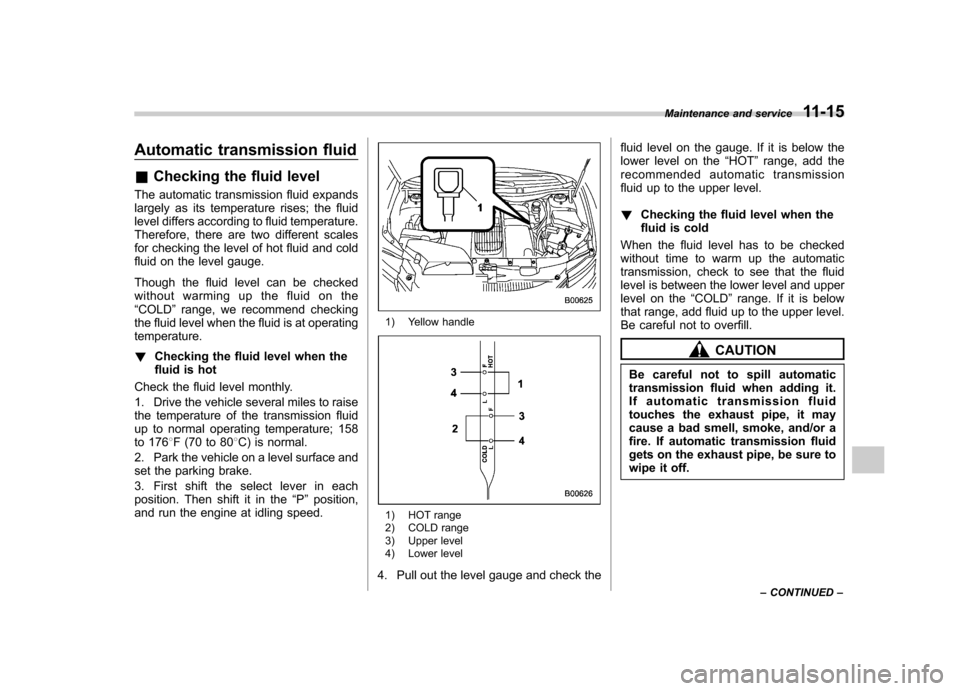
The automatic transmission fluid expands
largely as its temperature rises; the fluid
level differs according to fluid temperature.
Therefore, there are two different scales
for checking the level of hot fluid and cold
fluid on the level gauge.
Though the fluid level can be checked
without warming up the fluid on the“ COLD ”range, we recommend checking
the fluid level when the fluid is at operatingtemperature. ! Checking the fluid level when the
fluid is hot
Check the fluid level monthly.
1. Drive the vehicle several miles to raise
the temperature of the transmission fluid
up to normal operating temperature; 158
to 176 8F (70 to 80 8C) is normal.
2. Park the vehicle on a level surface and
set the parking brake.
3. First shift the select lever in each
position. Then shift it in the “P ” position,
and run the engine at idling speed.
1) Yellow handle
1) HOT range
2) COLD range
3) Upper level
4) Lower level
4. Pull out the level gauge and check the fluid level on the gauge. If it is below the
lower level on the
“HOT ”range, add the
recommended automatic transmission
fluid up to the upper level. ! Checking the fluid level when the
fluid is cold
When the fluid level has to be checked
without time to warm up the automatic
transmission, check to see that the fluid
level is between the lower level and upper
level on the “COLD ”range. If it is below
that range, add fluid up to the upper level.
Be careful not to overfill.
CAUTION
Be careful not to spill automatic
transmission fluid when adding it.
If automatic transmission fluid
touches the exhaust pipe, it may
cause a bad smell, smoke, and/or a
fire. If automatic transmission fluid
gets on the exhaust pipe, be sure to
wipe it off. Maintenance and service
11-15
– CONTINUED –
Page 347 of 422
11-16Maintenance and service
&Recommended fluid
Refer to “Fluids ”F 12-7.
NOTE
Using any non-specified type of auto-
matic transmission fluid could result in
damage inside the transmission. When
replacing the automatic transmission
fluid, be sure to use the specified type. Front differential gear oil &
Checking the oil level
1) Yellow handle
1. Park the vehicle on a level surface and
stop the engine.
2. Pull out the level gauge, wipe it clean,
and insert it again.
1) Upper level
2) Lower level
3. Pull out the level gauge again and
check the oil level on it. If it is below the
lower level, add oil to bring the level up to
the upper level.
CAUTION
Be careful not to spill front differ-
ential gear oil when adding it. If oil
touches the exhaust pipe, it may
cause a bad smell, smoke, and/or a
fire. If oil gets on the exhaust pipe,
be sure to wipe it off.
Page 348 of 422
&Recommended grade and viscosity
Each oil manufacturer has its own base
oils and additives. Never use different
brands together. For details, refer to “Front
differential and rear differential gear oil ”
F 12-6. Rear differential gear oil
There is no oil level gauge. To check the
rear differential gear oil level, consult your
SUBARU dealer for inspection. &
Recommended grade and viscosity
Each oil manufacturer has its own base
oils and additives. Never use different
brands together. For details, refer to “Front
differential and rear differential gear oil ”
F 12-6. Power steering fluid &
Checking the fluid level
WARNING
Be careful not to burn yourself
because the fluid may be hot.
CAUTION
. When power steering fluid is
being added, use only clean fluid,
and be careful not to allow any
dirt into the tank. And never use
different brands together.
. Be careful not to spill power
steering fluid when adding it. If Maintenance and service
11-17
– CONTINUED –
Page 349 of 422
11-18Maintenance and service
power steering fluid touches the
exhaust pipe, it may cause a bad
smell, smoke, and/or a fire. If
power steering fluid gets on the
exhaust pipe, be sure to wipe itoff.
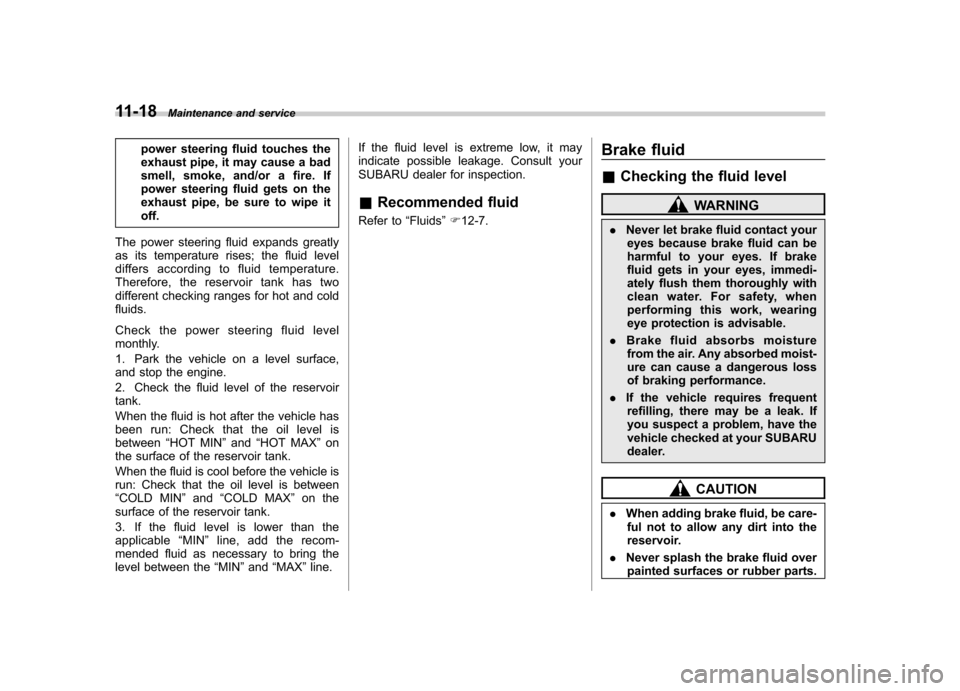
The power steering fluid expands greatly
as its temperature rises; the fluid level
differs according to fluid temperature.
Therefore, the reservoir tank has two
different checking ranges for hot and coldfluids.
Check the power steering fluid level
monthly.
1. Park the vehicle on a level surface,
and stop the engine.
2. Check the fluid level of the reservoir tank.
When the fluid is hot after the vehicle has
been run: Check that the oil level isbetween “HOT MIN ”and “HOT MAX ”on
the surface of the reservoir tank.
When the fluid is cool before the vehicle is
run: Check that the oil level is between“ COLD MIN ”and “COLD MAX ”on the
surface of the reservoir tank.
3. If the fluid level is lower than the
applicable “MIN ”line, add the recom-
mended fluid as necessary to bring the
level between the “MIN ”and “MAX ”line. If the fluid level is extreme low, it may
indicate possible leakage. Consult your
SUBARU dealer for inspection.
& Recommended fluid
Refer to “Fluids ”F 12-7. Brake fluid &
Checking the fluid level
WARNING
. Never let brake fluid contact your
eyes because brake fluid can be
harmful to your eyes. If brake
fluid gets in your eyes, immedi-
ately flush them thoroughly with
clean water. For safety, when
performing this work, wearing
eye protection is advisable.
. Brake fluid absorbs moisture
from the air. Any absorbed moist-
ure can cause a dangerous loss
of braking performance.
. If the vehicle requires frequent
refilling, there may be a leak. If
you suspect a problem, have the
vehicle checked at your SUBARU
dealer.
CAUTION
. When adding brake fluid, be care-
ful not to allow any dirt into the
reservoir.
. Never splash the brake fluid over
painted surfaces or rubber parts.