2011 SUBARU TRIBECA lights
[x] Cancel search: lightsPage 209 of 422
5-22Audio
! How to insert a CD(s)
! Inserting a CD
1. Briefly press the “LOAD ”button (10). If
the magazine in the player has an idle
position where you can insert a disc, the
disc number indicator associated with the
idle position will blink.
If no indicator blinks, it means that there is
no idle position in the magazine.
2. After the disc number indicator has
started to flash, insert the disc when“ LOAD ”flashes on the display. The disc
will then be automatically drawn in, and
the player will begin to play back the first
track of the disc. . To insert more discs in succession,
repeat Steps 1 and 2. The magazine will
be loaded with discs in the ascending
order of position number.
If you do not insert any disc in 15 seconds
after you have pressed the “LOAD ”button,
the player will begin to play back the first
track of the last disc you have inserted. . The disc indicator steadily lights up if a
disc is already inserted in the correspond-
ing position of the magazine. . While the player is in the loading mode,
if you press “FM AM ”button, the player will
enter the standby mode. Press the “CD ”
button (1) to start playback. !
Inserting a disc in a desired position
1. Briefly press the “LOAD ”button (10). If
the magazine in the player has an idle
position where you can insert a disc, the
disc number indicator associated with the
idle position will blink.
The positions in the magazine the indica-
tor of which steadily lights up are already
loaded with discs.
2. Press the disc select button (9) at the
position where you want to insert a disc.
3. Insert the disc when “LOAD ”flashes
on the display. The disc will then be
automatically drawn in, and the player will
begin to play the first track on the disc. . If you wish to insert another disc,
repeat the procedure beginning with step 1.
If you do not insert any disc in 15 seconds
after you have pressed the “LOAD ”button,
the player will begin to play back the first
track of the last disc you have inserted. . While the player is in the loading mode,
if you press “FM AM ”button, the player will
enter standby mode. Press the “CD ”
button (1) to start playback. ! Loading all the magazine (full disc
loading mode)
1. If you continue to press the “LOAD ”button (10) for more than 1.5 seconds, the
player will produce beep sound and will
enter the full disc loading mode.
2. A
“disc number ”indicator will blink,
and “ALL LOAD ”will be on display for a
period of 15 seconds. If a disc is success-
fully loaded during this period, the disc
number indicator will stop blinking and will
steadily light.
3. When the loading of a disc is com-
plete, the next disc number indicator will
blink. Then repeat Step 2.
4. When the magazine is filled with discs
by repeating Steps 2 and 3, the player will
start playback of the discs, beginning with
the one inserted first.
If you fail to insert any disc during each 15
seconds interval, the full disc loading
mode will be canceled, and the player will
start playback of the disc inserted first. ! How to play back a CD or make a pause
! When there is no CD inserted:
Properly insert a CD. Refer to “How to
insert a CD(s) ”F 5-22.
When a CD is loaded, the player will start
playback of the CD, beginning with the
first track.
Page 210 of 422

!When there are CDs loaded:
Press a desired one of the disc select
buttons (9) the disc number indicator of
which steadily lights up. The player will
then start playback of the selected CD,
beginning with the first track.
If a disc that the player cannot read has
been loaded, “CHECK DISC ”will appear
on the display and the player will not playanything. ! To select a song from its beginning
! Forward direction
Briefly press the “
”side of the “TUNE
TRACK ”button (2) to skip to the beginning
of the next track/file (track). Each time the
button is pressed, the indicated track/file
(track) number will increase.
NOTE
In an MP3 folder, skipping past the last
track/file (track) will take you back to
the first track/file (track) in the folder. ! Backward direction
Briefly press the “
”side of the “TUNE
TRACK ”button (2) to skip to the beginning
of the current track/file (track). Each time
the button is pressed, the indicated track/
file (track) number will decrease. NOTE
In an MP3 folder, skipping past the first
track/file (track) will take you to the last
track/file (track) in the folder. !
Fast-forwarding and rewinding
! Fast-forwarding
Press the “
”side of the “TUNE TRACK ”
button (2) continuously to fast-forward the track/file.
Release the button to stop fast-forwarding. NOTE
If you fast-forward to the end of the last
track/file (track), fast-forwarding will
stop and the player will start playback
beginning with the first track/file(track). ! Rewinding
Press the “
”side of the “TUNE TRACK ”
button (2) continuously to rewind the track/ file.
Release the button to stop rewinding.
NOTE
If you rewind to the beginning of the
first track/file (track), the rewinding will
stop and the player will start playback. !
Repeating
! To repeat the currently playing track/
file (track)
To repeat a track/file (track), briefly pressthe “RPT ”button (6) while the track/file
(track) is playing. The display will show “ RPT ”, and the track/file (track) will be
repeated.
To cancel the track/file (track) repeat-play
mode, briefly press the “RPT ”button
twice. The “RPT ”indication will turn off,
and the normal playback mode will beresumed. NOTE . Each time you briefly press the
button, the mode will change to the
next one in the following sequence.
If you accidentally press the button and
cancel the track/file (track) repeat-play
mode, press it again to reselect the
repeat-play mode. . The repeat-play mode will be can-
celled if you perform any of the follow-
ing steps.
–Press the “RDM ”button
– Press the “SCAN ”button
– Press the “
”button Audio
5-23
– CONTINUED –
Page 219 of 422
6-2Interior equipment
Interior light
When leaving your vehicle, make sure the
lights are turned off to avoid batterydischarge. &Dome light
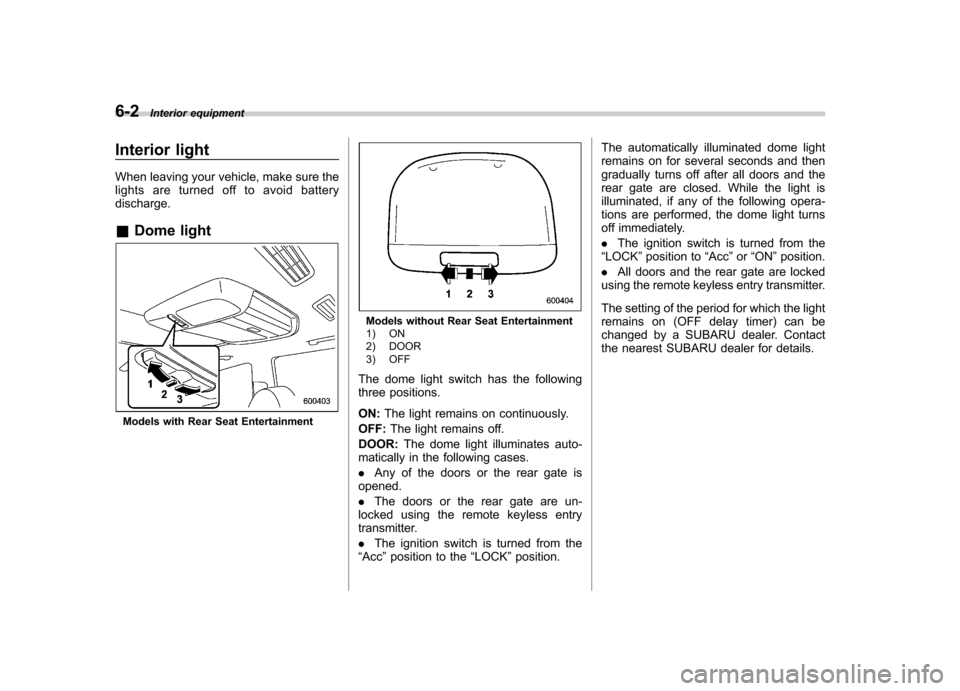
Models with Rear Seat Entertainment
Models without Rear Seat Entertainment
1) ON
2) DOOR
3) OFF
The dome light switch has the following
three positions. ON: The light remains on continuously.
OFF: The light remains off.
DOOR: The dome light illuminates auto-
matically in the following cases. . Any of the doors or the rear gate is
opened.. The doors or the rear gate are un-
locked using the remote keyless entry
transmitter. . The ignition switch is turned from the
“ Acc ”position to the “LOCK ”position. The automatically illuminated dome light
remains on for several seconds and then
gradually turns off after all doors and the
rear gate are closed. While the light is
illuminated, if any of the following opera-
tions are performed, the dome light turns
off immediately. .
The ignition switch is turned from the
“ LOCK ”position to “Acc ”or “ON ”position.
. All doors and the rear gate are locked
using the remote keyless entry transmitter.
The setting of the period for which the light
remains on (OFF delay timer) can be
changed by a SUBARU dealer. Contact
the nearest SUBARU dealer for details.
Page 220 of 422
&Cargo area light
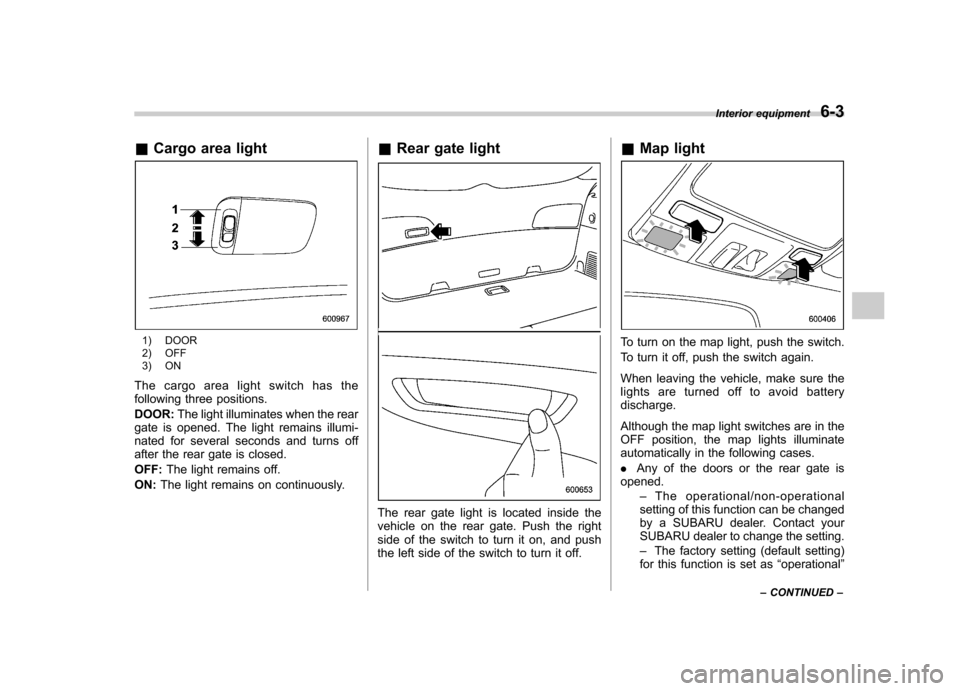
1) DOOR
2) OFF
3) ON
The cargo area light switch has the
following three positions. DOOR: The light illuminates when the rear
gate is opened. The light remains illumi-
nated for several seconds and turns off
after the rear gate is closed. OFF: The light remains off.
ON: The light remains on continuously. &
Rear gate light
The rear gate light is located inside the
vehicle on the rear gate. Push the right
side of the switch to turn it on, and push
the left side of the switch to turn it off. &
Map light
To turn on the map light, push the switch.
To turn it off, push the switch again.
When leaving the vehicle, make sure the
lights are turned off to avoid batterydischarge.
Although the map light switches are in the
OFF position, the map lights illuminate
automatically in the following cases. .Any of the doors or the rear gate is
opened.
–The operational/non-operational
setting of this function can be changed
by a SUBARU dealer. Contact your
SUBARU dealer to change the setting. – The factory setting (default setting)
for this function is set as “operational ”
Interior equipment
6-3
– CONTINUED –
Page 221 of 422
6-4Interior equipment
(automatic illumination - ON).
. The doors are unlocked using the
remote keyless entry transmitter. . The ignition switch is turned from the
“ Acc ”position to the “LOCK ”position.
The automatically illuminated map lights
remain illuminated for several seconds
and then gradually turn off after all doors
are closed.
While the lights are illuminated, if any of
the following operations are performed,
the map lights turn off immediately. . The ignition switch is turned from the
“ LOCK ”position to the “Acc ”or “ON ”
position.. All doors and the rear gate are locked
using the remote keyless entry transmitter.
The setting of the period for which the light
remains illuminated (OFF delay timer) can
be changed by a SUBARU dealer. Con-
tact your SUBARU dealer for details.
NOTE
If any of the doors or the rear gate is
not completely closed, the map lights
will remain illuminated as a result.
However, the map lights are automati-
cally turned off by the battery drainage
prevention functi on to prevent the
battery from discharging. For details, refer to
“Battery drainage prevention
function ”F 2-6.
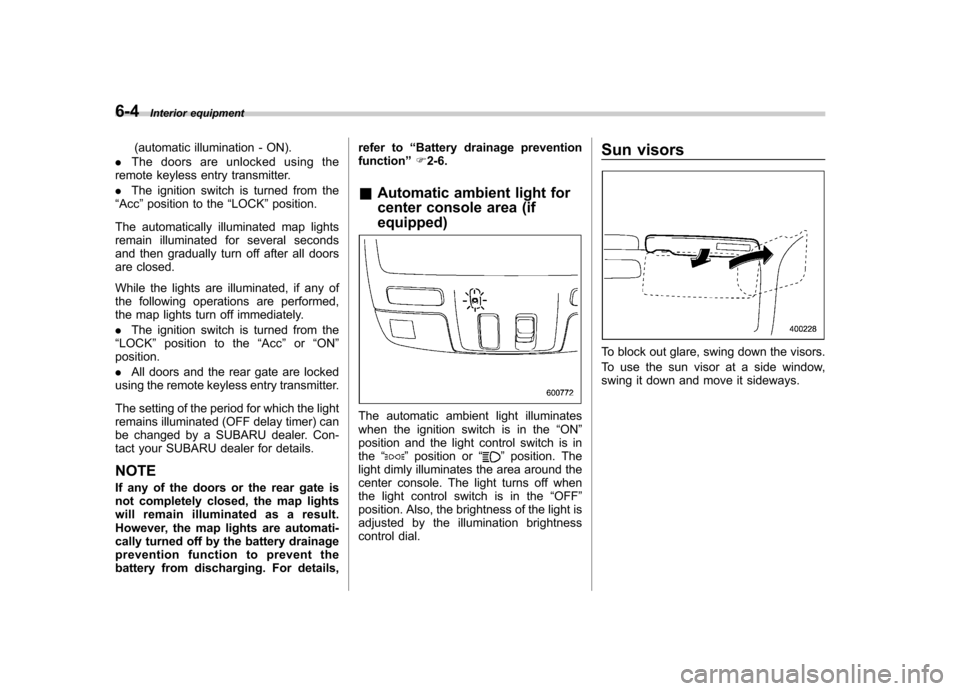
& Automatic ambient light for
center console area (if equipped)
The automatic ambient light illuminates
when the ignition switch is in the “ON ”
position and the light control switch is inthe “
”position or “”position. The
light dimly illuminates the area around the
center console. The light turns off when
the light control switch is in the “OFF ”
position. Also, the brightness of the light is
adjusted by the illumination brightness
control dial. Sun visors
To block out glare, swing down the visors.
To use the sun visor at a side window,
swing it down and move it sideways.
Page 250 of 422

Preparing to drive
You should perform the following checks
and adjustments every day before you
start driving.
1. Check that all windows, mirrors, and
lights are clean and unobstructed.
2. Check the appearance and condition
of the tires. Also check tires for properinflation.
3. Look under the vehicle for any sign of leaks.
4. Check that the hood and rear gate are
fully closed.
5. Check the adjustment of the seat.
6. Check the adjustment of the inside
and outside mirrors.
7. Fasten your seatbelt. Check that your
passengers have fastened their seatbelts.
8. Check the operation of the warning
and indicator lights when the ignition
switch is turned to the“ON ”position.
9. Check the gauges, indicator and warn-
ing lights after starting the engine.
NOTE
Engine oil, engine coolant, brake fluid,
washer fluid and other fluid levels
should be checked daily, weekly or at
fuel stops. Starting the engine
CAUTION
. Do not operate the starter motor
continuously for more than 10
seconds. If the engine fails to
start after operating the starter
for 5 to 10 seconds, wait for 10
seconds or more before tryingagain.
. If you restart the engine while the
vehicle is moving, shift the select
lever into the “N ” position. Do
not attempt to place the select
lever of a moving vehicle into the“ P ” position.
1. Apply the parking brake.
2. Turn off unnecessary lights and ac- cessories.
3. Shift the select lever to the “P ” or “N ”
position (preferably “P ” position). The
starter will only operate when the select
lever is at the “P ”or “N ”position.
4. Turn the ignition switch to the “ON ”
position and check the operation of the
warning and indicator lights. Refer to“ Warning and indicator lights ”F 3-9.
5. Turn the ignition switch to the “START ”
position without depressing the accelera- tor pedal. Release the key immediately
after the engine has started.
If the engine does not start, try the following.
(1) Turn the ignition switch to the“LOCK ”position and wait for at least
10 seconds. After checking that the
parking brake is firmly set, turn the
ignition switch to the “START ”position
while depressing the accelerator pedal
slightly (approximately a quarter of the
full stroke). Release the accelerator
pedal as soon as the engine starts.
(2) If this fails to start the engine, turn
the ignition switch back to the “LOCK ”
position and wait for at least 10
seconds. Then fully depress the accel-
erator pedal and turn the ignition
switch to the “START ”position. If the
engine starts, quickly release the
accelerator pedal.
(3) If this fails to start the engine, turn
the ignition switch again to the “LOCK ”
position. After waiting for 10 seconds
or longer, turn the ignition switch to the“ START ”position without depressing
the accelerator pedal.
(4) If the engine still refuses to start,
contact your nearest SUBARU dealer
for assistance.
6. Confirm that all warning and indicator
lights have turned off after the engine has Starting and operating
7-7
– CONTINUED –
Page 253 of 422
7-10Starting and operating
transmitter within a few seconds immedi-
ately following remote engine start shut-down. & Pre-heating or pre-cooling
the interior of the vehicle
Before exiting the vehicle, set the tem-
perature controls to the desired setting
and operation. After the system starts the
vehicle, the heater or air-conditioning will
activate and heat or cool the interior to
your setting. & Service mode
In service mode, the remote start function
is temporarily disabled to prevent the
system from unexpectedly starting the
engine while being serviced. ! To engage the service mode
Turn the ignition switch to the “ON ”
position, depress and hold the brake pedal
then, press and release the “
”button on
the remote engine start transmitter three
times. The system will pause for 1 second
and then flash the parking lights and honk
the horn three times indicating that the
system is in service mode. When attempt-
ing to activate the remote start system
while in service mode, the parking lights
will flash and the horn will honk two times
and will not start. !
To disengage the service mode
Turn the ignition switch to the “ON ”
position, depress and hold the brake
pedal, then press and release the “
”
button on the remote engine start trans-
mitter three times. The system will pause
for 1 second and flash the parking lights
one time indicating that the system has
exited service mode. NOTE
When taking your vehicle in for service,
it is recommended that you inform the
service personnel that your vehicle is
equipped with a remote engine startsystem. & Remote engine start trans-
mitter programming and pro-
grammable feature option
New transmitters can be programmed to
the remote engine start system in the
event that remote engine start transmitters
are lost, stolen or damaged. The remote
engine start system also has one pro-
grammable feature that can be adjusted
for user preference.
The remote engine start system can be
programmed to either make an audible
horn chirp upon remote start activation or
not. Remote engine start transmitter pro-
gramming and feature programming can be adjusted using the following procedure.
1. Open the driver
’s door (the driver ’s
door must remain opened throughout the
entire process).
2. Insert the key into the vehicle ’s ignition
switch and turn to the “ON ”position.
3. Locate the small black programming
button behind the fuse box cover, on the
driver ’s side left under the dashboard
panel.
4. Press and hold the black programming
button for 10 to 15 seconds. The horn will
honk and the parking lights will flash three
times to indicate that the system has
entered programming mode. At this point
you can perform either action (step 5 or
step 6).
5. To program a remote transmitter:
press and release the “
”button on each
transmitter. The horn will honk and the
parking lights will flash one time to indicate
a successful transmitter learn each timethe “
”button is pressed. You can
program up to eight transmitters.
6. To toggle the Horn Confirmation chirps
ON/OFF: press and release the brake to
toggle the feature. The horn will chirp and
the parking lights will flash one time to
indicate Confirmation Horn Chirps are“ OFF ”. The horn will honk and the parking
lights will flash 2 times to indicate Con-
firmation Horn Chirps are “ON ”. Depres-
Page 266 of 422
warning light illuminate simultaneously,
take the following steps.
1. Stop the vehicle in the nearest safe,
flat location.
2. Shut down the engine, apply the
parking brake, and then restart it.
3. Release the parking brake. If both
warning lights turn off, the EBD system
may be malfunctioning.
Drive carefully to the nearest SUBARU
dealer and have the system inspected.
4. If both warning lights illuminate again
and remain illuminated after the engine
has been restarted, shut down the engine
again, apply the parking brake, and check
the brake fluid level. Refer to“Brake fluid ”
F 11-18.
5. If the brake fluid level is not below the“ MIN ”mark, the EBD system may be
malfunctioning. Drive carefully to the
nearest SUBARU dealer and have the
system inspected.
6. If the brake fluid level is below the “ MIN ”mark, DO NOT drive the vehicle.
Instead, have the vehicle towed to the
nearest SUBARU dealer for repair.
WARNING
. Driving with the brake system
warning light illuminated is dan- gerous. This indicates your brake
system may not be working
properly. If the light remains
illuminated, have the brakes in-
spected by a SUBARU dealer
immediately.
. If at all in doubt about whether
the brakes are operating prop-
erly, do not drive the vehicle.
Have your vehicle towed to the
nearest SUBARU dealer for re-
pair. Vehicle Dynamics Control system
WARNING
Always use the utmost care in driving –overconfidence because
you are driving with a Vehicle Dy-
namics Control system equipped
vehicle could easily lead to a ser-
ious accident.
CAUTION
. Even if your vehicle is equipped
with Vehicle Dynamics Control
system, winter tires should be
used when driving on snow-cov-
ered or icy roads; in addition,
vehicle speed should be reduced
considerably. Simply having a
Vehicle Dynamics Control sys-
tem does not guarantee that the
vehicle will be able to avoid
accidents in any situation.
. Activation of the Vehicle Dy-
namics Control system is an
indication that the road being
travelled on has a slippery sur-
face; since having Vehicle Dy-
namics Control is no guarantee Starting and operating
7-23
– CONTINUED –