2011 SUBARU TRIBECA change time
[x] Cancel search: change timePage 1 of 422

Foreword
Congratulations on choosing a SUBARU vehicle. This Owner’s
Manual has all the information necessary to keep your SUBARU in
excellent condition and to properly maintain the emission control
system for minimizing emission pollutants. We urge you to read
this manual carefully so that you may understand your vehicle and
its operation. For information not found in this Owner ’s Manual,
such as details concerning repairs or adjustments, please contact
the SUBARU dealer from whom you purchased your SUBARU or
the nearest SUBARU dealer.
The information, specifications and illustrations found in this
manual are those in effect at the time of printing. FUJI HEAVY
INDUSTRIES LTD. reserves the right to change specifications and
designs at any time without prior notice and without incurring any
obligation to make the same or similar changes on vehicles
previously sold. This Owner ’s Manual applies to all models and
covers all equipment, including factory installed options. Some
explanations, therefore may be for equipment not installed in yourvehicle.
Please leave this manual in the vehicle at the time of resale. The
next owner will need the information found herein.
FUJI HEAVY INDUSTRIES LTD., TOKYO, JAPAN
is a registered trademark of FUJI HEAVY INDUSTRIES LTD.
* C
Copyright 2010 FUJI HEAVY INDUSTRIES LTD.
Page 21 of 422
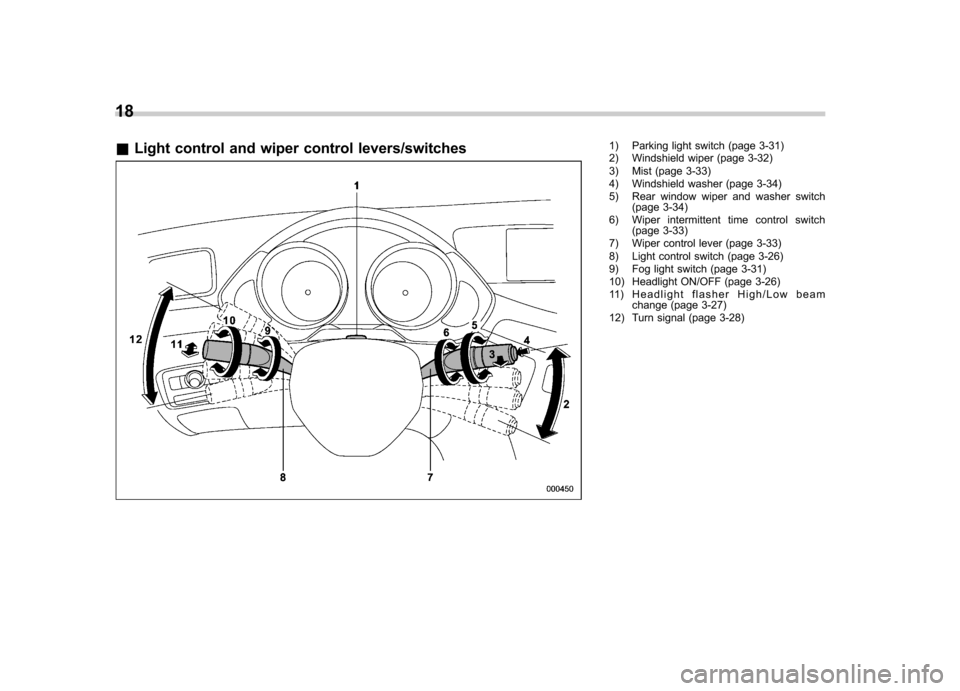
18 &Light control and wiper control levers/switches
1) Parking light switch (page 3-31)
2) Windshield wiper (page 3-32)
3) Mist (page 3-33)
4) Windshield washer (page 3-34)
5) Rear window wiper and washer switch
(page 3-34)
6) Wiper intermittent time control switch (page 3-33)
7) Wiper control lever (page 3-33)
8) Light control switch (page 3-26)
9) Fog light switch (page 3-31)
10) Headlight ON/OFF (page 3-26)
11) Headlight flasher High/Low beam change (page 3-27)
12) Turn signal (page 3-28)
Page 26 of 422

Function settings
A SUBARU dealer can change the settings of the functions shown in the following table to meet your personal requirements. Contact
the nearest SUBARU dealer for details. If your vehicle is equipped with the genuine SUBARU navigation system, the settings for some
of these functions can be changed using the navigation monitor. For details, please refer to the Owner’s Manual supplement for the
navigation system.
Item Function Possible settings Default setting Page
Alarm system Alarm system Operation/Non-operation Operation 2-16
Monitoring start delay time (after closure of doors) 0 second/30 seconds 30 seconds 2-17
Impact sensor operation (only models with shock
sensors (dealer option)) Operation/Non-operation Non-operation 2-20
Passive arming Operation/Non-operation Non-operation 2-19
Dome light/map lights illumination ON/OFF OFF 2-16
Remote keyless entry sys- tem Hazard warning flasher Operation/Non-operation Operation 2-8
Audible signal
Operation/Non-operation Operation 2-11
Key lock-in prevention Key lock-in prevention Operation/Non-operation Operation 2-7
Remote engine start system
(dealer option) Horn chirp confirmation ON/OFF ON 7-10
Rear window defogger Rear window defogger Operation for 15 minutes/ Continuous operationOperation for 15 minutes 3-36
Windshield wiper deicer Windshield wiper deicer Operation for 15 minutes/ Continuous operationOperation for 15 minutes 3-35
Map lights/Dome light Operation of map lights/dome light OFF delay timer OFF/Short/Normal/Long Normal 6-2/6-3
Map lights Illumination in conjunction with a door open Operation/Non-operation Operation (Illumination - ON)6-3
Battery drainage prevention function Battery drainage prevention function Operation/Non-operation Operation 2-6 23
– CONTINUED –
Page 55 of 422
1-28Seat, seatbelt and SRS airbags
&Seatbelt maintenance
To clean the seatbelts, use a mild soap
and lukewarm water. Never bleach or dye
the belts because this could seriously
affect their strength.
Inspect the seatbelts and attachments
including the webbing and all hardware
periodically for cracks, cuts, gashes,
tears, damage, loose bolts or worn areas.
Replace the seatbelts even if only minor
damage is found.
CAUTION
. Keep the belts free of polishes,
oils, chemicals and particularly
battery acid.
. Never attempt to make modifica-
tions or changes that will prevent
the seatbelt from operating prop-
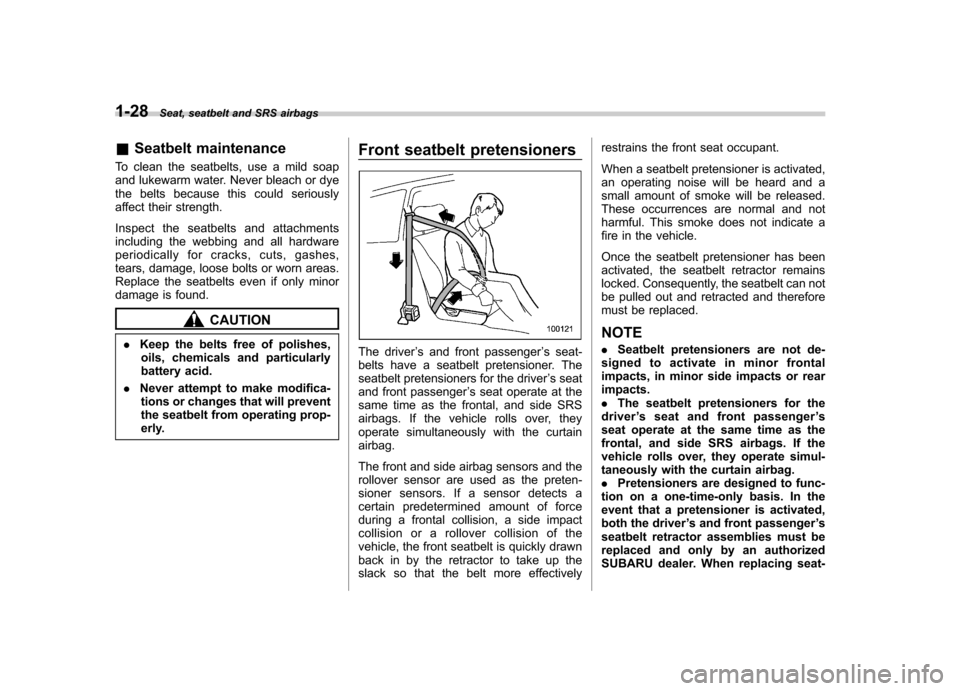
erly. Front seatbelt pretensioners
The driver
’s and front passenger ’s seat-
belts have a seatbelt pretensioner. The
seatbelt pretensioners for the driver ’s seat
and front passenger ’s seat operate at the
same time as the frontal, and side SRS
airbags. If the vehicle rolls over, they
operate simultaneously with the curtainairbag.
The front and side airbag sensors and the
rollover sensor are used as the preten-
sioner sensors. If a sensor detects a
certain predetermined amount of force
during a frontal collision, a side impact
collision or a rollover collision of the
vehicle, the front seatbelt is quickly drawn
back in by the retractor to take up the
slack so that the belt more effectively restrains the front seat occupant.
When a seatbelt pretensioner is activated,
an operating noise will be heard and a
small amount of smoke will be released.
These occurrences are normal and not
harmful. This smoke does not indicate a
fire in the vehicle.
Once the seatbelt pretensioner has been
activated, the seatbelt retractor remains
locked. Consequently, the seatbelt can not
be pulled out and retracted and therefore
must be replaced.
NOTE . Seatbelt pretensioners are not de-
signed to activate in minor frontal
impacts, in minor side impacts or rear impacts.. The seatbelt pretensioners for the
driver ’s seat and front passenger ’s
seat operate at the same time as the
frontal, and side SRS airbags. If the
vehicle rolls over, they operate simul-
taneously with the curtain airbag.. Pretensioners are designed to func-
tion on a one-time-only basis. In the
event that a pretensioner is activated,
both the driver ’s and front passenger ’s
seatbelt retractor assemblies must be
replaced and only by an authorized
SUBARU dealer. When replacing seat-
Page 62 of 422
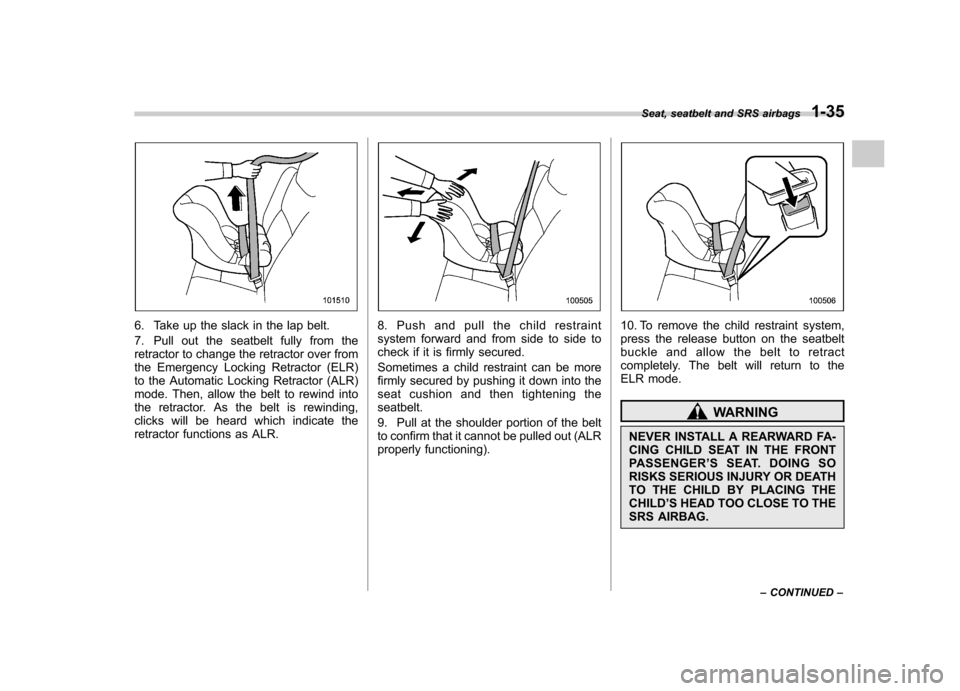
6. Take up the slack in the lap belt.
7. Pull out the seatbelt fully from the
retractor to change the retractor over from
the Emergency Locking Retractor (ELR)
to the Automatic Locking Retractor (ALR)
mode. Then, allow the belt to rewind into
the retractor. As the belt is rewinding,
clicks will be heard which indicate the
retractor functions as ALR.8. Push and pull the child restraint
system forward and from side to side to
check if it is firmly secured.
Sometimes a child restraint can be more
firmly secured by pushing it down into the
seat cushion and then tightening theseatbelt.
9. Pull at the shoulder portion of the belt
to confirm that it cannot be pulled out (ALR
properly functioning).10. To remove the child restraint system,
press the release button on the seatbelt
buckle and allow the belt to retract
completely. The belt will return to the
ELR mode.
WARNING
NEVER INSTALL A REARWARD FA-
CING CHILD SEAT IN THE FRONT
PASSENGER ’SSEAT.DOINGSO
RISKS SERIOUS INJURY OR DEATH
TO THE CHILD BY PLACING THECHILD ’S HEAD TOO CLOSE TO THE
SRS AIRBAG. Seat, seatbelt and SRS airbags
1-35
– CONTINUED –
Page 63 of 422
1-36Seat, seatbelt and SRS airbags
NOTE
When the child restraint system is no
longer in use, remove it and restore the
ELR mode of the retractor. That mode
is restored by retracting the seatbelt
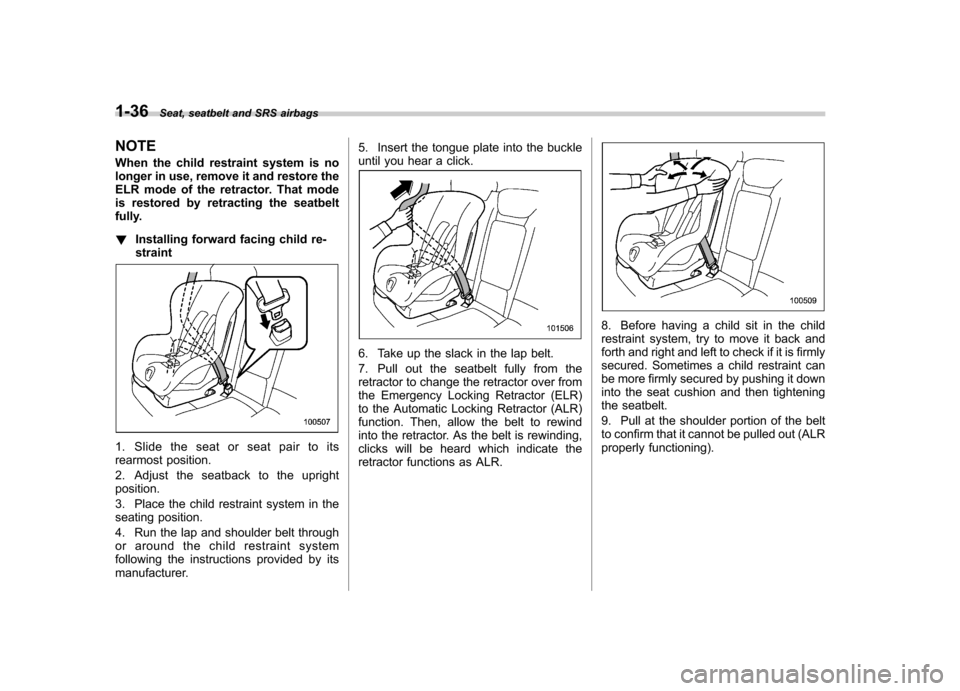
fully. ! Installing forward facing child re- straint
1. Slide the seat or seat pair to its
rearmost position.
2. Adjust the seatback to the upright position.
3. Place the child restraint system in the
seating position.
4. Run the lap and shoulder belt through
or around the child restraint system
following the instructions provided by its
manufacturer. 5. Insert the tongue plate into the buckle
until you hear a click.
6. Take up the slack in the lap belt.
7. Pull out the seatbelt fully from the
retractor to change the retractor over from
the Emergency Locking Retractor (ELR)
to the Automatic Locking Retractor (ALR)
function. Then, allow the belt to rewind
into the retractor. As the belt is rewinding,
clicks will be heard which indicate the
retractor functions as ALR.
8. Before having a child sit in the child
restraint system, try to move it back and
forth and right and left to check if it is firmly
secured. Sometimes a child restraint can
be more firmly secured by pushing it down
into the seat cushion and then tightening
the seatbelt.
9. Pull at the shoulder portion of the belt
to confirm that it cannot be pulled out (ALR
properly functioning).
Page 110 of 422
to the following two conditions: (1) This
device may not cause harmful inter-
ference, and (2) this device must
accept any interference received, in-
cluding interference that may cause
undesired operation.
Changes or modifications not ex-
pressly approved by the party respon-
sible for compliance could void theuser’s authority to operate the equip-
ment.
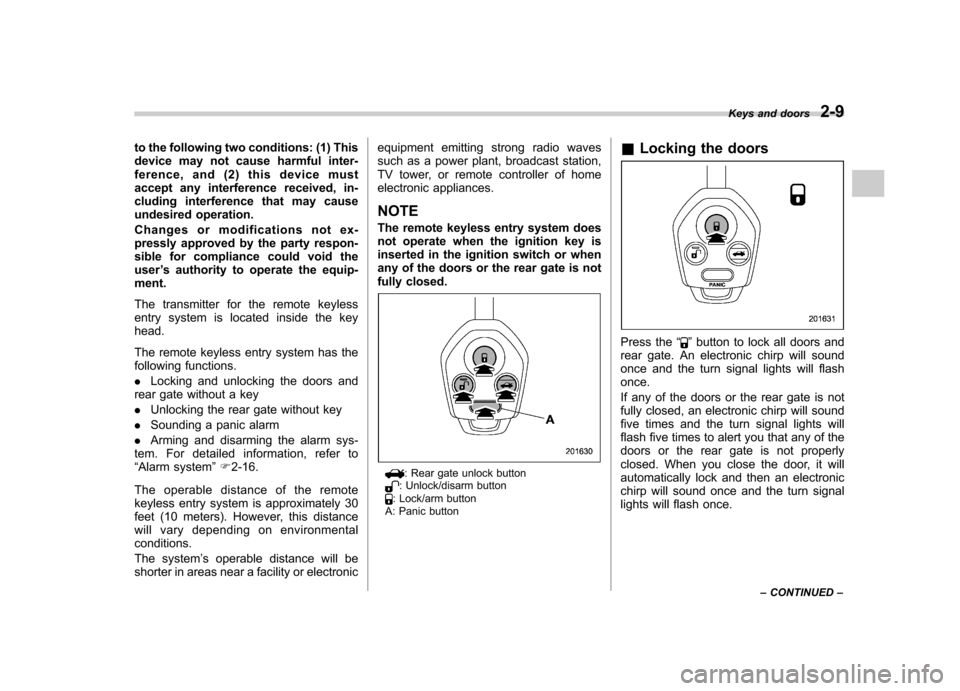
The transmitter for the remote keyless
entry system is located inside the keyhead.
The remote keyless entry system has the
following functions. . Locking and unlocking the doors and
rear gate without a key. Unlocking the rear gate without key
. Sounding a panic alarm
. Arming and disarming the alarm sys-
tem. For detailed information, refer to “ Alarm system ”F 2-16.
The operable distance of the remote
keyless entry system is approximately 30
feet (10 meters). However, this distance
will vary depending on environmental conditions.
The system ’s operable distance will be
shorter in areas near a facility or electronic equipment emitting strong radio waves
such as a power plant, broadcast station,
TV tower, or remote controller of home
electronic appliances.
NOTE
The remote keyless entry system does
not operate when the ignition key is
inserted in the ignition switch or when
any of the doors or the rear gate is not
fully closed.
: Rear gate unlock button: Unlock/disarm button: Lock/arm button
A: Panic button &
Locking the doors
Press the “”button to lock all doors and
rear gate. An electronic chirp will sound
once and the turn signal lights will flashonce.
If any of the doors or the rear gate is not
fully closed, an electronic chirp will sound
five times and the turn signal lights will
flash five times to alert you that any of the
doors or the rear gate is not properly
closed. When you close the door, it will
automatically lock and then an electronic
chirp will sound once and the turn signal
lights will flash once. Keys and doors
2-9
– CONTINUED –
Page 111 of 422
2-10Keys and doors
& Unlocking the doors
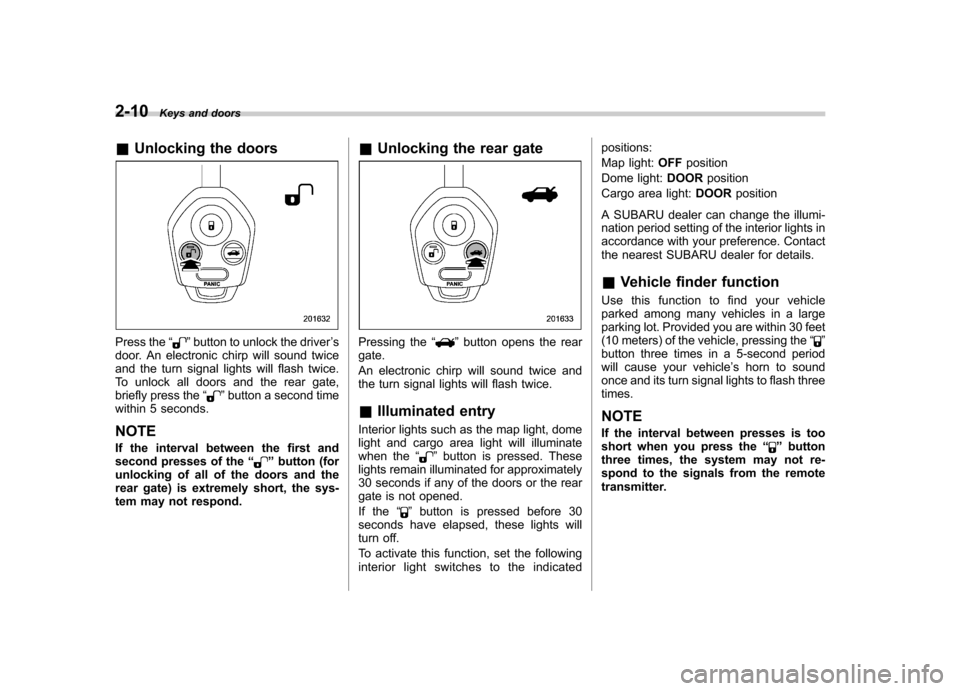
Press the “”button to unlock the driver ’s
door. An electronic chirp will sound twice
and the turn signal lights will flash twice.
To unlock all doors and the rear gate,
briefly press the “
”button a second time
within 5 seconds. NOTE
If the interval between the first and
second presses of the “
”button (for
unlocking of all of the doors and the
rear gate) is extremely short, the sys-
tem may not respond. &
Unlocking the rear gate
Pressing the “”button opens the rear
gate.
An electronic chirp will sound twice and
the turn signal lights will flash twice.
& Illuminated entry
Interior lights such as the map light, dome
light and cargo area light will illuminate
when the “
”button is pressed. These
lights remain illuminated for approximately
30 seconds if any of the doors or the rear
gate is not opened.
If the “
”button is pressed before 30
seconds have elapsed, these lights will
turn off.
To activate this function, set the following
interior light switches to the indicated positions:
Map light:
OFFposition
Dome light: DOORposition
Cargo area light: DOORposition
A SUBARU dealer can change the illumi-
nation period setting of the interior lights in
accordance with your preference. Contact
the nearest SUBARU dealer for details.
& Vehicle finder function
Use this function to find your vehicle
parked among many vehicles in a large
parking lot. Provided you are within 30 feet
(10 meters) of the vehicle, pressing the “
”
button three times in a 5-second period
will cause your vehicle ’s horn to sound
once and its turn signal lights to flash three times. NOTE
If the interval between presses is too
short when you press the “
”button
three times, the system may not re-
spond to the signals from the remote
transmitter.