2011 SUBARU IMPREZA WRX STI audio
[x] Cancel search: audioPage 6 of 459
Black plate (4,1)
北米Model "A1110BE-C" EDITED: 2010/ 12/ 17
2Chapter 4: Climate control
This chapter informs you how to operate
the climate control.
Chapter 5: Audio
This chapter informs you how to operate
your audio system.
Chapter 6: Interior equipment
This chapter informs you how to operate
interior equipment.
Chapter 7: Starting and operating
This chapter informs you how to start and
operate your SUBARU.
Chapter 8: Driving tips
This chapter informs you how to drive your
SUBARU in various conditions and ex-
plains some safety tips on driving.
Chapter 9: In case of emergency
This chapter informs you what to do if you
have a problem while driving, such as a
flat tire or engine overheating.
Chapter 10: Appearance care
This chapter informs you how to keep your
SUBARU looking good.
Chapter 11: Maintenance and service
This chapter informs you when you need
to take your SUBARU to the dealer for
scheduled maintenance and informs you
how to keep your SUBARU running
properly. Chapter 12: Specifications
This chapter informs you about dimen-
sions and capacities of your SUBARU.
Chapter 13: Consumer information and
Reporting safety defects
This chapter informs you about Uniform
tire quality grading standards and Report-
ing safety defects.
Chapter 14: Index
This is an alphabetical listing of all that’
sin
this manual. You can use it to quickly find
something you want to read.
& Safety warningsYou will find a number of WARNINGs,
CAUTIONs and NOTEs in this manual.
These safety warnings alert you to poten-
tial hazards that could result in injury to
you or others.
Please read these safety warnings as well
as all other portions of this manual care-
fully in order to gain a better understand-
ing of how to use your SUBARU vehicle
safely.
WARNING
A WARNING indicates a situation in
which serious injury or death could
result if the warning is ignored.
CAUTION
A CAUTION indicates a situation in
which injury or damage to your
vehicle, or both, could result if the
caution is ignored.NOTEA NOTE gives information or sugges-
tions how to make better use of your
vehicle.&Safety symbolYou will find a circle with a slash through it
in this manual. This symbol means “Do
not ”,“Do not do this ”,or“Do not let this
happen ”, depending upon the context.
Page 15 of 459
Black plate (1,1)
Table of contentsSeat, seatbelt and SRS airbags
1
Keys and doors
2
Instruments and controlsClimate control
4
Audio
5
Interior equipment
6
Starting and operating
7
Driving tips
8
In case of emergency
9
Appearance care
10
Maintenance and service
11
Specifications
12
Consumer information and Reporting safety defects
13
Index
143
北米Model "A1110BE-C" Edited: 2010/ 11/ 17
Page 20 of 459
Black plate (18,1)
北米Model "A1110BE-C" EDITED: 2010/ 12/ 17
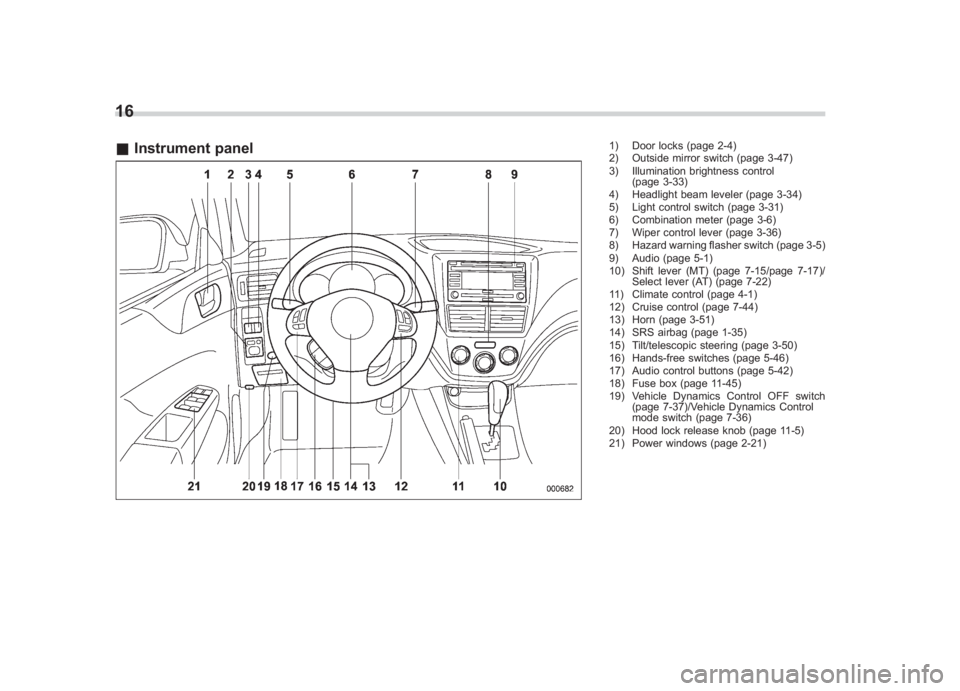
16& Instrument panel
1) Door locks (page 2-4)
2) Outside mirror switch (page 3-47)
3) Illumination brightness control
(page 3-33)
4) Headlight beam leveler (page 3-34)
5) Light control switch (page 3-31)
6) Combination meter (page 3-6)
7) Wiper control lever (page 3-36)
8) Hazard warning flasher switch (page 3-5)
9) Audio (page 5-1)
10) Shift lever (MT) (page 7-15/page 7-17)/ Select lever (AT) (page 7-22)
11) Climate control (page 4-1)
12) Cruise control (page 7-44)
13) Horn (page 3-51)
14) SRS airbag (page 1-35)
15) Tilt/telescopic steering (page 3-50)
16) Hands-free switches (page 5-46)
17) Audio control buttons (page 5-42)
18) Fuse box (page 11-45)
19) Vehicle Dynamics Control OFF switch (page 7-37)/Vehicle Dynamics Control
mode switch (page 7-36)
20) Hood lock release knob (page 11-5)
21) Power windows (page 2-21)
Page 73 of 459
Black plate (71,1)
北米Model "A1110BE-C" EDITED: 2010/ 12/ 17
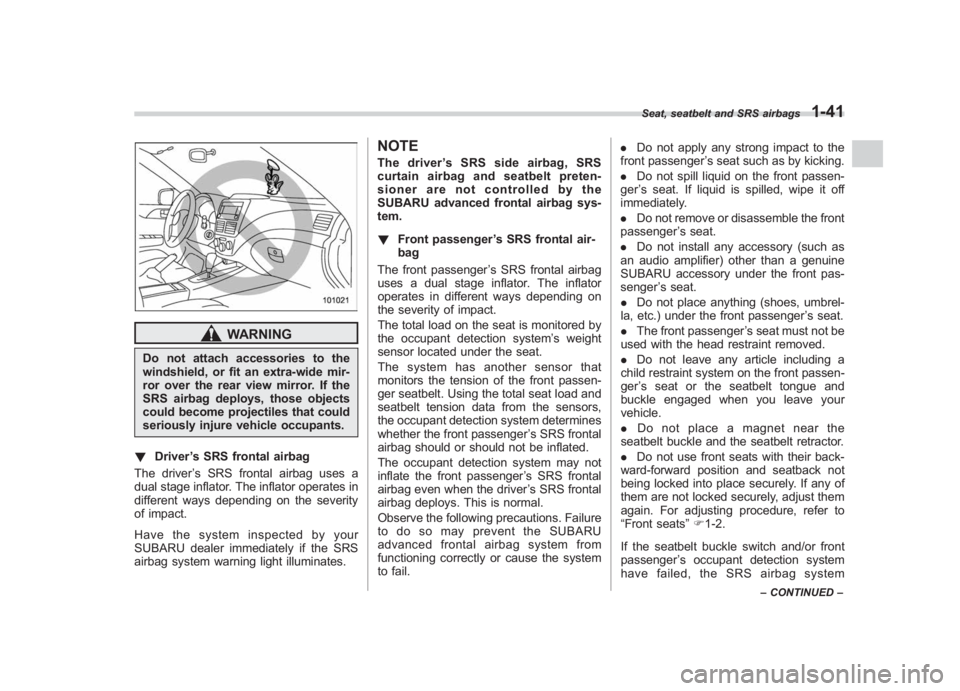
WARNING
Do not attach accessories to the
windshield, or fit an extra-wide mir-
ror over the rear view mirror. If the
SRS airbag deploys, those objects
could become projectiles that could
seriously injure vehicle occupants.
! Driver ’s SRS frontal airbag
The driver ’s SRS frontal airbag uses a
dual stage inflator. The inflator operates in
different ways depending on the severity
of impact.
Have the system inspected by your
SUBARU dealer immediately if the SRS
airbag system warning light illuminates.
NOTEThe driver ’s SRS side airbag, SRS
curtain airbag and seatbelt preten-
sioner are not controlled by the
SUBARU advanced frontal airbag sys-
tem.
! Front passenger ’s SRS frontal air-
bag
The front passenger ’s SRS frontal airbag
uses a dual stage inflator. The inflator
operates in different ways depending on
the severity of impact.
The total load on the seat is monitored by
the occupant detection system ’s weight
sensor located under the seat.
The system has another sensor that
monitors the tension of the front passen-
ger seatbelt. Using the total seat load and
seatbelt tension data from the sensors,
the occupant detection system determines
whether the front passenger ’s SRS frontal
airbag should or should not be inflated.
The occupant detection system may not
inflate the front passenger ’s SRS frontal
airbag even when the driver ’s SRS frontal
airbag deploys. This is normal.
Observe the following precautions. Failure
to do so may prevent the SUBARU
advanced frontal airbag system from
functioning correctly or cause the system
to fail. .
Do not apply any strong impact to the
front passenger ’s seat such as by kicking.
. Do not spill liquid on the front passen-
ger ’s seat. If liquid is spilled, wipe it off
immediately.
. Do not remove or disassemble the front
passenger ’s seat.
. Do not install any accessory (such as
an audio amplifier) other than a genuine
SUBARU accessory under the front pas-
senger ’s seat.
. Do not place anything (shoes, umbrel-
la, etc.) under the front passenger ’s seat.
. The front passenger ’s seat must not be
used with the head restraint removed.
. Do not leave any article including a
child restraint system on the front passen-
ger ’s seat or the seatbelt tongue and
buckle engaged when you leave your
vehicle.
. Do not place a magnet near the
seatbelt buckle and the seatbelt retractor.
. Do not use front seats with their back-
ward-forward position and seatback not
being locked into place securely. If any of
them are not locked securely, adjust them
again. For adjusting procedure, refer to
“Front seats ”F 1-2.
If the seatbelt buckle switch and/or front
passenger ’s occupant detection system
have failed, the SRS airbag system
Seat, seatbelt and SRS airbags
1-41
– CONTINUED –
1
Page 124 of 459
Black plate (126,1)
北米Model "A1110BE-C" EDITED: 2010/ 12/ 17
3-4
Instruments and controls
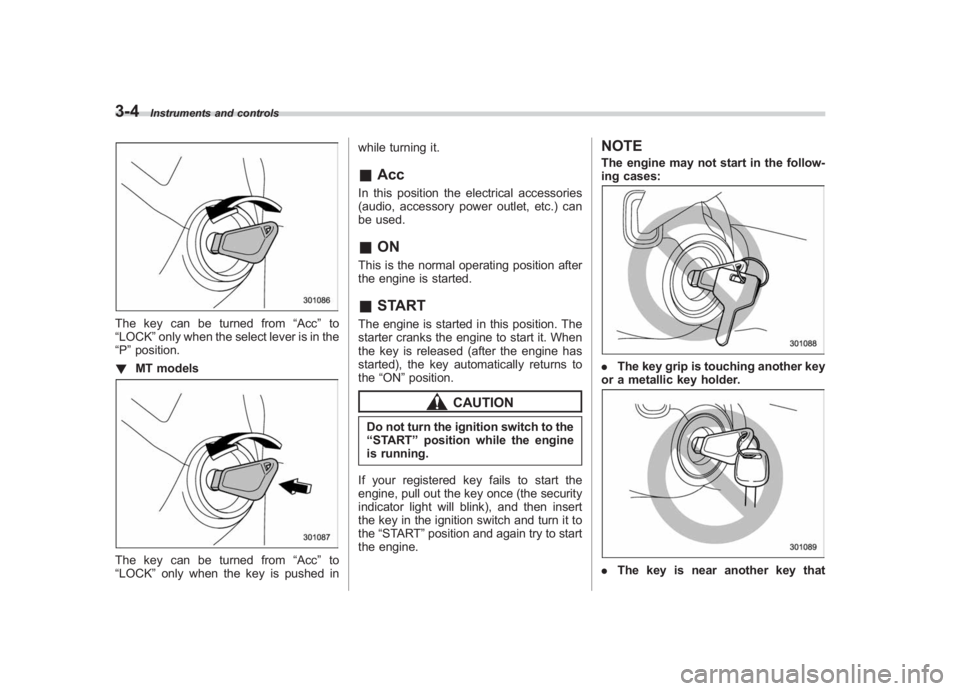
The key can be turned from “Acc”to
“LOCK” only when the select lever is in the
“P ”position.
! MT modelsThe key can be turned from “Acc”to
“LOCK” only when the key is pushed in while turning it.
&
AccIn this position the electrical accessories
(audio, accessory power outlet, etc.) can
be used.&ONThis is the normal operating position after
the engine is started.&STARTThe engine is started in this position. The
starter cranks the engine to start it. When
the key is released (after the engine has
started), the key automatically returns to
the “ON ”position.
CAUTION
Do not turn the ignition switch to the
“START ”position while the engine
is running.
If your registered key fails to start the
engine, pull out the key once (the security
indicator light will blink), and then insert
the key in the ignition switch and turn it to
the “START ”position and again try to start
the engine.
NOTEThe engine may not start in the follow-
ing cases:. The key grip is touching another key
or a metallic key holder.. The key is near another key that
Page 153 of 459
Black plate (155,1)
北米Model "A1110BE-C" EDITED: 2010/ 12/ 17
& Daytime running light system
WARNING
The brightness of the illumination of
the high beam headlights is reduced
by the daytime running light system.
The light switch must always be
turned to the “
”position when it
is dark outside.
The high beam headlights will automati-
cally illuminate at reduced brightness
when the engine has started, under the
following conditions:
. The select lever is in a position other
than the “P”position (AT models).
. The parking brake is fully released.
. The light switch is in the “OFF”or “
”
position.
NOTEWhen the light switch is in the “
”
position, the front side marker lights,
tail lights and license plate lights are
illuminated.
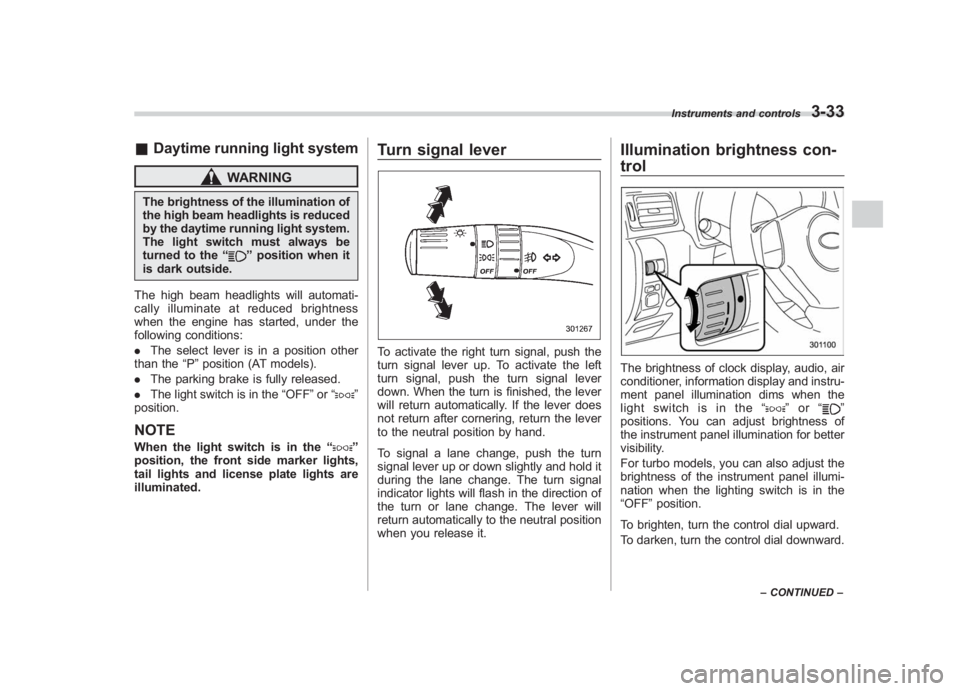
Turn signal leverTo activate the right turn signal, push the
turn signal lever up. To activate the left
turn signal, push the turn signal lever
down. When the turn is finished, the lever
will return automatically. If the lever does
not return after cornering, return the lever
to the neutral position by hand.
To signal a lane change, push the turn
signal lever up or down slightly and hold it
during the lane change. The turn signal
indicator lights will flash in the direction of
the turn or lane change. The lever will
return automatically to the neutral position
when you release it.
Illumination brightness con-
trolThe brightness of clock display, audio, air
conditioner, information display and instru-
ment panel illumination dims when the
light switch is in the “
”or “
”
positions. You can adjust brightness of
the instrument panel illumination for better
visibility.
For turbo models, you can also adjust the
brightness of the instrument panel illumi-
nation when the lighting switch is in the
“OFF ”position.
To brighten, turn the control dial upward.
To darken, turn the control dial downward.
Instruments and controls
3-33
– CONTINUED –
3
Page 189 of 459
Black plate (9,1)
北米Model "A1110BE-C" EDITED: 2010/ 11/ 17
Antenna system .................................................. 5-3
Roof antenna...................................................... 5-3
FM reception ....................................................... 5-3
Installation of accessories .................................. 5-4
Audio set ............................................................. 5-4
Type A audio set (if equipped) ............................. 5-5
Type B audio set (if equipped) ............................. 5-6
Type C audio set (if equipped) ............................. 5-7
Power and sound controls................................. 5-8
Power switch and volume control ........................ 5-8
Sound control ..................................................... 5-8
Adjustable level of each mode ............................ 5-11
FM/AM radio operation...................................... 5-12
FM/AM selection................................................. 5-12
Tuning ............................................................... 5-12
Displaying radio PS (Program Service Name) and RT (Radio Text) ................................................ 5-15
Station preset .................................................... 5-16
Satellite radio operation (if equipped) .............. 5-17
XM
TM
satellite radio (U.S.A. only)........................ 5-17
Sirius satellite radio ........................................... 5-17
Satellite radio reception ...................................... 5-17
Displaying satellite radio ID of tuner ................... 5-18
Band selection ................................................... 5-19
Channel and category selection .......................... 5-19
Channel preset ................................................... 5-21
Display selection ................................................ 5-22
CD player operation ........................................... 5-23
Play file.............................................................. 5-23
How to insert a CD (type A and C) ...................... 5-23How to insert a CD(s) (type B) ..
.......................... 5-23
How to play back a CD ...................................... 5-24
To select a track from its beginning. ................... 5-26
Fast-forwarding and fast-reversing ..................... 5-27
Repeating .......................................................... 5-28
Random playback .............................................. 5-29
Scan ................................................................. 5-30
Display selection ............................................... 5-30
Folder selection ................................................. 5-31
How to eject a CD from the player (type A and C).................................................................... 5-32
How to eject CDs from the player (type B) ..... ..... 5-32
When the following messages are displayed. . ..... 5-33
Auxiliary input jack (if equipped)...................... 5-34
Precautions to observe when handling a compact disc ................................................... 5-35
USB storage device / iPod
®operations
(type C audio) ................................................. 5-37
Play file............................................................. 5-37
Connectable USB storage device ....................... 5-37
Connectable iPod
®models ................................. 5-38
Connecting USB storage device / iPod
®............. 5-38
How to play back ............................................... 5-39
To select a track/index from its beginning ..... ..... 5-40
To select a chapter from its beginning when connecting iPod
®............................................. 5-40
Fast-forwarding and fast-reversing ..................... 5-40
Repeating .......................................................... 5-40
Random playback .............................................. 5-41
SCAN (only when connecting USB storage device) ............................................................ 5-41
Audio
5
Page 190 of 459
Black plate (10,1)
北米Model "A1110BE-C" EDITED: 2010/ 11/ 17
Audio
Selecting category (only when connecting
iPod
®) .............................................................. 5-41
Display selection ................................................ 5-42
Folder selection (only when connecting USB storage device) ................................................ 5-42
When “CHECK DEVICE ”is displayed .................. 5-42
Audio control buttons (if equipped) .................. 5-42
MODE button..................................................... 5-42
“
” and “
”buttons ......................................... 5-43
Volume control buttons ...................................... 5-44
MUTE button (models without Hands-free system) ............................................................ 5-44
Bluetooth
®audio (type C audio) ....................... 5-45
Media format..................................................... 5-45
Setting Bluetooth
®audio .................................... 5-45
Bluetooth
®audio operation ................................ 5-45
Hands-free system (if equipped) ...................... 5-46
Tips for the Hands-free system.......................... 5-47
Certification for the Hands-free system ............... 5-48
Safety precautions ............................................. 5-49
Using the Hands-free system ............................. 5-49
Bluetooth
®setting ............................................. 5-59