2011 SUBARU IMPREZA WRX STI check oil
[x] Cancel search: check oilPage 366 of 459
Black plate (372,1)
北米Model "A1110BE-C" EDITED: 2010/ 12/ 17
11-12
Maintenance and service
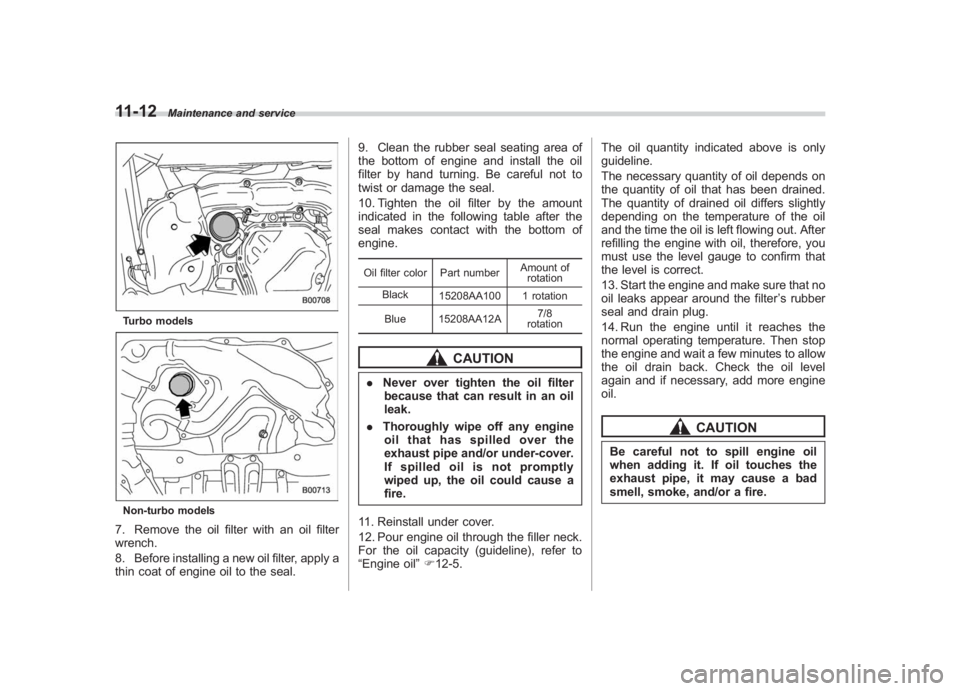
Turbo modelsNon-turbo models7. Remove the oil filter with an oil filter
wrench.
8. Before installing a new oil filter, apply a
thin coat of engine oil to the seal. 9. Clean the rubber seal seating area of
the bottom of engine and install the oil
filter by hand turning. Be careful not to
twist or damage the seal.
10. Tighten the oil filter by the amount
indicated in the following table after the
seal makes contact with the bottom of
engine.
Oil filter color Part number
Amount of
rotation
Black 15208AA100 1 rotation
Blue 15208AA12A 7/8
rotation
CAUTION
. Never over tighten the oil filter
because that can result in an oil
leak.
. Thoroughly wipe off any engine
oil that has spilled over the
exhaust pipe and/or under-cover.
If spilled oil is not promptly
wiped up, the oil could cause a
fire.
11. Reinstall under cover.
12. Pour engine oil through the filler neck.
For the oil capacity (guideline), refer to
“Engine oil ”F 12-5. The oil quantity indicated above is only
guideline.
The necessary quantity of oil depends on
the quantity of oil that has been drained.
The quantity of drained oil differs slightly
depending on the temperature of the oil
and the time the oil is left flowing out. After
refilling the engine with oil, therefore, you
must use the level gauge to confirm that
the level is correct.
13. Start the engine and make sure that no
oil leaks appear around the filter
’s rubber
seal and drain plug.
14. Run the engine until it reaches the
normal operating temperature. Then stop
the engine and wait a few minutes to allow
the oil drain back. Check the oil level
again and if necessary, add more engine
oil.
CAUTION
Be careful not to spill engine oil
when adding it. If oil touches the
exhaust pipe, it may cause a bad
smell, smoke, and/or a fire.
Page 368 of 459
Black plate (374,1)
北米Model "A1110BE-C" EDITED: 2010/ 12/ 17
11-14
Maintenance and service
shortened to that of the mixing
coolant.
. Do not splash the engine coolant
over painted parts. The alcohol
contained in the engine coolant
may damage the paint surface.
& Cooling fan, hose and con-
nectionsYour vehicle employs an electric cooling
fan which is thermostatically controlled to
operate when the engine coolant reaches
a specific temperature.
If the radiator cooling fan does not operate
even when the following conditions occur,
the cooling fan circuit may be defective.
. For turbo models, the engine coolant
temperature gauge exceeds the normal
operating range. Refer to “Temperature
gauge (turbo models) ”F 3-11.
. For non-turbo models, the coolant
temperature high warning light blinks or
illuminates in RED. Refer to “Coolant
temperature low indicator light (non-turbo
models)/Coolant temperature high warn-
ing light (non-turbo models) ”F 3-17.
Check the fuse and replace it if necessary.
Refer to “Fuses”F 11-45 and “Fuse panel
located in the engine compartment” F12-
14. If the fuse is not blown, have the cooling
system checked by your SUBARU dealer.
If frequent addition of coolant is neces-
sary, there may be a leak in the engine
cooling system. It is recommended that
the cooling system and connections be
checked for leaks, damage, or looseness.
&
Engine coolant! Checking the coolant level
WARNING
Never attempt to remove the radia-
tor cap until the engine has been
shut off and has cooled down
completely. Since the coolant is
under pressure, you may suffer
serious burns from a spray of boil-
ing hot coolant when the cap is
removed.
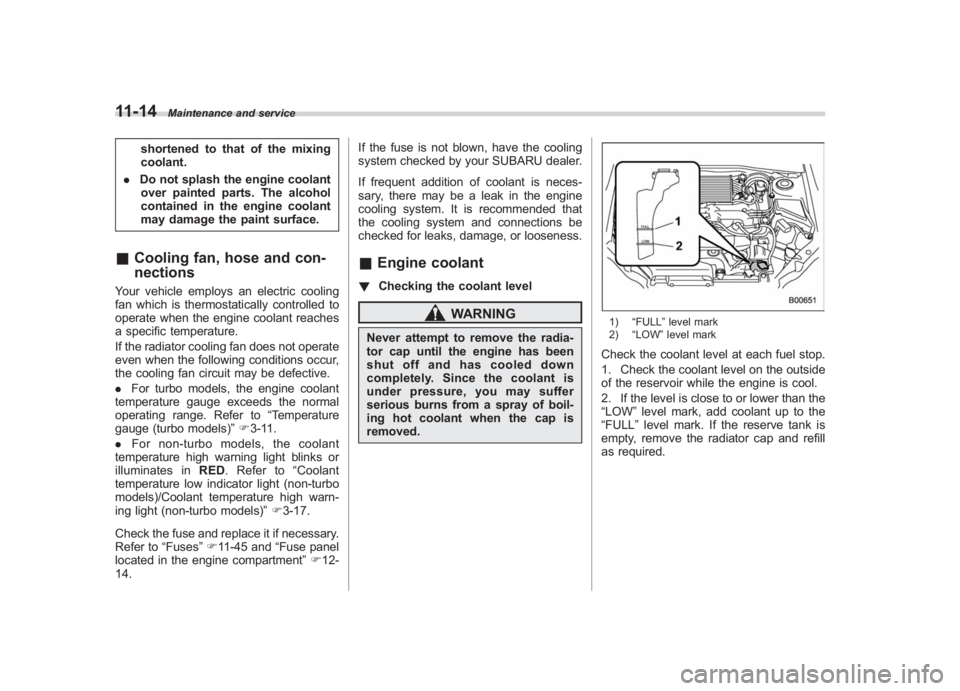
1) “FULL ”level mark
2) “LOW ”level markCheck the coolant level at each fuel stop.
1. Check the coolant level on the outside
of the reservoir while the engine is cool.
2. If the level is close to or lower than the
“LOW ”level mark, add coolant up to the
“FULL ”level mark. If the reserve tank is
empty, remove the radiator cap and refill
as required.
Page 369 of 459
Black plate (375,1)
北米Model "A1110BE-C" EDITED: 2010/ 12/ 17
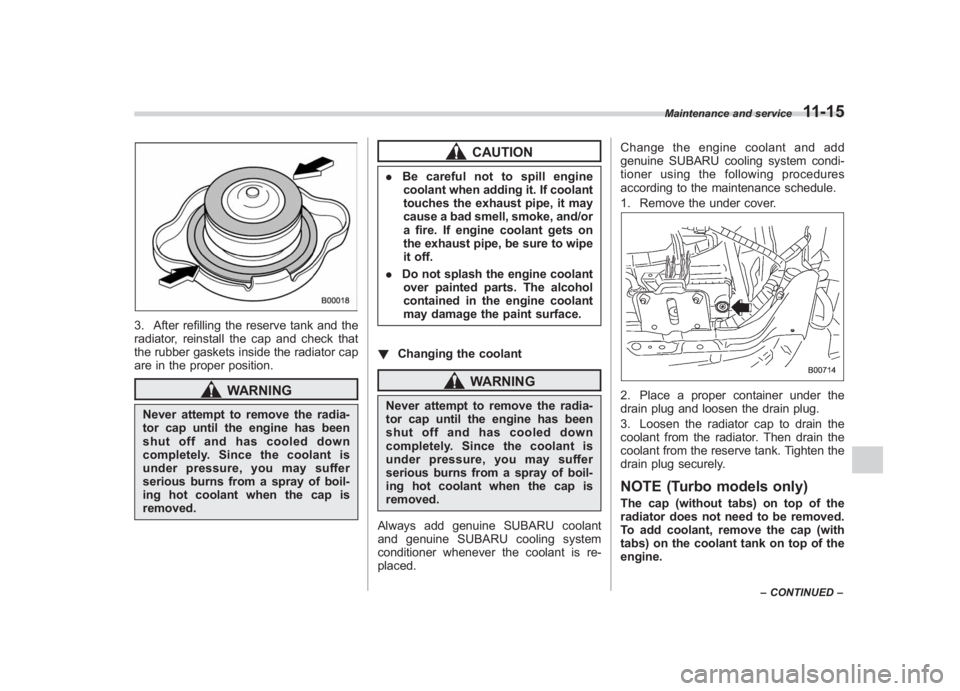
3. After refilling the reserve tank and the
radiator, reinstall the cap and check that
the rubber gaskets inside the radiator cap
are in the proper position.
WARNING
Never attempt to remove the radia-
tor cap until the engine has been
shut off and has cooled down
completely. Since the coolant is
under pressure, you may suffer
serious burns from a spray of boil-
ing hot coolant when the cap is
removed.
CAUTION
. Be careful not to spill engine
coolant when adding it. If coolant
touches the exhaust pipe, it may
cause a bad smell, smoke, and/or
a fire. If engine coolant gets on
the exhaust pipe, be sure to wipe
it off.
. Do not splash the engine coolant
over painted parts. The alcohol
contained in the engine coolant
may damage the paint surface.
! Changing the coolant
WARNING
Never attempt to remove the radia-
tor cap until the engine has been
shut off and has cooled down
completely. Since the coolant is
under pressure, you may suffer
serious burns from a spray of boil-
ing hot coolant when the cap is
removed.
Always add genuine SUBARU coolant
and genuine SUBARU cooling system
conditioner whenever the coolant is re-
placed. Change the engine coolant and add
genuine SUBARU cooling system condi-
tioner using the following procedures
according to the maintenance schedule.
1. Remove the under cover.
2. Place a proper container under the
drain plug and loosen the drain plug.
3. Loosen the radiator cap to drain the
coolant from the radiator. Then drain the
coolant from the reserve tank. Tighten the
drain plug securely.NOTE (Turbo models only)The cap (without tabs) on top of the
radiator does not need to be removed.
To add coolant, remove the cap (with
tabs) on the coolant tank on top of the
engine.
Maintenance and service
11-15
–
CONTINUED –
11
Page 374 of 459
Black plate (380,1)
北米Model "A1110BE-C" EDITED: 2010/ 12/ 17
11-20
Maintenance and service
& Recommended spark plugsFor the recommended spark plugs, refer
to“Electrical system ”F 12-3.
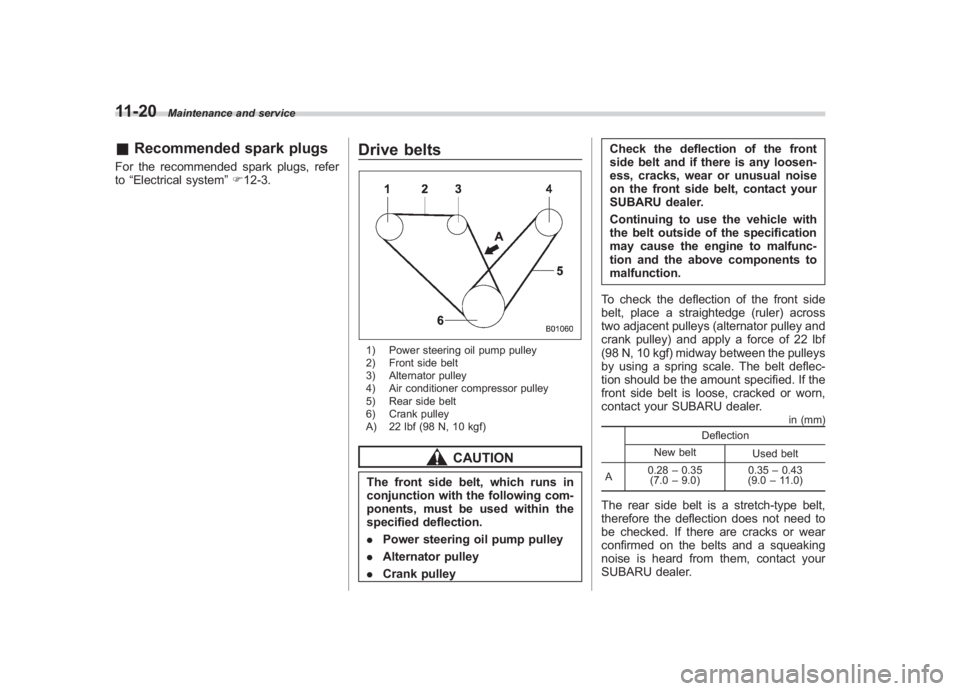
Drive belts1) Power steering oil pump pulley
2) Front side belt
3) Alternator pulley
4) Air conditioner compressor pulley
5) Rear side belt
6) Crank pulley
A) 22 lbf (98 N, 10 kgf)
CAUTION
The front side belt, which runs in
conjunction with the following com-
ponents, must be used within the
specified deflection.
. Power steering oil pump pulley
. Alternator pulley
. Crank pulley Check the deflection of the front
side belt and if there is any loosen-
ess, cracks, wear or unusual noise
on the front side belt, contact your
SUBARU dealer.
Continuing to use the vehicle with
the belt outside of the specification
may cause the engine to malfunc-
tion and the above components to
malfunction.
To check the deflection of the front side
belt, place a straightedge (ruler) across
two adjacent pulleys (alternator pulley and
crank pulley) and apply a force of 22 lbf
(98 N, 10 kgf) midway between the pulleys
by using a spring scale. The belt deflec-
tion should be the amount specified. If the
front side belt is loose, cracked or worn,
contact your SUBARU dealer.
in (mm)
Deflection
New belt Used belt
A 0.28
–0.35
(7.0 –9.0) 0.35
–0.43
(9.0 –11.0)
The rear side belt is a stretch-type belt,
therefore the deflection does not need to
be checked. If there are cracks or wear
confirmed on the belts and a squeaking
noise is heard from them, contact your
SUBARU dealer.
Page 375 of 459
Black plate (381,1)
北米Model "A1110BE-C" EDITED: 2010/ 12/ 17
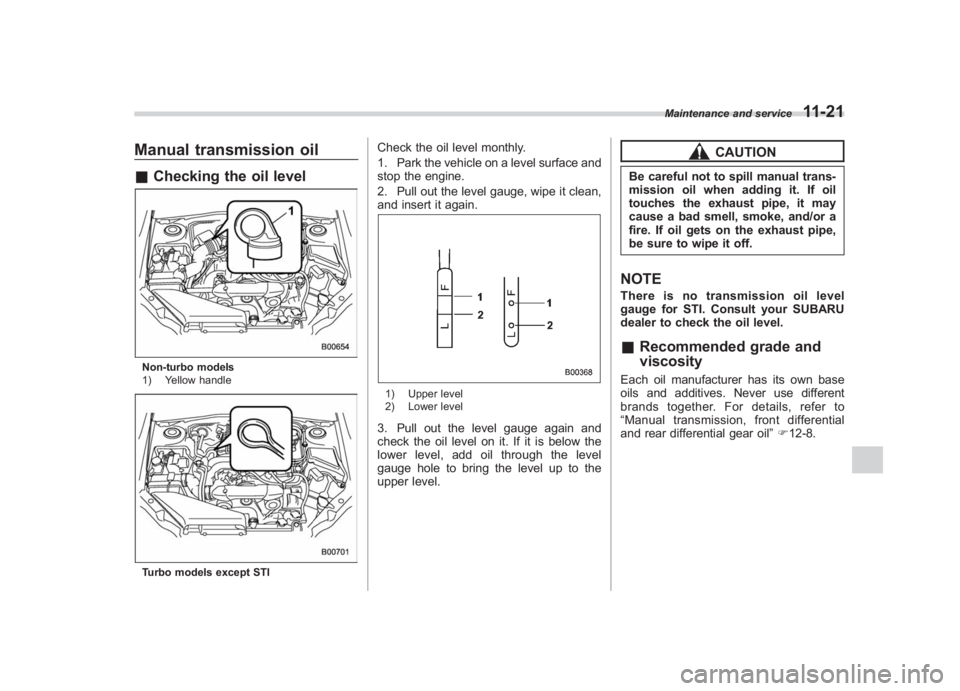
Manual transmission oil& Checking the oil levelNon-turbo models
1) Yellow handleTurbo models except STI
Check the oil level monthly.
1. Park the vehicle on a level surface and
stop the engine.
2. Pull out the level gauge, wipe it clean,
and insert it again.1) Upper level
2) Lower level3. Pull out the level gauge again and
check the oil level on it. If it is below the
lower level, add oil through the level
gauge hole to bring the level up to the
upper level.
CAUTION
Be careful not to spill manual trans-
mission oil when adding it. If oil
touches the exhaust pipe, it may
cause a bad smell, smoke, and/or a
fire. If oil gets on the exhaust pipe,
be sure to wipe it off.NOTEThere is no transmission oil level
gauge for STI. Consult your SUBARU
dealer to check the oil level.&Recommended grade and
viscosityEach oil manufacturer has its own base
oils and additives. Never use different
brands together. For details, refer to
“Manual transmission, front differential
and rear differential gear oil ”F 12-8.
Maintenance and service
11-21
11
Page 377 of 459
Black plate (383,1)
北米Model "A1110BE-C" EDITED: 2010/ 12/ 17
& Recommended fluidRefer to “Fluids”F 12-9.NOTEFor optimum transmission perfor-
mance, only use the automatic trans-
mission fluid that is recommended and
provided by SUBARU.
If the recommended automatic trans-
mission fluid is unavailable, Dexron III
may be temporarily used. If the Dexron
III is used continuously there will be a
noticeable increase in the vibration and
noise from the automatic transmission.
Front differential gear oil (AT
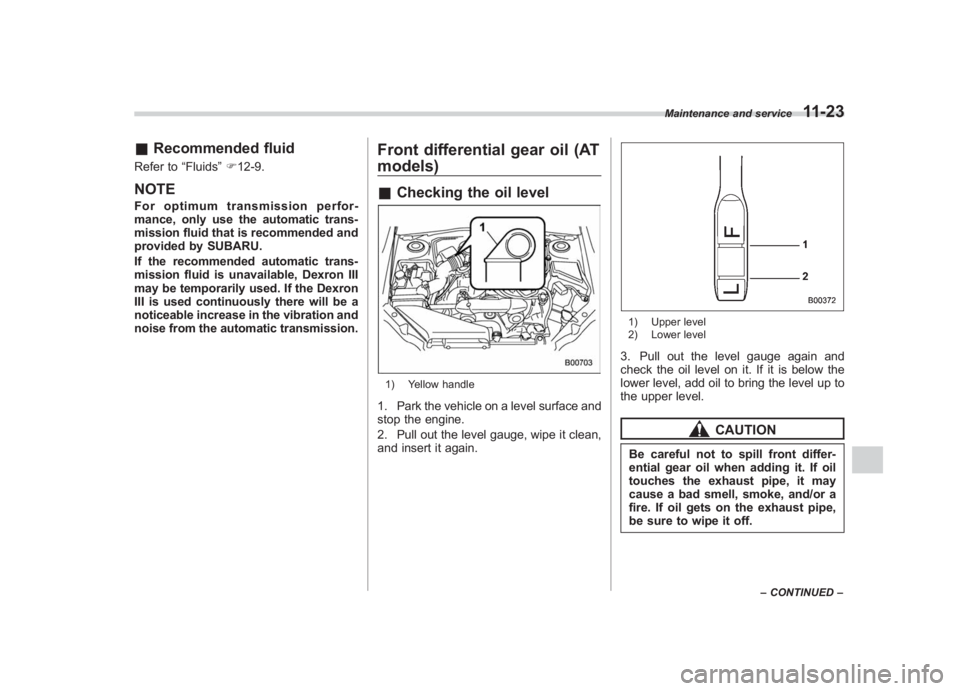
models)& Checking the oil level1) Yellow handle1. Park the vehicle on a level surface and
stop the engine.
2. Pull out the level gauge, wipe it clean,
and insert it again.
1) Upper level
2) Lower level3. Pull out the level gauge again and
check the oil level on it. If it is below the
lower level, add oil to bring the level up to
the upper level.
CAUTION
Be careful not to spill front differ-
ential gear oil when adding it. If oil
touches the exhaust pipe, it may
cause a bad smell, smoke, and/or a
fire. If oil gets on the exhaust pipe,
be sure to wipe it off.
Maintenance and service
11-23
–CONTINUED –
11
Page 378 of 459
Black plate (384,1)
北米Model "A1110BE-C" EDITED: 2010/ 12/ 17
11-24
Maintenance and service
& Recommended grade and
viscosityEach oil manufacturer has its own base
oils and additives. Never use different
brands together. For details, refer to
“Manual transmission, front differential
and rear differential gear oil ”F 12-8.
Rear differential gear oilThere is no rear differential gear oil level
gauge. To check the rear differential gear
oil level, we recommend that you consult
your SUBARU dealer for inspection.& Recommended grade and
viscosityEach oil manufacturer has its own base
oils and additives. Never use different
brands together. For details, refer to
“Manual transmission, front differential
and rear differential gear oil ”F 12-8.
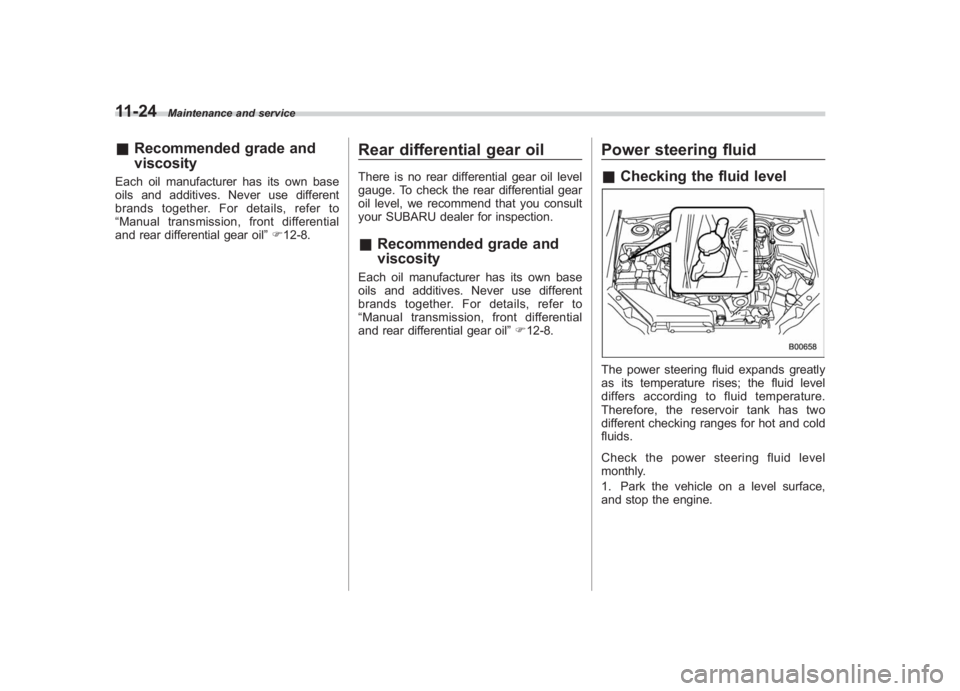
Power steering fluid& Checking the fluid levelThe power steering fluid expands greatly
as its temperature rises; the fluid level
differs according to fluid temperature.
Therefore, the reservoir tank has two
different checking ranges for hot and cold
fluids.
Check the power steering fluid level
monthly.
1. Park the vehicle on a level surface,
and stop the engine.
Page 379 of 459
Black plate (385,1)
北米Model "A1110BE-C" EDITED: 2010/ 12/ 17
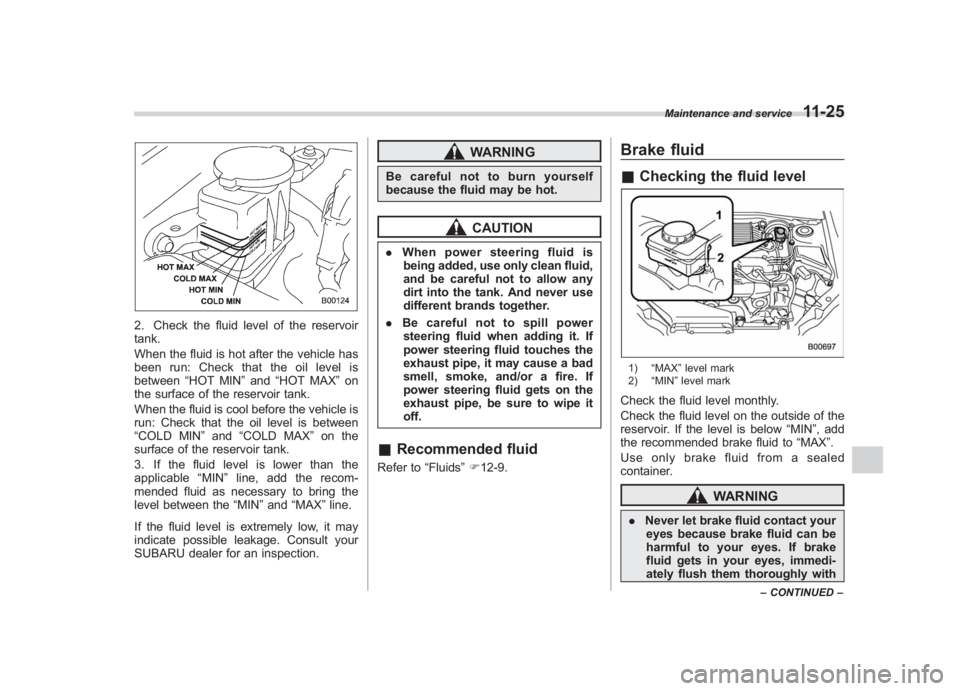
2. Check the fluid level of the reservoir
tank.
When the fluid is hot after the vehicle has
been run: Check that the oil level is
between “HOT MIN ”and “HOT MAX ”on
the surface of the reservoir tank.
When the fluid is cool before the vehicle is
run: Check that the oil level is between
“COLD MIN ”and “COLD MAX ”on the
surface of the reservoir tank.
3. If the fluid level is lower than the
applicable “MIN ”line, add the recom-
mended fluid as necessary to bring the
level between the “MIN”and “MAX ”line.
If the fluid level is extremely low, it may
indicate possible leakage. Consult your
SUBARU dealer for an inspection.
WARNING
Be careful not to burn yourself
because the fluid may be hot.
CAUTION
. When power steering fluid is
being added, use only clean fluid,
and be careful not to allow any
dirt into the tank. And never use
different brands together.
. Be careful not to spill power
steering fluid when adding it. If
power steering fluid touches the
exhaust pipe, it may cause a bad
smell, smoke, and/or a fire. If
power steering fluid gets on the
exhaust pipe, be sure to wipe it
off.& Recommended fluidRefer to “Fluids”F 12-9.
Brake fluid& Checking the fluid level1) “MAX ”level mark
2) “MIN ”level markCheck the fluid level monthly.
Check the fluid level on the outside of the
reservoir. If the level is below “MIN”, add
the recommended brake fluid to “MAX”.
Use only brake fluid from a sealed
container.
WARNING
. Never let brake fluid contact your
eyes because brake fluid can be
harmful to your eyes. If brake
fluid gets in your eyes, immedi-
ately flush them thoroughly with
Maintenance and service
11-25
– CONTINUED –
11