2011 SUBARU IMPREZA WRX STI remote control
[x] Cancel search: remote controlPage 166 of 459
Black plate (168,1)
北米Model "A1110BE-C" EDITED: 2010/ 12/ 17
3-46
Instruments and controls
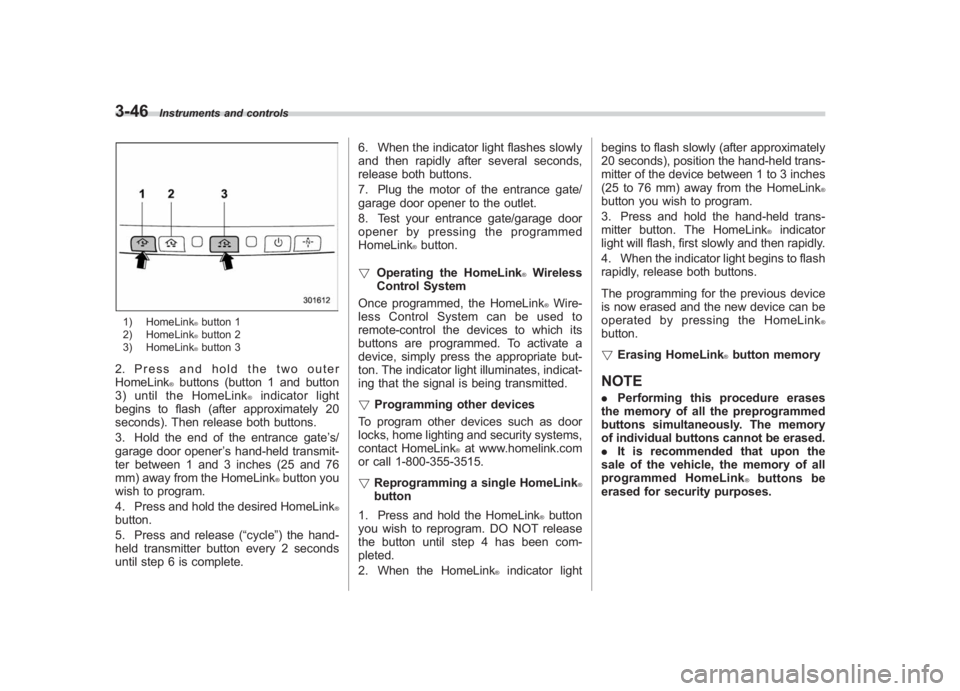
1) HomeLink
®button 1
2) HomeLink®button 2
3) HomeLink®button 3
2. Press and hold the two outer
HomeLink
®buttons (button 1 and button
3) until the HomeLink
®indicator light
begins to flash (after approximately 20
seconds). Then release both buttons.
3. Hold the end of the entrance gate ’s/
garage door opener ’s hand-held transmit-
ter between 1 and 3 inches (25 and 76
mm) away from the HomeLink
®button you
wish to program.
4. Press and hold the desired HomeLink
®
button.
5. Press and release ( “cycle”) the hand-
held transmitter button every 2 seconds
until step 6 is complete. 6. When the indicator light flashes slowly
and then rapidly after several seconds,
release both buttons.
7. Plug the motor of the entrance gate/
garage door opener to the outlet.
8. Test your entrance gate/garage door
opener by pressing the programmed
HomeLink
®button.
! Operating the HomeLink
®Wireless
Control System
Once programmed, the HomeLink®Wire-
less Control System can be used to
remote-control the devices to which its
buttons are programmed. To activate a
device, simply press the appropriate but-
ton. The indicator light illuminates, indicat-
ing that the signal is being transmitted.
! Programming other devices
To program other devices such as door
locks, home lighting and security systems,
contact HomeLink
®at www.homelink.com
or call 1-800-355-3515.
! Reprogramming a single HomeLink
®
button
1. Press and hold the HomeLink
®button
you wish to reprogram. DO NOT release
the button until step 4 has been com-
pleted.
2. When the HomeLink
®indicator light begins to flash slowly (after approximately
20 seconds), position the hand-held trans-
mitter of the device between 1 to 3 inches
(25 to 76 mm) away from the HomeLink
®
button you wish to program.
3. Press and hold the hand-held trans-
mitter button. The HomeLink
®indicator
light will flash, first slowly and then rapidly.
4. When the indicator light begins to flash
rapidly, release both buttons.
The programming for the previous device
is now erased and the new device can be
operated by pressing the HomeLink
®
button.
! Erasing HomeLink
®button memory
NOTE. Performing this procedure erases
the memory of all the preprogrammed
buttons simultaneously. The memory
of individual buttons cannot be erased.
. It is recommended that upon the
sale of the vehicle, the memory of all
programmed HomeLink
®buttons be
erased for security purposes.
Page 167 of 459
Black plate (169,1)
北米Model "A1110BE-C" EDITED: 2010/ 12/ 17
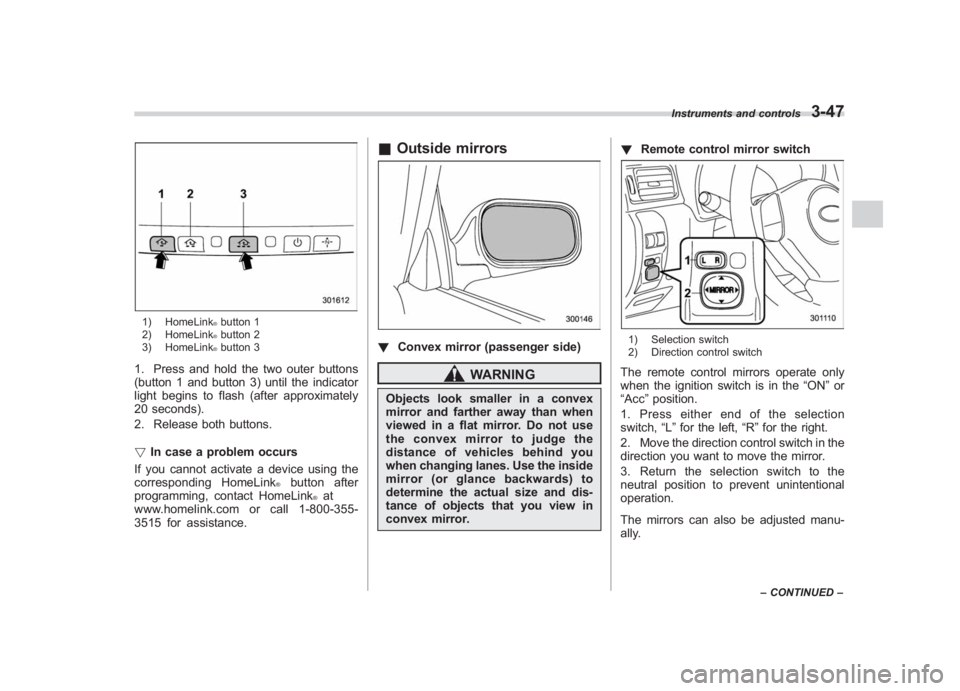
1) HomeLink
®button 1
2) HomeLink®button 2
3) HomeLink®button 3
1. Press and hold the two outer buttons
(button 1 and button 3) until the indicator
light begins to flash (after approximately
20 seconds).
2. Release both buttons.
! In case a problem occurs
If you cannot activate a device using the
corresponding HomeLink
®
button after
programming, contact HomeLink
®at
www.homelink.com or call 1-800-355-
3515 for assistance.
& Outside mirrors! Convex mirror (passenger side)
WARNING
Objects look smaller in a convex
mirror and farther away than when
viewed in a flat mirror. Do not use
the convex mirror to judge the
distance of vehicles behind you
when changing lanes. Use the inside
mirror (or glance backwards) to
determine the actual size and dis-
tance of objects that you view in
convex mirror. !
Remote control mirror switch
1) Selection switch
2) Direction control switchThe remote control mirrors operate only
when the ignition switch is in the “ON”or
“Acc ”position.
1. Press either end of the selection
switch, “L”for the left, “R”for the right.
2. Move the direction control switch in the
direction you want to move the mirror.
3. Return the selection switch to the
neutral position to prevent unintentional
operation.
The mirrors can also be adjusted manu-
ally.
Instruments and controls
3-47
– CONTINUED –
3
Page 233 of 459
Black plate (235,1)
北米Model "A1110BE-C" EDITED: 2010/ 12/ 17
Bluetooth
®
audio (type C
audio)
This function enables you to play back
audio sources recorded in Bluetooth
®
audio devices. You need to register the
Bluetooth
®audio device in the system
before using it.
& Media formatBluetooth
®
audio devices cannot be
connected if they are not compatible with
the following Bluetooth
®profiles.
. A2DP (Advanced Audio Distribution
Profile)
. AVRCP (Audio/Video Remote Control
Profile)
& Setting Bluetooth
®audio
1. Select the “BT-A SETUP”menu by
pressing the “MENU”button.
2. Perform the following procedure while
“BT-A ”is displayed.NOTEYou cannot set a Bluetooth
®
audio
while driving. !
Registering (pairing) device
1. Select the “PAIR AUDIO” menu by
operating the “TUNE/TRACK/CH ”dial. If a
device is already registered, “MEMORY
FULL ”is displayed and the mode changes
to the Bluetooth
®audio setting mode.
2. After the passkey is shown on the
display, input the passkey into the cell
phone. If you input the correct passkey,
“PAIRED ”is displayed and the registering
procedure is finished. If you input an
incorrect passkey, “FAILED”is displayed,
the registering procedure was not suc-
cessful and the mode changes to the
Bluetooth
®audio setting mode.
! Selecting device
1. Select the “SELECT AUDIO” menu by
operating the “TUNE/TRACK/CH ”dial. If
no devices are registered, “EMPTY”is
displayed and the mode changes to the
Bluetooth®audio setting mode.
2. Select the “CONFIRM”menu by oper-
ating the “TUNE/TRACK/CH ”dial. If the
device is connected, “SELECTED ”is
displayed and the selecting procedure is
finished. If the device cannot be con-
nected, “FAILED”is displayed and the
selecting procedure was not successful. !
Setting passkey
1. Select the “SET PASSKEY ”menu by
operating the “TUNE/TRACK/CH ”dial.
After the currently set passkey is dis-
played, a new passkey can be entered.
2. Input the new passkey by operating
the “TUNE/TRACK/CH ”dial.
3. Select the “CONFIRM”menu by oper-
ating the “TUNE/TRACK/CH ”dial. The
new passkey is displayed, the passkey is
changed and the mode changes to the
Bluetooth
®audio setting mode.
! Deleting device
1. Select the “DELETE AUDIO ”menu by
operating the “TUNE/TRACK/CH ”dial. If
no devices are registered, “EMPTY”is
displayed and the mode changes to the
Bluetooth®audio setting mode.
2. Select the “CONFIRM”menu by oper-
ating the “TUNE/TRACK/CH ”dial. “DE-
LETED ”is displayed and the mode
changes to the Bluetooth
®audio setting
mode.
& Bluetooth
®audio operation
NOTE
Depending on the connected device, it
may not activate as per the following
items or not work smoothly.
Audio
5-45
– CONTINUED –
5
Page 265 of 459
Black plate (13,1)
北米Model "A1110BE-C" EDITED: 2010/ 11/ 17
Fuel ...................................................................... 7-3
Fuel requirements ............................................... 7-3
Fuel filler lid and cap ........................................... 7-4
State emission testing (U.S. only) ...................... 7-7
Preparing to drive ............................................... 7-8
Starting the engine .............................................. 7-9
MT models.......................................................... 7-9
AT models ........................................................... 7-9
Stopping the engine ........................................... 7-10
Remote engine start system (dealer option) .............................................................. 7-11
Starting your vehicle .......................................... 7-11
Remote start safety features ............................... 7-11
Entering the vehicle while it is running via remote start ................................................................. 7-12
Entering the vehicle following remote engine start shutdown ......................................................... 7-12
Pre-heating or pre-cooling the interior of the vehicle ............................................................. 7-12
Service mode ..................................................... 7-12
Remote engine start transmitter programming and programmable feature option ..................... 7-12
System maintenance .......................................... 7-13
Manual transmission –6 speeds (STI) ............. 7-15
Selecting reverse gear ........................................ 7-15
Shifting speeds .................................................. 7-16
Driving tips ........................................................ 7-16
Manual transmission –5 speeds (except
STI) ................................................................... 7-17
Shifting speeds .................................................. 7-17
Driving tips ........................................................ 7-18
Driver’s Control Center Differential (DCCD)
(STI) ................................................................. 7-18
To change mode of driver ’s control center
differential ....................................................... 7-19
Auto mode ........................................................ 7-19
Manual mode ..................................................... 7-20
Temporary release ............................................. 7-22
Automatic transmission .................................... 7-22
Select lever....................................................... 7-23
Shift lock function ............................................. 7-24
Selection of manual mode .................................. 7-26
Driving tips ........................................................ 7-27
SPORT mode ..................................................... 7-28
SI-DRIVE (STI) .................................................... 7-28
Intelligent (I) mode ............................................. 7-28
Sport (S) mode .................................................. 7-29
Sport Sharp (S#) mode. ...................................... 7-29
SI-DRIVE selector .............................................. 7-30
Limited slip differential (LSD) (STI) .................. 7-30
Power steering ................................................... 7-31
Braking ............................................................... 7-31
Braking tips ....................................................... 7-31
Brake system .................................................... 7-31
Disc brake pad wear warning indicators ............. 7-32
ABS (Anti-lock Brake System).......................... 7-32
ABS system self-check...................................... 7-33
ABS warning light .............................................. 7-33
Electronic Brake Force Distribution (EBD)
system ............................................................. 7-33
Steps to take if EBD system malfunctions ..... ..... 7-33
Starting and operating
7
Page 276 of 459
Black plate (280,1)
北米Model "A1110BE-C" EDITED: 2010/ 12/ 17
7-12
Starting and operating
& Entering the vehicle while it
is running via remote start1. Unlock the vehicle doors using the
remote keyless entry system. If the vehi-
cle’s doors are unlocked manually using
the key, the vehicle’ s alarm system will
trigger and the remote engine start system
will turn off. Inserting the key into the
ignition switch and turning it to the “ON”
position or pressing the unlock button “
”
on the remote keyless entry transmitter
will disarm the alarm system. Refer to
“Alarm system ”F 2-16.
2. Enter the vehicle. Do not depress the
brake pedal.
3. Insert the key into the ignition switch
and turn to the “ON ”position. If the ignition
switch is accidentally turned to the
“START ”position, the system ’s “starter
anti-grind ”feature will prevent the starter
from re-cranking.
4. Depress the brake pedal. The remote
starter disengages, the vehicle’ s power
window features are re-enabled and the
vehicle will operate normally.
& Entering the vehicle follow-
ing remote engine start shut-
downAn alarm trigger may occur if the vehicle is
opened by the remote keyless entry transmitter within a few seconds immedi-
ately following remote engine start shut-
down.
&
Pre-heating or pre-cooling
the interior of the vehicleBefore exiting the vehicle, set the tem-
perature controls to the desired setting
and operation. After the system starts the
vehicle, the heater or air-conditioning will
activate and heat or cool the interior to
your setting.&Service modeIn service mode, the remote start function
is temporarily disabled to prevent the
system from unexpectedly starting the
engine while being serviced.
! To engage the service mode
Turn the ignition switch to the “ON ”
position, depress and hold the brake
pedal, then press and release the “
”
button on the remote engine start trans-
mitter three times. The system will pause
for 1 second and then flash the turn signal
lights and honk the horn three times
indicating that the system is in service
mode. When attempting to activate the
remote start system while in service
mode, the turn signal lights will flash and
the horn will honk two times and will not start.
!
To disengage the service mode
Turntheignitionswitchtothe “ON ”
position, depress and hold the brake
pedal, then press and release the “
”
button on the remote engine start trans-
mitter three times. The system will pause
for 1 second and flash the turn signal
lights once indicating that the system has
exited service mode.
NOTEWhen taking your vehicle in for service,
it is recommended that you inform the
service personnel that your vehicle is
equipped with a remote engine start
system.& Remote engine start trans-
mitter programming and pro-
grammable feature optionNew transmitters can be programmed to
the remote engine start system in the
event that remote engine start transmitters
are lost, stolen or damaged. The remote
engine start system also has one pro-
grammable feature that can be adjusted
for user preference.
The remote engine start system can be
programmed to either make an audible
horn chirp upon remote start activation or
Page 422 of 459
Black plate (428,1)
北米Model "A1110BE-C" EDITED: 2010/ 12/ 17
12-12
Specifications
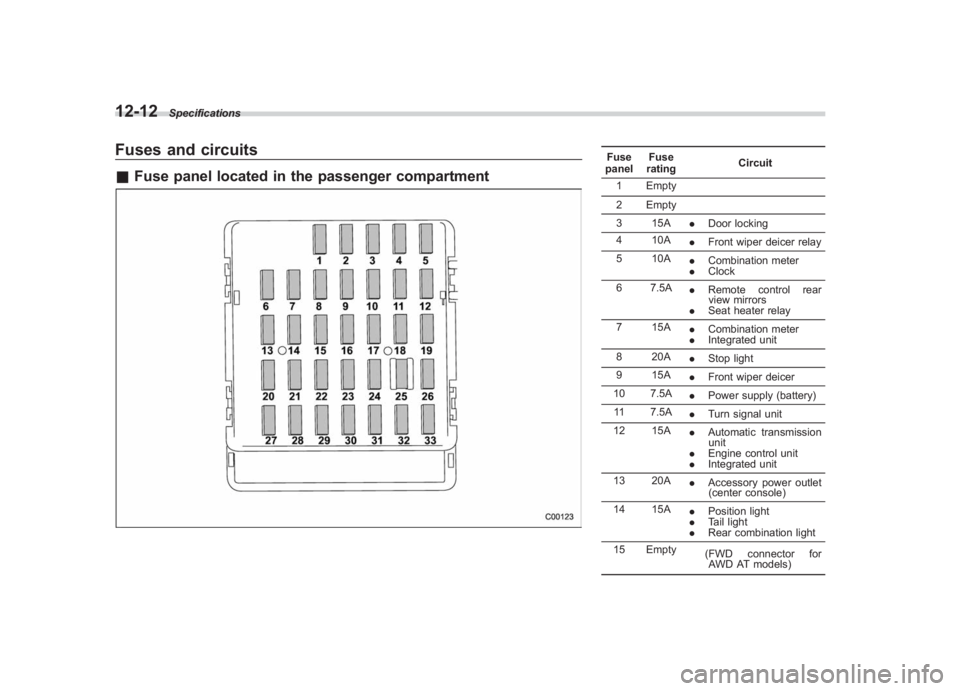
Fuses and circuits& Fuse panel located in the passenger compartment
Fuse
panel Fuse
rating Circuit
1 Empty
2 Empty
3 15A .Door locking
4 10A .Front wiper deicer relay
5 10A .Combination meter
. Clock
6 7.5A .Remote control rear
view mirrors
. Seat heater relay
7 15A .Combination meter
. Integrated unit
8 20A .Stop light
9 15A .Front wiper deicer
10 7.5A .Power supply (battery)
11 7.5A .Turn signal unit
12 15A .Automatic transmission
unit
. Engine control unit
. Integrated unit
13 20A .Accessory power outlet
(center console)
14 15A .Position light
. Tail light
. Rear combination light
15 Empty (FWD connector for
AWD AT models)
Page 448 of 459
Black plate (2,1)
北米Model "A1110BE-C" EDITED: 2010/ 12/ 17
14-2
Index
A
ABS (Anti-lock Brake System) ..................................... 7-32
Warning light ......................................................... 3-21
Accessories ....................................................... 5-4, 11-46
Accessory power outlet ................................................. 6-8
Active head restraint ..................................................... 1-5
Air cleaner element ................................................... 11-17
Air conditioner Automatic climate control system ............................. 4-11
Manual climate control system ............................. 4-4, 4-7
Air filtration system ..................................................... 4-13
Airflow selection Automatic climate control system ......................... 4-2, 4-9
Manual climate control system ............................. 4-2, 4-4
Alarm system ............................................................ 2-16
All-Wheel Drive warning light ....................................... 3-23
Aluminum wheel ....................................................... 11-38
Cleaning ............................................................... 10-3
Antenna system ........................................................... 5-3
Anti-lock Brake System (ABS) ..................................... 7-32
Arming the system ..................................................... 2-17
Armrest ....................................................................... 1-8
Ashtray ..................................................................... 6-10
AT OIL TEMP warning light ......................................... 3-18
Audio Antenna system ....................................................... 5-3
Auxiliary input jack ................................................. 5-34
Bluetooth
®audio .................................................... 5-45
CD player operation ............................................... 5-23
Control button ........................................................ 5-42
FM/AM radio operation ........................................... 5-12 iPod
®operations
.................................................... 5-37
Power and sound controls ........................................ 5-8
Satellite radio operations ......................................... 5-17
Set ........................................................................\
5-4
USB storage device operations ................................ 5-37
Auto-dimming mirror/compass .............................. 3-40, 3-41
Automatic climate control system ................................... 4-8
Automatic transmission ............................................... 7-22
Fluid ........................................................... 11-22, 12-9
MANUAL mode ...................................................... 7-26
Oil temperature warning light (AT OIL TEMP) ............. 3-18
Select lever ........................................................... 7-23
Shift lock function ................................................... 7-24
SPORT mode ........................................................ 7-28
Automatic/Emergency Locking Retractor (A/ELR) ........... 1-12
Auxiliary input jack ...................................................... 5-34
B
Battery .................................................................... 11-44
Drainage prevention function ..................................... 2-5
Jump starting ......................................................... 9-11
Replacement (remote engine start transmitter) ........... 7-13
Replacement (remote keyless entry system) .............. 2-11
Bluetooth®audio ........................................................ 5-45
Booster seat .............................................................. 1-27
Bottle holder ............................................................... 6-7
Brake Assist .................................................................... 7-32
Booster ....................................................... 7-31, 11-27
Fluid ........................................................... 11-25, 12-9
Pad and lining ...................................................... 11-30