2011 SUBARU IMPREZA WRX power steering
[x] Cancel search: power steeringPage 349 of 458

10-2Appearance care
Exterior care &Washing
CAUTION
. When washing the vehicle, the
brakes may get wet. As a result,
the brake stopping distance will
be longer. To dry the brakes,
drive the vehicle at a safe speed
while lightly depressing the
brake pedal to heat up thebrakes.
. Do not wash the engine compart-
ment and area adjacent to it. If
water enters the engine air in-
take, electrical parts or the power
steering fluid reservoir, it will
cause engine trouble or a mal-
function of power steering.
. Do not use any organic solvents
when washing the surface of the
bulb assembly cover. However, if
a detergent with organic solvents
is used to wash the cover sur-
face, completely rinse off the
detergent with water. Otherwise,
the cover surface may be da-maged.
. For 5-door models, since your
vehicle is equipped with a rear wiper, automatic car-wash
brushes could become tangled
around it, damaging the wiper
arm and other components. Ask
the automatic car-wash operator
not to let the brushes touch the
wiper arm or to fix the wiper arm
on the rear window glass with
adhesive tape before operating
the machine.
NOTE
When having your vehicle washed in
an automatic car wash, make sure
beforehand that the car wash is of
suitable type.
The best way to preserve your vehicle ’s
beauty is frequent washing. Wash the
vehicle at least once a month to avoid
contamination by road grime.
Wash dirt off with a wet sponge and plenty
of lukewarm or cold water. Do not wash
the vehicle with hot water and in directsunlight.
Salt, chemicals, insects, tar, soot, tree
sap, and bird droppings should be washed
off by using a light detergent, as required.
If you use a light detergent, make certain
that it is a neutral detergent. Do not use
strong soap or chemical detergents. All cleaning agents should be promptly
flushed from the surface and not allowed
to dry there. Rinse the vehicle thoroughly
with plenty of lukewarm water. Wipe the
remaining water off with a chamois or softcloth. !
Washing the underbody
Chemicals, salts and gravel used for
deicing road surfaces are extremely cor-
rosive, accelerating the corrosion of un-
derbody components, such as the exhaust
system, fuel and brake lines, brake
cables, floor pan and fenders, and sus-pension.
Thoroughly flush the underbody and in-
side of the fenders with lukewarm or cold
water at frequent intervals to reduce the
harmful effects of such agents.
Mud and sand adhering to the underbody
components may accelerate their corro-sion.
After driving off-road or on muddy or
sandy roads, wash the mud and sand off
the underbody. Carefully flush the suspen-
sion and axle parts, as they are particu-
larly prone to mud and sand buildup. Do
not use a sharp-edged tool to remove
caked mud.
Page 354 of 458

Maintenance schedule....................................... 11-3
Maintenance precautions ................................... 11-3
Before checking or servicing in the engine compartment .................................................... 11-4
When checking or servicing in the engine compartment .................................................... 11-4
When checking or servicing in the engine compartment while the engine is running .......... 11-5
Engine hood ....................................................... 11-5
Engine compartment overview .......................... 11-7
Non-turbo models .............................................. 11-7
Turbo models except STI .................................... 11-8
STI..................................................................... 11-9
Engine oil .......................................................... 11-10
Checking the oil level ....................................... 11-10
Changing the oil and oil filter ............................ 11-11
Recommended grade and viscosity .................. 11-13
Synthetic oil ..................................................... 11-13
Cooling system ................................................ 11-13
Cooling fan, hose and connections ................... 11-14
Engine coolant ................................................. 11-14
Air cleaner element .......................................... 11-17
Replacing the air cleaner element ..................... 11-17
Spark plugs ...................................................... 11-19
Recommended spark plugs .............................. 11-20
Drive belts ........................................................ 11-20
Manual transmission oil .................................. 11-21
Checking the oil level ....................................... 11-21
Recommended grade and viscosity .................. 11-21Automatic transmission fluid
.......................... 11-22
Checking the fluid level .................................... 11-22
Recommended fluid ......................................... 11-23
Front differential gear oil (AT models) ........... 11-23
Checking the oil level ...................................... 11-23
Recommended grade and viscosity .................. 11-24
Rear differential gear oil .................................. 11-24
Recommended grade and viscosity .................. 11-24
Power steering fluid ........................................ 11-24
Checking the fluid level .................................... 11-24
Recommended fluid ......................................... 11-25
Brake fluid ........................................................ 11-25
Checking the fluid level .................................... 11-25
Recommended brake fluid ............................... 11-26
Clutch fluid (MT models) ................................. 11-26
Checking the fluid level .................................... 11-26
Recommended clutch fluid ............................... 11-27
Brake booster .................................................. 11-27
Brake pedal ...................................................... 11-28
Checking the brake pedal free play .................. 11-28
Checking the brake pedal reserve distance....... 11-28
Clutch pedal (MT models) ............................... 11-29
Checking the clutch function ............................ 11-29
Checking the clutch pedal free play .................. 11-29
Hill start assist system (MT models –if
equipped) ...................................................... 11-29
Replacement of brake pad and lining ............ 11-30
Breaking-in of new brake pads and linings ....... 11-30
Parking brake stroke ....................................... 11-31
Maintenance and service
11
Page 360 of 458

Engine compartment overview &Non-turbo models1) Power steering fluid reservoir
(page 11-24)
2) Manual transmission oil level gauge (MT) (page 11-21) or Differential gear oil level
gauge (AT) (page 11-23)
3) Clutch fluid reservoir (page 11-26)
4) Automatic transmission fluid level gauge (AT) (page 11-22)
5) Brake fluid reservoir (page 11-25)
6) Fuse box (page 11-45)
7) Battery (page 11-44)
8) Windshield washer tank (page 11-38)
9) Engine oil filler cap (page 11-10)
10) Engine coolant reservoir (page 11-14)
11) Radiator cap (page 11-14)
12) Engine oil level gauge (page 11-10)
13) Air cleaner case (page 11-17) Maintenance and service
11-7
– CONTINUED –
Page 361 of 458

11-8Maintenance and service
& Turbo models except STI
1) Power steering fluid reservoir
(page 11-24)
2) Manual transmission oil level gauge (MT) (page 11-21)
3) Clutch fluid reservoir (page 11-26)
4) Brake fluid reservoir (page 11-25)
5) Fuse box (page 11-45)
6) Battery (page 11-44)
7) Windshield washer tank (page 11-38)
8) Engine oil filler cap (page 11-10)
9) Engine coolant reservoir (page 11-14)
10) Engine oil level gauge (page 11-10)
11) Radiator cap (page 11-14)
12) Air cleaner case (page 11-17)
Page 362 of 458

&STI1) Power steering fluid reservoir
(page 11-24)
2) Clutch fluid reservoir (page 11-26)
3) Brake fluid reservoir (page 11-25)
4) Fuse box (page 11-45)
5) Battery (page 11-44)
6) Windshield washer tank (page 11-38)
7) Engine oil filler cap (page 11-10)
8) Engine coolant reservoir (page 11-14)
9) Engine oil level gauge (page 11-10)
10) Radiator cap (page 11-14)
11) Air cleaner case (page 11-17) Maintenance and service
11-9
Page 373 of 458

11-20Maintenance and service
&Recommended spark plugs
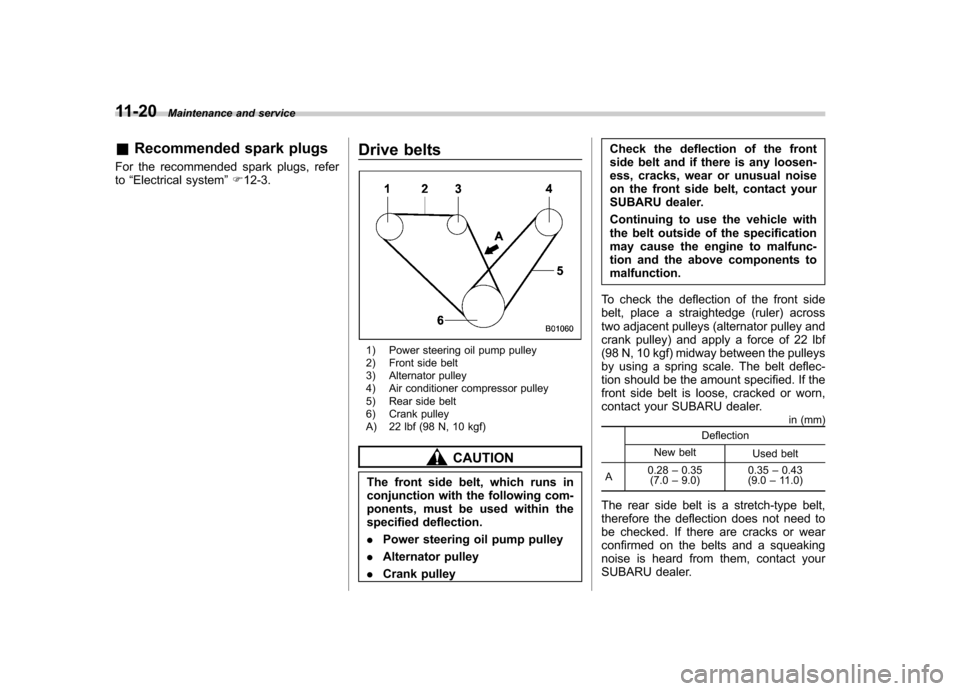
For the recommended spark plugs, refer to “Electrical system ”F 12-3. Drive belts
1) Power steering oil pump pulley
2) Front side belt
3) Alternator pulley
4) Air conditioner compressor pulley
5) Rear side belt
6) Crank pulley
A) 22 lbf (98 N, 10 kgf)
CAUTION
The front side belt, which runs in
conjunction with the following com-
ponents, must be used within the
specified deflection. . Power steering oil pump pulley
. Alternator pulley
. Crank pulley Check the deflection of the front
side belt and if there is any loosen-
ess, cracks, wear or unusual noise
on the front side belt, contact your
SUBARU dealer.
Continuing to use the vehicle with
the belt outside of the specification
may cause the engine to malfunc-
tion and the above components tomalfunction.
To check the deflection of the front side
belt, place a straightedge (ruler) across
two adjacent pulleys (alternator pulley and
crank pulley) and apply a force of 22 lbf
(98 N, 10 kgf) midway between the pulleys
by using a spring scale. The belt deflec-
tion should be the amount specified. If the
front side belt is loose, cracked or worn,
contact your SUBARU dealer. in (mm)
Deflection
New belt Used belt
A 0.28
–0.35
(7.0 –9.0) 0.35
–0.43
(9.0 –11.0)
The rear side belt is a stretch-type belt,
therefore the deflection does not need to
be checked. If there are cracks or wear
confirmed on the belts and a squeaking
noise is heard from them, contact your
SUBARU dealer.
Page 377 of 458

11-24Maintenance and service
&Recommended grade and viscosity
Each oil manufacturer has its own base
oils and additives. Never use different
brands together. For details, refer to“ Manual transmission, front differential
and rear differential gear oil ”F 12-8. Rear differential gear oil
There is no rear differential gear oil level
gauge. To check the rear differential gear
oil level, we recommend that you consult
your SUBARU dealer for inspection. &
Recommended grade and viscosity
Each oil manufacturer has its own base
oils and additives. Never use different
brands together. For details, refer to“ Manual transmission, front differential
and rear differential gear oil ”F 12-8. Power steering fluid &
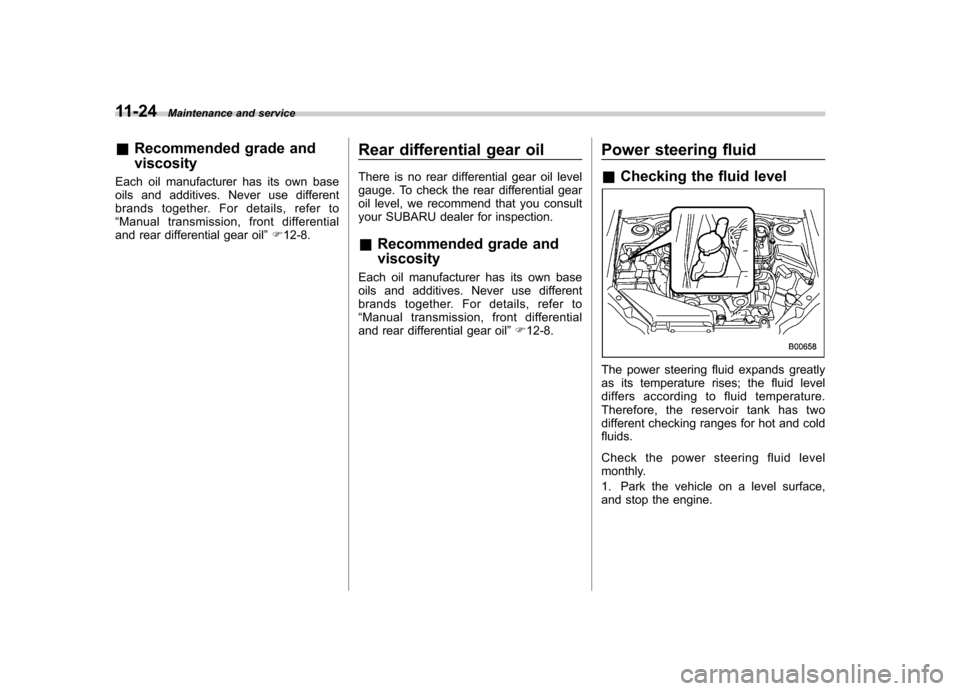
Checking the fluid level
The power steering fluid expands greatly
as its temperature rises; the fluid level
differs according to fluid temperature.
Therefore, the reservoir tank has two
different checking ranges for hot and cold fluids.
Check the power steering fluid level
monthly.
1. Park the vehicle on a level surface,
and stop the engine.
Page 378 of 458

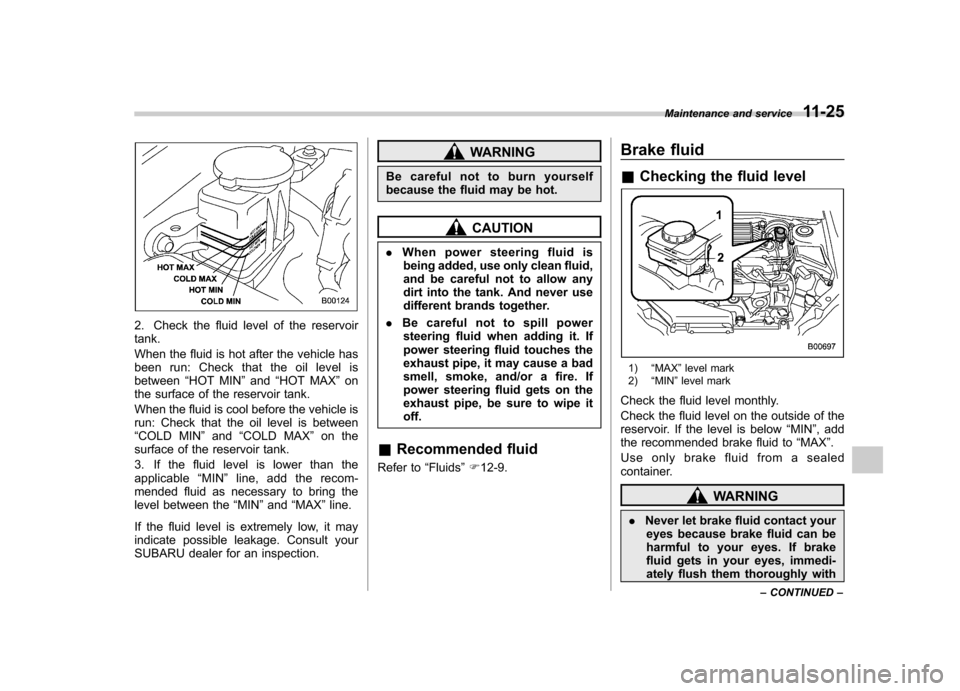
2. Check the fluid level of the reservoir tank.
When the fluid is hot after the vehicle has
been run: Check that the oil level isbetween“HOT MIN ”and “HOT MAX ”on
the surface of the reservoir tank.
When the fluid is cool before the vehicle is
run: Check that the oil level is between“ COLD MIN ”and “COLD MAX ”on the
surface of the reservoir tank.
3. If the fluid level is lower than the
applicable “MIN ”line, add the recom-
mended fluid as necessary to bring the
level between the “MIN ”and “MAX ”line.
If the fluid level is extremely low, it may
indicate possible leakage. Consult your
SUBARU dealer for an inspection.
WARNING
Be careful not to burn yourself
because the fluid may be hot.
CAUTION
. When power steering fluid is
being added, use only clean fluid,
and be careful not to allow any
dirt into the tank. And never use
different brands together.
. Be careful not to spill power
steering fluid when adding it. If
power steering fluid touches the
exhaust pipe, it may cause a bad
smell, smoke, and/or a fire. If
power steering fluid gets on the
exhaust pipe, be sure to wipe it off.
& Recommended fluid
Refer to “Fluids ”F 12-9. Brake fluid &
Checking the fluid level
1) “MAX ”level mark
2) “MIN ”level mark
Check the fluid level monthly.
Check the fluid level on the outside of the
reservoir. If the level is below “MIN ”, add
the recommended brake fluid to “MAX ”.
Use only brake fluid from a sealed
container.
WARNING
. Never let brake fluid contact your
eyes because brake fluid can be
harmful to your eyes. If brake
fluid gets in your eyes, immedi-
ately flush them thoroughly with Maintenance and service
11-25
– CONTINUED –