2011 SUBARU IMPREZA lock
[x] Cancel search: lockPage 244 of 458

First menu Second menu Third menuDetails
SETUP SECURITY SET PIN Setting a PIN code
PHBK LOCK* Locking the phonebook
PHBK UNLOCK* Unlocking the phonebook
GO BACK
PHONE SETUP PAIR PHONE Registering a new cell phone
SELECT PHONE Selecting a cell phone to be used
CHANGE NAME Changing the registered name of the cell phone
LIST PHONES Showing the list of the registered cell phones
SET PASSKEY Changing the pass key
DELETE Deleting the registered cell phone
GO BACK
SYSTEM SETUP GUIDANCE VOL Setting the volume of the voice guidance
INITIALIZE Initialization
SEL LANGUAGE Selecting the language (using the Hands-free system)
GO BACK
GO BACK —
*: If a PIN code is not registered, the menu described in the chart is not available. Audio
5-57
– CONTINUED –
Page 245 of 458

5-58Audio
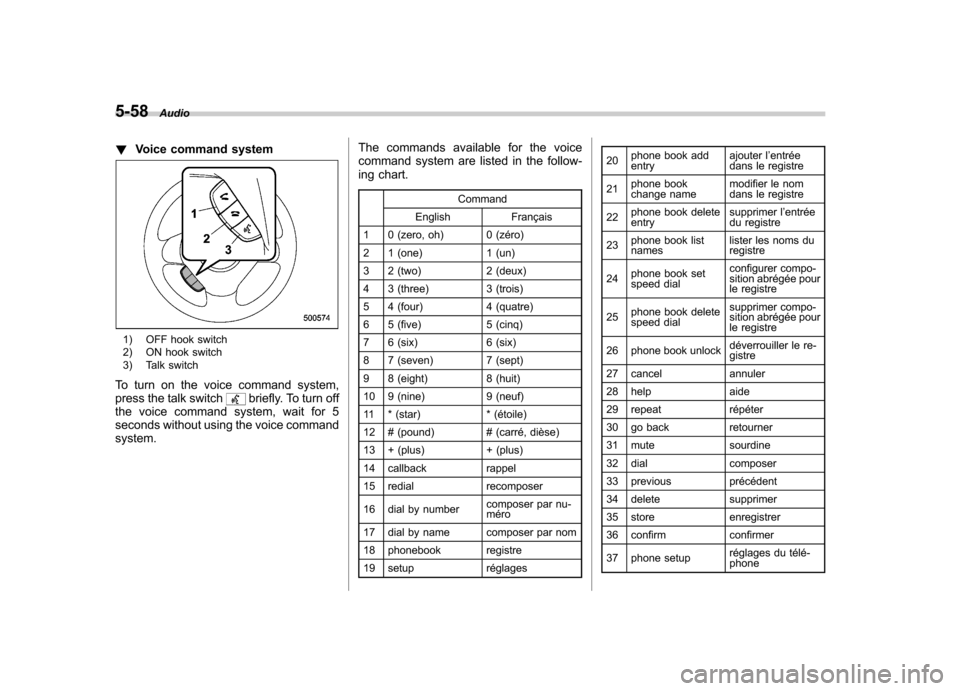
!Voice command system
1) OFF hook switch
2) ON hook switch
3) Talk switch
To turn on the voice command system,
press the talk switch
briefly. To turn off
the voice command system, wait for 5
seconds without using the voice commandsystem. The commands available for the voice
command system are listed in the follow-
ing chart.
Command
English Français
1 0 (zero, oh) 0 (zéro)
2 1 (one) 1 (un)
3 2 (two) 2 (deux)
4 3 (three) 3 (trois)
5 4 (four) 4 (quatre)
6 5 (five) 5 (cinq)
7 6 (six) 6 (six)
8 7 (seven) 7 (sept)
9 8 (eight) 8 (huit)
10 9 (nine) 9 (neuf)
11 * (star) * (étoile)
12 # (pound) # (carré, dièse)
13 + (plus) + (plus)
14 callback rappel
15 redial recomposer
16 dial by number composer par nu- méro
17 dial by name composer par nom
18 phonebook registre
19 setup réglages 20
phone book add entry ajouter l
’entrée
dans le registre
21 phone book
change name modifier le nom
dans le registre
22 phone book deleteentry supprimer l
’entrée
du registre
23 phone book listnames lister les noms duregistre
24 phone book set
speed dial configurer compo-
sition abrégée pour
le registre
25 phone book delete
speed dial supprimer compo-
sition abrégée pour
le registre
26 phone book unlock déverrouiller le re-gistre
27 cancel annuler
28 help aide
29 repeat répéter
30 go back retourner
31 mute sourdine
32 dial composer
33 previous précédent
34 delete supprimer
35 store enregistrer
36 confirm confirmer
37 phone setup réglages du télé- phone
Page 246 of 458

38 security sécurité
39 pair phonejumeler le télé- phone
40 change name modifier le nom
41 select phone sélectionner le tél- éphone
42 list phones lister les télé-phones
43 set pass key configurer le
passe-partout
44 add entry ajouter l ’entrée
45 delete entry supprimer l ’entrée
46 delete speed dial supprimer compo-
sition abrégée
47 by voice vocalement
48 by phone par téléphone
49 call history historique d ’appels
50 set speed dial configurer compo-
sition abrégée
51 incoming entrant
52 outgoing sortant
53 list names lister les noms
54 set PIN configurer NIP
55 phone book lock verrouiller le regis- tre&
Bluetooth®setting
! Security setting
! Setting PIN code
The PIN code is a 4-digit number and is
used when locking the phonebook.
1. Select the “SETUP ”menu.
2. Select the “SECURITY ”menu.
3. Select the “SET PIN ”menu. Then
“ CURRENT PIN? ”is displayed.
4. Input the current PIN code by operat-
ing the “TUNE/TRACK/CH ”dial or saying
the number.
5. Select the “CONFIRM ”menu.
6. Input the new PIN code by operating the “TUNE/TRACK/CH ”dial or saying the
number.
7. Select the “CONFIRM ”menu.
! Locking the phonebook
1. Select the “SETUP ”menu.
2. Select the “SECURITY ”menu.
3. Select “PHBK LOCK ”by operating the
“ TUNE/TRACK/CH ”dial or say “PHONE-
BOOK LOCK ”. Then “CURRENT PIN? ”is
displayed.
4. Input the PIN code by operating the “ TUNE/TRACK/CH ”dial or saying the
number.
5. Select the “CONFIRM ”menu. If the inputted PIN code is correct,
“LOCKED ”is
displayed and the phonebook is locked.
NOTE
While the phonebook is locked, if the
operation restricted menu is selected,“ PHBK LOCK ”is displayed.
! Unlocking the phonebook
1. Select the “SETUP ”menu.
2. Select the “SECURITY ”menu.
3. Select the “PHBK UNLOCK ”menu by
operating the “TUNE/TRACK/CH ”dial or
say “PHONEBOOK UNLOCK ”. Then
“ CURRENT PIN? ”is displayed.
NOTE
If the phonebook is not locked, “UN-
LOCK ”is displayed and the mode
changes to the security mode.
4. Input the PIN code by operating the “ TUNE/TRACK/CH ”dial or saying the
number.
5. Select the “CONFIRM ”menu. If the
inputted PIN code is correct, “UN-
LOCKED ”is displayed and the phone-
book is unlocked. Audio
5-59
– CONTINUED –
Page 251 of 458

6-2Interior equipment
Interior lights
When leaving your vehicle, make sure the
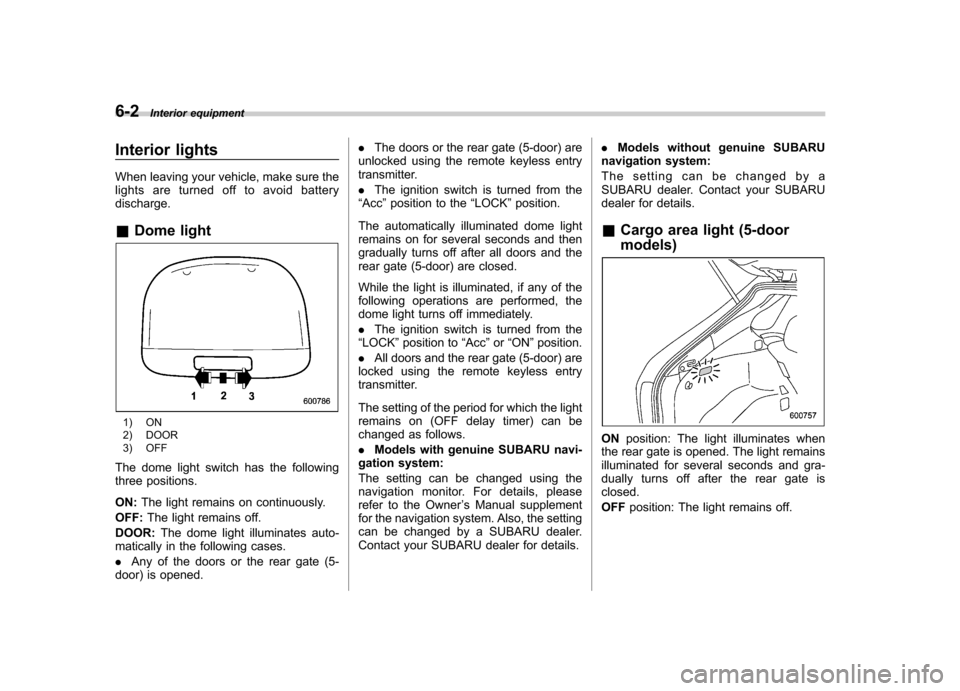
lights are turned off to avoid batterydischarge. &Dome light
1) ON
2) DOOR
3) OFF
The dome light switch has the following
three positions. ON: The light remains on continuously.
OFF: The light remains off.
DOOR: The dome light illuminates auto-
matically in the following cases. . Any of the doors or the rear gate (5-
door) is opened. .
The doors or the rear gate (5-door) are
unlocked using the remote keyless entry
transmitter. . The ignition switch is turned from the
“ Acc ”position to the “LOCK ”position.
The automatically illuminated dome light
remains on for several seconds and then
gradually turns off after all doors and the
rear gate (5-door) are closed.
While the light is illuminated, if any of the
following operations are performed, the
dome light turns off immediately. . The ignition switch is turned from the
“ LOCK ”position to “Acc ”or “ON ”position.
. All doors and the rear gate (5-door) are
locked using the remote keyless entry
transmitter.
The setting of the period for which the light
remains on (OFF delay timer) can be
changed as follows. . Models with genuine SUBARU navi-
gation system:
The setting can be changed using the
navigation monitor. For details, please
refer to the Owner ’s Manual supplement
for the navigation system. Also, the setting
can be changed by a SUBARU dealer.
Contact your SUBARU dealer for details. .
Models without genuine SUBARU
navigation system:
The setting can be changed by a
SUBARU dealer. Contact your SUBARU
dealer for details.
& Cargo area light (5-door models)
ON position: The light illuminates when
the rear gate is opened. The light remains
illuminated for several seconds and gra-
dually turns off after the rear gate isclosed. OFF position: The light remains off.
Page 252 of 458

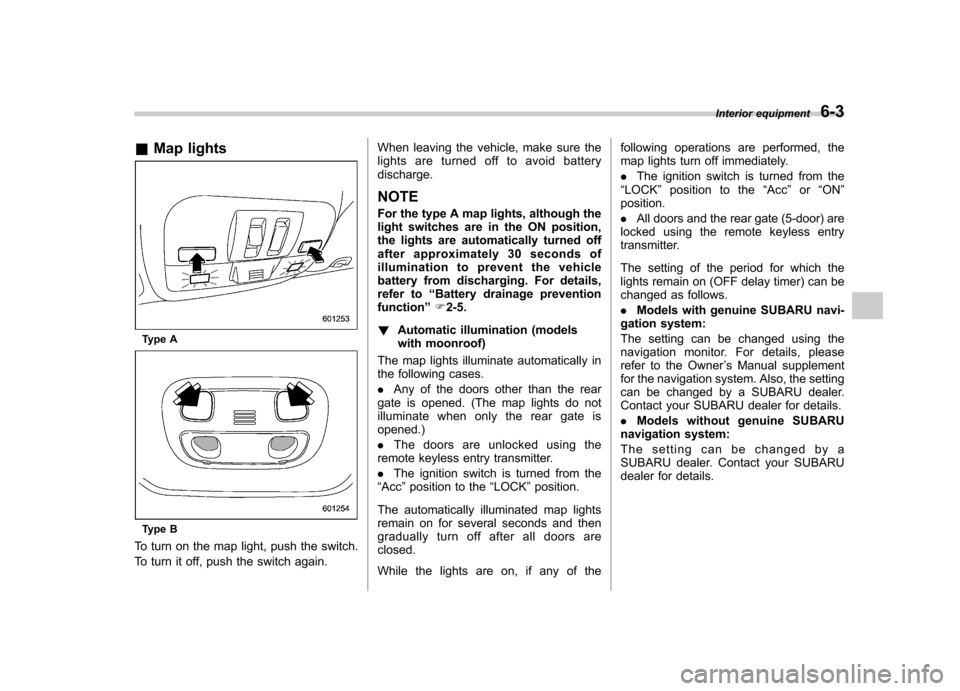
&Map lights
Type A
Type B
To turn on the map light, push the switch.
To turn it off, push the switch again. When leaving the vehicle, make sure the
lights are turned off to avoid batterydischarge.
NOTE
For the type A map lights, although the
light switches are in the ON position,
the lights are automatically turned off
after approximately 30 seconds of
illumination to prevent the vehicle
battery from discharging. For details,
refer to “Battery drainage prevention
function ”F 2-5.
! Automatic illumination (models
with moonroof)
The map lights illuminate automatically in
the following cases. . Any of the doors other than the rear
gate is opened. (The map lights do not
illuminate when only the rear gate isopened.) . The doors are unlocked using the
remote keyless entry transmitter.. The ignition switch is turned from the
“ Acc ”position to the “LOCK ”position.
The automatically illuminated map lights
remain on for several seconds and then
gradually turn off after all doors areclosed.
While the lights are on, if any of the following operations are performed, the
map lights turn off immediately. .
The ignition switch is turned from the
“ LOCK ”position to the “Acc ”or “ON ”
position.. All doors and the rear gate (5-door) are
locked using the remote keyless entry
transmitter.
The setting of the period for which the
lights remain on (OFF delay timer) can be
changed as follows. . Models with genuine SUBARU navi-
gation system:
The setting can be changed using the
navigation monitor. For details, please
refer to the Owner ’s Manual supplement
for the navigation system. Also, the setting
can be changed by a SUBARU dealer.
Contact your SUBARU dealer for details. . Models without genuine SUBARU
navigation system:
The setting can be changed by a
SUBARU dealer. Contact your SUBARU
dealer for details. Interior equipment
6-3
Page 253 of 458

6-4Interior equipment
Sun visors
To block out glare, swing down the visors.
To use the sun visor at a side window,
swing it down and move it sideways. &
Vanity mirror
CAUTION
Keep the vanity mirror cover closed
while the car is being driven to avoid
being temporarily blinded by the
glare of bright light.
To use the vanity mirror, swing down the
sun visor and open the vanity mirror cover. Storage compartment
CAUTION
. Always keep the storage com-
partment closed while driving to
reduce the risk of injury in the
event of a sudden stop or anaccident.
. Do not store spray cans, contain-
ers with flammable or corrosive
liquids or any other dangerous
items in the storage compart-ment.
Page 254 of 458

&Glove box
1) Lock
2) Unlock
To open the glove box, pull the handle. To
close it, push the lid firmly upward.
To lock the glove box, insert the key and
turn it clockwise. To unlock the glove box,
insert the key and turn it counterclockwise. &
Center consoleTo open the lid, pull up the lock release. &Coin tray (if equipped)
A coin tray is built in the center console. Cup holders
CAUTION
Take care to avoid spills. Beverages,
if hot, might burn you or your
passengers. Spilled beverages may
also damage upholstery, carpets or
audio equipment.
& Front passenger ’s cup holder
CAUTION
Do not pick up a cup from the cup
holder or put a cup in the holder
while you are driving, as this may
distract you and lead to an accident. Interior equipment
6-5
– CONTINUED –
Page 264 of 458

Fuel...................................................................... 7-3
Fuel requirements ............................................... 7-3
Fuel filler lid and cap ........................................... 7-4
State emission testing (U.S. only) ...................... 7-7
Preparing to drive ............................................... 7-8
Starting the engine .............................................. 7-9
MT models .......................................................... 7-9
AT models ........................................................... 7-9
Stopping the engine ........................................... 7-10
Remote engine start system (dealer option) .............................................................. 7-11
Starting your vehicle .......................................... 7-11
Remote start safety features ............................... 7-11
Entering the vehicle while it is running via remote start ................................................................. 7-12
Entering the vehicle following remote engine start shutdown ......................................................... 7-12
Pre-heating or pre-cooling the interior of the vehicle ............................................................. 7-12
Service mode ..................................................... 7-12
Remote engine start transmitter programming and programmable feature option ..................... 7-12
System maintenance .......................................... 7-13
Manual transmission –6 speeds (STI) ............. 7-15
Selecting reverse gear ........................................ 7-15
Shifting speeds .................................................. 7-16
Driving tips ........................................................ 7-16
Manual transmission –5 speeds (except
STI) ................................................................... 7-17
Shifting speeds .................................................. 7-17
Driving tips ........................................................ 7-18 Driver
’s Control Center Differential (DCCD)
(STI) ................................................................. 7-18
To change mode of driver ’s control center
differential ....................................................... 7-19
Auto mode ........................................................ 7-19
Manual mode ..................................................... 7-20
Temporary release ............................................. 7-22
Automatic transmission .................................... 7-22
Select lever ....................................................... 7-23
Shift lock function ............................................. 7-24
Selection of manual mode .................................. 7-26
Driving tips ........................................................ 7-27
SPORT mode ..................................................... 7-28
SI-DRIVE (STI) .................................................... 7-28
Intelligent (I) mode ............................................. 7-28
Sport (S) mode .................................................. 7-29
Sport Sharp (S#) mode. ...................................... 7-29
SI-DRIVE selector .............................................. 7-30
Limited slip differential (LSD) (STI) .................. 7-30
Power steering ................................................... 7-31
Braking ............................................................... 7-31
Braking tips ....................................................... 7-31
Brake system .................................................... 7-31
Disc brake pad wear warning indicators ............. 7-32
ABS (Anti-lock Brake System) .......................... 7-32
ABS system self-check ...................................... 7-33
ABS warning light .............................................. 7-33
Electronic Brake Force Distribution (EBD) system ............................................................. 7-33
Steps to take if EBD system malfunctions ..... ..... 7-33
Starting and operating
7