2011 SKODA YETI navigation system
[x] Cancel search: navigation systemPage 18 of 31
Function keys in the main menu TELEPHONE
■ Press the button PHONE .
■ - Switches on voice operation, only with GSM II telephone preinstalla-
tion. Further information on how to operate the voice control can be found
in the operating instructions of your vehicle.
■ SOS - emergency setup only with the GSM III telephone preinstallation via
the rSAP profile. Further information on how to operate the GSM III tele-
phone preinstallation can be found in the operating instructions of your ve-
hicle.
■ - Accept a call, dial the entered number. After pressing, the call list is
displayed in the main menu PHONE.
■ - End or reject call - only active during a call
■ - Dial number
■ Delete - Delete numbers
■ - Dial number
■ - Open phonebook
■ Find - Open the input screen for search in the phonebook
■ Details - Display information relating to a telephone book entry
■ - Open the list of missed calls
■ Edit - Edit number
■ - Dial number
■ - Open list of dialled numbers
■ Edit - Edit number
■ - Dial number
■ - Open list of received calls
■ Edit - Edit number
■ - Dial number
■ - Voice mail (the voice mail number must have been configured)
⇒
page 17, Settings in PHONE mode WARNING
Concentrate fully at all times on your steering! As the driver you are fully re-
sponsible for road safety. Only use the system so that you are in full control of
your vehicle in every traffic situation - risk of accident! ÐTelephone calls and functions during a call Calls can be received even if the navigation system is switched off.
If you have started the process of connecting to a call number or accepted a call,
the main menu PHONE will change to the display
Phone conversation.
Starting a phone conversation
using the navigation system, you can start a phone conversation directly by enter-
ing a telephone number, by selecting from the phonebook, the list of selected
phone numbers, or the list of received calls ⇒ page 16
, Function keys in the main
menu TELEPHONE.
If you vehicle is fitted with the GSM II telephone preinstallation, you can also start
the phone conversation using voice operation with the aid of the function key ⇒
page 16, Function keys in the main menu TELEPHONE
.
Incoming phone call
■ - accept call
■ - reject call
Additional functions during the phone conversation
■ Extras - opens a list of additional functions
■ Mute - switches the microphone on/off during the conversation. A conver-
sation in the vehicle is not picked up by the microphone and so cannot be
heard by the other party.
■ Hands-free - switches the hands-free system on/off The conversation is not
broadcast to the vehicle through the speakers but only via the phone
speaker (private call).
■ Hold call - “hold” call (following appears: “
Call being held”). The connection
remains but the call is not transmitted. Resume call - call is resumed
■ Conference - Conference call involving all call participants
⇒ page 16
, Car-
rying out an additional phone conversation
■ Enter numbers - opens the input screen for DTMF key tones
- end call
Carrying out an additional phone conversation
Press the button PHONE .
Select a new call number or select a stored call number. 16
PHONE mode
Page 19 of 31
■
Extras - opens a list of additional functions
■ Swap call - switch between calls
■ Conference - Conference call involving all call participants
DTMF key tones
A particular DTMF key tone is assigned to each each key of a mobile phone. DTMF
key tones are used, for example, for the input of a password via the mobile phone
or for choosing functions in a
“Call centre”.
If a DTMF key tone has to be entered during a conversation, you can open the
keypad by pressing the function key Extras →
Enter numbers and follow the instruc-
tions (for example:
“For a private conversation with one of our co-workers, please
press 3 ”).
Ð
Settings in PHONE mode Press the button
PHONE →
SETUP .
■ Bluetooth settings 1)
- Settings for the Bluetooth ®
- function
■ Paired device list - opens a list of all connected devices
■ Search for devices - Search for external devices with an activated Bluetooth
®
function
■ Set Bluetooth visibility - Switch on visibility of the navigation system on other
devices with the Bluetooth ®
function
■ Enter passkey - Change the 4 digit code for connecting devices
■ Enter mobile box number - Enter the mobile box number for the mobile phone
■ Delete call lists 2)
- Deletes all call lists from the memory of the phone unit
■ Switch off telephone 2)3)
- switches off the phone unit (the mobile phone remains
paired)
■ Telephone audio volume - adjusts the volume of the mobile phone by turning but-
ton 15 ■
Load telephone book - loads the phonebook from the mobile phone to the memo-
ry of the radio navigation system. This procedure can take a few minutes.
■ Factory settings - resets device to factory settings- deletes user profiles
Ð1)
This feature is not available if the mobile phone is connected by means of the GSM III telephone pre-
installation. Bluetooth ®
settings for the GSM III telephone preinstallation can be found in your vehi-
cle's Owners manual.
2) This feature is not available if the mobile phone is connected by means of the GSM III telephone pre-
installation.
3) This function is not active if the mobile phone is connected using the GSM III telephone preinstalla-
tion via the HFP profile. 17
PHONE mode
Page 20 of 31
NAV mode (Navigation)
Overview
Before using the radio navigation system Street and location names can be changed. It is therefore possible under excep-
tional circumstances that the names stored in the navigation data might not cor-
respond to the changed names.
In regions not at all or only partially digitalised and which are therefore not inclu-
ded in the navigation data, the radio navigation system will try to continue provid-
ing guidance to the destination. Please note that under these circumstances the
guidance to the destination may not be completely correct if, for example, one-
way streets and road categories (motorway, country road etc.) are not at all or on-
ly partially included in the navigation data used.
The route calculated by the radio navigation system is a recommendation for
reaching the intended destination. While driving please pay attention to stopping
restrictions, traffic lights, one-way streets, lane changes, bodies of water and fer-
ries, railways etc. Ð
Safety instructions for the operation of the navigation system WARNING
● Please concentrate fully at all times on your driving! Inattention by the
driver can lead to accidents and injuries. As the driver you are fully responsible
for road safety.
● The following must always have priority over the driving recommenda-
tions:
–the road traffic legislation, even if the driving recommendations contra-
dict the StVO,
– the actual acknowledgement of traffic signs, light signals or signs
placed by the police at the relevant location,
– the facts and circumstances prevailing at the relevant location.
● Please observe the respective traffic regulations when driving. WARNING (Continued)
● Traffic signs and traffic regulations always have priority over the driving
recommendations provided by the navigation system.
● Route guidance is subject to constant changes, particularly to information
relating to one-way streets, pedestrian zones etc. stored in the navigation da-
ta. Information on traffic lights, stop and right of way signs, parking and stop-
ping restrictions as well as lane constrictions and speed restrictions is not in-
cluded in the radio navigation system.
● Adjust your speed to suit weather, road and traffic conditions. Do not al-
low, for example, the radio navigation system to make you drive faster in fog -
risk of accident!
● Only if the traffic situation allows it should you operate the radio naviga-
tion system with its wide range of possibilities.
● The driving recommendations provided may vary from current situations,
e.g. due to road works or out of date navigation data. In such a case, always
observe the traffic regulations and ignore the driving recommendations. Ð
General The route is recalculated each time if you ignore driving recommendations or
change the route. This process takes only a few seconds. Driving recommenda-
tions can only then be re-transmitted.
When entering an address (city, street), only those letters or symbols which make
up a logical entry will be presented. A list of possible names will be shown. Do not
forget to enter the blank space in names made up of more than one word, such as
High Wycombe ⇒
page 6, Input screen with keypad
The last voice response can be repeated by pressing the button 15 . The volume of
a navigation recommendation can be changed whilst it is being made.
The GPS satellites will not be able to reach the aerial once you are in a tunnel or
underground garage. The unit will orientate itself via the wheel sensors. 18
NAV mode (Navigation)
Page 21 of 31
Note
● All dtns. (country-, village-, road-, point of interest names) must be entered in-
cluding all country specific (or language-specific for points of interest) special
characters.
● Depending on the country, some functions of the radio navigation system can
no longer be selected on the screen at certain speeds. This is not a malfunction,
but corresponds to the legal requirements of this particular country. Ð
Navigation data and the memory card The navigation data are already available after the memory of the navigation sys-
tem is switched on first and can be used directly for navigation.
Update navigation data
– Remove the mechanical copy protection from the memory card.
– Insert a memory card ⇒ page 12, Inserting and removing the memory card
The following appears automatically after you insert the memory card: Assign - as-
signs the memory card to the navigation system. For licensing reasons, the memo-
ry card is assigned to your radio navigation system and cannot be used in a differ-
ent navigation system.
■ Use SD - use the navigation data directly from the memory card. If you want to
use navigation data from other regions which differs from the data stored in
the memory of the navigation system, you can also use data directly from the
memory card for guidance. This means you have two different sets of naviga-
tion data at your disposal. This means it is not necessary to copy the naviga-
tion data from the memory card to the memory of the radio navigation system.
■ Install - copies the navigation data from the memory card to the internal mem-
ory of the navigation system. The
“old” navigation data in the internal memory
of the navigation system are deleted. Data cannot be recovered once deleted
⇒ .
No navigation data is available during copying. The copy process takes around 2
hours.
Do not remove the memory card during the process of copying data from the
memory card to the internal memory of the radio navigation system! You can
damage the memory card Manual copying
If you insert the memory card with valid navigation data but the copy process
does not
start automatically, you can start it manually.
Press the button NAV →
SETUP .
■ Navigation data basis - displays the options for the navigation data
■ Install/use SD data - installs/uses the navigation data from the memory card
CAUTION
If the navigation data of the radio navigation data is overwritten by a different
version, these data can not be restored ! Note
You can obtain a memory card with the latest navigation data or data for other
countries from
ŠKODA Original Accessories. Ð
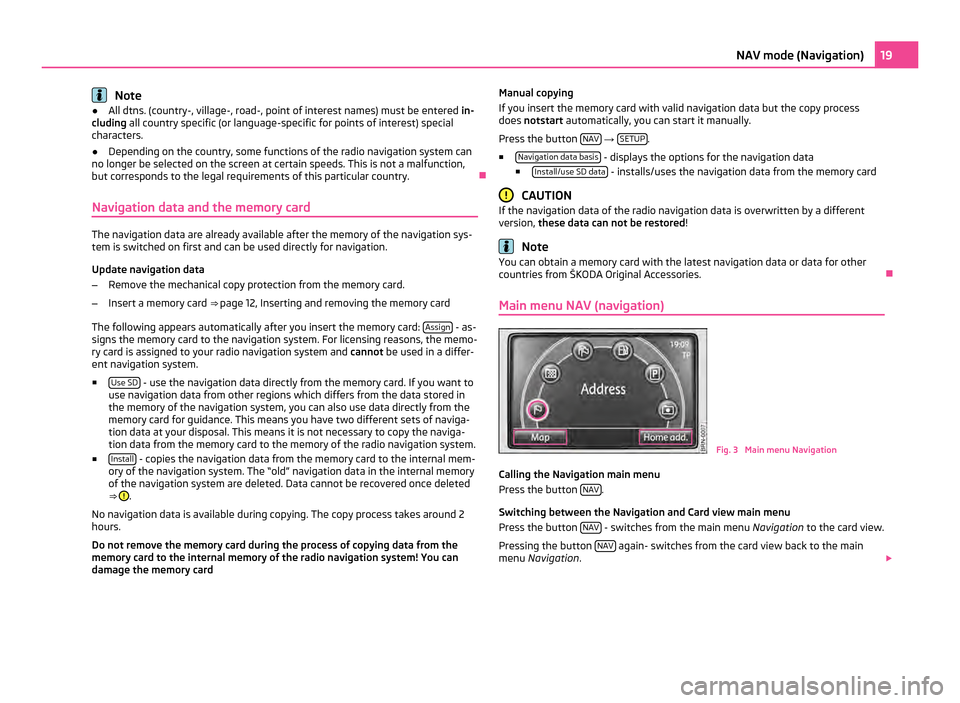
Main menu NAV (navigation) Fig. 3 Main menu Navigation
Calling the Navigation main menu
Press the button NAV .
Switching between the Navigation and Card view main menu
Press the button NAV - switches from the main menu
Navigation to the card view.
Pressing the button NAV again- switches from the card view back to the main
menu Navigation . 19
NAV mode (Navigation)
Page 23 of 31
■
Delete destination memory - Deleting the destination memory or the list of the last
destinations.
■ All - deletes all destinations from the memory
■ Last destins. - deletes all destinations from the list of last destinations
■ Navigation data basis - displays information about the navigation data stored in
the radio navigation system or on the memory card or when using navigation
data directly from the memory card ⇒ page 19, Navigation data and the memo-
ry card. Ð
Destinations Entering and saving destinations Manually entering and saving destinations
Press the button
NAV followed by the function key
When entering the address, first choose the country, then the city or the post
code. Afterwards it is possible to specify the address in more detail by entering
the street and house number or an intersection. This address information is speci-
fied in the following input screens.
If the entries are sufficient for the route guidance, the function key
Finish will ap-
pear. You can now begin route guidance or you can enter additional details for the
destination.
■ Store - opens screen for entering the name of the destination
■ Delete - change the name of the destination
■ OK - saves the name of the destination
■ Start - starts route guidance
Destination memory
Press the button NAV followed by the function key
- displays a list of the man-
ually-saved destinations (guidance can be started by pressing the function button
with a displayed destination).
Turn the button 15 to select a destination which you want to rename, edit or de-
lete. ■
Details - shows additional information about the destination (name of the des-
tination, country, city, etc.). The displayed information can be changed.
■ Delete – delete the selected destination
■ Start - starts route guidance
Store last destinations
Press the button NAV followed by the function button
- displays a list of the
last destinations which was automatically saved.
After you confirm one of the displayed destinations, the devices switches to the
map view and route guidance begins automatically.
■ Details - shows additional details about the destination
■ Store - enter name of destination, saves
■ Delete - deletes name of destination
■ OK - confirms and saves the name of the destination
■ Start - starts route guidance
Entering a stopover destination
An additional destination and one stopover destination can be entered during the
route guidance. You reach the entered stopover destination before the route
guidance is resumed to the final destination. The final destination is the destina-
tion for which was route guidance was initially started. When making your entry,
always think about whether you are entering a stopover destination or the final
destination.
During route guidance, press the button NAV - switches to the main menu of the
Navigation.
Enter a new address or choose a previously saved address.
Zwischenz.Stopover - choose a newly-entered destination as the stopover
New destin. - end the current route guidance and choose a new destination as the
final destination
Select petrol station or car parks
Press the button NAV followed by the function key
- searches for
Petrol sta-
tion or - Car park
- petrol stations/car parks in the vicinity of the current loca-
tion. 21
NAV mode (Navigation)
Page 25 of 31

Setting options
Turn the button
15 - changes the scale.
Press the button 15 - repeat the last navigation announcement.
Press the display - displays the function keys Extras and
Stop ⇒
page 24, Stop-
ping route guidance.
■ Extras - edits options for the map display
■ 2D north - two-dimensional, from the top towards the north
■ 2D heading - two-dimensional, from the top in the direction of travel
■ 3D heading - three-dimensional, diagonally from the front (“bird's-eye per-
spective”)
■ Overview map - the calculated route is displayed from the current position to
the destination in an overview map (during active route guidance)
■ Route list - List of route sections
⇒ page 23,
Displaying stretches of the
journey Ð
Dynamic route guidance with TMC use The prerequisite for dynamic route guidance is being able to receive a TMC traffic
radio station for the navigation area. Received TMC traffic reports are shown in a
list
⇒ page 25, Displaying TMC traffic reports
.
When the dynamic route guidance is activated, the route calculation includes pos-
sible TMC traffic notifications.
Traffic problems received via TMC which affect the route are displayed in the map
by means of a coloured symbol. Traffic problems, which do not affect the route,
are displayed in the map by means of a grey symbol. The positioning of the TMC
symbol shows the beginning of a traffic disruption and the direction, when the
TMC traffic report is able to clearly define both.
When the function Dynamic Route ⇒ page 20, Settings in the (NAV) Navigation
mode is activated and the radio navigation system calculates a time advantage for
driving around the traffic disruption along the route, an alternative route is calcu-
lated automatically.
When recalculating the route, a corresponding navigation announcement is out-
put. The same announcement is made when there was a traffic disruption in the
original route calculation which has since been removed. Note
● Making a diversion from a traffic jam based on TMC traffic reports may not al-
ways offer a time advantage, e.g. if the diversion route is also congested.
● If a traffic disruption was not yet entered via the TMC traffic reports, route dis-
ruptions can also be entered manually ⇒ page 23,
Blocking stretches of the jour-
ney. Ð
Displaying stretches of the journey Pop-ups during route guidance
Press the button
followed by the function key
Route .
■ The list of the points (street names, street descriptions and stretches of the
road) still to be driven, is displayed in the Route list .
■ Details - show details for the selected stretch of the journey.
Ð
Blocking stretches of the journey Manually blocking a stretch of the route ahead (e.g. due to a reported traffic
impairment)
Press the button
followed by the function key
Route .
■ Congestion ahead - turn the button
15 to select the length of the stretch to be
blocked from the current position. The length of the currently blocked stretch
of the journey is shown in the lower line of the screen. When reaching the
maximum blockable length the word
“(Max) ” will appear next to the length en-
try.
■ OK - confirms the length of the blocked stretch
To remove the block of a stretch ahead, press the button followed by the func-
tion key Route .
■ Lift cong. excl. - manually remove blocked stretch
Blocking stretches of the journey using the route list
Press the button followed by the function key
Route .
■ Route list - List of route sections
■ Exclude - select the start of the stretch to be blocked
■ Exclude to - select the end of the stretch to be blocked
23
NAV mode (Navigation)
Page 27 of 31

TMC display
Displaying TMC traffic reports TMC traffic reports are used to optimise the route during route guidance when
there are traffic disruptions
⇒
page 23, Dynamic route guidance with TMC use
You can browse through all the traffic information received in the detailed display,
in sequence by using the function keys.
Press the button TMC - display a list of the current traffic reports.
■ Details - display the details for a selected traffic report
Press the button - display the name of the TMC station currently being received.
Traffic problems are illustrated in the detailed display and in the map by a corre-
sponding symbol. The direction, in which the traffic problem is found in the map, is
displayed in colour. A traffic problem which is located on the route (in direction of
travel) is marked in red, a traffic problem in the opposite direction is marked in
grey. Note
● If a TMC traffic radio station is available for current location, the TMC traffic re-
ports are updated continuously in the background. The station you are listening to
does not have to be a TMC station.
● TMC traffic reports can only be evaluated and saved by the radio navigation
system when navigation data are available for the driven area.
● The accuracy of the dynamic route guidance depends on the transmitted traf-
fic reports. The radio stations broadcasting this information are responsible for
the content.
● TMC traffic reports are necessary for the dynamic route guidance.
● Making a diversion from a traffic jam based on TMC traffic reports may not al-
ways offer a time advantage, e.g. if the diversion route is also congested. Ð
Settings TMC traffic reports Press the button
TMC →
SETUP .
■ Traffic program (TP) - switches traffic programme on/off
■ Dynamic route - switches on/off the usage of TMC traffic notifications for route
guidance ⇒
page 23, Dynamic route guidance with TMC use Ð 25
TMC display
Page 29 of 31

Settings
Basic system settings . . . . . . . . . . . . . . . . . . . . . . . . . 8
Media . . . . . . . . . . . . . . . . . . . . . . . . . . . . . . . . . . . . . . . 11
Mobile phone . . . . . . . . . . . . . . . . . . . . . . . . . . . . . . . . 17
Navigation . . . . . . . . . . . . . . . . . . . . . . . . . . . . . . . . . . 20
Radio . . . . . . . . . . . . . . . . . . . . . . . . . . . . . . . . . . . . . . . . . 9
Sound . . . . . . . . . . . . . . . . . . . . . . . . . . . . . . . . . . . . . . . . 8
System . . . . . . . . . . . . . . . . . . . . . . . . . . . . . . . . . . . . . . . 8
TMC traffic reports . . . . . . . . . . . . . . . . . . . . . . . . . . . 25
Switching the unit off . . . . . . . . . . . . . . . . . . . . . . . . . . 5
Switching the unit on . . . . . . . . . . . . . . . . . . . . . . . . . . 5
T TMC Dynamic route guidance . . . . . . . . . . . . . . . . . . . . . . 23
Text traffic reports . . . . . . . . . . . . . . . . . . . . . . . . . . . 25
TP Display . . . . . . . . . . . . . . . . . . . . . . . . . . . . . . . . . . . . . . 10
Traffic Program . . . . . . . . . . . . . . . . . . . . . . . . . . . . . . 10
V Volume - Setting . . . . . . . . . . . . . . . . . . . . . . . . . . . . . . . 5
W
Warranty . . . . . . . . . . . . . . . . . . . . . . . . . . . . . . . . . . . . . . 3 27
Index