2011 SKODA OCTAVIA TOUR handbrake
[x] Cancel search: handbrakePage 4 of 183

Contents3
Using the system
Safety
Driving Tips
General Maintenance
Breakdown assistance
Technical Data
ContentsLayout of this Owner's Manual
(explanations)
. . . . . . . . . . . . . . . . . . . . . . . . . .
Using the system
. . . . . . . . . . . . . . . . . . . . .
Cockpit
. . . . . . . . . . . . . . . . . . . . . . . . . . . . . . . . . . . . . . . .
Overview . . . . . . . . . . . . . . . . . . . . . . . . . . . . . . . . . . . .
The brief instruction
. . . . . . . . . . . . . . . . . . . . . . . . . .
Basic functions and important information . . . . .
Instruments and Indicator/Warning Lights
. .
Overview of the instrument cluster . . . . . . . . . . . .
Engine revolutions counter . . . . . . . . . . . . . . . . . . . .
Speedometer . . . . . . . . . . . . . . . . . . . . . . . . . . . . . . . . .
Engine coolant temperature Display . . . . . . . . . . .
Fuel gauge . . . . . . . . . . . . . . . . . . . . . . . . . . . . . . . . . . .
Counter for distance driven . . . . . . . . . . . . . . . . . . .
Service Interval Display . . . . . . . . . . . . . . . . . . . . . . .
Digital clock . . . . . . . . . . . . . . . . . . . . . . . . . . . . . . . . . .
Recommended gear* . . . . . . . . . . . . . . . . . . . . . . . . .
Multi-functional indicator (onboard computer)* .
Warning lights . . . . . . . . . . . . . . . . . . . . . . . . . . . . . . . .
Unlocking and locking
. . . . . . . . . . . . . . . . . . . . . . . .
Key . . . . . . . . . . . . . . . . . . . . . . . . . . . . . . . . . . . . . . . . . .
Changing the battery in the remote control key
Electronic immobiliser . . . . . . . . . . . . . . . . . . . . . . . .
Child safety lock . . . . . . . . . . . . . . . . . . . . . . . . . . . . . .
Central locking system . . . . . . . . . . . . . . . . . . . . . . . .
Remote control* . . . . . . . . . . . . . . . . . . . . . . . . . . . . . .
Synchronisation of the remote control . . . . . . . . .
Anti-theft alarm system* . . . . . . . . . . . . . . . . . . . . . .
Power windows* . . . . . . . . . . . . . . . . . . . . . . . . . . . . .
Lights and Visibility
. . . . . . . . . . . . . . . . . . . . . . . . . . .
Lights . . . . . . . . . . . . . . . . . . . . . . . . . . . . . . . . . . . . . . . .
Interior lighting . . . . . . . . . . . . . . . . . . . . . . . . . . . . . . . Visibility . . . . . . . . . . . . . . . . . . . . . . . . . . . . . . . . . . . . .
Windshield wiper and wash system . . . . . . . . . . . .
Rear-view mirror . . . . . . . . . . . . . . . . . . . . . . . . . . . . .
Seats and Stowage
. . . . . . . . . . . . . . . . . . . . . . . . . . .
Front seats . . . . . . . . . . . . . . . . . . . . . . . . . . . . . . . . . .
Head restraints . . . . . . . . . . . . . . . . . . . . . . . . . . . . . . .
Middle rear head restraint* . . . . . . . . . . . . . . . . . . . .
Rear seats . . . . . . . . . . . . . . . . . . . . . . . . . . . . . . . . . . .
Pedals . . . . . . . . . . . . . . . . . . . . . . . . . . . . . . . . . . . . . . .
luggage compartment . . . . . . . . . . . . . . . . . . . . . . . .
Net partition* (Combi) . . . . . . . . . . . . . . . . . . . . . . . .
The roof rack* . . . . . . . . . . . . . . . . . . . . . . . . . . . . . . . .
Cup holder . . . . . . . . . . . . . . . . . . . . . . . . . . . . . . . . . . .
Note holder . . . . . . . . . . . . . . . . . . . . . . . . . . . . . . . . . .
Ashtray* . . . . . . . . . . . . . . . . . . . . . . . . . . . . . . . . . . . . .
Cigarette lighter*, power sockets . . . . . . . . . . . . . .
Storage compartments . . . . . . . . . . . . . . . . . . . . . . .
Overview . . . . . . . . . . . . . . . . . . . . . . . . . . . . . . . . . . . .
Storage compartment on the front passenger side
Storage compartment on the driver's side . . . . . .
Storage compartment on the dash panel . . . . . . .
Storage compartment in front centre console* .
Storage compartment in the front doors . . . . . . .
Front seat armrest with storage compartment*
Rear seat armrest with storage compartment* .
Storage compartment in re ar centre console* . .
Seat backrest with opening for skis* . . . . . . . . . . .
Clothes hooks* . . . . . . . . . . . . . . . . . . . . . . . . . . . . . . .
Heating and air conditioning system
. . . . . . . .
Air outlet vents . . . . . . . . . . . . . . . . . . . . . . . . . . . . . .
Heating . . . . . . . . . . . . . . . . . . . . . . . . . . . . . . . . . . . . . .
Climatic* . . . . . . . . . . . . . . . . . . . . . . . . . . . . . . . . . . . . .
Starting-off and Driving
. . . . . . . . . . . . . . . . . . . . . .
Setting steering wheel position . . . . . . . . . . . . . . .
Ignition lock . . . . . . . . . . . . . . . . . . . . . . . . . . . . . . . . . . Starting the engine . . . . . . . . . . . . . . . . . . . . . . . . . . .
Switching off the engine . . . . . . . . . . . . . . . . . . . . . .
Shifting . . . . . . . . . . . . . . . . . . . . . . . . . . . . . . . . . . . . . .
Handbrake . . . . . . . . . . . . . . . . . . . . . . . . . . . . . . . . . . .
Rear parking aid* . . . . . . . . . . . . . . . . . . . . . . . . . . . . .
Cruise control system (CCS)* . . . . . . . . . . . . . . . . . .
Communication
. . . . . . . . . . . . . . . . . . . . . . . . . . . . . . .
Mobile phones and two-way radio systems . . . .
Safety
. . . . . . . . . . . . . . . . . . . . . . . . . . . . . . . . . . . . . .
Passive Safety
. . . . . . . . . . . . . . . . . . . . . . . . . . . . . . . .
Basic information . . . . . . . . . . . . . . . . . . . . . . . . . . . .
Correct seated position . . . . . . . . . . . . . . . . . . . . . . .
Seat belts
. . . . . . . . . . . . . . . . . . . . . . . . . . . . . . . . . . . . .
Why seat belts? . . . . . . . . . . . . . . . . . . . . . . . . . . . . . .
The physical principle of a frontal collision . . . . .
Important safety information regarding the use of seat
belts . . . . . . . . . . . . . . . . . . . . . . . . . . . . . . . . . . . . . . . .
How are seat belts correctly fastened? . . . . . . . .
Airbag system
. . . . . . . . . . . . . . . . . . . . . . . . . . . . . . . .
Description of the airbag system . . . . . . . . . . . . . .
Front airbags . . . . . . . . . . . . . . . . . . . . . . . . . . . . . . . .
side airbags* . . . . . . . . . . . . . . . . . . . . . . . . . . . . . . . . .
Head airbags* . . . . . . . . . . . . . . . . . . . . . . . . . . . . . . . .
Deactivating an airbag . . . . . . . . . . . . . . . . . . . . . . . .
Transporting children safely
. . . . . . . . . . . . . . . . .
What you should know about transporting children!
Child seat . . . . . . . . . . . . . . . . . . . . . . . . . . . . . . . . . . . .
Attaching a child seat using the “ISOFIX” system
Attaching child seat using the “Top Tether”* system
6799101015151516161616171718182129292930303034353637404043
4445484949505051535357585960606061616262626363636464646566666769737373
7475767677778080818181828585858687898990929495979799102103
s2lk.2.book Page 3 Monday, April 18, 2011 7:41 AM
Page 27 of 183
Instruments and Indicator/Warning Lights
26
If the warning light
comes on immediately after starting the engine, the ESP
system can be switched off for technical reasons. In this case, the ESP system can
be switched on again by switching the ignition on and off. If the warning light goes
out, the ESP system is fully functional again.
Further information on the ESP page 105, “Electronic stability programme
(ESP)*”.
Electronic Differential Lock (EDL)*
The EDL is a part of the ESP. A fault in the EDL is indicated by the ESP warning light
in the instrument cluster. Have the vehi cle inspected without delay by an author-
ised Škoda Service Partner. Further information on the EDL page 106, “Electronic
Differential Lock (EDL)*”.
Note
If the battery has been disconnected and reconnected, the warning light
comes
on after switching on the ignition. The wa rning light must go out after driving a
short distance.
Tyre inflation pressure*
The warning light
lights up, if there is a substantial drop in inflation pressure in
one of the tyres. Reduce the speed and check or correct as soon as possible the
inflation pressure in the tyres page 141.
If the warning light flashes, there is a system fault. Visit the nearest specialist
garage and have the fault rectified.
Further information about tyre pressure-control system page 109.
WARNING
•
When the warning light
lights up, immediately reduce the speed and
avoid sudden steering and brake manoeu vres. Please stop the vehicle without
delay at the nearest possible stop and inspect the tyres and their inflation pres-
sures.
•
Under certain circumstances (e.g. sporty style of driving, wintry or unpaved
roads) the warning light
can be delayed or does not light up at all.
Note
If the battery has been disconnected, the warning light
comes on after switching
on the ignition. The warning light must go out after driving a short distance.
Antilock brake system (ABS)
The warning light
shows the functionality of the ABS.
The warning light comes on for a few seconds after the ignition has been switched
on or when starting the engine. The warning light goes out after an automatic check
sequence has been completed.
A fault in the ABS
The system is not functioning pr operly if the ABS warning light
does not go out
within a few seconds after switching on the ignition, does not light up at all or lights
up while driving. The vehicle will only be braked by the normal brake system. Visit a
specialist garage as quickly as possible an d adjust your style of driving appropriately
as you will not know how great the damage is.
Further information about ABS page 108, “Antilock brake system (ABS)”.
A fault in the entire brake system
If the ABS warning light
comes on together with th e brake system warning light
(handbrake must be released), there is a fault not only in the ABS but also in
another part of the brake system .
WARNING
•
If the brake system warning light
comes on together with the ABS
warning light
stop the vehicle immediately and check the brake fluid level in
the reservoir page 135, “Brake fluid”. If the fluid level has dropped below the
MIN marking, do not drive any further - risk of accident! Obtain professional
assistance.
•
Pay attention to the following instruct ions before checking the brake fluid
level and opening the bonnet page 131, “Working in the engine compart-
ment”.
•
If the brake fluid is at the correct leve l, the ABS control function has failed.
The rear wheels may then block very ra pidly when braking. In certain circum-
stances, this can result in the rear end of the car breaking away - risk of skidding!
Drive carefully to the nearest specialist garage and have the fault rectified.
Bonnet
The warning light
comes on if the bonnet is unlocked. If the bonnet unlocks
while driving, the warning light lights up
and as a warning an audible signal
sounds.
s2lk.2.book Page 26 Monday, April 18, 2011 7:41 AM
Page 28 of 183

Instruments and Indicator/Warning Lights27
Using the system
Safety
Driving Tips
General Maintenance
Breakdown assistance
Technical Data
The warning light comes on even when the ignition is switched off. The warning
light lights up for a
maximum of 5 minutes.
Seat belt warning light
The warning light
comes on after the ignition is switched on as a reminder to
fasten the seat belt. The warning light only goes out if the driver has fastened his
seat belt.
If the seat belt has not been fastened by the driver, a permanent warning signal
sounds at vehicle speeds greater than 20 km/h and simultaneously the warning
light flashes
.
If the seat belt is not fastened by the driver during the next 90 seconds, the warning
signal is deactivated and the warning light
lights up permanently.
Further information on the seat belts page 85, “Seat belts”.
Thickness of the brake pads*
The warning light
comes on for a few seconds when the ignition is switched on.
If the warning light comes on, contact a specialist garage immediately and have
the brake pads on all of the wheels inspected.
Boot lid
The warning light
comes on when the ignition is switched on if the luggage
compartment door is open. If th e boot lid opens while driving
, the warning light
lights up and an audible signal sounds.
The warning light comes on even when the ignition is switched off. The warning
light lights up for a maximum of 5 minutes.
Open door
The warning light
comes on if one or several door s are opened or if the boot lid
is opened. If one of the doors opens while driving, the warning light lights
up and
an audible signal sounds.
The warning light comes on even when the ignition is switched off. The warning
light lights up for a maximum of 5 minutes.
Brake system
The warning light
flashes or comes on if the brake fluid level is too low, if there
is a fault in the ABS or if the handbrake is applied.
If the warning light flashes and an audi ble signal sounds three times (handbrake
is not applied), stop and check the brake fluid level .
If there is a fault in the ABS which also influences the function of the brake system
(e.g. distribution of brake pressure), the ABS warning light
comes on and at the
same time the brake system warning light starts flashing
. Be aware that not only
the ABS but also another part of the brake system is defective .
An audible signal sounds three time s as an additional warning signal.
One should get used to high pedal forces, long braking distances and long free play
of the brake pedal when driving to the next specialist garage.
For further information on the brake system page 107, “Brakes”.
Handbrake applied
The warning light
also comes on if the handbrake is applied. An audible warning
is also given if you drive the vehicle for at least 3 seconds at a speed of more than
6 km/h.
WARNING
•
Pay attention to the following instruct ions before checking the brake fluid
level and opening the bonnet page 131, “Working in the engine compart-
ment”.
•
If the brake system warning light
does not go out a few seconds after
switching on the ignition or comes on when driving, stop immediately and check
the brake fluid in the reservoir page 135. If the fluid level has dropped below
the MIN marking, do not drive any further - risk of accident! Obtain professional
assistance.
Alternator
The warning light
comes on after the ignition has been switched on. It should go
out after the engine has started.
If the warning light does not go out after the engine has started, or comes on when
driving, drive to the nearest specialist garage. The vehicle battery will be discharged
in this case so switch off all no n-essential electrical components.
s2lk.2.book Page 27 Monday, April 18, 2011 7:41 AM
Page 65 of 183
Seats and Stowage
64
Closing air inlet
– Push the lock as far as the stop downwards.
On vehicles fitted with air conditioning, the storage compartment is equipped with
a lockable inlet for thermally treated (warmed-up) air.
At open air supply, air flows into the storage with a temper ature which is as high as
the one out of the air outlet nozzle s, depending on temperature setting.
The air inlet in the storage compartment is connected to position
through adjust-
ment of the control dial for air distribu tion. This position causes the maximum
amount of air to flow into the storage co mpartment (depending on the rotary regu-
lator position for the fan).
You can use the storage compartment, for example, to temper drinks cans, etc.
If you do not use the air inlet in the storage compartment, the end cover should
always be kept closed.
Note
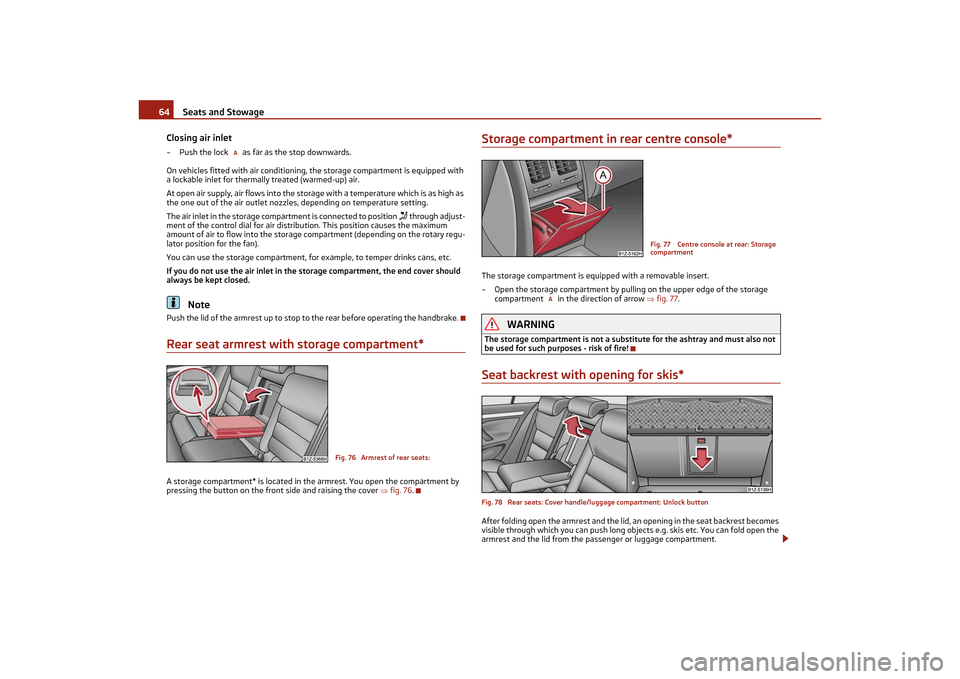
Push the lid of the armrest up to stop to the rear before operating the handbrake.Rear seat armrest with storage compartment*A storage compartment* is located in the armrest. You open the compartment by
pressing the button on the front side and raising the cover fig. 76.
Storage compartment in rear centre console*The storage compartment is equipped with a removable insert.
– Open the storage compartment by pulling on the upper edge of the storage
compartment in the direction of arrow fig. 77.
WARNING
The storage compartment is not a substitu te for the ashtray and must also not
be used for such purposes - risk of fire!Seat backrest with opening for skis*Fig. 78 Rear seats: Cover handle/luggage compartment: Unlock buttonAfter folding open the armrest and the lid, an opening in the seat backrest becomes
visible through which you can push long objects e.g. skis etc. You can fold open the
armrest and the lid from the passenger or luggage compartment.
A
Fig. 76 Armrest of rear seats:
Fig. 77 Centre console at rear: Storage
compartment
A
s2lk.2.book Page 64 Monday, April 18, 2011 7:41 AM
Page 75 of 183

Starting-off and Driving
74
Applies to all models:
Position
To lock the steering , with the ignition key withdrawn, turn the steering wheel until
the steering locking pin is heard to engage. You should always lock the steering as
a general rule if you leave your vehicle. This acts as a deterrent against possible
theft of your vehicle .
Position
Move the steering wheel back and forward a little if the ignition key cannot, or
cannot easily be turned into this positi on, in order to release the steering lock.
Position
The engine is started in this position. At the same time any switched on low beam
or main beam or other electrical compon ents with major electrical consumers are
briefly switched off. The ignition key moves back into position after being
released.
The ignition key must be turned back into position each time before starting the
engine again. The starter repeat lock in the ignition lock prevents the starter being
engaged when the engine is running and thus getting damaged.
WARNING
•
When driving, the ignition key must al ways be in the position (ignition
switched on) without the engine running. This position is indicated by the
warning lights coming on. If this is not the case, it could result in unexpected
locking of the steering wheel - risk of accident!
•
Do not withdraw the ignition key from the lock until the vehicle has come to
a stop. The steering lock can engage immediately - risk of accident!
•
Always withdraw the ignition key if you are going to leave the vehicle, even
for a short time. This is particularly import ant if children are left in the vehicle.
Children might otherwise start the engine or switch on electrical equipment (e.g.
power windows) - risk of accident or injury!
Starting the engineGeneral
You can only start the engine only using an original ignition key.•
Place the gearshift lever into neutral an d put on the handbrake firmly before
starting the engine.
•
Before starting, it is necessary to depress the clutch pedal and to keep it pressed
down until the engine starts. If you try and start the engine without pressing the
clutch pedal, the engine will not start. A message in the information display of the
instrument cluster will also appear indicate the need to press the clutch pedal.
•
Let go of the ignition key as soon as the engine starts otherwise you may
damage the starter.
The engine running noises may louder at first be louder for a short time after
starting the cold engine until oil pressure can be built up in the hydraulic valve clear-
ance compensation. This is quite norm al and is not an operating problem.
If the engine does not start ...
You can use the battery of anothe r vehicle as a jump-start aid page 153.
It is only possible to tow-start vehicles fitted with a manual gearbox. The tow-
starting distance must not be more than 50 metres. Observe the following
guidelines page 154, “Tow-starting and towing vehicle”.
WARNING
•
Never run the engine in non ventilated or enclosed areas. The exhaust gases
of the engine contain besides the odourless and colourless carbon monoxide a
poisonous gas - hazard! Carbon mono xide can cause unconsciousness and
death.
•
Never leave your vehicle unattended with the engine running.Caution
•
The starter may only be operated (ignitio n key position ), if the engine is not
running. If the starter is immediately operated after switching off the engine, the
starter or the engine can be damaged.
•
Avoid high engine revolutions, full throttle and high engine loads as long as the
engine has not yet reached its normal operating temperature - risk of damaging the
engine!
•
Vehicles which are fitted with an exhaus t gas catalytic converter should not be
tow-started over a distance of more than 50 metres.For the sake of the environment
Never warm up the engine when the vehicle is standing. Drive off right away.
Through this the engine reaches its operating temperature more rapidly and the
pollutant emissions are lower.
123
2
1
2
3
s2lk.2.book Page 74 Monday, April 18, 2011 7:41 AM
Page 77 of 183
Starting-off and Driving
76
ShiftingShift into reverse only when the vehicle is stationary. Depress the clutch pedal and
hold it fully depressed. Wait a moment be fore engaging reverse gear in order to
avoid any shift noises.
The reversing lights will come on once reverse gear is engaged, provided the igni-
tion is on.
WARNING
Never engage the reverse gear when driving - risk of accident!
Note
•
One should not lay the hand on the shift lever while driving the vehicle. The
pressure of the hand will be transferred to the gearshift forks in the gearbox. This
can, over a period of time, lead to early wear of the gearshift forks.
•
Depress the clutch pedal fully when changing gears, in order to avoid unneces-
sary wear and damage.
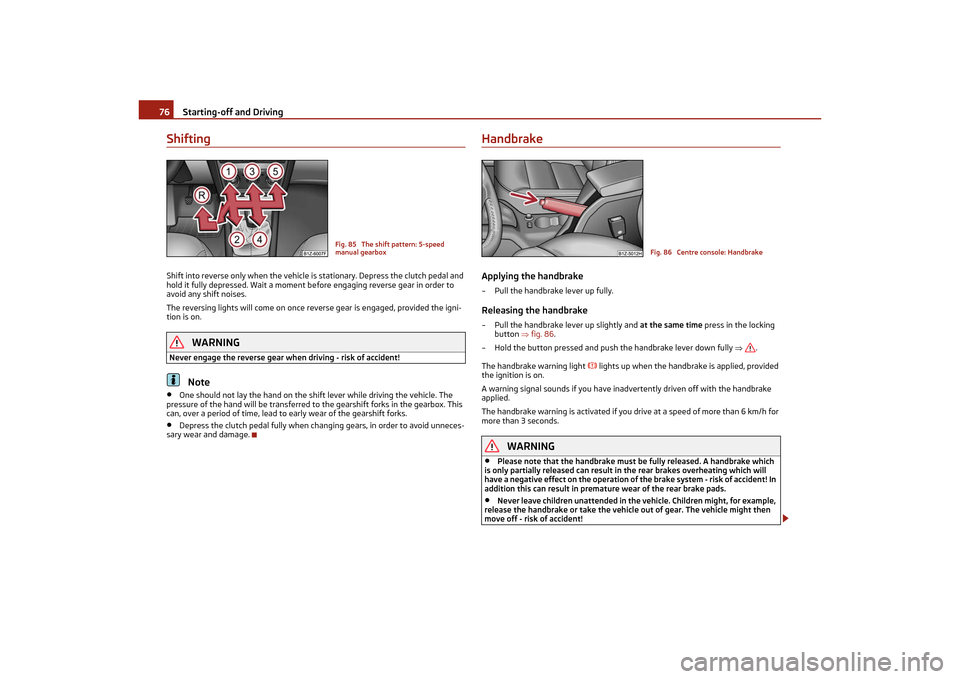
HandbrakeApplying the handbrake– Pull the handbrake lever up fully.Releasing the handbrake– Pull the handbrake lever up slightly and at the same time press in the locking
button fig. 86.
– Hold the button pressed and push the handbrake lever down fully .
The handbrake warning light
lights up when the handbrake is applied, provided
the ignition is on.
A warning signal sounds if you have inadvertently driven off with the handbrake
applied.
The handbrake warning is activated if you drive at a speed of more than 6 km/h for
more than 3 seconds.
WARNING
•
Please note that the hand brake must be fully released. A handbrake which
is only partially released can result in the rear brakes overheating which will
have a negative effect on the operation of the brake system - risk of accident! In
addition this can result in premat ure wear of the rear brake pads.
•
Never leave children unattended in the vehicle. Children might, for example,
release the handbrake or take the vehicl e out of gear. The vehicle might then
move off - risk of accident!
Fig. 85 The shift pattern: 5-speed
manual gearbox
Fig. 86 Centre console: Handbrake
s2lk.2.book Page 76 Monday, April 18, 2011 7:41 AM
Page 78 of 183

Starting-off and Driving77
Using the system
Safety
Driving Tips
General Maintenance
Breakdown assistance
Technical Data
Caution
Each time the vehicle is parked, first of all apply the handbrake and then additionally
engage the 1st gear.Rear parking aid*The parking aid provides a warnin g of obstacles behind the vehicle.The audible parking aid determines the distance from the rear bumper to an
obstacle behind the car with the aid of ultrasound sensors. These ultrasound
sensors are integrated in the rear bumper.
Range of sensors
The clearance warning begins at a distance of about 160 cm from the obstacle (area
fig. 87 ). The interval between the warning signals becomes shorter as the
clearance is reduced.
A continuous tone sounds from a distance of approx. 30 cm (area ) - danger area.
Do not reverse any further after this signal sounds! If the vehicle is equipped with
a factory-fitted towing device*, the border of the danger area - continuous tone -
extends 5 cm further behind the vehicle. The vehicle can be extended through an
installed detachable towing device.
On vehicles equipped with a factory-fitted radio*, the distance to the obstruction is
shown graphically in the display. On vehicl es with a factory-fitted towing device, the
sensors are deactivated when towing a trailer. The driver is informed about this by
a graphic display (vehicle towing a trailer) in the radio* display. The factory-fitted
radio* can be set so that the play function volume decreases when activating the
parking aid, see Owner's Manual radio*. This improves the audibility of the parking
aid. Activating
The parking aid is activated automatically when
reverse gear is engaged and the
ignition is turned on. This is confirmed by a brief acknowledgement signal.
Deactivating
The parking aid is deactivated by taking the car out of reverse gear.
WARNING
•
The parking aid is not a substitute for the driver paying proper attention and
it is always the driver's responsibility to take care when parking the vehicle or
carrying out similar manoeuvres.
•
You should therefore satisfy yourself, before reversing, that there is no small
obstacle, such as a rock, thin post, traile r drawbar etc., behind your vehicle. Such
obstacles might not be within the range detected by the sensors.
•
Under certain circumstances, surfaces of certain objects and types of
clothing cannot reflect the signal of the pa rking aid. Thus, such objects or people
may not be recognised by the sensors of the parking aid.Note
•
The parking aid does not operate if you are towing a trailer (applies to models
which feature a factory-fitted towing device*).
•
If a warning signal sounds for about 3 seconds after switching the ignition on
and engaging reverse gear, and there is no obstacle close to your vehicle, this indi-
cates a system fault. Have the fault rectified by a specialist workshop.
•
The sensors must be kept clean and free of ice to enable the parking aid to
operate properly.
Cruise control system (CCS)*IntroductionThe cruise control system (CCS) maintains a constant speed, above approx. 30 km/h
(20 mph), once it has been set, without yo u having to depress the accelerator pedal.
This is only possible to the extent pe rmitted by the power output and braking
power of the engine. The cruise control syst em makes it possible - particularly on
long journeys - for you to rest your “accelerator foot”.
Fig. 87 Parking aid: Detection range of
rear sensors
A
B
s2lk.2.book Page 77 Monday, April 18, 2011 7:41 AM
Page 119 of 183

Towing a trailer
118
Towing a trailerTowing a trailerTechnical requirementsYour vehicle is designed primarily for tr ansporting persons and luggage. It can,
however, also be used for towing a trailer - provided certain technical equipment is
fitted.
If your vehicle has already been supplied with a factory-fitted towing device then
everything that is necessary for towing a tr ailer in technical terms, and in terms of
the law, has already been taken into account.
Your vehicle is fitted with a 13-pin power socket for the electrical connection
between the vehicle and trailer. If th e trailer which you wish to tow has a 7-pin
connector , you can use a suitable adapter
6) from Škoda original accessories.
This work must be carried out in accordance with the manufacturer's specifications
if a towing device is retrofitted.
Authorised Škoda Service Partners can pr ovide information about retrofitting a
towing device and for any necessary modifications to the cooling system.
WARNING
We recommend that you have the towing de vice from Škoda original accessories
installed by an authorised Škoda Service Partner. He is familiar with all the rele-
vant details relating to retrofitting such equipment. There is a risk of an accident
if the towing device is not properly fitted!General MaintenanceTrailer load
The permissible trailer load must on no account be exceeded.
You can negotiate appropriately steeper inclines and descents if you do not make
full use of the permissible trailer load.
The trailer loads specified only apply for altitudes up to 1 000 metres above mean
sea level. The fact that the engine power output drops with increasing height due
to a lowering of air pressure and thus th e ability to climb, means that the towed w e i g h t m u s t b e r e d u c e d b y 1 0 % f o r e v e r y f u r t h e r i n c r e a s e o f 1 0 0 0 m e t r e s i n h e i g h t
above sea level. The towed weight is the weight of the (laden) vehicle and the
(laden) trailer together. One should take
this into account before driving up to
higher altitudes.
The trailer and drawbar load information on the type plate of the towing device
are merely test data for the towing device The data relating to your vehicle, which
is often less than this test data, can be found in your vehicle registration docu-
ments.
Distribution of the load
Distribute the load in the trailer in such a way that any heavy items are located as
close as possible to the axle. Secure the items to prevent them slipping.
Tyre inflation pressure
Select the tyre inflation pressure on your vehicle for that of “fully laden”,
page 141. The inflation pressure of the tyre s fitted to the trailer adjust in accord-
ance with the manufacturer's recommendation.
Exterior mirrors
You have to have additional exterior mirr ors fitted if you are not able to see the
traffic behind the trailer with the standard rear-view mirrors. Both exterior mirrors
should be attached to folding arms. Adjust the mirrors so that they provide you with
an adequate field of view to the rear.
Headlights
Before starting off with a hitched trailer, also check the setting of the headlights.
Alter the setting as necessary with th e aid of the headlight beam adjuster
page 41.
Detachable ball head
The ball rod is detachable on vehicles wh ich feature a factory-fitted towing device.
Further information on the towing device page 119.
Note
•
We recommend that you also have your vehicle inspected between service
intervals if you tow a trailer frequently.
•
The handbrake on the towing vehicle must be put on when coupling and decou-
pling the trailer.
6)In some countries the adapter is supplied with the towing device.s2lk.2.book Page 118 Monday, April 18, 2011 7:41 AM