2011 SKODA OCTAVIA seats
[x] Cancel search: seatsPage 82 of 248
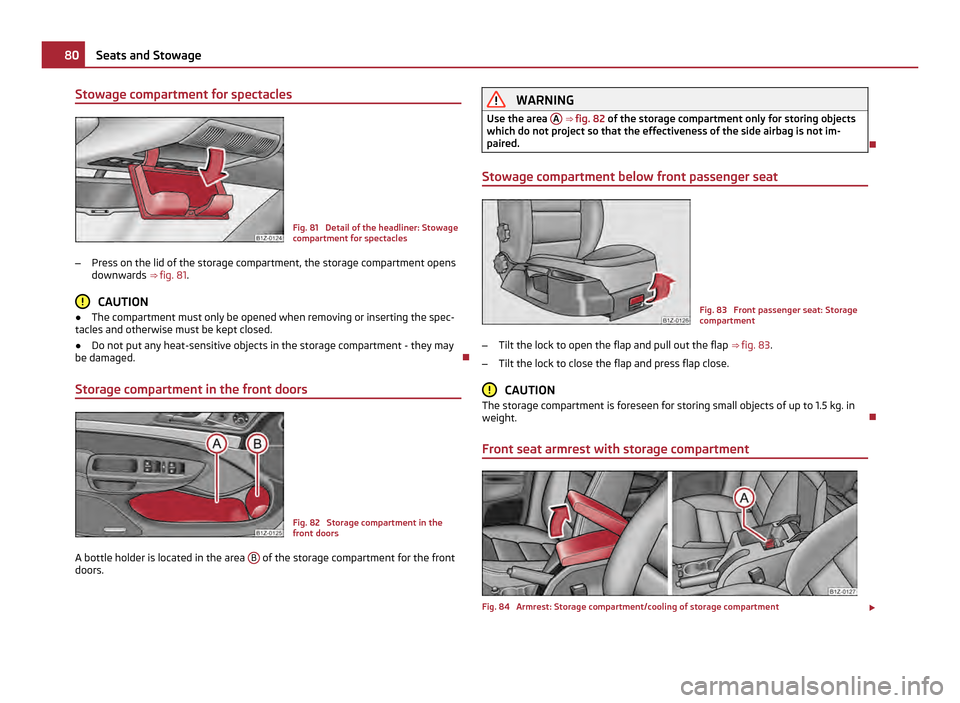
Stowage compartment for spectacles
Fig. 81 Detail of the headliner: Stowage
compartment for spectacles
– Press on the lid of the storage compartment, the storage compartment opens
downwards ⇒ fig. 81 . CAUTION
● The compartment must only be opened when removing or inserting the spec-
tacles and otherwise must be kept closed.
● Do not put any heat-sensitive objects in the storage compartment - they may
be damaged.
Storage compartment in the front doors Fig. 82 Storage compartment in the
front doors
A bottle holder is located in the area B of the storage compartment for the front
doors. WARNING
Use the area A ⇒ fig. 82 of the storage compartment only for storing objects
which do not project so that the effectiveness of the side airbag is not im-
paired.
Stowage compartment below front passenger seat Fig. 83 Front passenger seat: Storage
compartment
– Tilt the lock to open the flap and pull out the flap ⇒ fig. 83 .
– Tilt the lock to close the flap and press flap close. CAUTION
The storage compartment is foreseen for storing small objects of up to 1.5 kg. in
weight.
Front seat armrest with storage compartment Fig. 84 Armrest: Storage compartment/cooling of storage compartment
£80
Seats and Stowage
Page 83 of 248

The armrest is adjustable for height and length.
Opening storage compartment
–
Open the lid of the armrest in the direction of arrow ⇒ fig. 84 - left.
Closing storage compartment
– Open the lid up to the stop, then you can fold it downwards.
Setting height
– First of all fold the lid to the bottom and lift it in the direction of arrow into one
of the 4 fixed positions.
Adjusting in forward/back direction
– Push the lid into the desired position.
Opening air inlet
– Pull the lock A in upward direction.
Closing air inlet
– Push the lock A as far as the stop downwards.
On vehicles fitted with air conditioning, the storage compartment is equipped
with a lockable inlet for thermally treated (warmed-up) air.
At open air supply, air flows into the storage with a temperature which is as high
as the one out of the air outlet nozzles, depending on temperature setting.
The air inlet in the storage compartment is connected to position through ad-
justment of the control dial for air distribution. This position causes the maximum
amount of air to flow into the storage compartment (depending on the rotary reg-
ulator position for the fan).
You can use the storage compartment, for example, to temper drinks cans, etc.
If you do not use the air inlet in the storage compartment, the end cover should
always be kept closed. Note
Push the lid of the armrest up to stop to the rear before operating the handbrake. Rear seat armrest with storage compartment
Fig. 85 Armrest of rear seats:
The armrest includes a storage compartment. You open the compartment by
pressing the button on the front side and raising the cover ⇒
fig. 85 .
Stowage compartment in rear centre console Fig. 86 Centre console at rear: Stowage
compartment
The storage compartment is equipped with a removable insert.
– Open the storage compartment by pulling on the upper edge of the storage
compartment A in the direction of arrow
⇒ fig. 86 . WARNING
The storage compartment is not a substitute for the ashtray and must also
not be used for such purposes - risk of fire! 81
Seats and Stowage Using the system Safety Driving Tips General Maintenance Breakdown assistance Technical data
Page 84 of 248

Seat backrest with opening for skis
Fig. 87 Rear seats: Handle of lid/luggage compartment: Unlock button
After folding open the armrest and the lid, an opening in the seat backrest be-
comes visible through which you can push the removable through-loading bag
with skis. You can fold open the armrest and the lid from the passenger or lug-
gage compartment.
Opening from passenger compartment
– Fold down the armrest of the rear seat at the loop ⇒ page 66.
– Pull the handle up to the stop in upward direction and fold open the lid down-
wards ⇒
fig. 87 - left.
Opening from luggage compartment
– Push the unlock button downwards ⇒
fig. 87 - right and fold the lid (with arm-
rest) to the front.
Closing
– Fold the lid and the armrest up to the stop in upward direction - the lid must
click into place audibly.
Ensure that the armrest is always locked into place after closing. You can recog-
nize this on the fact that the red field above the unlocking button A of the lug-
gage compartment is not visible. WARNING
The opening for the skis is solely used for transporting skis which are placed
in a properly secured removable through-loading bag ⇒
page 82. Through-loading bag The removable through-loading bag is solely used for transporting
skis. Fig. 88 Securing the removable
through-loading bag
Loading
– Open the boot lid/luggage compartment door.
– Fold the rear armrest and the cover in the seat backrest downwards
⇒ page 82, Seat backrest with opening for skis
.
– Place the empty removable through-loading bag in such a way that the end of
the bag with the zip lies in the boot.
– Push the skis into the removable through-loading bag from the luggage com-
partment ⇒ .
Securing
– Tighten the strap A on the free end around the skis in front of the bindings
⇒ fig. 88 .
– Fold the seat backrest a little forward.
– Guide the securing strap B through the opening in the seat backrest around
the upper part of the seat backrest.
– Then push the seat backrest back into the upright position until the locking
button clicks into place - check by pulling on the seat backrest.
– Insert the securing strap B into the lock
C until it is heard to lock in place.
On vehicles fitted with a luggage net partition, guide the securing strap B around
the housing when the net partition is rolled up. After fixing the luggage net parti-
tion in place, it is not longer possible to unroll the luggage net partition. £82
Seats and Stowage
Page 85 of 248

WARNING
● After placing skis into the through-loading bag, you must secure the bag
with the securing strap B .
● The strap A must hold the skis tight.
● Make sure that the strap A holds the skis in front of the binding (see also
imprint on the removable through-loading bag). Note
● The through-loading bag is foreseen for four pairs of skis. The total weight of
the skis which are transported must not exceed 17 kg.
● You must put the skis and the sticks in the removable through-loading bag
with the tips facing the rear.
● If there are several pairs of skis in the removable through-loading bag, ensure
that the bindings are positioned at the same height.
● Carefully fold the empty (dry) through-loading bag together, place it in the lug-
gage compartment and secure it to prevent it slipping. The removable through-
loading bag must never be folded together or stowed when moist.
Side compartment Fig. 89 Luggage compartment: Side
compartment
– You can open the compartment by turning the locks in the direction of arrow.
The CD changer is housed in this compartment. Stowage compartment behind the rear seats (Estate car)
Fig. 90 Removing the storage compart-
ment
Removing
– First remove the foldable luggage compartment cover ⇒ page 70.
– Grasp the housing with both hands and remove it by pulling in direction of ar-
row ⇒ fig. 90 .
Install
– Push the housing up to the stop into the catch.
– Re-insert the foldable luggage compartment cover. WARNING
Only place small and light objects up to a total weight of 3 kg into the storage
compartment. In the event of a vehicle collision heavy objects could be thrown
out of the compartment - risk of injuries! For this reason, the front part of the
luggage compartment cover must always cover over the storage compart-
ment.
Clothes hooks The clothes hooks are located on the middle pillar and on the handle of the head-
liner above each of the rear doors.
£ 83
Seats and Stowage Using the system Safety Driving Tips General Maintenance Breakdown assistance Technical data
Page 86 of 248

WARNING
● Ensure that any clothes hanging from the hooks do not impair your vision
to the rear.
● Use the hooks for hanging only light items of clothing and ensure that
there are no heavy or sharp-edged objects in the pockets.
● The maximum permissible load of the hooks is 2 kg.
● Do not use clothes hangers for hanging up items of clothing otherwise this
will interfere with the protection offered by the head airbag. 84
Seats and Stowage
Page 100 of 248

Starting-off and Driving
Setting steering wheel position Fig. 98 Adjustable steering wheel: Lever below the steering wheel/safe distance to the
steering wheel
You can set the height and the forward/back position of the steering wheel to the
desired position.
– Adjust the driver seat ⇒ page 60, Adjusting the front seats.
– Pull the lever below the steering wheel down ⇒ fig. 98 - left ⇒
.
– Set the steering wheel to the desired position (concerning height and forward/
back position).
– Push the lever upwards as far as the stop. WARNING
● You must not adjust the steering wheel when the vehicle is moving!
● The driver must maintain a distance of at least 25 cm to the steering wheel
⇒ fig. 98 - right. Not maintaining this minimum distance will mean that the air-
bag system will not be able to properly protect you - hazard!
● For safety reasons the lever must always be firmly pushed up to avoid the
steering wheel altering its position unintentionally when driving - risk of acci-
dent! WARNING (Continued)
● If you adjust the steering wheel further towards the head, you will reduce
the protection offered by the driver airbag in the event of an accident. Check
that the steering wheel is aligned to the chest.
● When driving, hold the steering wheel with both hands firmly on the outer
edge in the 9 o'clock and 3 o'clock position. Never hold the steering wheel
firmly in the 12 o'clock position or in another way (e.g. in the middle of the
steering wheel or at the inner steering wheel edge). In such cases, injuries to
the arms, the hands and the head can occur when the driver airbag is de-
ployed.
Ignition lock Fig. 99 Ignition lock positions
Petrol engines 1 - ignition switched off, engine off, the steering can be locked.
2 - ignition switched on
3 - start engine
Diesel engines 1 - interruption of fuel supply, ignition switched off, engine off, the steering can
be locked.
2 - heating glow plugs on, ignition switched on
● You should not switch on any major electrical components during the heating
period otherwise the vehicle battery will be drained unnecessarily. £98
Starting-off and Driving
Page 131 of 248
Internet connection
An Internet connection can be established via a PC or PDA.
The control unit on the hands-free system supports the GPRS, EDGE and UMTS/3G
technologies.
An Internet is only possible via a telephone which is connected via the rSAP pro-
file.
The procedure for connecting to the Internet can vary depending on the type and
version of the operating system as well as the type of the device to be connected.
Successfully connecting to the internet requires appropriate knowledge of the op-
erating system for connecting the device .
Process of connection
– Connect the mobile phone with the hands-free system.
– Set the access point (depending on the operator, usually the “Internet”) in the
menu Phone - Settings - Data .
– Switch on the visibility of the hands-free system for the other devices in the
menu Phone - Bluetooth
- Visibility.
– Have the device to be connected search for available Bluetooth ®
devices.
– From the list of found devices, choose the hands-free system (“SKODA_BT” by
default).
– On the device to be connected, enter the password and follow any instructions
given on this device or in the information display.
– Enter the required Internet address in the browser. The operating system re-
quests the entry of the telephone number for the internet access (depending
on the operator, usually
“*99#”).
Music playback via Bluetooth ®The universal telephone preinstallation GSM IIl makes it possible to play back mu-
sic via Bluetooth ®
from the devices such as MP3 player, mobile phone or note-
book.
In order to enable the music playback via Bluetooth ®
, it is necessary to first con-
nect the device to be connected with the hands-free system in the menu Phone -
Bluetooth - Media player . The music playback process is performed on the connected device. Note
● The device to be connected must support the Bluetooth ®
profile A2DP, see
Owner's manual of the device to be coupled.
● This function is not available in vehicles fitted with the car radio Blues.
Multimedia AUX-IN and MDI inputs The input AUX-IN is located below the armrest of the front seats and is marked
with .
The input MDI is located in the glove box.
The inputs AUX-IN and MDI are used to connect external audio sources (e.g. iPod
or MP3 player) and play back music from these devices via your factory-fitted radio
or radio navigation system.
The description of the operation can be found in the relevant Owner's Manual of
your radio or your radio navigation system. Note
● The loudspeakers in the vehicle are matched to a power output of the radio
and radio navigation system of 4x 20 W.
● For the equipment sound system, the loudspeakers are matched to a power
output of the amplifier of 4x40°W + 6x20
W. 129
Communication Using the system Safety Driving Tips General Maintenance Breakdown assistance Technical data
Page 133 of 248

Safety
Passive Safety
Basic information
Driving the safe way Passive safety measures reduce the risk of injury in accident situa-
tions.
In this section you will find important information, tips and notes on the subject of
passive safety in your vehicle. We have combined everything here which you
should be familiar with, for example, regarding seat belts, airbags, child seats and
safety of children. It is therefore important, in particular, to comply with the notes
and warnings in this section for your own interest and in the interest of those
travelling with you. WARNING
● This chapter contains important information on how to use the vehicle for
the driver and his occupants. You will find further information on safety, which
concerns you and those travelling with you, in the following chapters of this
Owner's Manual.
● The complete on-board literature should always be in the vehicle. This ap-
plies in particular, if you rent out or sell the vehicle.
Safety equipment The safety equipment is part of the occupant protection and it can
reduce the risk of injuries in accident situations.
“Do not put at risk
” your safety and the safety of those travelling with you . In the
event of an accident, the safety equipment can reduce the risk of injuries.
The following list contains part of the safety equipment in your vehicle:
● three-point seat belts for all the seats;
● belt force limiter for front and outer rear seats;
● belt tensioners for front seats; ●
seat belt height adjusters for front seats;
● front airbag for the driver and front passenger;
● side airbags;
● head airbags;
● anchoring points for child seat using the “ISOFIX” system;
● anchoring points for child seat using the “Top Tether” system;
● head restraints adjustable for height;
● adjustable steering column.
The specified safety equipment works together, in order to optimally protect you
and those travelling with you in accident situations. The safety equipment does
not protect you or the people travelling with you, if you or your occupants adopt
an incorrect seated position or the equipment is not correctly adjusted or used.
For this reason you will be provided with information on why these equipment
components are very important, how it protects you and the occupants, what
should be observed when using the equipment and how you and the people trav-
elling with you can make full use of the existing safety equipment. This Owner's
Manual contains important warning notes, which you and those travelling with
you should pay attention to in order to reduce a risk of injury.
Safety concerns everybody!
Before setting off The driver is always fully responsible for his occupants and for the
operating safety of the vehicle.
For your own safety and the safety of the people travelling with you, please pay
attention to the following points before setting off.
● Ensure that the lighting and the turn signal system are functioning properly.
● Inspect the tyre inflation pressure.
● Ensure that all the windows offer a good visibility to the outside.
● Safely attach the items of luggage ⇒ page 66
, Loading the luggage compart-
ment. £ 131
Passive Safety Using the system Safety Driving Tips General Maintenance Breakdown assistance Technical data