Page 101 of 232
99
EASE OF USE
andCOMFOR
T
3
Practical information
To remove it
From the boot, pull the load space
cover towards you to release it from
the side pillars.
Guide the load space cover as it rolls up.
Remove the clips of the three fl aps
from the base of each row 2 head
restraint.
Compress the roller to the left to
remove it from the support B .
Raise it and pivot it forwards.
To store it
Store it in the recess at the boot sill,
with the two rear fl aps uppermost.
First, compress the load space screen
to the left.
Release.
Arrange the two fl aps and close the
storage fl ap.
The roller is fi tted with three fl aps
permitting concealment of the
boot, whether the row 2 seats
are in the normal position or the
comfort position.
Each fl ap has two clips which are
hooked on the base of each head
restraint.
Page 103 of 232

101
EASE OF USE
andCOMFOR
T
3
Practical information
The interior rack is not compatible
with the Zenith roof.
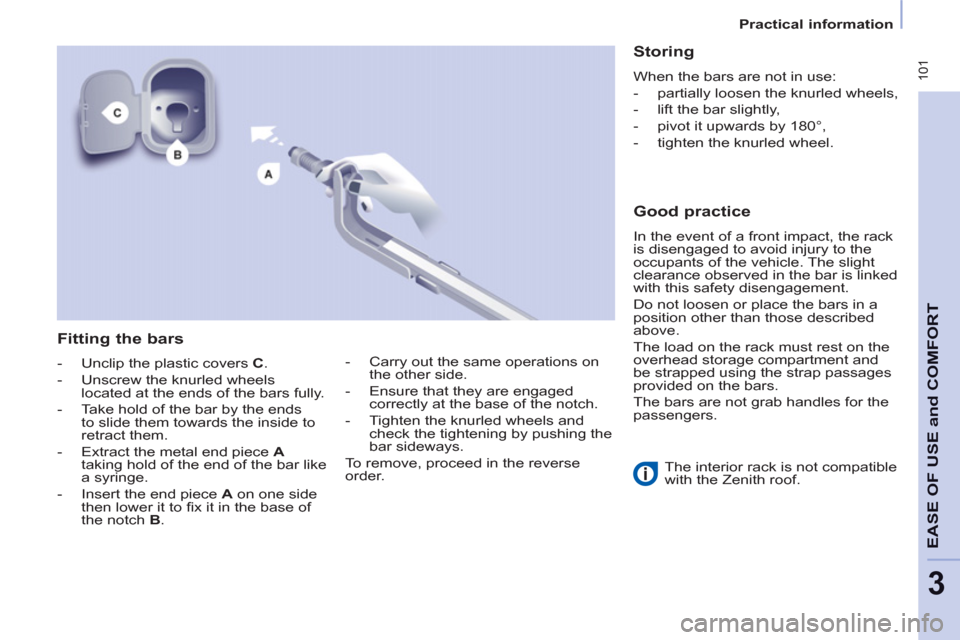
Fitting the bars
- Unclip the plastic covers C .
- Unscrew the knurled wheels
located at the ends of the bars fully.
- Take hold of the bar by the ends
to slide them towards the inside to
retract them.
- Extract the metal end piece A
taking hold of the end of the bar like
a syringe.
- Insert the end piece A on one side
then lower it to fi x it in the base of
the notch B .
Storing
When the bars are not in use:
- partially loosen the knurled wheels,
- lift the bar slightly,
- pivot it upwards by 180°,
- tighten the knurled wheel.
Good practice
In the event of a front impact, the rack
is disengaged to avoid injury to the
occupants of the vehicle. The slight
clearance observed in the bar is linked
with this safety disengagement.
Do not loosen or place the bars in a
position other than those described
above.
The load on the rack must rest on the
overhead storage compartment and
be strapped using the strap passages
provided on the bars.
The bars are not grab handles for the
passengers.
- Carry out the same operations on
the other side.
- Ensure that they are engaged
correctly at the base of the notch.
- Tighten the knurled wheels and
check the tightening by pushing the
bar sideways.
To remove, proceed in the reverse
order.
Page 107 of 232

105
Driving safely
SAFETY
4
DRIVING SAFELY
HORN
Press the centre of the steering wheel.
PARKING BRAKE
Applying
Pull the parking brake lever up to
immobilise your vehicle.
Check that the parking brake is applied
fi rmly before leaving the vehicle.
Releasing
Pull the lever and press the button to
lower the parking brake lever.
HAZARD WARNING LAMPS
Press this button, the direction
indicators fl ash.
They can operate with the ignition off.
The hazard warning lamps should only
be used in dangerous situations, when
stopping in an emergency or when
driving in unusual conditions.
When parking on a slope, direct your
wheels towards the pavement and pull
the parking brake lever up.
There is no advantage in engaging
a gear after parking the vehicle,
particularly if the vehicle is loaded.
If the parking brake is still on or has
not been released properly, this is
indicated by this warning lamp which
comes on on the instrument panel.
Automatic lighting of hazard
warning lights
When braking in an emergency,
depending on the force of deceleration,
the hazard warning lights come
on automatically. They switch off
automatically the fi rst time you
accelerate.
It is also possible to switch them off by
pressing the button on the fascia.
Page 109 of 232
107
Parking sensors
SAFETY
4
Activation/Deactivation
Operating fault
In the event of an operating fault, whenreverse gear is engaged the diode on
the button comes on, accompanied
b
y an audible signal and a message on the display. Consult a PEUGEOTdealer.
Good practice
In bad weather or in winter, ensure that
the sensors are not covered with mud,
i
ce or snow.
The s
ystem will be deactivated
automatically if a trailer is being towedor if a bicycle carrier is fi tted (vehiclefi tted with a towbar or bicycle carrier recommended by PEUGEOT ).
The parkin
g assistance cannot, in
any circumstances, take the place of the vigilance and responsibility of
the driver. Y
ou can activate or deactivate
the system by pressing thisbutton.
Th
e activation or deactivation of the system is stored when
the vehicle stops.
Page 117 of 232
11 5
SAFETY
4
Seat belts
Rear seat belts
(7 seat version)
In row 2
The three seats are fi tted with
three-point inertia reel seat belts.
When folding the side seats or the
seat backs to the table position, avoid
trapping the strap of the centre seat
belt.
When handling the side seats
(removing/installing) or when
accessing row 3, avoid hooking the
centre seat belt.
Ensure that the centre seat belt is
rolled up correctly in its strengthener
on the roof.
In row 3
The two seats are fi tted with
three-point inertia reel seat belts.
Do not attach the seat belts to the
stowing rings marked with a red cross,
represented on the label.
Take care to hook the seat belts
correctly on the rings provided for this
purpose.
The row 3 seat belts which are not in
use can be stored to clear the load
space and make use of the load space
cover easier.
Hook the snap hook in the location
provided on the rear pillar trim.
Page 120 of 232

11 8 11 8
Airbags
Curtain airbags
This is a system which protects the
driver and passengers (with the
exception of the centre seat of row 2)
in the event of a serious side impact in
order to limit the risk of head injuries.
Each curtain airbag is incorporated in
the pillars and the upper part of the
passenger compartment.
Activation
It is triggered at the same time as the
corresponding side airbag in the event
of a serious side impact applied to
all or part of the side impact zone B ,
perpendicular to the longitudinal
centreline of the vehicle on a horizontal
plane and directed from the outside
towards the inside of the vehicle.
The curtain airbag infl ates between the
front or rear occupant of the vehicle
and the windows.
Side airbags
This is a
system which protects the
driver and front passenger in the event
of a serious side impact in order to limit
the risk of injury to the chest.
Each side airbag is incorporated in the
front seat back frame, on the door side.
Activation
It is triggered unilaterally in the event
of a serious side impact applied to
all or part of the side impact zone B ,
perpendicular to the longitudinal
centreline of the vehicle on a horizontal
plane and directed from the outside
towards the inside of the vehicle.
The side airbag infl ates between the
front occupant of the vehicle and the
corresponding door trim pad.
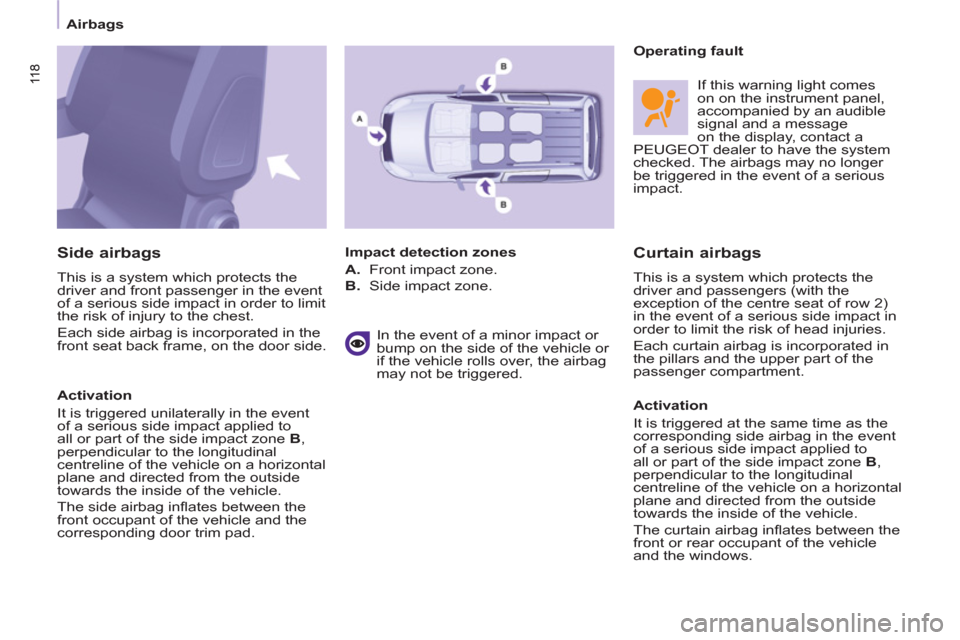
Impact detection zones
A. Front impact zone.
B. Side impact zone.
Operating fault
If this warning light comes
on on the instrument panel,
accompanied by an audible
signal and a message
on the display, contact a
PEUGEOT dealer to have the system
checked.
The airbags may no longer
be triggered in the event of a serious
impact.
In the event of a minor impact or
bump on the side of the vehicle or
if the vehicle rolls over, the airbag
may not be triggered.
Page 121 of 232

11 9
SAFETY
4
11 9
Airbags
Front airbags
The front airbags are incorporated in
the centre of the steering wheel for the
driver and in the fascia for the front
passenger.
Activation
They are deployed simultaneously,
unless the passenger's front airbag
has been disarmed, in the event of a
serious front impact applied to all or
part of the front impact zone A in the
longitudinal centreline of the vehicle
on a horizontal plane directed from the
front towards the rear of the vehicle.
The front airbag infl ates between
the front occupant of the vehicle and
the fascia to cushion his forward
movement.
Disarming
The passenger's front airbag alone can
be disarmed:
- With the ignition switched off
,
insert the key into the passenger
airbag disarming switch,
- turn it to the "OFF" position,
- then remove the key keeping the
slot in this position.
The airbag warning light on the
instrument panel is lit throughout
the period of disarming.
If the two airbag warning lights
are lit continuously, do not install
a rear-facing child seat. Consult a
PEUGEOT dealer.
Front airbag fault
To ensure the safety of your
child, it is essential to disarm the
passenger airbag when you install
a rear-facing child seat on the front
passenger seat. Otherwise, the child
would risk being killed or seriously
injured if the airbag were to infl ate.
Reactivation
In the "OFF" position, the passenger
airbag will not be triggered in the event
of an impact.
As soon as the child seat is removed,
turn the airbag slot to the "ON"
position to re-activate the airbag
and thus ensure the safety of your
passenger in the event of an impact.
If this warning light comes on,
accompanied by an audible
signal and a message on the
display, consult a PEUGEOT
dealer to have the system
checked.
Page 129 of 232
127
Towing a trailer
ACCESSORIE
S
5
For more information about
weights, refer to the administrative
documents (V5 registration
document, ...) or to the "Weights"
section of chapter 8.
TOWING A TRAILER, CARAVAN, BOAT, ETC...
Distribution of loads
Distribute the load in the trailer so
that the heaviest objects are as
close as possible to the axle and
the nose weight is close to the
maximum authorised without, however,
exceeding it.
Cooling
Towing a trailer on a slope increases
the coolant temperature. As the fan is electrically controlled, its
cooling capacity is not dependent on
the engine speed.
On the contrary, use a high gear to
lower the engine speed and reduce
your speed.
In all cases, pay attention to the
coolant temperature.
Driving advice
A towed vehicle must free wheel:
gearbox in neutral.