Page 90 of 232
88
Practical information
SCENTED AIR FRESHENER
The scented air freshener diffuses
a fragrance in the passenger
compartment from the roof console
vents.
Adjusting the flow
Turn the chromed button to adjust the
diffusion:
- to the left to decrease,
- to the right to increase.
To stop the diffusion, turn the chromed
button fully to the left.
Removing the scented air
freshener
- Press the button down while turning
it a quarter of a turn to the left to
the stop.
- Remove the scented air freshener
from the roof console.
- Replace the cartridge.
Page 91 of 232

89
EASE OF USE AND COMFOR
T
3
Practical information
Replacing a cartridge
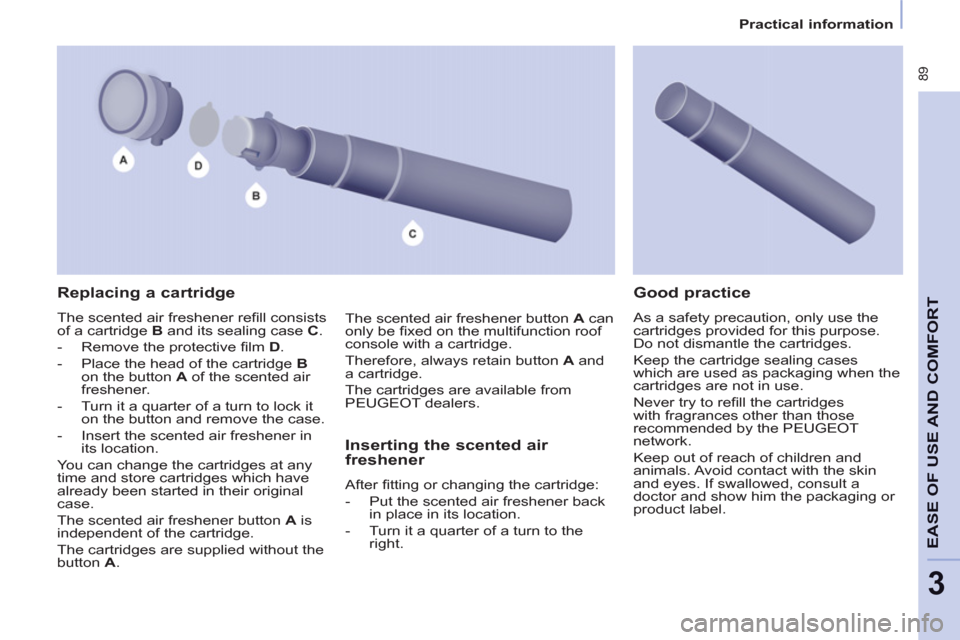
The scented air freshener refi ll consists
of a cartridge B and its sealing case C .
- Remove the protective fi lm D .
- Place the head of the cartridge B
on the button A of the scented air
freshener.
- Turn it a quarter of a turn to lock it
on the button and remove the case.
- Insert the scented air freshener in
its location.
You can change the cartridges at any
time and store cartridges which have
already been started in their original
case.
The scented air freshener button A is
independent of the cartridge.
The cartridges are supplied without the
button A .
Inserting the scented air
freshener
After fi tting or changing the cartridge:
- Put the scented air freshener back
in place in its location.
- Turn it a quarter of a turn to the
right.
Good practice
As a safety precaution, only use the
cartridges provided for this purpose.
Do not dismantle the cartridges.
Keep the cartridge sealing cases
which are used as packaging when the
cartridges are not in use.
Never try to refi ll the cartridges
with fragrances other than those
recommended by the PEUGEOT
network.
Keep out of reach of children and
animals. Avoid contact with the skin
and eyes. If swallowed, consult a
doctor and show him the packaging or
product label. The scented air freshener button A can
only be fi xed on the multifunction roof
console with a cartridge.
Therefore, always retain button A and
a cartridge.
The cartridges are available from
PEUGEOT dealers.
Page 92 of 232
90
Practical information
Zenith roof BARS
These two longitudinal Zenith roof bars
can be removed. The maximum authorised weight on
each bar is 35 kg.
In all cases, the load must rest on
the non-slip bands provided for this
purpose and must not touch the roof or
the glazing of the roof.
Recommendations for loading on
the roof:
- Open the protective covers.
- Use the screwdriver (stored in the
tool kit under the right-hand seat) to
remove the 4 bolts.
- Turn the bars 90° placing the
hollow parts towards the front.
- Tighten the 4 bolts.
- Close the protective covers.
- Use the strap passages A only to
secure the load fi rmly.
Page 93 of 232
91
EASE OF USE AND COMFOR
T
3
Practical information
ROOF BARS
If you install transverse bars on these bars, refer to the weight values indicated
by the manufacturer but do not exceed 75 Kg.
Page 99 of 232
97
EASE OF USE AND COMFOR
T
3
Practical information
Storage flaps
Raise the corresponding fl ap.
Next to the boot sill, the recess is
intended to receive the roller tube
containing the load space cover.
Seat belts
Ensure that the centre seat belt is
rolled up correctly in its strengthener
on the roof.
Prevent the row 3 seat belt buckles
from knocking by raising them as close
as possible to the stowages, located
on the roof.
The seat belt buckle attachment rings
on each side of the boot must not be
used to retain loads.
Page 103 of 232

101
EASE OF USE AND COMFOR
T
3
Practical information
The interior rack is not compatible
with the Zenith roof.
Fitting the bars
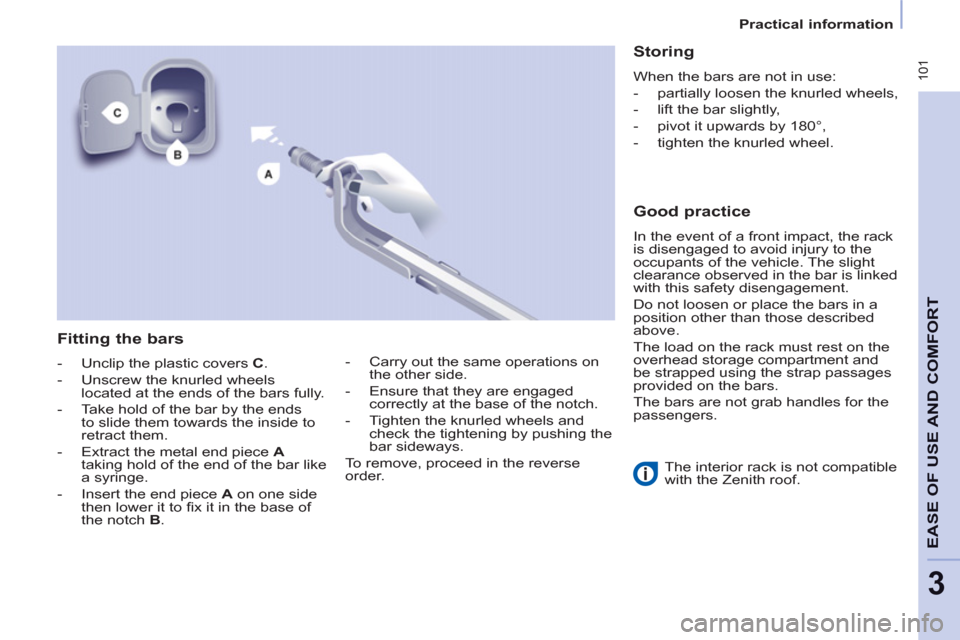
- Unclip the plastic covers C .
- Unscrew the knurled wheels
located at the ends of the bars fully.
- Take hold of the bar by the ends
to slide them towards the inside to
retract them.
- Extract the metal end piece A
taking hold of the end of the bar like
a syringe.
- Insert the end piece A on one side
then lower it to fi x it in the base of
the notch B .
Storing
When the bars are not in use:
- partially loosen the knurled wheels,
- lift the bar slightly,
- pivot it upwards by 180°,
- tighten the knurled wheel.
Good practice
In the event of a front impact, the rack
is disengaged to avoid injury to the
occupants of the vehicle. The slight
clearance observed in the bar is linked
with this safety disengagement.
Do not loosen or place the bars in a
position other than those described
above.
The load on the rack must rest on the
overhead storage compartment and
be strapped using the strap passages
provided on the bars.
The bars are not grab handles for the
passengers.
- Carry out the same operations on
the other side.
- Ensure that they are engaged
correctly at the base of the notch.
- Tighten the knurled wheels and
check the tightening by pushing the
bar sideways.
To remove, proceed in the reverse
order.
Page 117 of 232
11 5
SAFETY
4
Seat belts
Rear seat belts
(7 seat version)
In row 2
The three seats are fi tted with
three-point inertia reel seat belts.
When folding the side seats or the
seat backs to the table position, avoid
trapping the strap of the centre seat
belt.
When handling the side seats
(removing/installing) or when
accessing row 3, avoid hooking the
centre seat belt.
Ensure that the centre seat belt is
rolled up correctly in its strengthener
on the roof.
In row 3
The two seats are fi tted with
three-point inertia reel seat belts.
Do not attach the seat belts to the
stowing rings marked with a red cross,
represented on the label.
Take care to hook the seat belts
correctly on the rings provided for this
purpose.
The row 3 seat belts which are not in
use can be stored to clear the load
space and make use of the load space
cover easier.
Hook the snap hook in the location
provided on the rear pillar trim.
Page 131 of 232

129
ACCESSORIE
S
5
Equipment
A further range is also available,
structured around comfort, leisure and
maintenance:
Anti-theft alarm, window
etching, fi rst aid kit, high
visibility vest, front and rear
parking sensors, warning
triangle, security bolts for alloy
wheels, ...
Seat covers compatible with
airbags for the front seats,
bench seat, rubber mats, carpet
mats, snow chains, blinds,
tailgate bicycle carrier, ...
Audio equipment, hands-free
kit, speakers, CD changer,
satellite navigation system, USB
box, Video kit, ...
Regardless of the audio and
telematic equipment offered on the
market, the technical constraints
associated with the fi tting of equipment
of these product groups mean that the
special features of the equipment and
its compatibility with the capacities of
your vehicle's standard equipment must
be taken into account. Please ask a
PEUGEOT dealer for more information
before fi tting such equipment.
To prevent the mat from becoming
caught under the pedals:
- ensure that the mat and its fi xings
are positioned correctly,
- never fi t one mat on top of another.
Maximum weights on bars
- Transverse bars on longitudinal
bars: 75 Kg (these bars are not
compatible with the Zénith roof).
These accessories and parts, having been
tested and approved for reliability and
safety, are all adapted to your vehicle. A
wide range of recommended accessories
and genuine parts is available.
Installing radiocommunication
transmitters
You are advised to contact a
PEUGEOT dealer before installing
accessory radiocommunication
transmitters with external aerial on
your vehicle.
The PEUGEOT dealer network
will inform you of the specifi cation
(frequency band, maximum output
power, aerial position, specifi c
conditions of installation) of the
transmitters which can be fi tted, in
accordance with the Motor Vehicle
Electromagnetic Compatibility Directive
(2004/104/EC).