2011 Peugeot Partner Tepee change time
[x] Cancel search: change timePage 21 of 232
19
Access
READY TO SET OFF
2
When purchasing a second-hand
vehicle:
- have the keys memorised by a
PEUGEOT dealer to ensure that
the keys in your possession are
the only ones which can start
the vehicle.
Good practice
Do not make any modifi cations to the
electronic immobiliser system.
Operating the remote control, even
when it is in your pocket, may result in
involuntary unlocking of the doors.
The simultaneous use of other
high frequency equipment (mobile
telephones, domestic alarms…), may
interfere with the operation of the
remote control temporarily.
ELECTRONIC IMMOBILISER
All of the keys contain an electronic
immobiliser device.
This device locks the engine supply
system. It is activated automatically when
the key is removed from the ignition.
After the ignition is switched on, a
dialogue is established between the
key and the electronic immobiliser
system.
The metal part of the key must be
unfolded correctly for correct dialogue
to take place.
If you lose your keys
Visit a PEUGEOT dealer with the
vehicle's V5 registration document and
your identifi cation document.
A PEUGEOT dealer will be able
to retrieve the key code and
the transponder code so that a
replacement key can be ordered.
The remote control does not operate
while the key is in the ignition, even if
the ignition is off.
As a safety precaution (with children
on board), remove the key from the
ignition when leaving the vehicle, even
for a short time.
ALARM
If fi tted on your vehicle, this provides
two types of protection:
- exterior protection: it sounds if a
front/rear door or the bonnet is
opened.
-
interior protection: it sounds if the volume
inside the passenger compartment
changes (breaking of a window or a
movement inside the vehicle).
If your vehicle is fi tted with a separation
partition, the interior protection is not
active in the load space.
Locking the vehicle with
complete alarm
Setting the alarm
- Switch off the ignition and get out of
the vehicle.
- Set the alarm within fi ve minutes of
getting out of the vehicle, by locking
or deadlocking using the remote
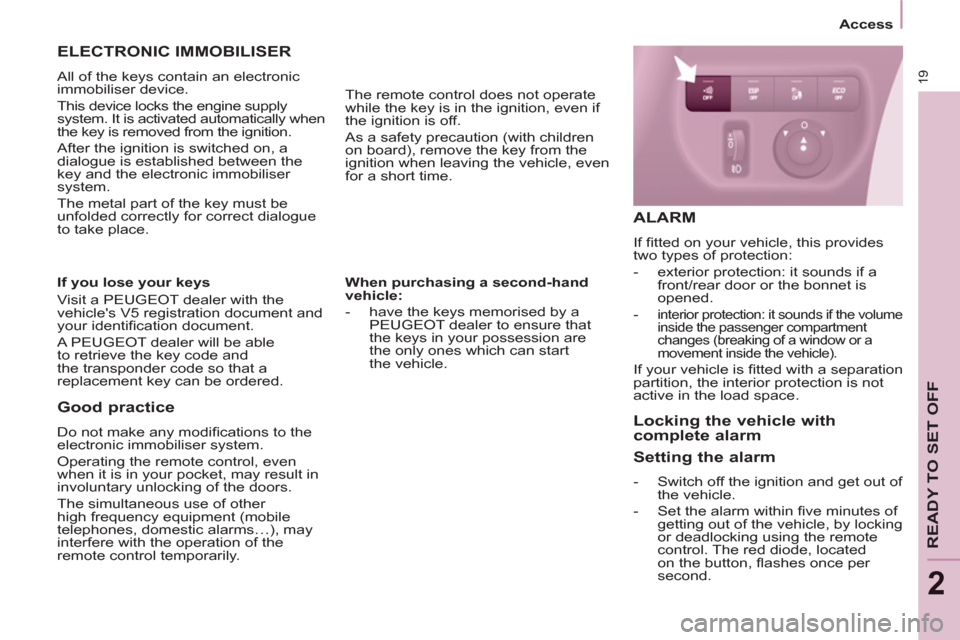
control. The red diode, located
on the button, fl ashes once per
second.
Page 35 of 232

33
READY TO SET OFF
22
Instruments and controls
Warning lamp
is
indicates
Solution - action
Particle
emission fi lter
on. a fault with the particle
emission fi lter (Diesel
additive level, risk of
blockage, ...). Have the fi lter checked by a PEUGEOT dealer.
Chapter 6, "Levels" section.
Dipped beam
headlamps/
Daytime
running lams
on.
a manual selection or automatic
illumination of headlamps. Turn the ring on the lighting control stalk to the
second position.
illumination of the dipped beam headlamps
from the time the ignition is switched on:
daytime running lamps (depending on the
country in which the vehicle is sold).
Chapter 3, "Steering mounted controls" section.
Main beam
headlamps
pulling of the stalk towards
you. Pull the stalk to return to dipped beam headlamps.
Direction
indicators
fl ashing with
audible signal. a change of direction via the
lighting stalk, to the left of
the steering wheel. To the Right: control to be pushed upwards.
To the Left: control to be pushed downwards.
Front
foglamps
on. a manual selection. The fog amps only operate if the sidelamps or
dipped beam headlamps are on.
Rear
foglamps
on. a manual selection. The foglamps only operate if the sidelamps or
dipped beam headlamps are on. In conditions of
normal visibility, switch them off to avoid breaking
the law. "This lamp is a dazzling red."
Page 41 of 232
39
READY TO SET OFF
22
Gearbox and steering wheel
GEARBOX
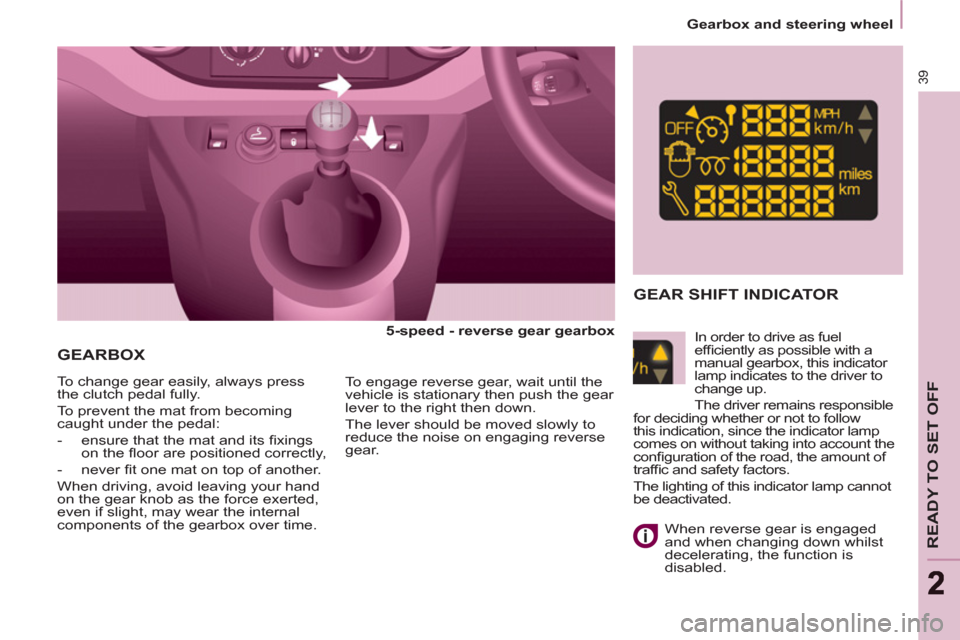
5-speed - reverse gear gearbox
To change gear easily, always press
the clutch pedal fully.
To prevent the mat from becoming
caught under the pedal:
- ensure that the mat and its fi xings
on the fl oor are positioned correctly,
- never fi t one mat on top of another.
When driving, avoid leaving your hand
on the gear knob as the force exerted,
even if slight, may wear the internal
components of the gearbox over time.
To engage reverse gear, wait until the
vehicle is stationary then push the gear
lever to the right then down.
The lever should be moved slowly to
reduce the noise on engaging reverse
gear.
GEAR SHIFT INDICATOR
In order to drive as fuel
effi ciently as possible with a
manual gearbox, this indicator
lamp indicates to the driver to
change up.
The driver remains responsible
for deciding whether or not to follow
this indication, since the indicator lamp
comes on without taking into account the
confi guration of the road, the amount of
traffi c and safety factors.
The lighting of this indicator lamp cannot
be deactivated.
When reverse gear is engaged
and when changing down whilst
decelerating, the function is
disabled.
Page 42 of 232
40
Gearbox and steering wheel
6-SPEED ELECTRONIC GEARBOX SYSTEM
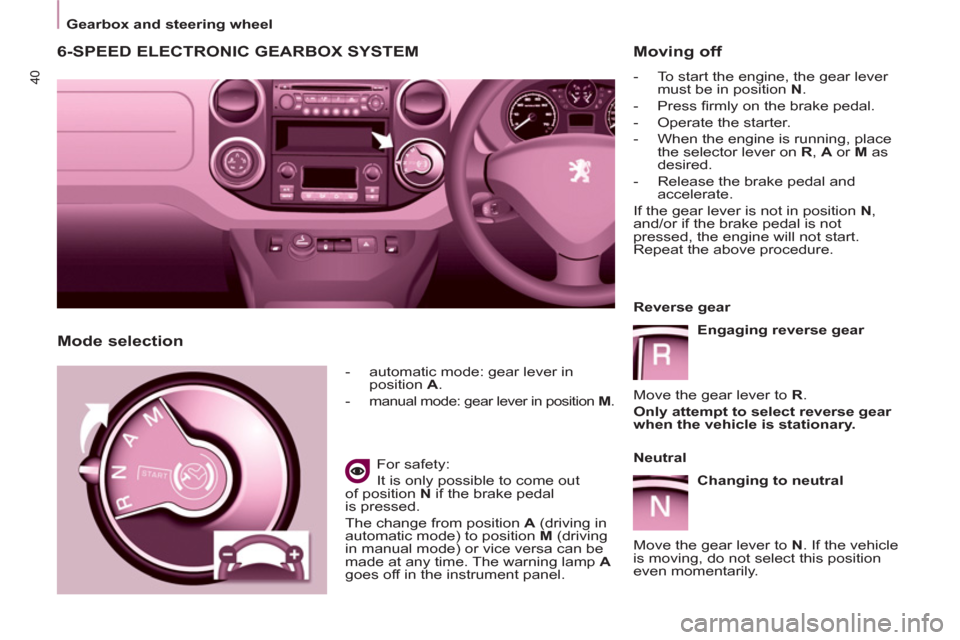
- automatic mode: gear lever in
position A
.
-
manual mode: gear lever in position M
.
For safety:
It is only possible to come out
of position N
if the brake pedal
is pressed.
The change from position A
(driving in
automatic mode) to position M
(driving
in manual mode) or vice versa can be
made at any time. The warning lamp A
goes off in the instrument panel.
Moving off
- To start the engine, the gear lever
must be in position N
.
- Press fi rmly on the brake pedal.
- Operate the starter.
- When the engine is running, place
the selector lever on R
, A
or M
as
desired.
- Release the brake pedal and
accelerate.
If the gear lever is not in position N
,
and/or if the brake pedal is not
pressed, the engine will not start.
Repeat the above procedure.
Mode selection
Reverse gear
Engaging reverse gear
Move the gear lever to R
.
Only attempt to select reverse gear
when the vehicle is stationary.
Neutral
Changing to neutral
Move the gear lever to N
. If the vehicle
is moving, do not select this position
even momentarily.
Page 50 of 232
48
Steering mounted controls
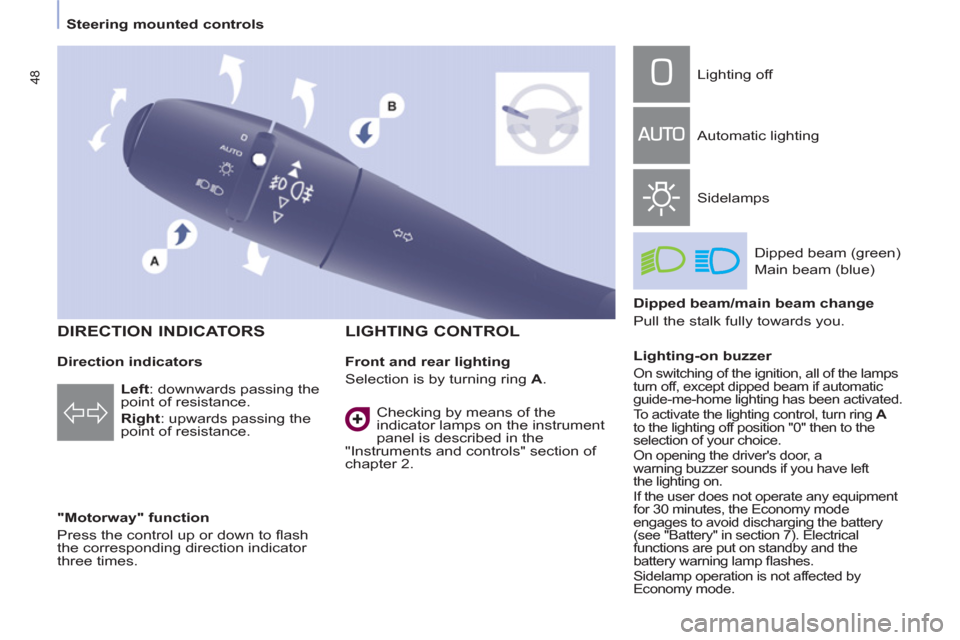
Direction indicators
"Motorway" function
Press the control up or down to fl ash
the corresponding direction indicator
three times.
LIGHTING CONTROL
Left
: downwards passing the
point of resistance.
Right
: upwards passing the
point of resistance.
Front and rear lighting
Selection is by turning ring A
. Lighting off
Automatic lighting
Sidelamps
Dipped beam (green)
Main beam (blue)
Dipped beam/main beam change
Pull the stalk fully towards you.
Lighting-on buzzer
On switching of the ignition, all of the lamps
turn off, except dipped beam if automatic
guide-me-home lighting has been activated.
To activate the lighting control, turn ring A
to the lighting off position "0" then to the
selection of your choice.
On opening the driver's door, a
warning buzzer sounds if you have left
the lighting on.
If the user does not operate any equipment
for 30 minutes, the Economy mode
engages to avoid discharging the battery
(see "Battery" in section 7). Electrical
functions are put on standby and the
battery warning lamp fl ashes.
Sidelamp operation is not affected by
Economy mode.
Checking by means of the
indicator lamps on the instrument
panel is described in the
"Instruments and controls" section of
chapter 2.
DIRECTION INDICATORS
Page 63 of 232

61
EASE OF USE AND COMFOR
T
3
Ventilation
Good practice
For maximum cooling or heating of the
passenger compartment, it is possible
to exceed the value 15 by turning until
LO is displayed or the value 27 by
turning until HI is displayed.
On entering the vehicle, the inside
temperature may be much colder (or
warmer) than is comfortable. There is
no advantage in changing the value
displayed in order to quickly reach the
level of comfort required. The system
will use its maximum performance to
reach the comfort value set.
DIGITAL AIR CONDITIONING WITH SEPARATE SETTINGS
Automatic operation
AUTO comfort programme
This is the normal air conditioning
system operating mode.
Driver or passenger side comfort
value
The value indicated in the screen
corresponds to a level of comfort and
not a temperature in degrees Celsius
or Fahrenheit.
Turn this control to the left
or to the right to decrease or
increase the value. A setting
around the value 21 provides
optimum comfort. However,
depending on your requirements, a
setting between 18 and 24 is usual.
Do not cover the sunshine sensor
located on the dashboard.
Press this button, the AUTO
symbol is displayed.
In accordance with the
comfort value selected,
the system controls the
distribution, the fl ow and the intake
of air to guarantee comfort and a
suffi cient circulation of air in the
passenger compartment. No further
action on your part is required. When the engine is cold, to prevent
an excessive diffusion of cold air, the
air diffuser will reach its optimum level
gradually.
For your comfort, the settings are
stored when the ignition is switched off
and are reinstated the next time the
vehicle is started.
The automatic function will no longer
be maintained if you change a setting
manually (AUTO is cleared).
FOR THE DRIVER AND PASSENGER
Page 91 of 232
89
EASE OF USE AND COMFOR
T
3
Practical information
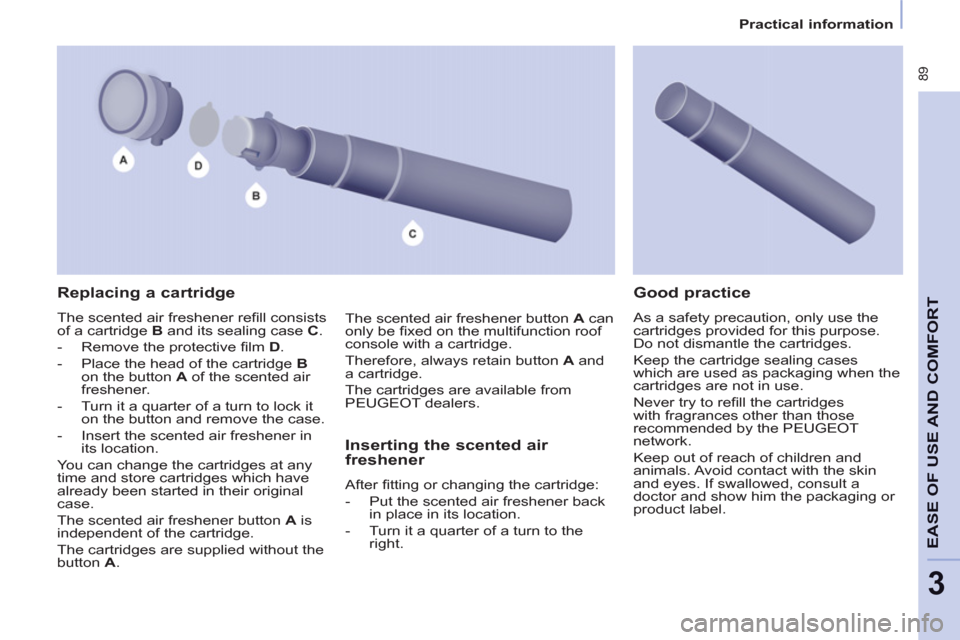
Replacing a cartridge
The scented air freshener refi ll consists
of a cartridge B and its sealing case C .
- Remove the protective fi lm D .
- Place the head of the cartridge B
on the button A of the scented air
freshener.
- Turn it a quarter of a turn to lock it
on the button and remove the case.
- Insert the scented air freshener in
its location.
You can change the cartridges at any
time and store cartridges which have
already been started in their original
case.
The scented air freshener button A is
independent of the cartridge.
The cartridges are supplied without the
button A .
Inserting the scented air
freshener
After fi tting or changing the cartridge:
- Put the scented air freshener back
in place in its location.
- Turn it a quarter of a turn to the
right.
Good practice
As a safety precaution, only use the
cartridges provided for this purpose.
Do not dismantle the cartridges.
Keep the cartridge sealing cases
which are used as packaging when the
cartridges are not in use.
Never try to refi ll the cartridges
with fragrances other than those
recommended by the PEUGEOT
network.
Keep out of reach of children and
animals. Avoid contact with the skin
and eyes. If swallowed, consult a
doctor and show him the packaging or
product label. The scented air freshener button A can
only be fi xed on the multifunction roof
console with a cartridge.
Therefore, always retain button A and
a cartridge.
The cartridges are available from
PEUGEOT dealers.
Page 108 of 232

106
Parking sensors
The audible and/or visual rear parkin
g
assistance consists of four proximity sensors, installed in the rear bumper. The sensors detect any obstacle whichenters the fi eld: person, vehicle, tree,fence, behind the vehicle during the manoeuvre.
Certain objects detected at the
beginning of the manoeuvre will no
longer be detected at the end of the
manoeuvre due to the blind spotsbetween and below the sensors. Examples: stake, roadworks cone or
pavement post.
Engage reverse gear REAR PARKING ASSISTANCE
Display on the screen
Stop the assistance
Change to neutral.
An audible signal confi rms the
activation of the system by engagingreverse gear.
The proximit
y information is indicated by an audible signal which becomes more rapid as the vehicle approaches
the obstacle. When the distancebetween the rear of the vehicle and
the obstacle is less than approximatelythirty centimetres, the audible signal becomes continuous.