Page 121 of 200
11 9
QUICK HELP
7
Changing a bulb
4.
Foglamps
Type C
, H1 - 55W
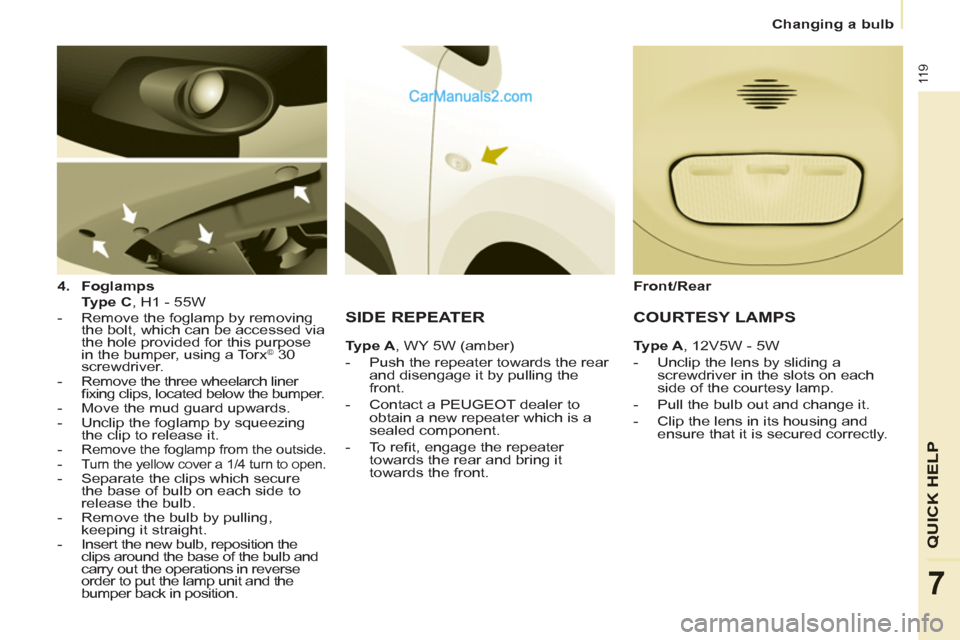
- Remove the foglamp by removing
the bolt, which can be accessed via
the hole provided for this purpose
in the bumper, using a Torx
© 30
screwdriver.
- Remove the three wheelarch liner
fi xing clips, located below the bumper.
- Move the mud guard upwards.
- Unclip the foglamp by squeezing
the clip to release it.
-
Remove the foglamp from the outside.
- Turn the yellow cover a 1/4 turn to open.
- Separate the clips which secure
the base of bulb on each side to
release the bulb.
- Remove the bulb by pulling,
keeping it straight.
- Insert the new bulb, reposition the
clips around the base of the bulb and
carry out the operations in reverse
order to put the lamp unit and the
bumper back in position.
SIDE REPEATER
Ty p e A
, WY 5W (amber)
- Push the repeater towards the rear
and disengage it by pulling the
front.
- Contact a PEUGEOT dealer to
obtain a new repeater which is a
sealed component.
- To refi t, engage the repeater
towards the rear and bring it
towards the front.
Front/Rear
COURTESY LAMPS
Type A
, 12V5W - 5W
- Unclip the lens by sliding a
screwdriver in the slots on each
side of the courtesy lamp.
- Pull the bulb out and change it.
- Clip the lens in its housing and
ensure that it is secured correctly.
Page 122 of 200
120
Changing a bulb
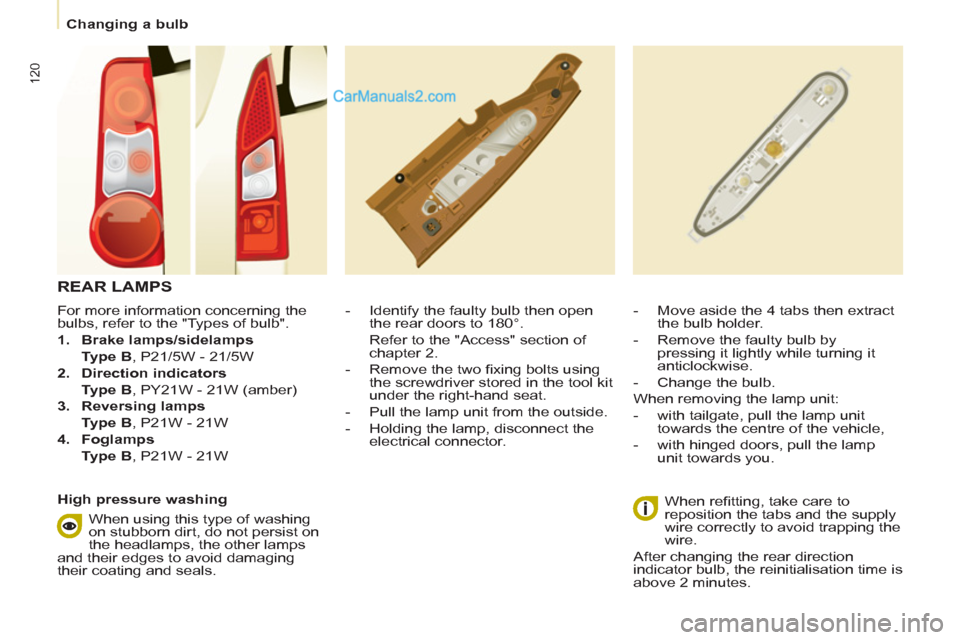
For more information concerning the
bulbs, refer to the "Types of bulb".
1.
Brake lamps/sidelamps
Type B
, P21/5W - 21/5W
2.
Direction indicators
Type B
, PY21W - 21W (amber)
3.
Reversing lamps
Type B
, P21W - 21W
4.
Foglamps
Type B
, P21W - 21W
- Identify the faulty bulb then open
the rear doors to 180°.
Refer to the "Access" section of
chapter 2.
- Remove the two fi xing bolts using
the screwdriver stored in the tool kit
under the right-hand seat.
- Pull the lamp unit from the outside.
- Holding the lamp, disconnect the
electrical connector.
- Move aside the 4 tabs then extract
the bulb holder.
- Remove the faulty bulb by
pressing it lightly while turning it
anticlockwise.
- Change the bulb.
When removing the lamp unit:
- with tailgate, pull the lamp unit
towards the centre of the vehicle,
- with hinged doors, pull the lamp
unit towards you.
When refi tting, take care to
reposition the tabs and the supply
wire correctly to avoid trapping the
wire.
After changing the rear direction
indicator bulb, the reinitialisation time is
above 2 minutes.
REAR LAMPS
High pressure washing
When using this type of washing
on stubborn dirt, do not persist on
the headlamps, the other lamps
and their edges to avoid damaging
their coating and seals.
Page 124 of 200
122
Changing a fuse
CHANGING A FUSE
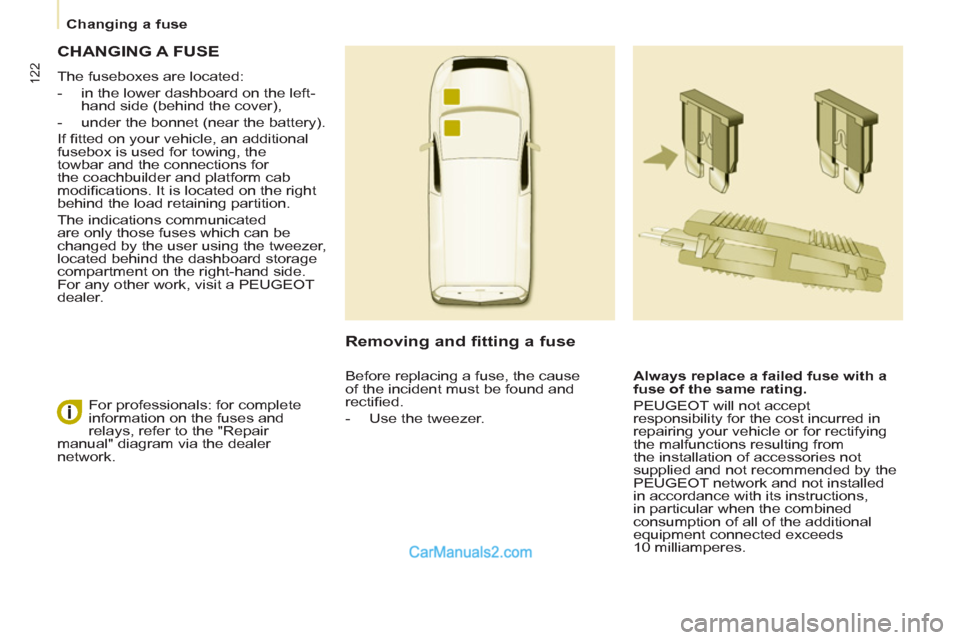
The fuseboxes are located:
- in the lower dashboard on the left-
hand side (behind the cover),
- under the bonnet (near the battery).
If fi tted on your vehicle, an additional
fusebox is used for towing, the
towbar and the connections for
the coachbuilder and platform cab
modifi cations. It is located on the right
behind the load retaining partition.
The indications communicated
are only those fuses which can be
changed by the user using the tweezer,
located behind the dashboard storage
compartment on the right-hand side.
For any other work, visit a PEUGEOT
dealer.
Removing and fitting a fuse
Always replace a failed fuse with a
fuse of the same rating.
PEUGEOT will not accept
responsibility for the cost incurred in
repairing your vehicle or for rectifying
the malfunctions resulting from
the installation of accessories not
supplied and not recommended by the
PEUGEOT network and not installed
in accordance with its instructions,
in particular when the combined
consumption of all of the additional
equipment connected exceeds
10 milliamperes. For professionals: for complete
information on the fuses and
relays, refer to the "Repair
manual" diagram via the dealer
network. Before replacing a fuse, the cause
of the incident must be found and
rectifi ed.
- Use the tweezer.
Page 126 of 200
124
Changing a fuse
PASSENGER COMPARTMENT FUSES
Fuses
F
Amperes
A
Allocation
1 - Spare
2 20 Heated seats
3 - Spare
4 15 Folding mirrors relay
5 15 Refrigeration equipment socket relay
TOWING/TOWBAR/
COACHBUILDERS/PLATFORM
CAB FUSES
The designations communicated are
an indication only as this additional
box relates to other information which
depends on the modifi er-coachbuilder
for which the handbook cannot be
used as a technical support.
Fuses
F
Amperes
A
Allocation
1 15 Spare
2 15 Ignition, generator operating relay
3 15 Trailer 12 V supply
4 15 Permanent supply for the modifi ers
5 40 Hazard warning lamps
Page 129 of 200
127
QUICK HELP
7
Having your vehicle towed
Without lifting
(4 wheels on the road)
You should always use a towbar.
BEING TOWED
From the front
- Unclip the cover by pressing the
bottom part.
- Screw in the removable towing eye
until it locks.
From the rear
- Unclip the cover using a coin or the
fl at part of the towing eye,
- Screw in the removable towing eye
until it locks.
When towing with the engine
switched off, there is no braking or
steering assistance.
Lifting (2 wheels on the road only)
It is preferable to raise the vehicle
using professional lifting equipment. The towing eye is stored in the tool kit,
located under the right-hand seat.
Vehicles fitted with a manual
gearbox (diesel version)
In the case of vehicles fi tted with a
manual gearbox, the gear lever must
be in the neutral position, failure to
observe this special condition may
result in damage to certain braking
components and the absence of
braking assistance when the engine is
started again.
Page 135 of 200
133
TECHNICAL DAT
A
8
Weights
WEIGHTS AND TOWED LOADS (KG)
General points
The GTW and towed load values
indicated are valid up to a maximum
altitude of 1 000 metres; the towed
load mentioned must be reduced by
10 % for each additional 1 000 metres.
The speed of a towing vehicle must not
exceed 50 mph (80 km/h) (comply with
the legislation in force in your country).
The braked towed weight with load
transfer can be increased on condition
that the equivalent of this load is
removed from the vehicle so that the
GTW is not exceeded. Warning: towing
using a lightly loaded towing vehicle
may have an adverse effect on its road
holding. High ambient temperatures may result
in a reduction in the performance
of the vehicle in order to protect the
engine; when the ambient temperature
is higher than 37 °C, limit the towed
weight.
The kerb weight is equal to the weight
without load + driver (75 kg) + fuel tank
fi lled to 90 %. For more information, refer to your
registration certifi cate.
In each country, it is imperative that
the towed loads authorised by local
legislation are complied with. To fi nd
out your vehicle's towing capacities
and its gross train weight, consult a
PEUGEOT dealer.
Page 145 of 200
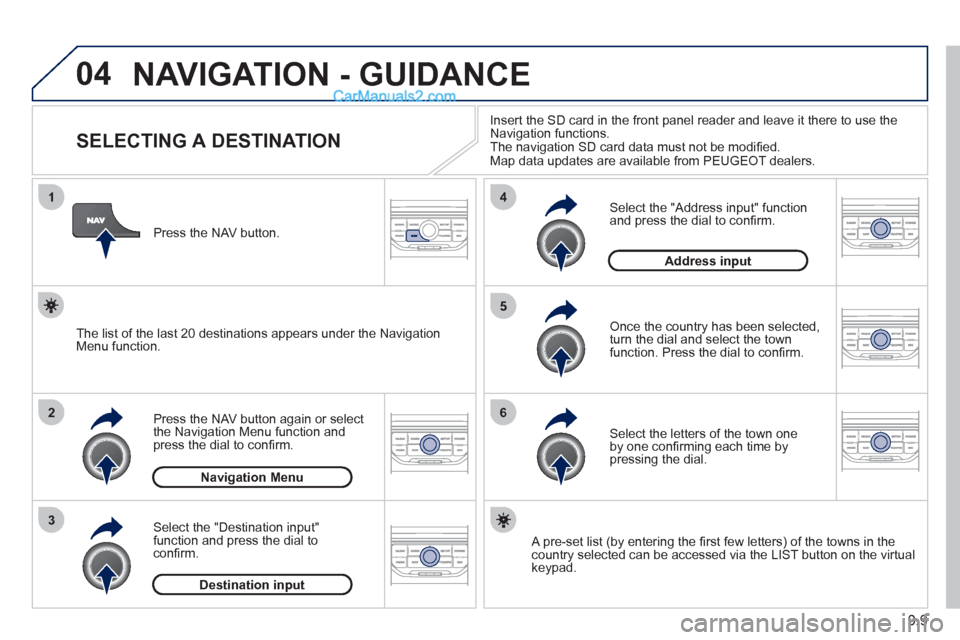
04
1
2
3
5
6
4
9.9
NAVIGATION - GUIDANCE
SELECTING A DESTINATION
Press the NAV button again or select
the Navigation Menu function and
press the dial to confi rm.
Select the "Destination in
put"
function and press the dial to
confi rm. Pr
ess the NAV button.
Select the letters of the town one
by one confi rming each time by pressing the dial.
Once the country has been selected,
turn the dial and select the townfunction. Press the dial to confi rm. Insert the
SD card in the front panel reader and leave it there to use the
Navigation functions.
The navigation SD card data must not be modifi ed.
Map data updates are available from PEUGEOT dealers.
A pre-set list (by entering the fi rst few letters) of the towns in thecountry selected can be accessed via the LIST button on the virtual
keypad.
Select the "Address input" function
and press the dial to confi rm.
The list o
f the last 20 destinations appears under the NavigationMenu function.
Navigation Menu
Destination input
Address input
Page 147 of 200
04
1
2
3
5
4
9.11
NAVIGATION - GUIDANCE
SETTING AND NAVIGATING TO
MY "HOME ADDRESS"
Press the NAV button twice to display
the Navigation Menu.
To be set as the "Home address"
, an address must fi rst be entered in the address book, for example from "Destination
input"/"Address input" then "Save to address book".
Select "Address book" and confi rm.
Then select "Search entry (complete address book)" and confi rm. Select "Destination in
put" and confi rm.
Then select "Choose from addressbook" and confi rm.
Select "Set as home address" andconfi rm to save.
Select
your home address and confi rm.
Then select "Edit entry" and confi rm.
To start navi
gation towards "Home address", press NAV twice
to display the Navigation Menu, select "Destination input" and confi rm.
Then select "Navi
gate HOME" and confi rm to start guidance.
Navigation Menu
Destination input
Address book
Edit entry
Set as "Home address"