Page 42 of 260

40
Gearboxes and steering wheel
Manual mode
Manual sequential gear changing.
- Select gear lever position M
,
- push the gear lever towards the + sign
to change up, from 1 through to 6,
In manual mode, it is only possible to
change from one gear to another if the
vehicle speed and engine speed permit.
If they do not, the vehicle will operate
temporarily in automatic mode.
When the vehicle is stationary or moving
very slowly, the gearbox automatically
selects first gear.
- conversely, push the gear lever towards
the - sign to change down.
You can change from position D
(automatic mode) to position M
(manual mode) at any time.
Good practice
Never select position N
when the vehicle is
moving.
Never select positions P
or R
unless the
vehicle is stationary.
Never change between positions to optimise
braking on a slippery surface.
There is a risk of damage to the gearbox:
- if you press the accelerator and brake
pedals at the same time,
- if you force the gear lever from
position P
to another position in the
event of a battery failure.
When the engine is at idle, brakes not
applied, if position R
, D
or M
is selected the
vehicle moves even without the accelerator
being pressed.
For this reason, do not leave children
unsupervised inside the vehicle, with the
engine running
.
Operating fault
Any operating fault is indicated by an
audible signal, accompanied by the
message "Automatic gear fault"
in
the screen.
In this situation the gearbox operates in
downgrade mode (locked in 3rd gear). You
may feel a substantial knock when changing
from P
to R
and from N
to R
(this will not
cause any damage to the gearbox).
Do not exceed 60 mph (100 km/h), keeping
within the limit of local speed restrictions.
Contact a PEUGEOT dealer or a qualified
workshop as soon as possible.
Page 44 of 260
42
Steering mounted controls
Dipped beam/main beam change
Pull the stalk full
y towards you.
Automatic lights
if
your vehicle is fitted with
a
brightness sensor. Li
ghts off
Dipped beam
(green)
Main beam (blue)
DIRECTION INDICATORS (flashing)
STEERING MOUNTED CONTROLS
Checking by means of the indicator lights on the instrument panel isdescribed in the "Instruments andcontrols" section of chapter 2.
Side lights
Lights-on buzzer
When the ignition is switched o
ff, when the
driver's door is o
pened, a buzzer sounds if
you have left your lights on.
Left: downwards passing
the point o
f resistance.
Right: upwards passing
the point o
f resistance.
LIGHTING CONTROL
Front and rear lights
Selection is by turning ring A.
Page 55 of 260

Ventilation
EASE OF USE AND COMFOR
T
3
WITH MANUAL ADJUSTMENT
If your vehicle is fitted with these controls,
the
y are located on the control panel of the
fascia centre console.
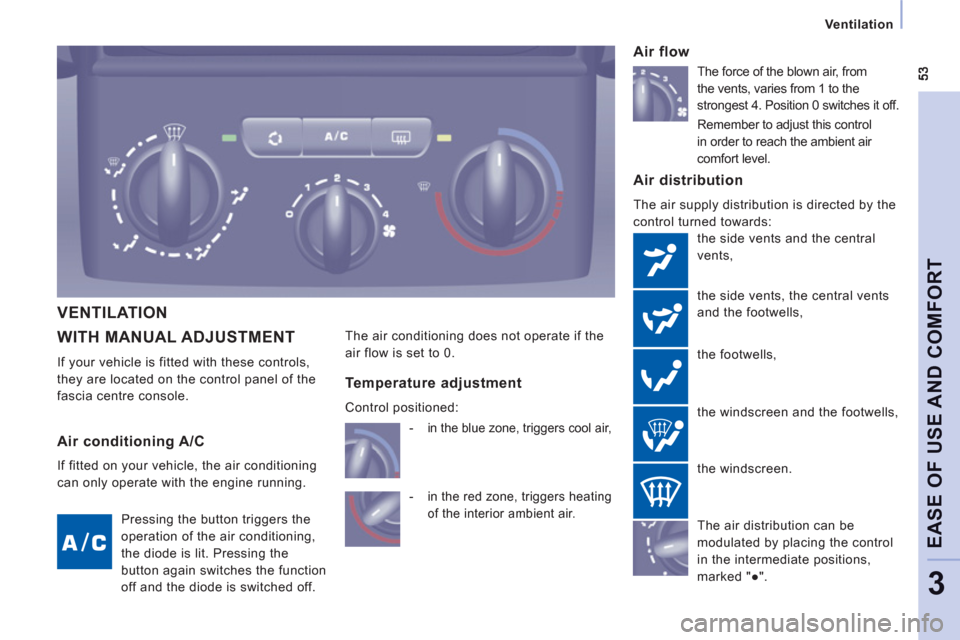
Air distribution
The air supply distribution is directed by the
control turned towards:
t
he side vents and the central
vents,
t
he side vents, the central vents
and the
footwells,
the footwells,
the windscreen and the
footwells,
Air flow
The air conditioning does not operate if the
air flow is set to 0.
th
e windscreen.
Air conditioning A/C
If fitted on your vehicle, the air conditioning
can only operate with the engine running.
Pressing the button triggers the
operation of the air conditioning,
the diode is lit. Pressin
g the
button a
gain switches the function
off and the diode is switched off.
Temperature adjustment
Control positioned:
-
in the red zone, triggers heating
of the interior ambient air.
- in the blue zone, triggers cool air,
The air distribution can be
modulated by placing the control
in the intermediate positions,
m
arked "●". The
force of the blown air, from
the vents, varies
from 1 to the
strongest 4. Position 0 switches it off.
Remember to ad
just this control
in order to reach the ambient air
comfort level.
VENTILATION
Page 60 of 260

58
Ventilation
CORRECT USE OF THE
VENTILATION AND AIR
CONDITIONING
Passenger compartment filter, carbon filter
Ensure that this filter is in good condition
and have all o
f the filter elements replaced
regularly.
Vents
"Leave them open"
For optimum distribution and diffusion of hot
or coo
l air in the passenger compartment,
there are ad
justable central and side vents
which can be directed sidewa
ys (right or
left) towards the top of the body. For your
comfort while driving, do not close them,
direct the flow of air towards the windows
instead.
Th
e air vents directed towards the floor of
the vehicle complete the equipment.
Re
fer to the "Checks" section of
chapter 6.
Air conditioning
In all seasons, the air conditioning should onlybe used with the windows closed. However,
if the interior temperature remains high after a prolonged period parked in the sun, do not hesitate to ventilate the passenger compartment for a few minutes. Use the AUT
O mode as much as
possible as it permits optimised control
of all of the functions: air flow, passen
ger
compartment comfort temperature,
air distribution, air intake mode or air
recirculation in the passenger compartment.
Operate the air conditioning system for 5 to
10 minutes, once or twice a month, to keep
it in per
fect working order.
It is normal that the condensation created by
the air conditionin
g system results in a flow
of water which ma
y form a puddle under the
ve
hicle when parked.
If the s
ystem does not produce cold air, do
not use it and contact a PEUGEOT dealer or
a
qualified workshop.
Page 74 of 260

72
Practical information
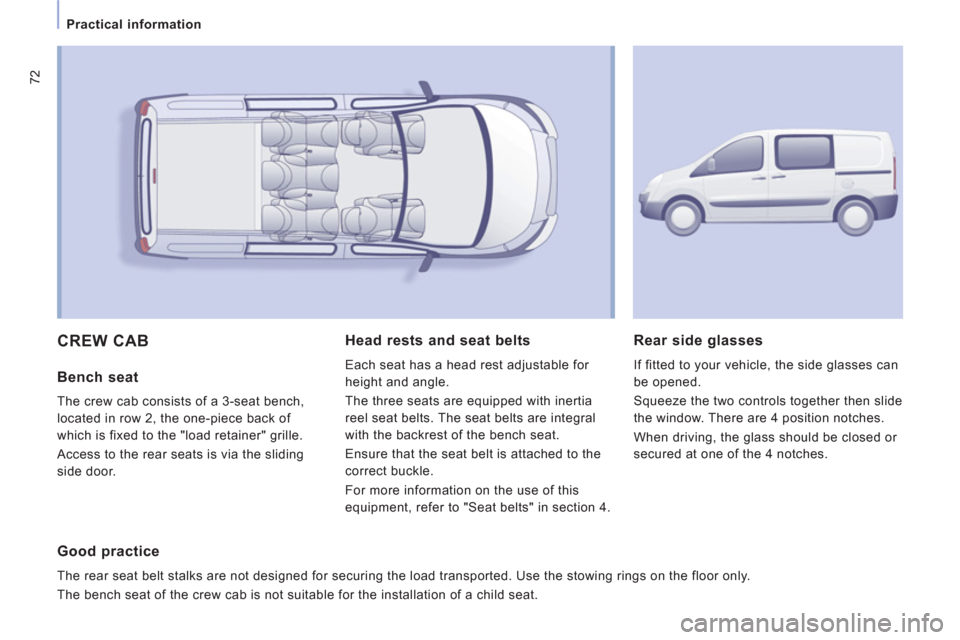
CREW CAB
Bench seat
The crew cab consists of a 3-seat bench,
located in row 2, the one-piece back of
which is fixed to the "load retainer"
grille.
Access to the rear seats is via the sliding
side door.
Head rests and seat belts
Each seat has a head rest adjustable for
height and angle.
The three seats are equipped with inertia
reel seat belts. The seat belts are inte
gral
with th
e backrest of the bench seat.
En
sure that the seat belt is attached to the
correct buckle.
F
or more information on the use of this
equipment, refer to "Seat belts" in section 4.
Good practice
The rear seat belt stalks are not designed for securing the load transported. Use the stowing rings on the floor only.
Th
e bench seat of the crew cab is not suitable for the installation of a child seat.
Rear side glasses
If fitted to your vehicle, the side glasses can
be opened.
Squeeze the two controls together then slide
the window. There are 4 position notches.
When driving, the glass should be closed or
secured at one of the 4 notches.
Page 75 of 260
73
Practical information
EASE OF USE AND COMFOR
T
3
LOAD SPACE FITTINGS
Depending on the vehicle's equipment, the
various fittin
gs below enhance your load
space.
Locations for stowing rail
Locations for securing a stowing rail are
available on each side of the vehicle.
Stowing rings
Use the stowing rings on the rear floor to
secure your loads.
As a sa
fety precaution in case of sharp
brakin
g, you are advised to place heavy
ob
jects as far forwards towards the cab as
poss
ible.
You are advised to immobilise the load by
securing it firmly using the stowing rings on
th
e floor.
Trims
The lower parts of the sides are fitted with
load protection trims.
Roof box on raised version
This is a storage compartment located in the
load space, above the cab roof.
Page 84 of 260
82
Driving safely
PARKING BRAKE
When parking on a slope, direct your wheels towards
the pavement and pull the parking brake lever up.
There is no advantage in engaging a gear after
parking the vehicle, particularly if the vehicle is
loaded.
HAZARD WARNING LAMPS
Press this button, the direction indicators
flash.
They can operate with the ignition off.
The hazard warning lamps should only be
used in dangerous situations, when stopping
in an emergency or when driving in unusual
conditions.
DRIVING SAFELY
Applying
Pull the parking brake lever up to immobilise
your vehicle.
Check that the parking brake is applied
firmly before leaving the vehicle.
If the parking brake is still on or has
not been released properly, this is
indicated by this warning lamp which
comes on on the instrument panel.
Releasing
Pull the lever and press the button to lower
the parking brake lever.
Page 85 of 260

83
Parking sensors
SAFETY
4
Engage reverse gear
An audible signal confi rms the activation of the
system by engaging reverse gear.
The proximity information is indicated by an
audible signal which becomes more rapid as
the vehicle approaches the obstacle. When
the distance between the rear of the vehicle
and the obstacle is less than approximately
thirty centimetres, the audible signal becomes
continuous.
Stop the assistance
Change to neutral.
REAR PARKING SENSORS
The audible and/or visual rear parking
sensor system consists of four proximity
sensors, installed in the rear bumper. The
sensors detect any obstacle which enters
the field: person, vehicle, tree, fence, behind
the vehicle during the manoeuvre.
Certain objects detected at the beginning of
the manoeuvre will no longer be detected
at the end of the manoeuvre due to the
blind spots between and below the sensors.
Examples: stake, roadworks cone or
pavement post.
Activation/Deactivation
You can activate or deactivate the
system by pressing this button.
The activation or deactivation of
the system is stored when the
vehicle stops.
Malfunction
In the event of a malfunction, when reverse
gear is engaged the LED in the button
comes on, accompanied by an audible
signal and a message in the screen. Contact
a PEUGEOT dealer or a qualified workshop.
Good practice
In bad weather or in winter, ensure that the
sensors are not covered with mud, ice or
snow.
The system will be deactivated automatically
if a trailer is being towed or if a bicycle
carrier is fitted (vehicle fitted with a
towbar or bicycle carrier recommended by
PEUGEOT).
The parking assistance cannot, in any
circumstances, take the place of the
vigilance and responsibility of the driver.
Display in the screen
You are advised to deactivate the system if
your vehicle is fitted with a rear ladder or if
you are transporting a load which exceeds
the length of the vehicle.